Showing posts with label pockets. Show all posts

Sunday, March 29, 2026

Smock vest from men's denim shirt

Here's a quick sewing project for converting a long-sleeved denim men's shirt into an oversized smock-style vest or apron with lined pockets.


I started with a long-sleeved denim men's shirt like the one in the photo below. (I forgot to take a "before" photo of my shirt, but mine looked almost identical to the one below.)


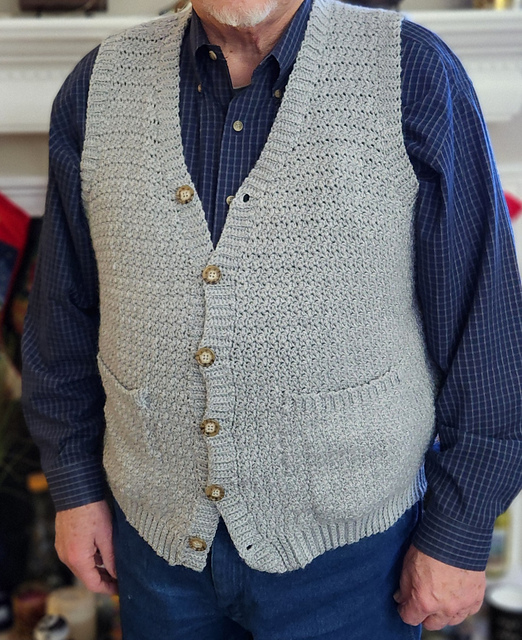
To make a pattern for the large patch pockets, I used my husband's Carhartt vest as the prototype. These pockets are large and deep, so there's plenty of room for stashing a phone, or my hands, or whatever else I would like to carry in there.

Husband's vest

I laid my husband's vest out flat on my fabric cutting table. Then I took a sheet of newspaper and laid it over the pocket. Using a pencil, I gently traced around the perimeter of the vest pocket to transfer its shape onto the newspaper, then I cut out that pocket shape. I placed the newspaper pocket over a piece of lightweight scrap cardboard I had in my craft stash and, using a ruler and pencil, I marked a half-inch larger (for the sewing seam allowance) to the size of the newspaper pocket around all the sides, then used the ruler to connect those lines, which are the lines for cutting out the pocket pattern on the cardboard.


Originally I was going to make the pocket pattern using a sheet of thin cutting-board vinyl, similar to the ones shown in the photo below, because it's durable for multiple uses as a pattern guide yet thin enough to be cut to size with scissors, but I couldn't find the sheets today that I know I have in my craft stash somewhere, which I bought years ago for this purpose, so I improvised and used the lightweight cardboard instead. Either way, it creates a pattern piece that can be reused for future projects where I want to have this same type of pocket, and, either way, the pattern is thin enough to store with my other pattern files.

Vinyl cutting-board sheets

There are many DIY tutorials online for how to upcycle shirts (or even jeans!) into a vest. One tutorial that I enjoyed was this one by Broken Ghost DIY on YouTube. The way she cut off the collar in her project is very similar to the technique I used here. I carefully trimmed off the flap portion of the collar of my shirt, leaving the collar band below intact for a sort-of mandarin collar effect.

Next, I carefully cut off the sleeves, cutting outside of the seams where the sleeves were sewn onto the shirt (cutting on the sleeve side of the seams, in other words). The tiny bit of fabric left behind after cutting off the collar and the sleeves will fray in the wash and lend a rustic touch to the edges.


I laid my pocket pattern over one of the sleeves and was gratified to see that there was enough fabric in the upper part of one sleeve to allow me to cut out two pockets. If one sleeve hadn't been big enough to cut out two pockets, I knew I would have been able to use the tops of both sleeves to cut one pocket out of each. But since I was able to cut both pockets out of one sleeve, now I have another whole extra sleeve to use as scrap fabric for another project later.

For the pocket lining, I dug into my fabric stash and selected two pink bandanas just waiting to be needed for something. I think the pink bandana fabric makes a nice accent/contrast to the blue denim. All together, I cut two pocket fronts out of the denim and two pocket linings out of the pink bandana fabric and then pinned the pieces together with right-sides facing.


I sewed the pocket fronts to the linings, leaving an unsewn gap of a few inches at the bottom of each pocket for turning them right-side out.


After sewing, I trimmed the excess fabric at each corner, then turned the pockets right-side out and pressed them smooth with my iron. With the seam allowance pressed to the inside, I topstitched along the bottom edge of each pocket to secure the areas that were previously left unsewn for turning the pockets right-side out.


To position the pockets on the front of the shirt, I laid the shirt flat on my cutting table, with some of the buttons fastened to keep the sides even, and then placed the pockets where I thought they looked good, using my cardboard pocket pattern as a guide to ensure the pockets were level with each other. I pinned them in place and then tried on the vest to see if the pockets were positioned at a comfortable height for my hands. Once I had the pockets pinned exactly where I wanted them, I sewed the pockets in place with my sewing machine, backstitching several times at the beginning/end to reinforce the pocket openings.

A peek inside the pockets

The nice thing about making pockets this way is that there are no raw edges exposed anywhere, because they are all hidden between the pocket fronts and the pocket linings.

And, just like that, my smock vest/apron was done and ready to wear! 


Thursday, October 26, 2023

Adult Crochet V-Neck Vest Cardigan-Style

After making this Yarnspirations pattern as written for a pullover vest, now I decided to see if I could adapt it to also make a cardigan-style vest for my husband. It is made with Bernat Softee Baby Solids & Marls yarn in the Flannel colorway. (Here's a link to my post about the pullover vest.)


Since this design is worked from the bottom up, the lower part of the torso will be seamless from the bottom edge up to where we divide for the armholes, which I think will look nice, and it also means that the only seams to sew will be the joins at the top of the shoulders. 

Main body done, including pocket openings

I also added pockets to the front panels, and the button placket is completed with six tortoiseshell buttons that are 7/8-inch across.

After 2 skeins about 12.5 inches tall

This project took me most of a year to complete only because I had a lot of big projects at work and just a whole lot of other things going on all year, which greatly reduced my time for crocheting. Normally, a project this size would take a few weeks to finish. Thankfully, things settled down enough for me to finish this in time to give it to my husband for Christmas.

After 1 skein about 6.5 inches tall


Thursday, June 1, 2023

Haiku Cardi crochet style

I decided to experiment with making a crochet version of the Haiku Cardi. For the fabric, I used the stitch pattern from the Genuine Pleasure Shawl, a free pattern designed by Jamie Swiatek, but just about any triangle shawl pattern with repeating rows would do because that is the base shape for the Haiku Cardi. 


The Genuine Pleasure Shawl has a 10-row pattern repeat, but it's easier to memorize than it sounds, so once you get into the rhythm of it, it becomes simple to read your stitches to figure out where you are as you go without having to constantly keep referring back to the pattern.


I made this to be a housecoat/bathrobe/dressing gown for our guest room, so I made the length a bit longer than I would for a regular cardigan, and I also added pockets to the front using the pockets from the Lazy Diamond Boho Pocket Shawl, a paid pattern designed by Crystal White-Van Cleemput, just because they work up quickly and look super cute.


Monday, February 20, 2023

Haiku Cardi


Finished cardi

It would have been helpful to me if the pattern had provided more of an overview description of the process of how the cardigan will come together, because although I do enjoy patterns with unconventional construction techniques, If I had realized before starting this that the fit of the cardigan would be closer to that of a cocoon-style cardigan with a sort of dolman-type sleeve, I might not have opted to work this pattern, because I generally don't care for cocoons or dolman sleeves.


Nevertheless, I am glad that I made this cardigan. It is a paid pattern designed by Svetlana Volkova. At about 21 inches length, measured from the top of the shoulder, I decided to add pockets of 29 stitches wide by 44 rows deep. I knitted the pocket linings in contrasting black yarn.


Some ways I deviated from the written pattern include making simple kfb increases instead of M1R/M1L increases and adding the pockets. I like the oversized fit even if the cardigan is somewhat less constructed than I had expected before starting the project. Total stitches after rejoining below armholes: 253.

This cardigan begins in the center-back and works upward from there in the shape of a triangle. When the triangle is large enough, the point of the triangle is at the back of the wearer's neck, and the wide side of the triangle wraps around the waist. The slanted sides of the triangle are then worked separately to finish the upper back on each side and wrap around the shoulder and become the upper front on each side. The front sides are then rejoined to the back to form the arm holes and stitches picked up along the bottom of the triangle. Then all stitches are knitted together to make the bottom part of the cardigan.

I do like how this project turned out, but I think if I make it again I will incorporate garter stitch instead of ribbing, because the ribbed front placket on this one wants to fold over toward the stockinette. Hopefully washing and blocking will fix that issue, but I'm thinking that using garter stitch plackets would naturally lie better than the ribbing.


Wednesday, December 14, 2022

A pocket scarf for Morgan

Last Christmas I made a reversible beanie for Morgan with the Red Heart Super Saver Zebra colorway on the outside and lined with white.

When I asked Morgan's mom for some gift ideas for this Christmas, she told me that Morgan has worn her zebra hat quite a lot throughout the past year and suggested that I make her a matching scarf for this Christmas. Challenge accepted! 

I got a few more skeins of the Zebra yarn and decided that I wanted to make a pocket scarf for Morgan. But unlike last year, when the hat knitted up like a dream, the yarn this year was being very uncooperative. I had to restart the project four times because of dropped stitches, which was frustrating, but I kept on trying because I knew this was going to be for my grandniece (if I could ever finish it!!).

During the initial failed starts, I alternated between using my Addi King and the Sentro 48, but neither one was working very well with the yarn. I finally settled on making the scarf on the Sentro and went very, verrrry slowly at first, pushing each stitch down by hand as it passed the feeder (like the technique shown in this video), to make absolutely certain that the stitches were seated properly. Then, when I had enough length completed (around 40 rows), I added some aggressive weight using the pot lid trick. The weight made the rest of the project work smoothly. (You just have to stop about every 15-20 rows to stretch the work below the pot lid and then reposition the lid closer to the top of the work to keep it high enough to keep tension on the needles.)


I knitted 320 rows, closed the tube ends, and then turned up 8 inches at each end of the scarf for the pockets and stitched the sides together using the invisible mattress stitch.


The only thing about this project that disappointed me was the way the stripes came out looking so different on the scarf than they were on the hat. The colors on the two projects do match, since it is the same colorway of the same brand of yarn, but I have to wonder if the yarn isn't being made slightly differently now than it was a year ago. (???) It's hard to say. But I hope Morgan will be happy with it! Fingers crossed!


Sunday, December 11, 2022

Butter Mellow pocket scarf

Sunshine, daisies, butter mellow,  
Turn this stupid, fat rat yellow.

That silly "spell" didn't work for Ron Weasley in "Harry Potter and the Sorcerer's Stone" as he tried to turn his rat familiar, Scabbers, yellow, but this butter-yellow yarn from my stash knitted up beautifully to make a cozy pocket scarf for Mika and Emmy. 

The sport-weight fiber worked to a gauge of about 4-5 rows per inch. And since I wanted a scarf 80 inches long (to turn up 10 inches at each end for deep pockets, leaving an overall length of about 60 inches), I made the scarf 400 rows long. (Which actually turned out to be a bit too long, but that was OK; I just made the pockets deeper to compensate.) The yarn is an interesting blend of 55% acrylic, 35% rayon, 5% wool, and 5% vinyon (whatever that is!), but the fiber is safe to machine wash and dry, so it's easy to care for.


Cast on with at least 6 rows of waste yarn in a contrasting color to your project yarn, then add your project yarn and crank until you have the desired number of rows. Cast off with another 6 or more rows of waste yarn, then remove project from the machine. Using a 5mm crochet hook, close each end of the tube as shown in this video by Jojo Juju. Fold each end of the scarf until the pockets are as deep as you want and pin them in place with locking stitch markers. Mattress stitch both sides of each pocket and knot securely. Hide all tails inside the tube, and enjoy your new pocket scarf! 

Jojo also has a full video tutorial for how to machine-knit a pocket scarf, which you can view at this link.

The sport-weight yarn is rated a 2, when usually size 4 yarn is used in the circular knitting machines. For me the trick to getting lightweight yarns like that to work in the machine is to maintain a firm tension.


I had just enough yarn left after knitting the scarf to make a matching beanie of 113 rows.


Monday, May 23, 2022

Making the It's Shawl Good cardigan

Back in 2018, I had four skeins of this beautiful Lion Brand Amazing yarn in the Violets colorway and tried to use them to make the It's Shawl Good Cardigan by Ashlea Konecny of Heart Hook Home. But these four small skeins just weren't enough to get very far on the project, and the colorway had apparently been discontinued. I tried looking to buy more skeins online, but they were mostly being offered for resale at around $25 each, which was WAY more than the retail price I paid for the ones I had, and I really had no intention of spending upwards of $300 just to acquire enough additional skeins that I would need to finish this shawligan project.

So the project languished in my WIP basket for several years. But that yarn was simply too lovely to just sit around like that, so I finally decided to frog the shawligan project and reuse the yarn in this machine-knit pocket scarf.

After doing that, I decided to start again to crochet the It's Shawl Good Cardigan using a different yarn and a larger hook: Big Twist Solids in the Taupe colorway and a 6.5mm hook.

Ashley and I seem to have a similar design aesthetic, so I really enjoy her patterns and the concepts she invents. 

I finished my It's Shawl Good cardigan by adding the pockets from the Lazy Diamond Boho Pocket Shawl. The pockets are about 10 inches square, so they're nice and roomy for keeping hands warm.


Sunday, April 10, 2022

Swingy Shawlivest cardigan with pockets

I continue to experiment with my Swingy Shawlivest paid pattern. This time I decided to add sleeves to make a Swingy Shawlivest cardigan-style and also added pockets. I love how this turned out. It's so swingy and almost cape-like; I know this is going to keep me nice and cozy come next winter. You can browse my other Swingy Shawlivest blog posts at this link.


I used a regular DC mesh stitch for this one, rather than the EDC in the original pattern.


After working the body of the Shawlivest to the desired length, I continued working a twisted rope fringe across the hem without cutting the yarn.

To make twisted rope fringe: SC into next ch 1 space. Pull up 16-inch loop and twist 40 times before joining with sl st to top of next DC. Repeat across hem. (Mine ended up with 228 fringes.)

Mikey of The Crochet Crowd has a video tutorial showing an even better method (similar to what I did, but he uses slip stitches exclusively, and his version is probably more durable over time that way, so I recommend doing it Mikey's way). You can increase the space between the fringes by just working more slip stitches in between them, if you wish.


It only took me about two weeks to crochet most of this cardigan. But it took me over a year to actually finish the project because I stalled out while doing the twisted fringe. All that twisting was seriously aggravating the elbow tendinopathy in my dominant arm. I managed to work my way across maybe the first 25% of the hem over a period of about 11 months (that was less than 60 fringes in ELEVEN MONTHS, guys ... seriously — ouch!!!), and then I realized that I just couldn't do it anymore.

I showed the project to my husband and shared with him how defeated I felt by my disability. We both felt it would be such a sad thing if I wasn't able to finish it because of that. He asked me to explain to him what my process was for making the twisted fringe, and then in secret my husband went searching around on the internet trying to find something that would help me finish making the fringe without hurting my arm so much.

What he found was nothing short of magical.

Before my husband found it, I had no idea a tool like this existed.

He found and bought for me a Maple Quad End Fringe Twister from Etsy seller theknitstore. He knew I didn't need a tool with four twisters on it, since I was only making one fringe at a time on this project, but he decided to get the quad twister anyway (the seller also has a dual end option) so, in his words, I would have more possible options for using the tool when I make other things in the future. What a sweet and thoughtful man I married, right?!?!

When the tool arrived I watched a YouTube video on how to operate it, and even though I was only working with one loop being twisted at a time, the tool made the work SO MUCH easier on my arm. Yes, there's still some manual movement involved, but it wasn't nearly as strenuous as twisting the long loops by hand, and the tool made the process so much faster.

Bottom line: After only being able to make around 60 twisted fringe loops by hand over the course of about 11 months, with the fringe twisting tool I finished the remaining 168 loops in ONLY TWO DAYS with no painful aftereffects from the work. No matter how you slice it, that is a definite win.

After completing the fringe, the only things left to do were to add sleeves and also a couple of patch pockets on the front.

I attached the yarn at the bottom of an armhole to begin working the sleeves. I just crocheted in the same mesh pattern using joined rows. I put in some stitch decreases for the first five rows and then worked the rest of the sleeve straight, and then I finished the sleeve with a few rows of fpdc/bpdc ribbing.

For the pockets I used the pocket pattern from the Lazy Diamond Boho Pocket Shawl, and I think they complement the cardigan nicely. The pockets are about 10 inches square, so they're nice and roomy for keeping hands warm. I might add a fabric liner to the pockets later (useful if I want to keep anything small in there, like coins, which might otherwise fall out between the crochet stitches), but I'll see how I feel about that later.

Saturday, December 11, 2021

A winter vest pour homme

Based on the Improv pattern by Karen Templer, my plan for this is to be a seamless, top-down, cardigan-style vest worked mostly in simple, classic stockinette with K1P1 edging at armholes and button placket/front (worked with the smaller-size needles) and some traditional tortoiseshell buttons. I'm making this for my husband, who needs a replacement for the old aran vest that he reaches for during the chilliest weeks of winter to give him an extra bit of warmth. 


My initial plan was to make this without pockets, but then I realized his original vest has pockets, so I should probably try to add pockets to the new vest by following Marly Bird's tutorial for inset pockets. Another technique that is new to me for this project is picking up stitches along a knitted edge (to add ribbing).


The biggest challenge/question for me, since I'm very slow at hand knitting (and I often have days where I simply cannot knit at all due to chronic pain issues), is whether I'll manage to finish this in time to give it to my husband for Christmas. I cast on for this project on Sept. 21, which gave me about three months to work to meet that goal. Fingers crossed it gets done in time!!! (Spoiler alert: I finished it on Dec. 11! Yay!)


My husband is a person who, even though he supports my enjoyment of knitting/crochet/etc., he has firmly stated right from the beginning his preference that I NOT ever make anything for him because he will refuse to wear it. 


Over time, his declaration has proved to be not entirely true (he has occasionally worn a hat or mitts or a cowl that I've made, sometimes explicitly for him and sometimes not, and he has loved to tatters the blue scarf I knitted for him), but I've always known to generally avoid directing any of my crafting energies toward making items for him.


But when it comes to this vest, I feel like this is a different situation: He has worn the same store-bought knitted vest during winter for decades, and now that THAT vest is wearing out, he's going to need a replacement. I know he prefers neutral, classic design and lines and fit for stuff like this, so I'm attempting to incorporate those values here. I think the trickiest part for me will be achieving the correct fit. As I've worked I've been constantly measuring, checking and rechecking gauge, and comparing size to other items in his wardrobe. Because if this doesn't fit right, I know he won't wear it.


That being said, I've worked out most of this project without using a pattern (other than getting started at the shoulders with Improv), so although I'm familiar with the general principles of garment construction (after decades of sewing/knitting/crochet experience), I'm still nervous to see how the final product for this turns out.


After following the guidelines from Improv for how to begin working a top-down cardigan, I split off stitches to work each of the front panels and the back panel separately, gradually increasing the widths as the lengths grew, then rejoined all the panels below the armhole openings and knit until the bottom of the vest was the right length. I made the armholes slightly oversized, because I knew he wouldn't like to have his arm movement constricted by too-tight armholes.


After rejoining the panels below the armholes, I decided to work the 18 stitches that I cast on below the armholes on each side in garter stitch to give the side panels below the arms a bit of textural differentiation in the torso.


I finished knitting the ribbing at the bottom of the vest the day after Thanksgiving. Two days later, I picked up and knitted the front edging, which extends from side to side behind the neck and includes the buttonholes on the left front. To me it's almost magical the way you can have a curled, gnarled mess of stockinette, but then when you add the edging/ribbing, suddenly the stockinette fabric uncurls and looks gorgeous. I know that's just the way stockinette is (it curls if there's no edge treatment), but it's still fascinating to see it all come together.


Here's the store-bought ye olde aran vest that has served Montie well for many years: