Showing posts with label seamless. Show all posts

Monday, September 28, 2026

Beaded Fidget Turtles

This crochet Beaded Fidget Turtle, a paid pattern by Emily Nigro (aka Willow & Wild) is super cute and very quick and easy to make, and it requires just a small amount of yarn, 2 safety eyes, 16 pony beads, and a bit of stuffing. After you make one, you'll then want to make more in ALLLL the colors!! 😂


I crocheted it using a 4 mm hook and used a 2.5 mm hook for the bead stitches.

It even has a little tail!

This one is a gift for my physical therapist. Anyone can tell the moment they walk into my PT's office that she loves turtles, because turtle iconography is everywhere, and she even has a pair of live turtles in a tank in the waiting room. 🐢 The ambience is very calm and soothing, and it's fun to sit and watch the turtles swim or sun themselves on a rock.

BTW, my PT's name is Rey. It isn't every day that one gets to have a Jedi as one's physical therapist, eh?! She is excellent.


After I saw how adorable the first turtle for Rey turned out, I realized that I also had to make one for Rey's office manager, Hannah, and for Rey's student intern, Cheyenne. So I did. 😊 Now there are three widdle turtles for me to take to my next PT appointment, and each one is slightly different. 💜


I have also made the Beaded Hedgehog Fidget by Willow & Wild. Her patterns are always fun, well-written, easy to follow, and result in some really adorable critters. She has tons of amazing patterns to choose from, so you should definitely check them out. I'm sure I will be making more in the future!

Sunday, September 20, 2026

Kawaii ghost keycover

I needed a cover for my car's key fob/remote to help protect it while it was inside my purse. This adorable little ghost key cover is ready to go to work! 👻


I made this based on the Crochet Cute Ghost Key Cover design by Kukkacrochet by Putri on YouTube. I modified her design to fit over my car's key fob, and I didn't include the hat or bat topper portion.


For the face, I used these safety eyes (which I found on Amazon). After securing the backs to the eye posts, I used a lighter to carefully heat the eye posts and pressed them flat using the flat side of a hammer head. (You just need any heat-resistant flat surface to press down on the hot plastic, and a hammer head is what I had handy. I didn't actually "hammer" the eye posts to flatten them. 😂) This step usually requires a few separate times of heating the plastic and pressing it down until it's shaped the way you want it. The taller the eye posts, the more times you'll need to heat and press them. Don't try to do it all at once. Just take your time and work at it gradually, and eventually they will flatten out. You definitely want to be extra careful to NOT burn your yarn as you work!!


To secure the crochet chain to the split keychain loop, I added a pony bead. Any pony bead will do, but I happened to have a glittery purple heart-shaped bead in my stash, so of course I used that one. 😍  To slip the pony bead onto the chain, use a 2.5 mm hook. Place the bead on the hook, catch the crochet chain in the hook, and pull the chain loop through the bead.


I don't remember anymore where I got the colorful split keychain rings from (that was at least 10 years ago), but it might have been the craft section at Walmart. They came in a bag of about 100 (basically a lifetime supply for my craft room) in two different sizes in four different colors: purple, blue, green, and red. Naturally, I used a purple one for this project! 💜 Happy Halloweeeeeeen!!

My little keychain ghost also matches with my ghost wheelchair wheel covers! 😁👻💜


Saturday, August 22, 2026

Montie's True Blues XL blanket

This is just a simple XL corner-to-corner moss stitch crochet blanket worked with two complementary colorways of yarn. 


Recently I saw a reel where crocheters were basically losing their minds in the comments at how beautiful this simple, monochrome C2C moss stitch baby blanket was by Laura of Hook and Fiber Made. It reminded me of how versatile crochet moss stitch is, because it works really well in solid colorways but also just as well in variegated colorways and also in other configurations, such as stripes, and I was fairly certain that it would look nice being worked up in stripes of the two colorways of yarn that I had in mind for this project.

Close up

Hooked by Robin has a good video tutorial on YouTube for how to make a C2C moss stitch blanket. I basically used the same process for this blanket; the only difference was that I used two colorways of yarn, alternating colors every two rows so I could carry the unused color up without ever having to cut it.

The somewhat unorthodox method I used to change colors is very much like what Play Hooky with Me shows in this video tutorial. The differences for me are that I'm working in moss stitch (so, SC and chains) and I'm only changing color at the end of every-other row. After changing colors, chaining and turning the work, I pulled the dropped color strand so it was crossing over the edge where I was working from back to front, where I would crochet over it without catching it in a stitch. (The strand would then be caught by and lie between my turning chains and the first SC of the new row.) That kept the dropped color close enough to pick up again the next time I changed colors, where I would repeat the process, and with marled look of the multicolored yarns I was working with, the "floats" are barely noticeable at all along the edge. If you were concerned about the floats being visible, all you would have to do is to crochet a border on your blanket as a finishing step; the first round of the border would fully conceal the floats.

Edge with floats vs. edge w/o floats

Using that method meant that the only tails I had to weave in at the end were the ones at the start and at the end of the project.

The yarn I used is Red Heart Bitty Stripes in the Horizon (blue) and Seaweed (green) colorways. Those are the same colors that I used to make my new grandnephew Waylon's blanket.

When I first started working on Waylon's blanket, my husband looked at what I was doing and said that he would actually like to have a similar-looking blanket for himself. That was a jaw-dropping moment for me, because if you know my husband the way I do, he NEVER wants me to crochet or knit ANYTHING for him, and he directly said so to me many times over the years. 😂 (Not because he doesn't support me in what I want to do, but because he is very particular about what he will and will not wear, and he doesn't want to hurt my feelings by not wearing something I've made for him if he doesn't choose to wear it.) So for him to tell me that he would actually LIKE for me to make him a blanket constitutes a jaw-dropping moment in my book.


My only concern was that this is not a tunisian entrelac pattern, as Waylon's blanket was. I did admittedly find tunisian crochet a bit challenging, so it wasn't as enjoyable for me, and I didn't want to attempt another tunisian blanket again this soon if I could avoid it. So I worked up a good start on the C2C moss stitch design so that I could give my husband a realistic preview of what the finished blanket would look like. I figured the worst that could happen would be that he said he didn't care for it, and if that happened, I could just finish off the blanket anyway, figure out what to do with it later, and then start on another tunisian one for him.

Another feature of the C2C moss stitch that I like better than tunisian entrelac is that moss stitch produces a fabric that is entirely reversible and looks equally good on either side. And another nice thing about moss stitch is that it grows surprisingly quickly, even though it isn't a tall crochet stitch.

I reached 60 inches wide on the short side of the rectangle after working 41 stripes each of both color A and color B. (Each stripe is two rows.) So the width for the short side of the rectangle was achieved after working 82 stripes, which equals 164 rows. 

60 inches wide

With the target width achieved, now I could stop increasing at one end of the row while continuing to increase at the other end of the row to continue to increase the length of the blanket until the target length of 84 inches was reached. (Details for how to work the "straight" rows are in the video by Hooked by Robin linked above.)

Turning the corner

If I've counted correctly, the straight rows are 167 single crochet stitches wide. Plus the chains in between, for however many total stitches long that is on the diagonal. 😅

Gauge view

Slogging through the middle section took months, because those are the longest rows, and they just seemed to go on and on and on and onnnn...

Fair time is coming. CROCHET FASTER!

But, finally, the long side reached its target length, and then I was able to start decreasing at both ends of the rows, heading toward the final corner. Changing colors on the decrease edges works about the same as on the increase edges, in that I would still pull the dropped color across, from back to front, and then crochet over it as I worked the next row, to secure the float where it needed to be to be picked up again. The only difference was making a decrease there instead of an increase.

Turning toward home!

Thankfully, I finished the blanket in time to enter it into our local fair. There's nothing flashy or fancy about the blanket; it's just the biggest single thing that I've ever made, so I wanted to enter it in the fair because of that. 😀

Peek-a-boo! (He's standing on the hearth.)


Sunday, March 1, 2026

Sweet Sweater and Bonnet for Princess Rosalee

To go with the ruffle dress for Princess Rosalee, I wanted to include a sweet little cardigan and bonnet, which both utilize the same V-stitch of the Baby Dress Raspberry pattern.


This is the thinnest yarn I have ever worked with, but it is not thread; it's a very thin but soft 3-ply spun yarn. The labelless skein was in a bag of yarn that was gifted to me years ago, so I don't know what brand it is or any other information about it, but it makes 20 wpi. After making both the cardigan and bonnet, I had just a small amount of the yarn left over.


The cardigan is finished with 6 white buttons (3/8-inch diameter), which I found on Amazon. The bonnet is trimmed with white grosgrain ribbon (3/8-inch wide), which I also found on Amazon, plus another one of the buttons applied decoratively on each side to cover and also reinforce the stitching that attaches the ribbon to the bonnet.


Friday, October 7, 2022

Wild-n-crazy Catnip Balls

This super-quick and easy project makes a fairly large cat toy with a diameter of about 3.5 inches. 


This is a great way to use up small yarn scraps. Grab all the wild colors you have on hand and let your creativity flow! Your kitties will thank you. My samples used about 25 yards each. 


Toy is not washable due to the embedded catnip sachet. Store catnip balls in an airtight plastic bag when not in use to help prolong the catnip scent. Gently squeeze toy periodically to help release fresh scent from the catnip. 


Knit 44 rows on a 22-needle circular knitting machine, such as the Addi Pro. 

Cinch each end and fold as to make a double layer beanie. Tie ends together at top of "hat" to secure. 


Make a sachet with a heaping teaspoon of dried catnip knotted inside the toe of a knee-high nylon stocking. Encase the catnip sachet inside a bunch of fiberfill and stuff it into the open end of the knitted ball. 


Pick up stitches around the open end of the knitted ball and pull to cinch the end closed. Knot to secure, then hide any loose yarn ends in center of ball. Now it's playtime for the kittehz! My grandkitties Marshmallow, Sushi, and Princess are gonna love these. Here's a short video of Princess playing with her new ball. 😍


Monday, July 4, 2022

Mosu Japanese Knot Bag

This was my covid isolation project. It is the Mosu Bag by Sweet Softies. They offer a free version of the pattern on their website. I made mine with the Taupe colorway of Big Twist Value yarn and a 5mm crochet hook, and I finished it with a vegan leather Chicago tag by Angie + Britt that says "Bee kind."


Actually, I worked most of the bag all in the first two days, because after that I felt way too sick to have the energy for doing anything at all during the next 10 days or so. Some time after that I started feeling better enough to finish crocheting the straps.

The pattern is very easy and quick to make and would lend itself to lots of creative interpretation. It makes a nice size handbag. 


Wednesday, May 18, 2022

Taking the cake

I wanted a crocheted carrier for transporting cakes inside my cake-taker, so I whipped this up using some cotton yarn scraps. 

Didn't use a pattern, but the stitch I used for the base resembles the boho stitch used in the It's Shawl Good Cardigan paid pattern by Ashlea Konecny. The sides/handles are made with a traditional chain-loop/SC mesh.


Monday, March 28, 2022

Cozy candles

I used SlipStitchery's Halloween Witch Jar Covers pattern as initial inspiration for these quick and easy flameless (battery operated) candle cozies. I worked each cozy in a different stitch and different colorway for some variety in them as a grouping.


I still intend to make some of the actual Halloween Witch Jar Covers sometime, too! 😊


Saturday, December 11, 2021

A winter vest pour homme

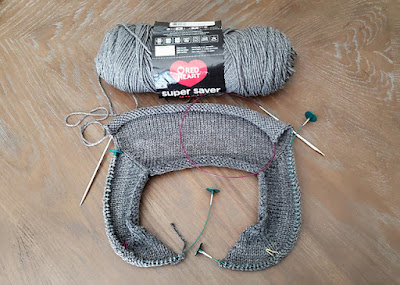
Based on the Improv pattern by Karen Templer, my plan for this is to be a seamless, top-down, cardigan-style vest worked mostly in simple, classic stockinette with K1P1 edging at armholes and button placket/front (worked with the smaller-size needles) and some traditional tortoiseshell buttons. I'm making this for my husband, who needs a replacement for the old aran vest that he reaches for during the chilliest weeks of winter to give him an extra bit of warmth. 


My initial plan was to make this without pockets, but then I realized his original vest has pockets, so I should probably try to add pockets to the new vest by following Marly Bird's tutorial for inset pockets. Another technique that is new to me for this project is picking up stitches along a knitted edge (to add ribbing).


The biggest challenge/question for me, since I'm very slow at hand knitting (and I often have days where I simply cannot knit at all due to chronic pain issues), is whether I'll manage to finish this in time to give it to my husband for Christmas. I cast on for this project on Sept. 21, which gave me about three months to work to meet that goal. Fingers crossed it gets done in time!!! (Spoiler alert: I finished it on Dec. 11! Yay!)


My husband is a person who, even though he supports my enjoyment of knitting/crochet/etc., he has firmly stated right from the beginning his preference that I NOT ever make anything for him because he will refuse to wear it. 


Over time, his declaration has proved to be not entirely true (he has occasionally worn a hat or mitts or a cowl that I've made, sometimes explicitly for him and sometimes not, and he has loved to tatters the blue scarf I knitted for him), but I've always known to generally avoid directing any of my crafting energies toward making items for him.


But when it comes to this vest, I feel like this is a different situation: He has worn the same store-bought knitted vest during winter for decades, and now that THAT vest is wearing out, he's going to need a replacement. I know he prefers neutral, classic design and lines and fit for stuff like this, so I'm attempting to incorporate those values here. I think the trickiest part for me will be achieving the correct fit. As I've worked I've been constantly measuring, checking and rechecking gauge, and comparing size to other items in his wardrobe. Because if this doesn't fit right, I know he won't wear it.


That being said, I've worked out most of this project without using a pattern (other than getting started at the shoulders with Improv), so although I'm familiar with the general principles of garment construction (after decades of sewing/knitting/crochet experience), I'm still nervous to see how the final product for this turns out.


After following the guidelines from Improv for how to begin working a top-down cardigan, I split off stitches to work each of the front panels and the back panel separately, gradually increasing the widths as the lengths grew, then rejoined all the panels below the armhole openings and knit until the bottom of the vest was the right length. I made the armholes slightly oversized, because I knew he wouldn't like to have his arm movement constricted by too-tight armholes.


After rejoining the panels below the armholes, I decided to work the 18 stitches that I cast on below the armholes on each side in garter stitch to give the side panels below the arms a bit of textural differentiation in the torso.


I finished knitting the ribbing at the bottom of the vest the day after Thanksgiving. Two days later, I picked up and knitted the front edging, which extends from side to side behind the neck and includes the buttonholes on the left front. To me it's almost magical the way you can have a curled, gnarled mess of stockinette, but then when you add the edging/ribbing, suddenly the stockinette fabric uncurls and looks gorgeous. I know that's just the way stockinette is (it curls if there's no edge treatment), but it's still fascinating to see it all come together.


Here's the store-bought ye olde aran vest that has served Montie well for many years: