Showing posts with label ribbing. Show all posts

Wednesday, March 18, 2026

Sno Cap Hood scarf

Brioche knits are drop-dead gorgeous. But even though I'm a fairly skilled knitter, I just have never really been able to wrap my head around the technique.


Sometimes it is possible to substitute the fisherman's rib stitch in place of brioche rib. This lovely hooded scarf, by little quail handcraft, designed in a simple brioche rib, seems to be a suitable candidate for that substitution, so I'm going to give it a try that way. 😊 Using the fisherman's rib stitch makes this pattern accessible for me. If you are able to knit in brioche, go for it! 

It has been a few years since the last time I worked in fisherman's rib, so I used the video and blog tutorials by Davina Choy of Sheep & Stitch to refresh my memory for how to work this easy, squishy stitch.

For the yarn, I am cannibalizing this poncho project that I crocheted in 2022. It weighs about 512 grams, which, by weight, works out to approximately the equivalent of 4 skeins of this yarn. Those 4 skeins weren't quite enough to finish the poncho to my satisfaction, even though I really liked the way the project was coming along (and I believe the Eggplant/Taupe colorway had already been discontinued, and I didn't feel like searching around online to try to buy more), so my poncho sat in purgatory for about four years while I figured out what else I wanted to make with this fiber.

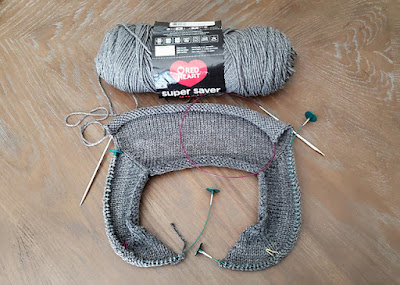
From poncho to Sno Cap Hood

Fair warning: There is enough of a wool halo in this yarn to frequently make it difficult to rip back. Also, there is a lot of variability in the thickness of this yarn from the way it's spun, which almost gives it a homespun character. 

Variable thickness in the fiber

I don't have the labels anymore, but from what I can see online, each of these skeins is supposed to be about 312 yards, so I should have more than enough on hand to knit a Sno Cap Hood, even with my mods to increase the size.

I deviated from the pattern by starting off with a scarf width of 25 stitches, because I prefer my scarves to be on the wider side. At this gauge, that is giving me a scarf that's about 6 inches wide, which is a fairly standard scarf width.


After knitting a couple of inches, I realized that I was not happy with the way the selvedge stitches were sitting, so I ripped back to the beginning and switched from working the slipped-stitch selvedges (as per the pattern) to working them in garter stitch. At least for the fiber that I'm working with here, having garter stitch selvedges looks better, so I'm glad I noticed early on how I felt about the edges and was able to make the change before I got so far along that ripping back would have been more painful. Sometimes you just have to go with what the personality of your fiber is saying. 😂

Before starting the hood increases, I knitted the length of the first scarf tail to about 36 inches, which was about 162 rows at the gauge I'm working with this fiber. 

To work the fisherman's rib double increases/decreases for the hood portion, this video tutorial by Carolina of So Wooly is the perfect guide for executing that technique. She also provides a written tutorial of the technique on her blog.

At first the hood increases seem counterintuitive because they alternate between being worked on the right side and the wrong side (and the center stitch "moves" each time, but I really can't explain it; you just have to do it and trust the pattern), but if you follow the pattern as written (because it's correct, of course!) and also "read" your knitting as you go, you'll soon be able to tell the rows where you need to increase. Once you start knitting the increases section, and you're able to see how it comes together, you will see how the instructions make sense and keep you making the increases on the knit side of the center stitch. 

Increases

I did make some mistakes as I was working the increase section. If you look closely at my photo of the increases, you can see where I increased on the wrong stitch a few times. But since I was able to stay in the ribbing pattern, those mistakes are not super obvious, thank goodness. Whew! 😅 The ribbing is somewhat forgiving of a few small mistakes. Using a couple of removable markers to mark the center section (and moving them after each increase/decrease) can help a lot. 

Love the phasing of the colors

I increased to a total of 57 stitches for the hood (or 11 increases). Not only do I prefer my scarves to be on the wider and longer side, but I also prefer my hoods to be amply sized to fit over my hair, which I usually wear up in a messy bun style. Plus, the extra depth will keep the back of my neck extra cozy when the hood is down, so win-win!

Another foot to go

As a natural English-style knitter, I am always Majestically Awkward 🦩 while knitting in any type of rib stitch, so I won't often take on an entire project in rib stitch, but this hooded scarf is definitely worth it. 💜 I love to watch videos of continental-style knitters working; it's hypnotically beautiful to me. And I have tried multiple times to retrain my hands to knit continental style (I comprehend how they're doing it), but my hands just simply refuse to cooperate because they know that they can already knit just fine in English style, thank you very much. 🤦 Oh well, I'll probably keep trying from time to time to learn continental style, and maybe someday it will stick for me. 😂 

In addition to this Sno Cap Hood, I was able to knit two other coordinating projects using the yarn from the poncho project: a Freja cowl and a messy-bun hat based on the Endless Texture Brim Hat design.

Matching accessories


Tuesday, August 19, 2025

Ric-Rac UGA Fan Messy Bun Beanie

Ever since I made one of these beanies for my grandniece Jill almost four years ago, I've been wanting to make one for myself in a messy-bun style (open top). So when Jill's mom, my niece Renee, announced that she would be hosting a party to celebrate the kickoff of Georgia's new football season, I knew that now was the time to grab my yarn and get hooking on this essential accessory. GOOOOOO Dawgs! Sic 'em! Woof! Woof! Woof! Woof! Woof! 🏈


I used scraps of yarn I had in my stash to make this, so, naturally, I ran out of the main red color when I was stitching the brim. I switched to another scrap of red that was a fairly close match to the first red, but there is a tiny bit of difference in the colors. But since this hat is for me, I'm OK with that. 😊


The hat works up quickly, and the cluster V-stitch is super easy while giving the stripes their distinct "ric-rac" look. I use this tutorial on YouTube by Hooked by Robin whenever I need a refresher on how to work the cluster V-stitch. The design is great for showing off the colors of any fandom, and the slouchy, stretchy nature of the beanie is amazingly comfortable for all-game-day wear. The 5/6 ribbed brim in alternating FPDC/BPDC stitches also provides complete, cozy coverage of your ears, which is wonderful on windy autumn/winter game days.

As you can tell by my latest posts, I'm on a beanie-making kick lately, thanks to the approach of fall, my favoritest season in the whole, wide world!! Plus, most crochet hats work up super fast, so it doesn't take long to have your latest favorite hat ready to wear. 

And because crochet hats work up quickly, it also means that I can usually finish one before the arthritis in my hands forces me to take a break from stitching. 👍


Saturday, January 6, 2024

Taylor's Beanie

When Taylor Swift wore that crocheted beanie to watch her boyfriend, Travis Kelce, play football with the Kansas City Chiefs, all of the online yarnie groups went BA-NA-NAS with people wanting to know how to make the same hat. It's the Taylor Effect, y'all.


Anyway, if you love a Swiftie, like I do, then you simply MUST make them one of these beanies. It works up quickly with simple stitches, so it's an easy project that will bring a huge thrill to your Swiftie's heart, because in no time at all they will be able to rock this hat just like Taylor did.


To replicate Taylor's look, it's important to use a bright white yarn for the main color and a rich, vibrant red with blue undertones for the stripe.


You will notice that I have the jersey number "wrong" on the beanie I made. That's because my Swiftie also loves a football player, and he happens to wear jersey number 84 (whereas Travis Kelce wears number 87). 

For the fur pom, I found an affordable pack of faux-fur poms on Amazon.

Photo showing Taylor's faux fur pompom


I am working on writing this pattern, which will be available as a free download on Ravelry. I will link to the pattern page here once it's available. Ravelry pattern link: https://www.ravelry.com/patterns/library/taylors-beanie-3


Monday, February 20, 2023

Haiku Cardi


Finished cardi

It would have been helpful to me if the pattern had provided more of an overview description of the process of how the cardigan will come together, because although I do enjoy patterns with unconventional construction techniques, If I had realized before starting this that the fit of the cardigan would be closer to that of a cocoon-style cardigan with a sort of dolman-type sleeve, I might not have opted to work this pattern, because I generally don't care for cocoons or dolman sleeves.


Nevertheless, I am glad that I made this cardigan. It is a paid pattern designed by Svetlana Volkova. At about 21 inches length, measured from the top of the shoulder, I decided to add pockets of 29 stitches wide by 44 rows deep. I knitted the pocket linings in contrasting black yarn.


Some ways I deviated from the written pattern include making simple kfb increases instead of M1R/M1L increases and adding the pockets. I like the oversized fit even if the cardigan is somewhat less constructed than I had expected before starting the project. Total stitches after rejoining below armholes: 253.

This cardigan begins in the center-back and works upward from there in the shape of a triangle. When the triangle is large enough, the point of the triangle is at the back of the wearer's neck, and the wide side of the triangle wraps around the waist. The slanted sides of the triangle are then worked separately to finish the upper back on each side and wrap around the shoulder and become the upper front on each side. The front sides are then rejoined to the back to form the arm holes and stitches picked up along the bottom of the triangle. Then all stitches are knitted together to make the bottom part of the cardigan.

I do like how this project turned out, but I think if I make it again I will incorporate garter stitch instead of ribbing, because the ribbed front placket on this one wants to fold over toward the stockinette. Hopefully washing and blocking will fix that issue, but I'm thinking that using garter stitch plackets would naturally lie better than the ribbing.


Wednesday, January 18, 2023

Adult Crochet V-Neck Vest

I'm making this in size 48 men's, but because I'm using a lighter-weight fiber than the pattern calls for (and because I crochet tightly), my gauge is 101 stitches for 24 inches across (which aligns with the stitch count for the largest size on the pattern, so I'll basically follow the stitch count instructions for that size).


Working the panels from the bottom up, one skein of the Bernat Softee Baby yarn went for about 14 inches, measured from the bottom edge of the ribbing. 


This design mainly uses the crochet lemon-peel stitch for the body of the vest, which gives a nice, pebbly-textured, reversible fabric that doesn't scream "I was crocheted." And although the fabric doesn't look holey, it does have quite a lot of small holes that lend breathability to it. (See my photo below with the sunshine showing through the vest panel.) This is a nice stitch for a masculine/unisex garment because it is comfortably ventilated while not looking "lacey."


I originally had wanted to knit a textured top-down V-neck pullover vest in a 3-weight yarn as an alternative to the cardigan-style vest that I knitted for my husband as a gift at Christmas 2021. After looking through a lot of patterns, I finally settled on the Ink (paid) pattern by Fiona Hamilton-MacLaren, which, as its description says, is a "cosy fitted vest with an all over texture pattern. The ribbed stitch pattern pulls the fabric in, but gives loads of stretch."

It's a beautiful design, and I really, really wanted to be able to make it. But the problem I was encountering is that it's not a pattern that I could put down and then easily pick back up again a few days later, even when I used a row counter and kept careful notes about where I left off. I was imploding my brain trying to keep track of where in the stitch pattern I needed to start each row, and spent a lot of time tinking (unknitting) rows where I started out wrong but it took me a full row or two to realize that my stitches had gone amiss. I was frustrated but also really sad at how difficult it was for me. I'm not saying Ink is a difficult design; the stitches are easy, mostly just knits and purls, and it's the way those basic stitches fit together that creates the beautiful, ribbed texture. I believe the problem rests with me and my inability to wrap my head around how it all fits together after putting the project down for a few days. I think I just need to attempt Ink again at a time when I can devote more uninterrupted concentration to it.

So after admitting defeat (albeit temporarily) with Ink, I started looking to see if I could find a top-down crocheted men's vest pattern with nice texture and a traditional fit. It wasn't until I altered my search criteria to accept bottom-up patterns that I found this Adult Crochet V-Neck Vest free pattern by Yarnspirations Design Studio. I usually prefer to make top-down garments, but the overall look of this vest fits with what I wanted to make, so I decided to give the bottom-up design a go. 

The downside of the lemon-peel stitch, compared to other, taller crochet stitches, is that it grows slowly, which can feel tedious (particularly when you're working from the bottom up). But if you just keep plugging along, the vest eventually will come together.

This is going to be a gift for my husband, as I said (probably for Christmas 2023), and if you've been reading my blog for a while, you already know that he strongly discourages me from making anything for him. He grumped vociferously when I asked him to stand up so I could measure the bottom ribbing at his waist when I started working the first piece for this vest. But sometimes my creative impulses just compel me to make him something. And I do believe that this has turned out to be a very nice vest for him that will fit comfortably and be nice and cozy. After Christmas, I'll add a photo of him wearing it to this post.

Edited to add: Here's the photo of him wearing it! It fits him perfectly. 😊


Instead of following the pattern instructions for the neck edging, I decided to try working 1 round in DC (including the decrease at the bottom front) followed by 2 rounds of alternating FPDC/BPDC to give the appearance of ribbing. That technique often works well for that effect, but I didn't like how it ended up looking here. So I ripped out that neck edging and redid it using the same technique that was used for the armhole edging.

I worked the armhole edging almost as described in the pattern, except instead of making the ribbing and then sewing it on, I worked the ribbing joining it to the armhole as I went using the join-as-you-go technique similar to what is shown in this video


To do that for the neck opening means the ribbing will begin/end at the bottom front. The ends will be "square" (not tapered) and will be sewn together overlapping, which is a common feature of knitted neck ribbing seen on some V-neck sweaters.


Monday, September 5, 2022

Knitting my T-shirt

I bought a funny T-shirt on Amazon that all you knitters out there can probably appreciate.

But after wearing it a few times, I decided that I wanted to try knitting the instructions printed on the shirt to see what it would look like. 

I studied the instructions and decided that the design was worked over multiples of 4 plus 3. So I cast on 35 stitches for my sample and started knitting.

Here's how it knits up. To me it looks like a reversible faux ribbing created by the twisted slip stitches. This stitch sequence could make a very nice scarf. Fun!


Thursday, January 27, 2022

Luna Triangle Cowl

I really like pullover triangle cowls. They look amazing, they are so easy to wear, and they keep your neck, shoulders, and chest nice and cozy. So when I saw the super cute Luna Triangle Cowl paid pattern by Deni Sharpe, I knew I wanted to make one for myself.

I deviated from the pattern in a few ways. First, the pattern is written for bulky (size 5) yarn using an 8mm hook, but I made mine in aran weight (since that's what I had in my stash) with a 6.5mm hook. I also opted to hand knit the ribbed top of the cowl instead of working it in crochet.


The knitted part I did in a lofty and reversible fisherman's rib worked in the round over 80 stitches. I followed the tutorial for this technique at this link. Then I picked up the stitches for the first row of crochet to begin the triangle portion of the cowl. Since I was starting with a different number of stitches for the bottom part of the cowl than was listed in the pattern, I had to adjust the stitch counts for the triangle part of the work.


Saturday, December 11, 2021

A winter vest pour homme

Based on the Improv pattern by Karen Templer, my plan for this is to be a seamless, top-down, cardigan-style vest worked mostly in simple, classic stockinette with K1P1 edging at armholes and button placket/front (worked with the smaller-size needles) and some traditional tortoiseshell buttons. I'm making this for my husband, who needs a replacement for the old aran vest that he reaches for during the chilliest weeks of winter to give him an extra bit of warmth. 


My initial plan was to make this without pockets, but then I realized his original vest has pockets, so I should probably try to add pockets to the new vest by following Marly Bird's tutorial for inset pockets. Another technique that is new to me for this project is picking up stitches along a knitted edge (to add ribbing).


The biggest challenge/question for me, since I'm very slow at hand knitting (and I often have days where I simply cannot knit at all due to chronic pain issues), is whether I'll manage to finish this in time to give it to my husband for Christmas. I cast on for this project on Sept. 21, which gave me about three months to work to meet that goal. Fingers crossed it gets done in time!!! (Spoiler alert: I finished it on Dec. 11! Yay!)


My husband is a person who, even though he supports my enjoyment of knitting/crochet/etc., he has firmly stated right from the beginning his preference that I NOT ever make anything for him because he will refuse to wear it. 


Over time, his declaration has proved to be not entirely true (he has occasionally worn a hat or mitts or a cowl that I've made, sometimes explicitly for him and sometimes not, and he has loved to tatters the blue scarf I knitted for him), but I've always known to generally avoid directing any of my crafting energies toward making items for him.


But when it comes to this vest, I feel like this is a different situation: He has worn the same store-bought knitted vest during winter for decades, and now that THAT vest is wearing out, he's going to need a replacement. I know he prefers neutral, classic design and lines and fit for stuff like this, so I'm attempting to incorporate those values here. I think the trickiest part for me will be achieving the correct fit. As I've worked I've been constantly measuring, checking and rechecking gauge, and comparing size to other items in his wardrobe. Because if this doesn't fit right, I know he won't wear it.


That being said, I've worked out most of this project without using a pattern (other than getting started at the shoulders with Improv), so although I'm familiar with the general principles of garment construction (after decades of sewing/knitting/crochet experience), I'm still nervous to see how the final product for this turns out.


After following the guidelines from Improv for how to begin working a top-down cardigan, I split off stitches to work each of the front panels and the back panel separately, gradually increasing the widths as the lengths grew, then rejoined all the panels below the armhole openings and knit until the bottom of the vest was the right length. I made the armholes slightly oversized, because I knew he wouldn't like to have his arm movement constricted by too-tight armholes.


After rejoining the panels below the armholes, I decided to work the 18 stitches that I cast on below the armholes on each side in garter stitch to give the side panels below the arms a bit of textural differentiation in the torso.


I finished knitting the ribbing at the bottom of the vest the day after Thanksgiving. Two days later, I picked up and knitted the front edging, which extends from side to side behind the neck and includes the buttonholes on the left front. To me it's almost magical the way you can have a curled, gnarled mess of stockinette, but then when you add the edging/ribbing, suddenly the stockinette fabric uncurls and looks gorgeous. I know that's just the way stockinette is (it curls if there's no edge treatment), but it's still fascinating to see it all come together.


Here's the store-bought ye olde aran vest that has served Montie well for many years: