Showing posts with label circle. Show all posts

Saturday, August 29, 2020

Doughnut Buddies

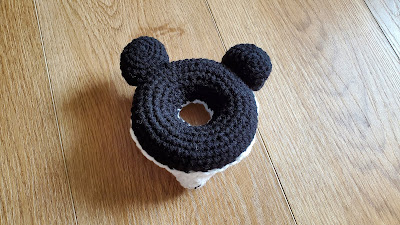
These Doughnut Buddies toys are so sweet (pun intended) and quick and easy to make. Each one can be made in an evening (about 4-6 hours each max, depending on the level of detail). Watch out -- these are fun and addictive. 😊


The only reason these project took me multiple days was because I had to wait for an order of safety eyes to arrive in the mail. 😄


Rachel Zain, the designer of all these adorable Doughnut Buddies, generally doesn't tell you in the patterns which colors to use at each step -- and that's fine because it allows for individual creativity. I made my Baby Yoda buddy on a burlap-brown base doughnut to represent The Child's robe, with green icing (of course) for his face and ears. (Rachel used the same green doughnut base on her alien as the icing, which is perfectly all right, too, of course.) 


And, of course, I simply HAD TO make a Mandalorian to go with my Baby Yoda. 😜


Tip: Leave a 14-inch-long tail before chaining to make the icing layer. This gives you the length you need to attach the center ring of icing to the doughnut.


I freehanded a couple of Doughnut Buddies last year as a gift for Lilliana, but it's fun to now have the official patterns to learn from and use as a jumping-off point for more creativity.


Monday, September 3, 2012

Getting mathematical with hats

I recently made the Brain Waves Beanie by Liz McQueen.


When reading her pattern, I found it interesting the way she included measurements for the diameter of the top of the hat at the end of each increasing round. (Most hat patterns only include the number of stitches you should have at the end of the round.)

Information about the diameter is important because when you stop increasing the size of the circle, that measurement will determine the circumference of the hat when you multiply it by Pi (as we learned in school with our friendly geometric formula: Pi times Diameter equals Circumference). And the circumference should correspond to the size of the head on the person you're making the hat for. Therefore, if the diameter of the top of the hat is about 7 inches across, then the finished hat will be about 22 inches around, because 7 times 3.14 equals 22 (in round numbers).

Alternatively, if you know the person's head circumference and want to determine your pattern from that measurement, the formula to tell you how large the diameter should be is Circumference divided by Pi. Therefore, if you want your hat to have a finished circumference of 22 inches, then 22 divided by 3.14 equals a diameter of about 7 inches.

This disc measures about 6.5 inches across (when laid flat; the edges are trying to curl in the photo), so that means if I stop increasing here, the finished hat will be about 20.5 inches.


Each round of (in this case) double crochet worked with a J hook using worsted-weight yarn is about .5 inches high, which means that each successive round adds about 1 inch to the diameter of the circle. If I add another increasing round to what I have in the photo (making the diameter about 7.5 inches), the finished hat circumference will be 23.5 inches. (A bit on the large size for most folks.)

Alternatively, if I made the same hat top using half-double crochet, the diameter size would be proportionally smaller.

When you factor in the differences in height that the various stitches have, plus how those stitches are affected by the weight of the yarn and the size of your hook, the potential combinations can be mind-boggling. Which is probably why pattern designers emphasize the importance of always working a test swatch before attempting a pattern.