Showing posts with label stash. Show all posts

Tuesday, November 28, 2023

But it fits!

This meme by Nicki of Nicki's Homemade Crafts made both me and my husband laugh out loud. Too funny!


Wednesday, September 8, 2021

A housewarming gift

I had a hank of some old, heavy worsted weight green yarn that either came from my mother's stash or else the big bag of random yarn balls that Mika gave me when she and her wife moved to Wisconsin.

Now that Mika and Emmy are buying their first house, I wanted to make them something as a housewarming gift. Since green and black are colors they are planning to utilize in their decor, the idea for this knitted pumpkin/floral display started to form in my mind.

The yarn was too heavy to run through my Sentro machine, so I tried it on the Addi instead, and, of course, the Addi was able to handle it just fine. (Addi only grumbled a tiny bit about how heavy the yarn was.)

There was enough yarn in the hank to get a tube of 114 rows, plus leaving a long tail (about 3 yards long) for finishing and sewing the pumpkin's sections.

Fold the tube inside itself in half, as for making a double-thick beanie. Cinch and secure the ends. Stuff the interior. Then using the long tail, wrap around the outside and through the center to create "sections" of the pumpkin. As you create the sections, the bottom will cinch itself closed. You can secure the bottom with a few extra stitches, if needed.

I cinched the ends while keeping a finger in the top hole so it would remain open after assembling the pumpkin. Leaving the hole slightly open this way will allow me to use the pumpkin as a "vase" for holding some silk flowers, which I think will make a lovely display. 


I also cut a stem from piece of black faux leather, making it about 6 inches long by 3/4-inch wide. I used a yarn needle to punch 2 holes near the stem ends, and used those holes to sew the yarns ends through after tying down the pumpkin's sections. Having a stem there means the pumpkin could also be displayed plain, without flowers.

The flowers I'm using are in autumn colors, but Mika and Emmy should be able to switch out the flowers throughout the years to match the changing seasons, if they wish. I cut the flower stems at about 4-5 inches long and bent them to help the flowers curve toward the pumpkin after inserting the stems into the hole at the top and working around the leather stem.


Monday, March 15, 2021

Lots-a hanger covers

Crocheted or knitted hanger covers are so quick and easy to make and are perfect for making your plastic tubular hangers slip-resistant. These are quick projects that can be great for busting down your yarn stash because they only require small amounts of yarn, and they produce a useful finished object. I mean, who doesn't need a collection of yarn-covered hangers in their closet to keep their nice blouses (etc.) from falling onto the floor? 😊


The crocheted Hanger Cover free pattern by Frugal Knitting Haus is a great, basic option for dressing up your everyday hangers. These look equally great whether worked in solid colors or variegated yarns.

The strip you crochet is six stitches wide (about 2 inches) by about 36 inches long. When you finish off, cut a long tail (about 2.25 times the length of the finished work) and use the tail to sew the cover to the hanger with a wide whip stitch (about 3-4 stitches per inch). No need to be fussy about it because the sewing stitches will blend into and be disguised by the cover. Knot the tails together and hide them inside the work for an easy finish.

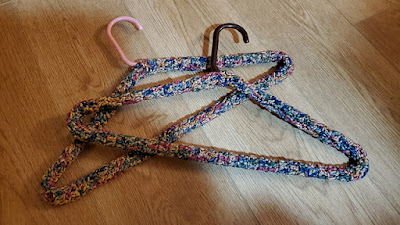
Another easy way to make hanger covers is by using a 22-needle knitting machine, such as the Addi Pro.

You can make a matching set of multiple hangers all from one skein of yarn, or you can do like I did above and just grab whatever pieces of yarn you have available for a unique, scrappy hanger.

Using a 22-needle machine, cast on with a few rows of waste yarn. Change to your working yarn and knit 160 to 170 rows to fit most tubular plastic hangers. Leave about a 2-yard tail before cutting the working yarn and drop it into the center. Change to waste yarn and work a few more rows then cast off from the machine. Gently stretch the knitted piece.

Using a 5mm crochet hook, close the end of the tube with the short tail and remove the waste yarn, pulling the short tail through the last loop to secure it. (Don't hide this tail inside yet.) Then close the end of the tube with the long tail, pulling the long tail through the last loop to secure it.

Thread the long yarn tail onto a large needle. Hold the knitted strip so the end wraps around the hanger and whip-stitch the long edges of the knitted piece together. Stretch the knitting until the ends of each side meet just below the hook of the hanger and whip-stitch or mattress-stitch the ends together for a neat appearance. Knot the tails together to secure and then hide the tails inside the knitting for an easy finish. Now your covered hanger is finished and ready to use.

The striped machine-knit hanger cover in the photo above was made with 160 rows, which was just long enough to fit snugly on the hanger. It might have been better if I'd made it 170 rows, which is what I did in the machine-knit hanger cover in the photo below. 


Saturday, August 29, 2020

Doughnut Buddies

These Doughnut Buddies toys are so sweet (pun intended) and quick and easy to make. Each one can be made in an evening (about 4-6 hours each max, depending on the level of detail). Watch out -- these are fun and addictive. 😊


The only reason these project took me multiple days was because I had to wait for an order of safety eyes to arrive in the mail. 😄


Rachel Zain, the designer of all these adorable Doughnut Buddies, generally doesn't tell you in the patterns which colors to use at each step -- and that's fine because it allows for individual creativity. I made my Baby Yoda buddy on a burlap-brown base doughnut to represent The Child's robe, with green icing (of course) for his face and ears. (Rachel used the same green doughnut base on her alien as the icing, which is perfectly all right, too, of course.) 


And, of course, I simply HAD TO make a Mandalorian to go with my Baby Yoda. 😜


Tip: Leave a 14-inch-long tail before chaining to make the icing layer. This gives you the length you need to attach the center ring of icing to the doughnut.


I freehanded a couple of Doughnut Buddies last year as a gift for Lilliana, but it's fun to now have the official patterns to learn from and use as a jumping-off point for more creativity.


Sunday, August 25, 2019

Garfield's yarn cellar

Brilliant! I'm partial to a bit of fruit-forward ... blue or purple ... myself. 😉

Garfield 8/25/2019


Saturday, April 6, 2019

Playing yarn chicken

When you play "yarn chicken," you win some, and you lose some. Oh well! 


OOOH, I found another skein in the stash bag where the first baby pink skein came from! I'm saved!! Bwah-ha-ha ...


Better to be lucky than good sometimes. 🙃

Thursday, December 20, 2018

Orbit the Magical, Mystical Dragon CAL free pattern

I haven't attempted much amigurumi, but when I saw the free crochet-a-long for Orbit the Dragon  that started in June, I knew I had to try to make him.


I had to do some sleuthing to figure out the color name of the variegated yarn I’m using for the main body of my dragon because the skein was gifted to me without a label on it. I figured it was probably something by Red Heart, so I clicked around on the Red Heart site until I found a match. This one works well as the main body color for this pattern because the color changes are very short - about every 2 inches - which contributes to the mystical body “scales” appearance.

I kept up with the CAL until the end when it was time to assemble the pieces. That was the part that scared me so I procrastinated doing the assembly for months. But I wanted to give Orbit to my daughter for Christmas, so when Dec. 20th rolled around I knew I couldn’t put it off any longer. Aughhh! But I took my time and followed the instructions carefully and Orbit turned out just as cute as expected. Yay!

Week 1:

Week 2: 

Week 3:

Starting assembly:


Orbit assembled!


Color breakdown:

Head, body, nostrils: Red Heart in Monet Print
Eyes: Red Heart in Soft White and Black
Cheeks: Red Heart With Love in Bubble Gum
Horns: Red Heart in Soft White and Monet Print
Belly: Red Heart in Perfect Pink
Fins: Red Heart in Honeydew
Paws: Red Heart in Perfect Pik
Legs: Red Heart in Monet Print
Tail: Red Heart in Monet Print
Ears: Red Heart in Monet


Monday, July 11, 2011