Showing posts with label face. Show all posts

Tuesday, October 7, 2025

Sally Stitches Pumpkin

Many years ago, as I was first learning about how to work with circular knitting machines, I used a small scrap of Red Heart Ombre yarn in the True Blue colorway to make a quick, single-layer pumpkin.

After finishing it, I decided later that circular-knitted pumpkins definitely look better when they're made double-layered. But I had this single-layer blue pumpkin sitting there wondering how it might fit into my seasonal decorating for one of my favorite holidays: Halloween.

Inspo photo from Disney's Emoji Blitz game

My poor blue pumpkin actually sat for a long, long time (more than five years!) waiting for its chance to become something more. I didn't want to just rip it apart and start over, using the materials for something else.


I would pull it out of a yarn bin every so often and ponder it. I'm not sure exactly when it finally occurred to me that the light blue yarn kind of resembled the skin tone of Sally from The Nightmare Before Christmas. But once I got that idea in my head, I was determined to transform my blue pumpkin into a Sally character pumpkin.

Another inspo photo found online

Sally's most distinctive features are her blue skin, her cherry-red hair, her big white eyes with little black pupils, and, of course, the black stitches all over her skin. (Her colorful patchwork dress is also distinctive, but for this project, I was going to focus just on Sally's face.)

Another inspo photo found online

For the eyes, I followed this tutorial by Harriet's Crochet on YouTube. I made the eyes with fingering weight cotton yarn in black and white and a 2.25 mm crochet hook. I used white instead of the iris color shown in the tutorial, and also added an extra round of white to get them to the finished size I wanted.

Top view after adding hair and eyes

For the hair, using the cherry-red yarn and a 5 mm hook, I crocheted a foundation SC chain until it was long enough to reach vertically from pole to pole on the pumpkin, which ended up being 28 stitches long. The remaining rows are worked in YOslst in the back loop to give a texture that resembles her strands of hair. The finished rectangle is about 14 inches long and covers about 2/3 of the pumpkin (leaving the other 1/3 of the pumpkin open for her face). I gathered the top and bottom edges and wrapped them around the pumpkin and tied everything together to secure.


Then I crocheted a vine-like stem similar to the one I added to my crocheted Little Rustic Pumpkin back in 2019. To make the vine, I crocheted 6 SC in a magic circle, then kept crocheting the 6 stitches in a continuous spiral until the length was long enough to cover a 12-inch pipe cleaner. (I actually twisted together two pipe cleaners.) After inserting the pipe cleaners, I started increasing each round of SC until the circle had 42 stitches (to provide a secure base for the vine, and to cover the "bald spot" at the top of Sally's head where I wasn't able to cinch the top of her red hair any tighter).

Bottom view


Sewing on her eyes was probably the scariest step for me, because I didn't want to have them end up looking wonky. But I just worked slowly and carefully, and they ended up looking pretty good. 😊 I intentionally did NOT stitch her eyes down tightly where they cross the creases between the pumpkin segments. 


Using the fingering-weight black yarn, I embroidered a kind of stem stitch to line the top edge of her eyes and then continued sewing her eyelashes in little V's back across the line across the top of her eyes.

Then, in black, I embroidered Sally's distinctive slash that crosses her face near her right eye. And then I embroidered the stitches that extend across her cheeks on either side of her lips.


The final touch was to embroider her lips using a sort of puffy satin stitch using a bit of the same yarn as her hair. You can find more info about the yarns I used on my Ravelry project page.

I think my Sally Stitches Pumpkin turned out great, and she looks so happy sitting there on my hearth beside her "Jack Skellington."

Feet up to relax after a job well done


I love Sally's character, and I have even dressed up as her for my friend Kim's Halloween party!

Sally's Song

I sense there's something in the windThat feels like tragedy's at handAnd though I'd like to stand by himCan't shake this feeling that I haveThe worst is just around the bendAnd does he notice my feelings for him?And will he see how much he means to me?I think it's not to be
 
What will become of my dear friend?Where will his actions lead us then?Although I'd like to join the crowdIn their enthusiastic cloudTry as I may, it doesn't lastAnd will we ever end up together?No, I think not, it's never to becomeFor I am not the one


Thursday, October 2, 2025

Skeleton Doll

This is a fun, easy, and quick-to-make pattern by Ashley of A Crafty Concept for an adorably spooky little crochet skeleton doll, a perfect addition for everyone's handmade Halloween decor!


The written pattern is free on her blog, and she also provides a video tutorial.

Work in progress - paint drying

He reminds me of a simplified version of Jack Skellington, so I have set him on my hearth beside his adoring Sally in pumpkin form. Maybe I can give him a tuxedo coat and bat bow tie later for a little more authenticity (Disney-thentic, ha).

Jack's Lament

There are few who'd deny, at what I do I am the best
For my talents are renowned far and wide
When it comes to surprises in the moonlit night
I excel without ever even trying
With the slightest little effort of my ghostlike charms
I have seen grown men give out a shriek
With the wave of my hand and a well placed moan
I have swept the very bravest off their feet

Yet year after year, it's the same routine
And I grow so weary of the sound of screams
And I, Jack, the Pumpkin King
Have grown so tired of the same old thing

Oh, somewhere deep inside of these bones
An emptiness began to grow
There's something out there, far from my home
A longing that I've never known

I'm the master of fright, and a demon of light
And I'll scare you right out of your pants
To a guy in Kentucky, I'm Mister Unlucky
And I'm known throughout England and France

And since I am dead, I can take off my head
To recite Shakespearean quotations
No animal nor man can scream like I can
With the fury of my recitations

But who here would ever understand
That the Pumpkin King with the skeleton grin
Would tire of his crown, if they only understood
He'd give it all up if he only could

Oh, there's an empty place in my bones
That calls out for something unknown
The fame and praise come year after year
Does nothing for these empty tears 


Monday, July 28, 2025

A Chicken for Suzanne

My dear friend Suzanne is a self-proclaimed "chicken gal" and suburbanite-of-necessity who longs to return to her farmgirl days living in the country with a yard full of chickens.


What better way to celebrate her upcoming birthday than sending an Emotional Support Chicken for her to hug and hold while she dreams her sweet farmgirl dreams?


The Emotional Support Chicken by Annette Corsino is just a downright fun pattern to knit, and I think it looks best when executed in tweedy-ish yarn colorways that are reminiscent of the feathers of real chickens. When I saw the lovely marled colorways of KnitPal Cotton to the Core, I just knew they would produce some lovely chickens well worth adding to any metaphorical flock. For this hen, I'm using Caramel Brown as color A and Fresh Peach as color B.


This yarn is on the lighter side for being labeled as a worsted weight - definitely much lighter than the stuff that Red Heart labels as worsted weight. In my opinion, it's closer to being DK weight. I'm still using the needle size specified in the pattern, though, so we'll see how big this hen ends up being compared to the other ones I've knitted with Red Heart. 😅 


I hope Suzanne loves her new chicken, and if she gives it a name, I will update this post to let all y'all know what it is! 💜🐔💜


I'm pretty sure that Suzanne's chicken is the first one of these that I've managed to sew together according to the way the pattern designer intended. Yay!
Thursday, July 24, 2025

Mini Simple Stardew Valley Chicken

I discovered that this pattern makes an adorable chick-sized mini chicken if you use a few scraps of standard 4-weight yarn, a 5 mm hook, and 8 mm safety eyes. This is the Simple Stardew Valley Chicken free pattern, which can be found on Ravelry.


They are so quick and easy to make that you can whip up a whole tiny flock in just an evening. I made all three of these in just a few hours. 


Each chick measures about 3.5 inches long by about 2.5 inches tall (not including the comb). The kawaii safety eyes came from this kit on Amazon. You can view more info about the yarns I used for these on my Ravelry project page.


The pattern was originally designed to be made with chenille blanket yarn, which produces a much larger softie (example photo from the pattern below).


Wednesday, July 2, 2025

Tooth Fairy Pillow pocket lovey

This tooth fairy pillow is going to be a gift for my wonderful dental hygienist, Carra.


In recent years, I've developed awful sensitivity in my teeth from enamel damage incurred from grinding my teeth and/or clenching my jaw during sleep. I started wearing a mouth guard at night, but not until after the damage was already done.

Ever since my teeth were damaged, having dental cleanings done has been terribly painful, to the point where I even considered not going to the dentist at all anymore (yeah, of course, I know that skipping dental visits wouldn't have made my situation any better, obviously, but ugh). I even felt that I had to change dental practices because my previous dentist didn't seem to be sufficiently sympathetic to my pain and wasn't really working with me to follow a plan to manage it.

My new hygienist, Carra (and, really, the entire team at Dr. Shelton's), has been nothing short of AMAZING. Carra has been very sympathetic and gentle with me at every visit and always gives me and my teeth the most wonderful care.

I always try to profusely thank Carra each time I see her, to let her know how much I appreciate her wonderful "bedside manner," as it were, but in addition to saying thank you, I wanted to give her a small, tangible token to express my gratitude, and thus I went searching for a crochet tooth pattern that was both super adorable and also sort of representative of who she is in her career. To me, Carra is my personal tooth fairy angel! 👼

This free Tooth Fairy Pillow pattern by Heather Corinne Smith is just right in every way. (She also has a video tutorial you can follow.) The design makes a tooth softie/lovey of a nice size (mine is about 6 inches tall, not including the hanging loop, by 6 inches wide), and the kawaii embroidered facial features are just so cute. The pocket on the back (about 3.75 inches wide by 2.5 inches tall) is the perfect size for holding a Dutch Bros gift card and sticker to add an extra touch of sweetness to the gift. I finished mine by adding a bow made of a small scrap of hot pink ribbon (it was only about 8 inches long to start with, so it was barely long enough, but it worked!!) that I had in my stash and followed this quick tutorial on YouTube to tie it, then I carefully sewed it to the tooth using a needle and thread.

Back with pocket

This turned out so cute, and I think Carra is going to love it. So if you love your dental hygienist as much as I love mine, maybe you should make one of these for your hygienist, too!

Monday, June 2, 2025

Emotional Support Chicken

I just couldn't resist the allure of the Emotional Support Chicken any longer. Meet Scrappy Henrietta! 😍


This pattern arrived on the knitting scene sometime in 2023 or 2024 (I believe), and the internet practically EXPLODED with excitement.

I added the pattern to my Ravelry favorites for safe-keeping but decided to wait before making one. I noticed, however, as the months went by the way the emotional support chicken consistently remained on the first page of Ravelry's "hot right now" designs, suggesting that the internet's adoration for the ESCs had yet to abate. It was on FIRE.


Eventually, I just couldn't resist the pull of the ESC any more.  


I think the thing that put me over the edge was when I discovered that The Knitting Tree LA had made a companion video for the pattern. Checking out the video was my undoing. 😂

Tail part 1

I grabbed a long old scrap of Hobby Lobby's I Love This Yarn in the Jazzy Stripe colorway (left over from an Infinite Granny Square afghan project) and cast on to follow along with the video, which starts at the tail.

Tail part 2

For part 2 of the tail and the main part of the body, I used a couple of long scraps of Red Heart With Love in the Pewter Gray colorway that were left over from when I made my Autumn Mists vest with no pattern.

Tail and main body

I don't know which yarn I used for the neck and head, but it was one long scrap of an ombre-ish yarn with purple, dark pink, and raspberry colors that is probably something by Red Heart, but I didn't have a label for it anymore.

Neck and head added

I used up the remainder of the raspberry ombre scrap for the top end of the undersection piece, and more of the gray yarn to finish the undersection.

Henrietta got a bit wonky as I was sewing her up, where the two ends of her neck stripes don't line up at the front, but hey. She is still adorable, and I wuv her!! She has 15 mm blue safety eyes from a pack that I bought off Etsy years ago from a seller named 6060, who is no longer active on the site. Whenever I'm installing safety eyes, I always use this tool to help set the backs, because it makes it a lot easier for my arthritic hands to handle the task of snapping them on securely.

You might be able to knit a whole ESC by only watching the video, but I think the video really makes a better accompaniment if you also own the written pattern, so before I reached the end of the first tail section, I bought the pattern: And the emotional support chicken claimed yet another willing (happy) victim. 😂

I followed this up by making a friend for Scrappy Henrietta, another Emotional Support Chicken, Scrappy Patty, in colors to match our guest bedroom.

Scrappy Patty and Scrappy Henrietta

 
Scrappy Patty sitting on the bed in our guest bedroom

Scrappy Patty side view

Wednesday, November 20, 2024

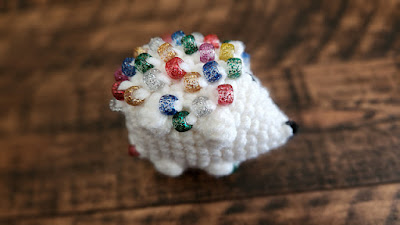
Beaded Fidget Hedgehog

This is a great pattern for using up scrap yarn from your stash. Each hedgehog requires only a small amount of yarn (plus a pair of 8 mm safety eyes, about 68 pony beads, and the other supplies). 


For my first two hedgehogs, I used glitter pony beads that I've had in my crafting stash for at least 27 years. I originally purchased the beads to adorn some Pocahontas costumes for Halloween/dress-up playtime that I sewed for my daughters back in the 1990s. 

My daughters on Halloween in the 1990s wearing the beaded costumes.

Now, all these years later, I can give them each an adorable hedgehog made with the same beads along with a printed photo of them wearing the Pocahontas costumes when they were little. That's a nifty full-circle moment in my book! 😁

So tiny and cute!

Little hedgehog feet.

Little hedgehog bum.

The pattern also has a link to an Etsy listing where you can opt to purchase a printable "carrier" for gifting your hedgehogs, which gives them a cute finishing touch.

Saturday, February 17, 2024

Kawaii Pop Tart

Using my Addi King Size 46-needle knitting machine, I made this kawaii amigurumi Hot Fudge Sundae Pop Tart toy.

I don't eat stuff like pop tarts anymore, but back in the day, the hot fudge sundae flavor was my favorite.


Recipe is 60 rows of crust/base color and 60 rows of frosting color. For a 48-needle machine, make it 65 rows of each. Since my pop tart is a Hot Fudge Sundae Pop Tart, I used a dark brown yarn (Red Heart Super Saver in Coffee) for the crust color and a white yarn (Red Heart Super Saver in White) for the frosting layer. I recommend using waste yarn to cast on and cast off from the machine because it makes it easier to close the tubes later.

Crochet each end of the tube closed and remove the waste yarn. Then fold your tube in half, putting the crust color on one side and the frosting color on the other side. Using the crust color and a 5mm crochet hook, work half-double crochet stitches around the outside edge of the pop tart, first to join the ends of the tubes together (across the short side), then around the corner (placing at least 2 HDCs in each corner), then down one long side (joining the crust layer to the frosting layer), then around the next corner, then across the other short side (where the tube is folded), then around the third corner. At this point, lightly stuff the pop tart, just barely enough to give the center some loft (don't make it at all firm). After stuffing the center, continue crocheting around the last (long) side (again, joining the crust layer to the frosting layer) until you're back to where you started. Don't forget to work a couple extra stitches in that last corner. Then join to the first HDC stitch and fasten off.

I did 65 rows in my sample piece of a Hot Fudge Sundae Pop Tart on my 46-needle machine, and the aspect ratio is a bit tall compared to what a real pop tart looks like, so I adjusted my recipe to be 60 rows of each color on the 46-needle machines, which should work better, and 65 rows of each color on the 48-needle machines.

For the eyes, I used a couple of 10mm eyes from this kit that I bought on Amazon. I embroidered the little mouth using a small length of Red Heart yarn in black.

For the colorful sprinkles, I found this skein of Ice Yarns Lorena Print in purple/pink/yellow/green/turquoise, which are the exact same colors as the sprinkles on the real Hot Fudge Sundae Pop Tarts. And for the chocolatey swirls, I embroidered chain stitches using more of the Red Heart yarn in the Coffee (brown) colorway.

Inspo photo


Tuesday, September 12, 2023

Neo and Scoop Mini-Dinos free pattern

Since the beginning of the year I have been in the middle of several large, long-term projects and felt like I needed to give myself a mental break and make something that works up super fast but also gives a finished product that is super satisfying. 


This Mini-Dino designed by Mary of the MerryMakes blog turned out to be just the project that my weary heart needed. He is SO STINKIN' CUTE!!! And he was really fast and easy to make. I wuv him!!! I also love that Mary has a video tutorial that walks us through every step of the creation process.


I made mine with a 5.5mm hook, which is a larger hook than the pattern specifies, but I tend to crochet tighter than the average bear anyhow, so I think it worked out fine. At the gauge I was working, my dino turned out to be about 6.5 inches tall. For comparison, Mary's Mini-Dinos work up to be about 5 inches tall when made with worsted weight yarn and a 4mm hook. I was also using the yarn-over single crochet technique rather than the more traditional yarn-under single crochet technique that a lot of amigurumi makers use. Mary also works her dinos using the yarn-over single crochet, but I've read that if you use the yarn-under single crochet, your finished item will be slightly shorter than if you used the yarn-over single crochet.

The pattern also specifies to use 6mm safety eyes, but I didn't have any safety eyes on hand, so I used two 10mm black buttons from this kit that I found on Amazon last year. It has black buttons in a bunch of different sizes, so they are useful for lots of various projects. So far I have used these buttons for eyes on a few recent amigurumis: my Zoey Zebra and also my Halloween Melly Teddy Ragdolls Gabby Ghost and Bobby Bat.

Just because he is soooo adorable, here's another picture of Neo posing on the coffee table with my Round Basket for Square Coasters. 😍

Neo turned out so cute that I decided he needed a friend, so I used a small scrap of Red Heart Super Saver in the Zebra colorway to make his friend Scoop. Scoop looks like newsprint from a newspaper, so that's how she got her name.