Showing posts with label in-the-round. Show all posts

Sunday, August 31, 2025

Ric-Rac Panthers Fan Messy-Bun Earflap Beanie

The football team at our hometown high school, the Perry Panthers, has school colors of maroon and gold. They also have white away-game jerseys, and also alternate uniforms that are primarily black. I'm trying to utilize all of those colors in this hat.


Previous times when I've made this Messy-Bun Earflap Beanie (or the regular hat style), it has been using a combination of three colors. This time I'm attempting to make it using four colors. I sketched out several different stripe arrangements before settling on this configuration. I think it works pretty well at incorporating all four colors while still keeping the maroon and gold as the dominant colors.

Let's go, Panthers!!! 2023 GHSA 4A Football champions!


Monday, May 29, 2023

Zoey Zebra Melly Teddy Ragdoll

I only made it through the first two parts of the free Zoey Zebra crochet-along before life got in the way and I regrettably had to set the project aside for a few months. By the time I was able to pick it up again, the free links were gone, so I decided to endeavor to finish the project by making the remaining pieces based on the designer Melanie Grobler's photos.


It was easy enough to approximate the legs by looking at the photos, but when it came to the ears, I decided to google around to find something similar that someone else had done and shared the steps. Why reinvent the wheel if I didn't have to, right? I used the ears from Jess Huff's Heidi the Horse free amigurumi pattern, which is also available at this link.


For the rose, I used the free 3D Rose pattern by Lisa Auch, which is also available at this link.

The eyes are 12mm black buttons from this set on Amazon.

Here is a link to my Ravelry project page.


Sunday, April 16, 2023

Meet Pierre

A while back, I bought a Woobles kit for Pierre Penguin at my local little yarn shop, and today I finally made him. 😊


Isn't he adorable? Here's a link to my Ravelry project page, which has info about the yarn colors, etc. The kit comes with everything you need to crochet your own little Pierre, and if your local LYS doesn't carry the Woobles kits you can also buy them online, but you can also buy the Woobles Easy Peasy Yarn in 13 different, bright, amigurumi-ready colors on Amazon.

Pierre kind of reminds me of the old Weebles toys. Am I the only person who remembers the Weebles?? 😆


Saturday, January 7, 2023

Iced Gingerbread Russian brioche messy bun hat

I have made this hat pattern a couple times before (here and here) and really enjoy it. It isn't exactly standard brioche; the technique is easier than brioche but still results in a beautiful, squishy, reversible, two-color project, so I love it.


The color scheme I've chosen here reminds me of iced gingerbread, so that's what I'm calling this hat. 😊


The biggest difference this time is that I stopped decreasing after the 48-stitch section to leave the top of the crown open as a messy bun/ponytail style hat. I used a 5mm crochet hook to cast off the knitted stitches into a round of 48 SC, and then worked one more round of SC with a few decreases to get the final stitch count down to 40 stitches.


The language of the video is Russian, but it's easy to follow along with the designer, Katerina Mushyn, as she knits in the video, so even if you don't speak Russian, don't be afraid to try this pattern. She also provides written instructions in both Russian and English in the video and on her website.


Video tutorial: https://youtu.be/iPabTSvzu04
Written pattern: http://prjaga.com/vyazanie-dlya-zhenshchin/shapka-beret/komplekt-bordo-shapka-i-snud-spicami

It's also helpful to use a row counter that has main/subcounter functionality with this project. I used this free browser-based Row Counter App.


Sunday, October 9, 2022

Simple Sachet Aromatherapy Set

An easy set to crochet with cotton yarn for bedside aromatherapy. I often have nasal congestion when I first lie down at bedtime, which can make it difficult to breathe, and thus to relax and fall asleep. I've found that using eucalyptus or peppermint essential oils can help make it easier for me to breathe, so I came up with the idea to crochet this aromatherapy sachet and stand set to place on my bedside table. (Actually, I use a CPAP machine at night, which I keep in a drawer of my nightstand, so I place this sachet a few inches away from the air intake of my machine, so the fragrance can reach it easily, and it works well.) You can somewhat control how strong the scent is by placing the sachet closer or farther away from you.


I will do my best to describe the process I used to create this, but please keep in mind that it's entirely possible that my descriptions and instructions might not make sense to you. I'm including photos of the finished items not only to show you what the finished product looks like, but also to help you visualize the steps you'll be doing along the way if you want to try to re-create my design. If my instructions don't make sense to you, please feel free to use my idea as a jumping-off point for your own creation that you make in whatever way that makes the best sense to you. Using just the sachet round by itself without the stand works just fine, too.


Materials: Cotton yarn, worsted weight (I used Lily Sugar n Cream in white), 5mm crochet hook, scissors, yarn needle 

For aromatherapy disc (worked in rounds, make 2):

Setup: Ch 4. Sl in 1st ch to join in a circle.

Round 1: DC 12 in circle. Join with sl in top of 1st st. (12 DC)

Round 2: 2 DC in each st. Join with a sl in top of 1st st. (24 DC)

Finish off and weave in ends but leave a long tail on one of the discs for sewing the two discs together.

Hold the two discs together with wrong sides facing and use a whip stitch or running stitch to sew the two discs together using the long tail. Finish off and weave in tail.

For base (worked flat, make 2):

Setup: FSC 12. Ch 1; turn.

Row 1: SC in each st across. Ch 1; turn. (12 SC)

Rows 2-5: Repeat row 1. (12 SC)

Finish by SCing evenly around all 4 sides, placing 2 or 3 SCs in each corner. Join with a sl to 1st SC. (Mine has about 40 SC all the way around.)

Finish off and weave in ends but leave a long tail on one of the bases for sewing the two bases together.

Before sewing the two base pieces together, work "stand" on the right side of one base.

For stand:

We are going to use a surface crochet technique to build a "stand" on the top of one of the base pieces; the stand will be where you can place the aromatherapy disc during use.

Stand foundation row: Place a slipknot on hook. Working into the spaces between stitches on the base piece, and staying about 3 stitches in from the edges, work surface SCs in the shape of the outline of a rectangle, placing 2 SCs in each corner. My sample ended up with 25 surface SCs in this foundation row. Join with a sl in the 1st SC. Now we will continue to SC rows on top of the foundation row in joined rounds to build the "sides" of the stand.

Rows 2-4: Ch 1. SC in the top of each SC from the previous row. Join with a sl in 1st SC. (About 25 SC in each round, depending on how many SCs you have in your foundation row.) Finish off and weave in the ends from the stand.

Now we will sew the two base pieces together. Hold the two bases together with wrong sides facing and use a whip stitch or running stitch to sew the two bases together using the long tail. Finish off and weave in tail.


Friday, October 7, 2022

Wild-n-crazy Catnip Balls

This super-quick and easy project makes a fairly large cat toy with a diameter of about 3.5 inches. 


This is a great way to use up small yarn scraps. Grab all the wild colors you have on hand and let your creativity flow! Your kitties will thank you. My samples used about 25 yards each. 


Toy is not washable due to the embedded catnip sachet. Store catnip balls in an airtight plastic bag when not in use to help prolong the catnip scent. Gently squeeze toy periodically to help release fresh scent from the catnip. 


Knit 44 rows on a 22-needle circular knitting machine, such as the Addi Pro. 

Cinch each end and fold as to make a double layer beanie. Tie ends together at top of "hat" to secure. 


Make a sachet with a heaping teaspoon of dried catnip knotted inside the toe of a knee-high nylon stocking. Encase the catnip sachet inside a bunch of fiberfill and stuff it into the open end of the knitted ball. 


Pick up stitches around the open end of the knitted ball and pull to cinch the end closed. Knot to secure, then hide any loose yarn ends in center of ball. Now it's playtime for the kittehz! My grandkitties Marshmallow, Sushi, and Princess are gonna love these. Here's a short video of Princess playing with her new ball. 😍


Monday, July 4, 2022

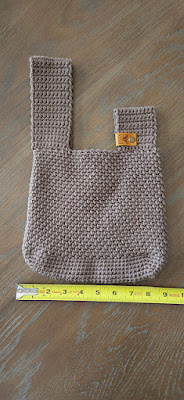
Mosu Japanese Knot Bag

This was my covid isolation project. It is the Mosu Bag by Sweet Softies. They offer a free version of the pattern on their website. I made mine with the Taupe colorway of Big Twist Value yarn and a 5mm crochet hook, and I finished it with a vegan leather Chicago tag by Angie + Britt that says "Bee kind."


Actually, I worked most of the bag all in the first two days, because after that I felt way too sick to have the energy for doing anything at all during the next 10 days or so. Some time after that I started feeling better enough to finish crocheting the straps.

The pattern is very easy and quick to make and would lend itself to lots of creative interpretation. It makes a nice size handbag. 


Wednesday, May 18, 2022

Taking the cake

I wanted a crocheted carrier for transporting cakes inside my cake-taker, so I whipped this up using some cotton yarn scraps. 

Didn't use a pattern, but the stitch I used for the base resembles the boho stitch used in the It's Shawl Good Cardigan paid pattern by Ashlea Konecny. The sides/handles are made with a traditional chain-loop/SC mesh.


Monday, March 28, 2022

Cozy candles

I used SlipStitchery's Halloween Witch Jar Covers pattern as initial inspiration for these quick and easy flameless (battery operated) candle cozies. I worked each cozy in a different stitch and different colorway for some variety in them as a grouping.


I still intend to make some of the actual Halloween Witch Jar Covers sometime, too! 😊


Thursday, January 27, 2022

Luna Triangle Cowl

I really like pullover triangle cowls. They look amazing, they are so easy to wear, and they keep your neck, shoulders, and chest nice and cozy. So when I saw the super cute Luna Triangle Cowl paid pattern by Deni Sharpe, I knew I wanted to make one for myself.

I deviated from the pattern in a few ways. First, the pattern is written for bulky (size 5) yarn using an 8mm hook, but I made mine in aran weight (since that's what I had in my stash) with a 6.5mm hook. I also opted to hand knit the ribbed top of the cowl instead of working it in crochet.


The knitted part I did in a lofty and reversible fisherman's rib worked in the round over 80 stitches. I followed the tutorial for this technique at this link. Then I picked up the stitches for the first row of crochet to begin the triangle portion of the cowl. Since I was starting with a different number of stitches for the bottom part of the cowl than was listed in the pattern, I had to adjust the stitch counts for the triangle part of the work.


Monday, April 19, 2021

Soap Gripper free pattern

Back in August 2015 I was wanting to make a simple Soap Gripper to keep the soap from slipping out of my hand while bathing. For my first attempt I used a 6mm hook and some white Lily Sugar & Cream cotton yarn and came up with this:


This little sack is so well fitted to the bar of soap it contains, however, that it's actually difficult to generate suds with it while bathing. From this I have learned that some positive ease is a good thing in a soap holder.
 

The close fit does make it very easy to get a secure grip on the bar of soap, though. And if you're giving away a bar of soap (perhaps homemade?) as a gift, then this little holder is one way you can choose to present it.
 

I posted about this project on Ravelry and closed by saying that if anyone reading about it was interested in replicating the project, I would post my construction notes "below." BUT time went by, and, wouldn't you know it, before long I forgot all about posting my construction notes. And then I lost the little white Soap Gripper itself, so my ability to count its stitches and describe how it was made was also lost.
 
So today I tried to remedy that oversight by posting the following:

Well, I obviously forgot to add my notes here for how I made the white Soap Gripper shown in the photos. Sorry about that! I can tell from the photos that it was mostly worked in SC, and it looks like I started with a few chains at the closed end (to give it a more oval shape rather than working all the starting row of stitches into the center of a circle), then I ended with what appears to be a row or two of DCs alternating front-post and back-post for a ribbing effect at the open end. I can't tell for sure how many stitches around this was ... maybe 24. So if you want make one that closely approximates the white one in the top photos, I'd suggest you try these steps.

However, as I said before, it didn't take long for my husband and me to conclude that we prefer a tiny bit more positive ease in our Soap Grippers (to make lathering easier), and my husband also prefers a more open mesh (rather than the tight, closed fabric that the SC stitch gives).

So I've subsequently been making Soap Grippers for us as follows:
 

Using 100% cotton yarn, worsted weight (4) and a 5mm or 5.5mm hook. (The variegated blue yarn shown in my sample photos is Lily Sugar n'Cream Ombres in the Faded Denim colorway.)

Setup/round 1: In a magic circle, ch 1 then work the following stitches into the center of the circle (or chain 2 then work the following stitches into the second chain from the hook): 1 SC, 1 HDC, 6 DC. (8 stitches)

We will work subsequent rounds in a continuous spiral, without joining at the end of rounds, for a seamless appearance until the ribbing at the cuff. Use a stitch marker to keep track of the beginning of the round.

Round 2: 2 DC in each st. (16 DC)

Round 3: 2 DC in first st, 1 DC in next st. (2 DC in next st, 1 DC in the st after that.) Repeat from ( to ) around. (24 DC)

Rounds 4-9: DC in each st around. (24 DC)

To smooth out the edge: HDC in next stitch; SC in next st after that; SL in next st after that.

Now we will work some "ribbing" at the open end of the Soap Gripper. (These rounds are joined at the end.)

Round 10: Ch 2. FPDC in 1st st; BPDC in next st. (FPDC in next st; BPDC in next st after that.) Repeat from ( to ) around. Join with a sl to top of 1st st.

Round 11: Ch 2. FPDC in FPDC from previous row; BPDC in BPDC from previous row. Repeat around. Join with a sl to top of 1st st.

Finish off; weave in ends. Add a bar of soap and enjoy your new Soap Gripper.
 

For a slightly different looking mesh effect, instead of working stitches into the tops of stitches from the previous round, as directed above, you can opt to work stitches in between the stitches from the previous round.

These Soap Grippers are super quick and easy to make and are very useful to keep the soap from slipping out of your hand while bathing. After using, place Soap Gripper (with the soap still inside) on a soap drying rack and allow to dry. When your bar of soap is nearly depleted, add a new bar of soap and continue using. The Soap Gripper helps you to get every last bit of use out of your bars/slivers of soap, which is frugal and saves you money!


Friday, January 22, 2021

Puff Hat Addi Express King Size

It took me a week to complete this project because I never had much time on any given day to work on it. If you had a couple of hours available to focus on the project, it would only take one day to finish this.


Designer Claudia Bostic shared her free pattern to make these Puff Hats in the files of the Addi Circular Knitting Machines group on Facebook. This design is a good alternative for making beanies to fit larger size heads.

Since this was my first attempt at making the pattern, it didn't turn out 100% perfectly, but it's not bad for a first try. I attempted to use the kitchener stitch to graft the ends of the large (bottom) tube, based on instructions from Yay for Yarn's tutorial on YouTube. (Grafting the ends of the large tube is an optional technique; you can join the ends of that tube using any method you prefer.)

Saturday, December 19, 2020

Circle Hot Pad pattern - totally giftable

I consider myself a tight crocheter, but I did have to go down two hook sizes to match the designer's gauge on this Circle Hot Pad by Esther Thompson. As she said, gauge isn't very important for this potholder/trivet, but you do want to have a nice firm fabric to protect surfaces or your hands from the heat. This was very quick to make and is so cute and totally giftable. The Hobby Lobby Crafter's Secret Cotton in the Desert Gold colorway looks modern and chic. There is a free version of this pattern on the designer's website.


I added a hanging loop by chaining 10 at the end of the last round, slip stitching the chain to the trivet next to where I started chaining, then turning and working 20 SC's back over the chain. A 1-inch wooden or metal ring sewn to the trivet would also look nice as a hanging loop. 


There was also just enough of the main color (Desert Gold) left to make a coordinating 4-inch-diameter coaster in 6 rounds. I made it double-layered like the trivet, but for the coaster I slip stitched it together with the ivory yarn for a bit of contrast on the colorful side. 

The multicolored balls of this Crafter's Secret cotton are 57 grams, whereas the solid color balls are 71 grams. So, using the solid color as the contrast color for this project, you have enough of the solid color to make two trivets (if you don't use any to make a coaster, the way I did).

I gifted the colorful trivet set to my niece Renee, and I made another set to give to my sister Juanita in the Hobby Lobby Crafter's Secret Cotton in the more neutral-looking colorway called The City.


Saturday, September 12, 2020

Sparkle Pumpkin

The Taylor Lynn YouTube tutorial at this link suggests 45 rows for pumpkins made on the Sentro 40, but I made this one 52 rows tall because that was how many rows it took to use up the small hank of this yarn I had on hand. I mean, after all, real pumpkins come in all shapes and sizes, so why not add a few extra rows to this one? 😉

I wasn't sure how this metallic yarn would work in my machine (wasn't sure if the metallic filament would get separated/tangled in the needles, etc.), but the yarn ran through perfectly smoothly. In fact, I'm used to having to constantly monitor the stitches on my machine to make sure none has dropped (because my machine ALWAYS drops at least one stitch during every project), but this yarn ran through without one single stitch dropping. Amazing!

Finished it off with half of a cinnamon stick for a stem. I think the green color will make a nice contrast to more traditional color pumpkins in my fall display.


Update 10/20/2022: Two years later and I'm still tinkering with this pumpkin. 😊 I decided to crochet a stem to replace the cinnamon stick, figuring that the crocheted stem would fit the scale of the pumpkin better and also be child-friendly. The stem is made with a small amount of Big Twist yarn in the Taupe colorway. And then I went on and added some curly vines, one in Taupe, one in Red Heart Super Saver in Saffron, and one in a double strand of Fixler Brothers Quick Knit Sport in 018 (yellow). How you like me NOW?!? 😂