Saturday, August 29, 2020

Doughnut Buddies

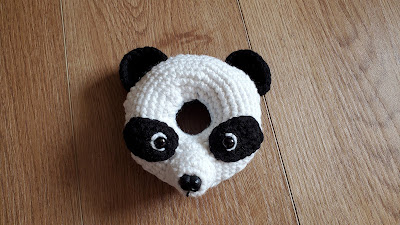
These Doughnut Buddies toys are so sweet (pun intended) and quick and easy to make. Each one can be made in an evening (about 4-6 hours each max, depending on the level of detail). Watch out -- these are fun and addictive. 😊


The only reason these project took me multiple days was because I had to wait for an order of safety eyes to arrive in the mail. 😄


Rachel Zain, the designer of all these adorable Doughnut Buddies, generally doesn't tell you in the patterns which colors to use at each step -- and that's fine because it allows for individual creativity. I made my Baby Yoda buddy on a burlap-brown base doughnut to represent The Child's robe, with green icing (of course) for his face and ears. (Rachel used the same green doughnut base on her alien as the icing, which is perfectly all right, too, of course.) 


And, of course, I simply HAD TO make a Mandalorian to go with my Baby Yoda. 😜


Tip: Leave a 14-inch-long tail before chaining to make the icing layer. This gives you the length you need to attach the center ring of icing to the doughnut.


I freehanded a couple of Doughnut Buddies last year as a gift for Lilliana, but it's fun to now have the official patterns to learn from and use as a jumping-off point for more creativity.



Wednesday, August 26, 2020

The knitting clock

Asking price for this is not disclosed, so it's probably not in my budget. 😆 But aside from price this grandfather clock is SO me. 

http://www.sirenelisewilhelmsen.com/#grandfatherknittingclock

Tuesday, August 18, 2020

Boho Summer Cotton Swingy Shawlivest

I like the look of the four-row repeated stitch pattern of the Boho Summer Cardigan (there is a free version of the pattern on YouTube), which got me wondering whether I could use that stitch pattern in the shape of a Swingy Shawlivest

I'm making this one with cotton yarn for wear during the warm summer months. This was an experiment in melding two different patterns, and you can see by the way the center increase veers off at an angle (rather than staying centered) that it didn't turn out totally perfect, but it's still completely wearable and comfortable and will be fine for me. If I wanted to do this again to give to someone else, I'd have to recalculate how to keep the center increase in the center. 😉

Decided to finish this one with crocheted rope-twist fringe along the bottom to complement the boho style. There are many tutorials on YouTube for how to make this type of fringe. I like this one and this one

For 6-inch fringe: SC into first st. ( * SC into next st and pull up a loop that's 16 inches long. Using your finger, twist the loop 40 times. Place end of loop back on hook and sl in same SC where you started the long loop. SC in next st. Pull the twisted loop open and then drop it to allow the rope twist to settle evenly along its length. ** ) Repeat from * to  ** across hem, ending with a SC in the last st. Finish off and weave in all ends. 

Some people twist the loop while it's on their hook, and if it works for you to do it that way, great. But I find it easier for me to twist the loop on my finger. I'm always dropping the loop when I try to twist it while it's on my hook. So use whichever method works best for you. 

Since my loops are 16 inches long, that means each strand of fringe actually uses 32 inches of yarn, which is only 4 inches less than a yard. Keep that in mind if you want to make fringe this way; it requires a LOT of yardage. Generally more yardage than cut fringe would require. But the upside of the rope-twisted fringe is it can safely go into the washer and dryer. 

To make 3-inch fringe, work the same as above but only pull up an 8-inch loop and twist it 20 times. I suppose to get a 4.5-inch fringe you would pull up a 12-inch loop and twist it 30 times. (etc.)

Total yarn weight used: 928 grams, including fringe. 

Saturday, August 1, 2020

True Blue Swingy Shawlivest

I love the look of ombre/gradient yarns, so I wanted to try using one to make another Swingy Shawlivest, since I practically live in these vests all winter - they are so comfortable. 

Here's a link to my Ravelry project page. Vest total yarn weight: 1,000 grams. Estimated actual yardage totals the length of about 3.5 skeins, but I needed portions from another two skeins to match the stripes in the armhole section, so at least 6 skeins are needed to complete the project with this yarn.