I suppose it turned out OK considering that it was the first time I'd ever used knitting looms.
Monday, November 22, 2010
Loom-knitted hat for Caleb
I suppose it turned out OK considering that it was the first time I'd ever used knitting looms.
Tuesday, October 5, 2010
Craving crochet
"Really feel like sitting at home and learning to crochet."
I posted this as my status on Facebook on Oct. 5, 2010. Shortly thereafter I would grab some yarn, pick up a hook, turn on YouTube for lessons, and never look back as I started on a crafting journey with crochet that would bring me joy and fulfillment for years to come.
Tuesday, June 29, 2010
Knitting and crochet
Now that I've been able to get a little crafty again recently by hand-knotting lanyards, I find my appetite whetted to expand to other practical projects, such as knitting and crochet. I did some knitting years ago, but I never learned how to crochet properly. My daughter Mika is pretty much a self-taught crocheter, so maybe she will give me some guidance.
Anyway, I discovered a Freedomblogging blog today called "Fiber Lust Confessional," and there I found a link to a booklet of free patterns available as a PDF download from Berroco yarns. Hopefully, I can find the time to try some of these!
Monday, May 24, 2010
Lanyards
For a while now, I've been wanting to craft some hand-knotted/beaded lanyards on which to wear my credentials to work. There's a great site called BooJee Beads where I could buy some really cool handmade lanyards, but I think it would be a lot more satisfying (and a lot less expensive) to make them myself.
So I finally got my thoughts organized and found a great site - Free-Macrame-Patterns.com - with free macramé instructions and patterns, including detailed instructions for how to craft jewelry and related items out of small cords (like 1 mm hemp or embroidery floss), which is the size I had in mind for making my lanyards.
I first wanted to make a lanyard with a spiral pattern. This page at Free-Macrame-Patterns has simple, detailed instructions for how to create the spiral effect. I wasn't able to find embroidery floss at Walmart to begin my project, so I settled for 1 mm hemp, which is probably a lot easier to work with because it's less slippery than the floss, so it holds the knots much better.
Step 1: Mount two cords to a ring or holding cord. This will give you four strands to work with. Using the two outside cords as your working cords, tie the first half of a square knot (i.e., a half knot).
Step 2: Repeat the half knot over and over. Make sure you tie each of the knots exactly the same way. The cords will twist to form an attractive spiral chain.
Thursday, October 1, 2009
Door hanger/organizer craft project
DOOR HANGER/ORGANIZER
Craft time: Make a handy door organizerDisney FamilyFun magazine
Hang this organizer on your front door and never lose your keys, sunglasses, or other essentials again. Sticky notes help remind family members of more ephemeral matters.
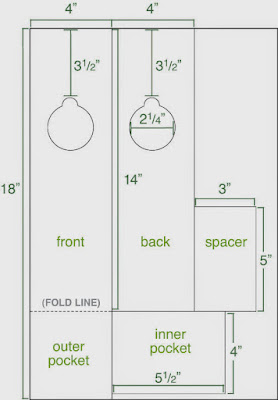
From a 12- by 18-inch sheet of craft foam, cut out the pieces as shown in the diagram. Line up the tops of the front and back panels and stick them together with double-sided tape. Stack the inner pocket on top so that it aligns with the bottom edge of the back panel, as shown. Align a strip of duct tape with the top edge of the pocket and wrap the tape around the stack.
Fold the bottom section of the front panel over the inner pocket and secure the sides with duct tape. Roll up the spacer piece and tape it closed, then tape it near the bottom of the back of the organizer. (This will help the organizer hang flat.)
Punch two holes in the outer pocket and link a short length of ball chain through them. Add a small carabiner to the chain. Use double-sided tape to attach a pad of sticky notes above the doorknob hole.


