Showing posts with label family. Show all posts

Sunday, April 6, 2025

Memory pillow


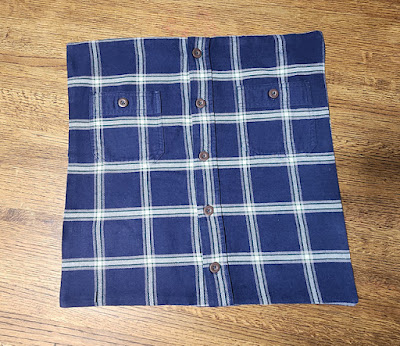
When my father-in-law died in 2019, one of his daughters, my sister-in-law Linda, saved one of his heavy plaid flannel Wrangler shirts with the idea of making it into a memory pillow, and I was honored when Linda asked me if I would be willing to make the pillow for her.

With a quick Google search for "memory pillow" or "how to make memory pillow," you will easily find many examples and tutorials for how to make one like this.

I was fairly sure how to go about it, but I watched this video tutorial by Lesley Chandler on YouTube to have the steps clear in my mind before starting.

To make one of these, you need to know the basic skills for working with a sewing machine. You're basically cutting two squares out of the shirt and then sewing them together to make a cover that will fit a square pillow form. If you're using a button-front shirt like I did, you don't even need to leave a gap in the sewing for turning the pieces right-side out, because the shirt's button front can serve that purpose. And, in the future, you can also open the buttons to remove the pillow form any time you want to launder the pillow cover, so it's a win-win.

Begin by laying the shirt out flat, with all the buttons buttoned, on a large tabletop. Iron the shirt to help the fabric lie evenly if it has any wrinkles. I measured the distance across the front between the sleeve seams to get an idea of what the largest size pillow cover that the shirt would make. It was about 18 inches between the sleeve seams across the front. 


I had an extra 18-inch square Ikea feather pillow form on hand that I wanted to use for this project. Knowing that the finished pillow cover will be less than the full dimensions of the cut fabric (because of the amount taken up by the seam allowances), I figured that my finished pillow cover would juuuust barely be large enough to work with that pillow form. But square pillow forms come in different sizes, so you should be able to find one that will fit your particular pillow cover.


You can make the cutting easier by first cutting a piece of newspaper into the shape/dimensions to act as the pattern. Since the distance between the sleeve seams was 18 inches, I decided to cut an 18-inch square to be my pattern. 

I laid the shirt out flat on a cutting mat on my work table and positioned the pattern on top. I adjusted the position of the pattern until I had it where I wanted it, using the placement of the shirt pockets as a guide to where the pattern should be placed. When I was happy with the placement, I pinned the pattern in place and used my fabric scissors to carefully cut around the pattern. You could use a rotary cutter and ruler if you're comfortable with those. I have those tools but didn't want to risk making a bad cut on this precious shirt.


After the pieces are cut, set aside the pattern and excess fabric. Turn the pillow cover squares so the right sides are facing each other and pin them together. Then sew them together using an appropriate seam allowance, carefully easing the machine through the bulkier areas across the button placket. I used about a 1/4-inch seam allowance for this.


After sewing all the way around, trim the excess fabric at the corners. Then unbutton the shirt's buttons and turn the pillow cover right-side out, using a blunt tool to help poke out the corners. Rebutton the buttons and press the sewn pillow cover again to smooth the seams.


The final step is to open the buttons again and place the pillow form inside. Button the buttons, and you now have a wonderful memory pillow of your loved one's shirt that you can hug whenever you want to.


In her video tutorial, Lesley Chandler shared that there are sellers on Etsy who make custom iron-on patches with a lovely little verse that can be added to a memory pillow project. She suggested this one and placed it on a bottom-front corner of her pillow. I think the patch would also work on a bottom corner of the back side of the pillow. 


I wasn't sure if Linda would want a patch like that on her pillow, however, so I sent her a link to it so she could see what it was and read about it, and then decide if she wanted it. She could always opt to add a patch to her pillow cover later, because the only equipment needed to add it is an iron.

After completing the memory pillow, I looked at the fabric scraps left over and decided there was plenty of fabric left to make a small memento for each of my father-in-law's four children, including Linda, my husband, and their other two sisters. I figured a keychain wristlet would be lovely and useful, and I already had the clasp hardware on hand.

I like this tutorial by Devi Therkildsen on YouTube for making "seamless" fabric wristlets that work with the type of clasp hardware I have on hand. Each wristlet requires a piece of fabric that's 12 inches long by 4 inches wide, and also a piece of lightweight interfacing of the same size if your fabric is lightweight. (I didn't use interfacing on these flannel wristlets because the fabric itself was already heavy enough to be durable.) You can see the four finished wristlets next to the finished memory pillow in the lead photo of this post.

Wednesday, November 20, 2024

Beaded Fidget Hedgehog

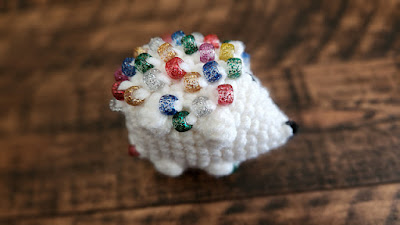
This is a great pattern for using up scrap yarn from your stash. Each hedgehog requires only a small amount of yarn (plus a pair of 8 mm safety eyes, about 68 pony beads, and the other supplies). 


For my first two hedgehogs, I used glitter pony beads that I've had in my crafting stash for at least 27 years. I originally purchased the beads to adorn some Pocahontas costumes for Halloween/dress-up playtime that I sewed for my daughters back in the 1990s. 

My daughters on Halloween in the 1990s wearing the beaded costumes.

Now, all these years later, I can give them each an adorable hedgehog made with the same beads along with a printed photo of them wearing the Pocahontas costumes when they were little. That's a nifty full-circle moment in my book! 😁

So tiny and cute!

Little hedgehog feet.

Little hedgehog bum.

The pattern also has a link to an Etsy listing where you can opt to purchase a printable "carrier" for gifting your hedgehogs, which gives them a cute finishing touch.

Wednesday, July 3, 2019

Quick baby girl gift idea: Angel Popover Dress free pattern

Gosh, I know I should post here more often, I really do, and I apologize for being so random and infrequent about posting. At least I do a better job at keeping my Ravelry project notebook up to date. Sigh!

We got a surprise phone call on Saturday afternoon from great-granddaughter Lilliana’s dad saying he has a couple of vacation days coming up soon and he wanted to bring his family down for a quick visit. Activating excited great-grandma mode in 3 … 2 … 1!!!


I needed a quick pattern to make Lilliana (now 16 months old) a sweet little dress to celebrate getting to meet her in person for the first time, and the Angel Popover Dress (free pattern) filled that need quite nicely. This size 2T version worked up in just a few hours of work over two evenings.


I threaded a 3/8-inch pink satin ribbon between the stitches of the first row and tied a bow in the center front, added a pink tank top and miniskirt from the store as a liner beneath the lacy white crochet dress, and voila!


Saturday, December 25, 2010

Little gifts

Jill got crocheted arm warmers and a little matching hat for her Barbie doll for Christmas. Here is a rather overexposed photo of the items before we sent them to Jill.


I made these by creating rectangles in rows of basic single crochet, with the ribbing designed to run lengthwise down Jill's arms. Once the rectangles were wide enough to wrap around her arms, I brought the long edges together and seamed them, leaving small openings for her thumbs a couple of inches from the hand end of each. Then I finished them by adding some pink pony beads for pizzazz.

Thursday, October 1, 2009

Door hanger/organizer craft project

I love these craft project ideas from Disney FamilyFun magazine that I find on the wire service at work! Here's another one worth sharing because it's an item that is not only easy to make, but it just might come in handy – and not only for families with children.

This door hanger is made out of a simple peice of craft foam. (Disney FamilyFun/MCT)

DOOR HANGER/ORGANIZER

Craft time: Make a handy door organizer

Disney FamilyFun magazine

Hang this organizer on your front door and never lose your keys, sunglasses, or other essentials again. Sticky notes help remind family members of more ephemeral matters.

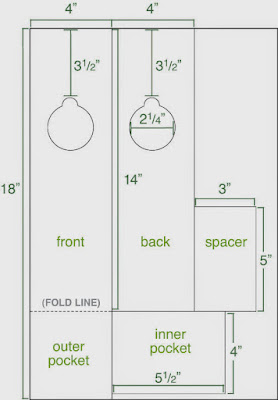
From a 12- by 18-inch sheet of craft foam, cut out the pieces as shown in the diagram. Line up the tops of the front and back panels and stick them together with double-sided tape. Stack the inner pocket on top so that it aligns with the bottom edge of the back panel, as shown. Align a strip of duct tape with the top edge of the pocket and wrap the tape around the stack.

Fold the bottom section of the front panel over the inner pocket and secure the sides with duct tape. Roll up the spacer piece and tape it closed, then tape it near the bottom of the back of the organizer. (This will help the organizer hang flat.)

Punch two holes in the outer pocket and link a short length of ball chain through them. Add a small carabiner to the chain. Use double-sided tape to attach a pad of sticky notes above the doorknob hole.

The diagram with measurements for the door hanger organizer. (MCT)

This door hanger is made out of a simple peice of craft foam. (Disney FamilyFun/MCT)


Friday, September 4, 2009

Super-easy kid's cape project idea made from an old T-shirt

A cape is super easy to make out of an old T-shirt, and kids will love it.

Here's a great idea for anyone who knows a wannabe superhero, princess, king, queen, prince (or other royalty), knight, red riding hood, robin hood, musketeer, villain, traveling minstrel ... the list goes on and on!!!

Not only is this craft super easy and requires NO sewing, but it has the added benefit of recycling (repurposing, really) old T-shirts that might otherwise end up being thrown away.

These instructions come from a story that will appear in Sunday's Lifestyles section in the Appeal-Democrat. The story originally ran in the St. Louis Post-Dispatch.

Project 1: Kid’s cape
Number of steps necessary to make: Two
Difficulty: Super-duper easy
Time: About five minutes
Tools: Sharp scissors
Basic instructions: 1) Lay the shirt flat, with the portion you want on the cape facing up. 2) Cut, starting at one far end of the bottom, up diagonally to the collar. Repeat on the other side, and then cut around the collar of the shirt.
Observations: This was easier than I would have thought possible.

Thursday, September 3, 2009

Ocean in a bottle craft

Here's a great craft to use some of those shells you or your kids pick up at the beach, courtesy of Disney FamilyFun magazine.

"This mini ocean made major waves with our kid testers, who loved to send the shells, sand, and water tossing and tumbling. The project starts with a clean plastic bottle (ours is an 18-ounce beverage container). Pour in a cup of sand and add a handful of small shells (we used 10). Mix a drop of green and a drop of blue food coloring into 6 cups of water, then use the tinted water to fill the bottle halfway. Add a pinch of silver glitter. Fill the rest of the bottle with mineral or baby oil, leaving as little air space at the top as possible. Run a line of hot glue around the inside of the bottle cap, then quickly screw on the cap to create a spill-proof seal."

Make your own beach using shells, sand and a plastic bottle.