Showing posts with label craft. Show all posts

Thursday, October 2, 2025

Skeleton Doll

This is a fun, easy, and quick-to-make pattern by Ashley of A Crafty Concept for an adorably spooky little crochet skeleton doll, a perfect addition for everyone's handmade Halloween decor!


The written pattern is free on her blog, and she also provides a video tutorial.

Work in progress - paint drying

He reminds me of a simplified version of Jack Skellington, so I have set him on my hearth beside his adoring Sally in pumpkin form. Maybe I can give him a tuxedo coat and bat bow tie later for a little more authenticity (Disney-thentic, ha).

Jack's Lament

There are few who'd deny, at what I do I am the best
For my talents are renowned far and wide
When it comes to surprises in the moonlit night
I excel without ever even trying
With the slightest little effort of my ghostlike charms
I have seen grown men give out a shriek
With the wave of my hand and a well placed moan
I have swept the very bravest off their feet

Yet year after year, it's the same routine
And I grow so weary of the sound of screams
And I, Jack, the Pumpkin King
Have grown so tired of the same old thing

Oh, somewhere deep inside of these bones
An emptiness began to grow
There's something out there, far from my home
A longing that I've never known

I'm the master of fright, and a demon of light
And I'll scare you right out of your pants
To a guy in Kentucky, I'm Mister Unlucky
And I'm known throughout England and France

And since I am dead, I can take off my head
To recite Shakespearean quotations
No animal nor man can scream like I can
With the fury of my recitations

But who here would ever understand
That the Pumpkin King with the skeleton grin
Would tire of his crown, if they only understood
He'd give it all up if he only could

Oh, there's an empty place in my bones
That calls out for something unknown
The fame and praise come year after year
Does nothing for these empty tears 


Sunday, August 24, 2025

UGA bead football earrings

When my niece Renee announced that she would be hosting a party to celebrate the kickoff of Georgia's new football season, I hit the aisles at Michael's and online at Etsy to source the beads and findings I needed to make these earrings - an essential accessory for every Lady Bulldog fan to wear on game day. GOOOOOO Dawgs! Sic 'em! Woof! Woof! Woof! Woof! Woof! 🏈

French hook style

This was a fun little jewelry-making project that gave me an excuse to break out my tools and findings to create a pair of earrings for myself (to wear dangling from my huggie hoops) and a french hook pair as a hostess gift for Renee. So quick and fun to make!


I also got to use my Beadsmith wire looper for the first time on this project. I bought the wire looper to be able to make myself a DIY chain knitting counter, based on the project that Marly Bird designed. The looper tool was so handy to use for this earring beading project as well.

Huggie hoop style


Monday, December 2, 2024

Memorial Christmas ornament idea

I saw this idea online for a Christmas tree ornament that's made using canning lids and rings, rustic twine, perhaps some small beads or other seasonally decorative pieces (like the holly and berries in the photos below), some foam board or cardboard for backing, a hot glue gun, and small pieces of fabric, such as from a loved one's shirt.


These look like they would be fairly quick and easy to make. And they would also make meaningful gifts if the fabric comes from someone who's close to the person you're making the ornament for.

Sunday, October 27, 2024

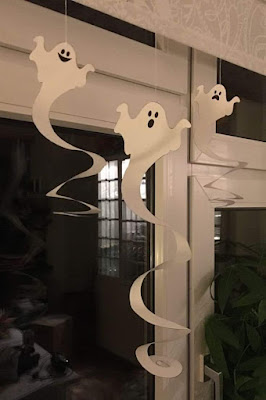
Quick and easy Halloween decor craft

With Halloween less than a week away, here's a super easy decoration idea that you can use to decorate your front porch or anywhere you need a bit of spooky ambience.


All you need to make these adorable little ghosts is a printer, some paper for the printer, and some scissors. You can even let your littles color a sheet of ghosts for some extra fun.


Click here to download the printable PDF. 


Saturday, December 30, 2023

Etsy vs. Ravelry

In creative circles, there is an ongoing debate about which online platform is best for selling patterns: Etsy or Ravelry. And more sites are regularly coming online to also try to grab a piece of the action, such as Ribblr, LoveCrafts, Ko-fi, and more. 

As a pattern designer, I have used both Etsy and Ravelry to sell patterns, so I can speak to this debate from the viewpoint of having used both. 

Etsy charges sellers a fee for their listings (and the listings expire and have to be renewed every X number of days, which means you pay the listing fee again) whether you sell anything or not. Ravelry doesn't charge listing fees, and your listings never expire; it only charges you a fee when you make a sale. Depending on your individual needs and goals, there are different advantages and disadvantages to each platform, so the answer of which platform is best is entirely dependent upon your particular situation. There is no one-size-fits-all best answer.


Thursday, December 28, 2017

Friday, October 6, 2017

How to sew quilted bowl cozy

My daughter, LadyU, shared this quick video tutorial showing how to sew a quilted bowl cozy. It's a relatively easy item to craft if you have a sewing machine. These cozies are so cool, and they also are nice for a cold bowl of ice cream. I've also seen them crocheted with cotton yarn. 🙂


Thursday, June 22, 2017

Fixing the old headphones

When the old foam earpiece covers disintegrate on your husband's old headphones, it's crochet to the rescue! 😁🎧


Saturday, December 25, 2010

Little gifts

Jill got crocheted arm warmers and a little matching hat for her Barbie doll for Christmas. Here is a rather overexposed photo of the items before we sent them to Jill.


I made these by creating rectangles in rows of basic single crochet, with the ribbing designed to run lengthwise down Jill's arms. Once the rectangles were wide enough to wrap around her arms, I brought the long edges together and seamed them, leaving small openings for her thumbs a couple of inches from the hand end of each. Then I finished them by adding some pink pony beads for pizzazz.

Tuesday, October 5, 2010

Craving crochet

"Really feel like sitting at home and learning to crochet."

I posted this as my status on Facebook on Oct. 5, 2010. Shortly thereafter I would grab some yarn, pick up a hook, turn on YouTube for lessons, and never look back as I started on a crafting journey with crochet that would bring me joy and fulfillment for years to come.


Tuesday, June 29, 2010

Knitting and crochet

Now that I've been able to get a little crafty again recently by hand-knotting lanyards, I find my appetite whetted to expand to other practical projects, such as knitting and crochet. I did some knitting years ago, but I never learned how to crochet properly. My daughter Mika is pretty much a self-taught crocheter, so maybe she will give me some guidance.

Anyway, I discovered a Freedomblogging blog today called "Fiber Lust Confessional," and there I found a link to a booklet of free patterns available as a PDF download from Berroco yarns. Hopefully, I can find the time to try some of these!


Monday, May 24, 2010

Lanyards

For a while now, I've been wanting to craft some hand-knotted/beaded lanyards on which to wear my credentials to work. There's a great site called BooJee Beads where I could buy some really cool handmade lanyards, but I think it would be a lot more satisfying (and a lot less expensive) to make them myself.

So I finally got my thoughts organized and found a great site - Free-Macrame-Patterns.com - with free macramé instructions and patterns, including detailed instructions for how to craft jewelry and related items out of small cords (like 1 mm hemp or embroidery floss), which is the size I had in mind for making my lanyards.

I first wanted to make a lanyard with a spiral pattern. This page at Free-Macrame-Patterns has simple, detailed instructions for how to create the spiral effect. I wasn't able to find embroidery floss at Walmart to begin my project, so I settled for 1 mm hemp, which is probably a lot easier to work with because it's less slippery than the floss, so it holds the knots much better.

Step 1: Mount two cords to a ring or holding cord. This will give you four strands to work with. Using the two outside cords as your working cords, tie the first half of a square knot (i.e., a half knot).

Step 2: Repeat the half knot over and over. Make sure you tie each of the knots exactly the same way. The cords will twist to form an attractive spiral chain.


Here's a photo of my first work in progress. I started with blue and yellow strands.


And here's the finished lanyard:
 

Here's the second lanyard:


Thursday, October 1, 2009

Door hanger/organizer craft project

I love these craft project ideas from Disney FamilyFun magazine that I find on the wire service at work! Here's another one worth sharing because it's an item that is not only easy to make, but it just might come in handy – and not only for families with children.

This door hanger is made out of a simple peice of craft foam. (Disney FamilyFun/MCT)

DOOR HANGER/ORGANIZER

Craft time: Make a handy door organizer

Disney FamilyFun magazine

Hang this organizer on your front door and never lose your keys, sunglasses, or other essentials again. Sticky notes help remind family members of more ephemeral matters.

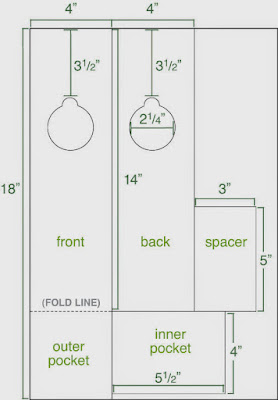
From a 12- by 18-inch sheet of craft foam, cut out the pieces as shown in the diagram. Line up the tops of the front and back panels and stick them together with double-sided tape. Stack the inner pocket on top so that it aligns with the bottom edge of the back panel, as shown. Align a strip of duct tape with the top edge of the pocket and wrap the tape around the stack.

Fold the bottom section of the front panel over the inner pocket and secure the sides with duct tape. Roll up the spacer piece and tape it closed, then tape it near the bottom of the back of the organizer. (This will help the organizer hang flat.)

Punch two holes in the outer pocket and link a short length of ball chain through them. Add a small carabiner to the chain. Use double-sided tape to attach a pad of sticky notes above the doorknob hole.

The diagram with measurements for the door hanger organizer. (MCT)

This door hanger is made out of a simple peice of craft foam. (Disney FamilyFun/MCT)


Friday, September 4, 2009

Super-easy kid's cape project idea made from an old T-shirt

A cape is super easy to make out of an old T-shirt, and kids will love it.

Here's a great idea for anyone who knows a wannabe superhero, princess, king, queen, prince (or other royalty), knight, red riding hood, robin hood, musketeer, villain, traveling minstrel ... the list goes on and on!!!

Not only is this craft super easy and requires NO sewing, but it has the added benefit of recycling (repurposing, really) old T-shirts that might otherwise end up being thrown away.

These instructions come from a story that will appear in Sunday's Lifestyles section in the Appeal-Democrat. The story originally ran in the St. Louis Post-Dispatch.

Project 1: Kid’s cape
Number of steps necessary to make: Two
Difficulty: Super-duper easy
Time: About five minutes
Tools: Sharp scissors
Basic instructions: 1) Lay the shirt flat, with the portion you want on the cape facing up. 2) Cut, starting at one far end of the bottom, up diagonally to the collar. Repeat on the other side, and then cut around the collar of the shirt.
Observations: This was easier than I would have thought possible.

Thursday, September 3, 2009

Ocean in a bottle craft

Here's a great craft to use some of those shells you or your kids pick up at the beach, courtesy of Disney FamilyFun magazine.

"This mini ocean made major waves with our kid testers, who loved to send the shells, sand, and water tossing and tumbling. The project starts with a clean plastic bottle (ours is an 18-ounce beverage container). Pour in a cup of sand and add a handful of small shells (we used 10). Mix a drop of green and a drop of blue food coloring into 6 cups of water, then use the tinted water to fill the bottle halfway. Add a pinch of silver glitter. Fill the rest of the bottle with mineral or baby oil, leaving as little air space at the top as possible. Run a line of hot glue around the inside of the bottle cap, then quickly screw on the cap to create a spill-proof seal."

Make your own beach using shells, sand and a plastic bottle.


Friday, January 30, 2009

Lavender wreath craft

Just in time for Valentine's Day, here's a craft that utilizes one of my favorite flowers: lavender!

This article comes from the Fort Worth Star-Telegraph newspaper.

This Valentine's Day, declare your love with this sweet idea for a lavender double-hearted wreath. (Clare Miers/Fort Worth Star-Telegram/MCT)

Lavender lends Valentine’s Day wreath a European feel


By Clare Miers
Fort Worth Star-Telegram

Valentine’s Day is a great winter-blues chaser. It’s not quite time to welcome spring, but it’s a colorful time to celebrate love and relationships of all kinds. Declare your love with this sweet idea for a double-hearted wreath.

THE INSPIRATION

Claire Heymann, owner of Hotel St. Germain in Dallas, told me once that in Europe, red and white for Valentine’s Day is not as popular as it is in the United States. She said that in Paris, we can find shades of lavender with a touch of black and other romantic combinations. Using one of Heymann’s favorite color schemes as an inspiration for a Valentine’s Day wreath project, I collected some lavender-y purple berry sprigs, fresh lavender and some natural grapevine forms to make something very special this year.

THE MATERIALS

Two heart-shaped wreaths from a craft store (I bought mine at Michaels for less than $5 each)

Twiggy-looking craft wire (Michaels, less than $3 for a large roll)

Purple and crystal-looking berry sprigs ($1.99 each from craft store)

Gold-tone heart-shaped ornament (craft store)

Bundle of dried lavender (available in most craft stores)

THE CONSTRUCTION

I arranged the two woody heart wreaths together in a layered pattern and bonded them with the woody-looking wire, twisting it on the back.

Then I inserted the ready-made purple and crystal berry sprigs onto the face of the grapevine hearts, keeping to the lower quadrants of the heart shapes, berries pointed upward.

I placed each lavender stem into areas with the berry picks to create a nice mix of artificial decor and natural botanicals. (The dried lavender makes the wreath smell wonderful.) I attached the heart-shaped ornament into the arrangement using craft wire.

To dress your wreath more, consider using more dried flowers or charms. I inserted a few tiny dried white roses and more lavender to cover where I installed the heart ornament. For charms, think of adding some old heart-shaped costume jewelry or look around for wooden hearts that are often hanging from garland sold at craft stores.

I added a loop of wire to the back so that the wreath would hang easily, and the project was complete.

Tuesday, September 9, 2008

Nifty bulletin board craft idea

Here's a cute craft idea I came across while browsing the features story wire at work – give new life to an old cookie sheet by recycling it into a magnetic bulletin board! Here's a photo of the finished product:


You need an old, non-aluminum cookie sheet, colorful contact paper or self-stick shelf lining, heavy-duty magnets and (if you want to have a pencil cup like in the picture) a clean and empty tin or frozen juice can.

Unroll the contact paper and lay it out flat on a table. Set the cookie sheet upright on the contact paper and use a pencil to trace around the base of the pan. Using scissors, cut the contact paper along the pencil line. Turn the cookie sheet upside down and align the edges of the contact paper to the base of the pan.

Starting at one corner, carefully peel away the contact paper's backing, adhering the contact paper to the base of the pan as you go. (This is the most difficult part, because you don't want to end up with air bubbles between the contact paper and the cookie sheet!) If you end up with an air bubble, carefully push it toward the nearest edge of the contact paper until the air is evacuated.

Add colorful magnets and some note paper to your magnetic message board and hang it by a nail from the hole in the cookie sheet. (If your cookie sheet doesn't come with a hole in one rim, you may have to punch one yourself or fashion another means for hanging it.)

If you want to add a pencil cup, set the can on another flat sheet of contact paper. Mark the height of the can on the contact paper. Starting from one edge of the contact paper, roll the can one complete revolution over the contact paper and mark the place. Add another inch to the length of contact paper you measured to ensure the piece will fit your can well after you cut it out. With a ruler and pencil, trace a rectangle from the points you marked on the contact paper. Cut the contact paper along the pencil lines. Align the edges of the contact paper to the can and carefully apply as you did to the cookie sheet. Glue a couple of heavy-duty magnets to one side of the can. When the glue has set, attach the pencil cup to your bulletin board and drop in a few pens and pencils.

Voila! Your new message board is ready for use.