Showing posts with label beads. Show all posts

Sunday, August 24, 2025

UGA bead football earrings

When my niece Renee announced that she would be hosting a party to celebrate the kickoff of Georgia's new football season, I hit the aisles at Michael's and online at Etsy to source the beads and findings I needed to make these earrings - an essential accessory for every Lady Bulldog fan to wear on game day. GOOOOOO Dawgs! Sic 'em! Woof! Woof! Woof! Woof! Woof! 🏈

French hook style

This was a fun little jewelry-making project that gave me an excuse to break out my tools and findings to create a pair of earrings for myself (to wear dangling from my huggie hoops) and a french hook pair as a hostess gift for Renee. So quick and fun to make!


I also got to use my Beadsmith wire looper for the first time on this project. I bought the wire looper to be able to make myself a DIY chain knitting counter, based on the project that Marly Bird designed. The looper tool was so handy to use for this earring beading project as well.

Huggie hoop style


Wednesday, November 20, 2024

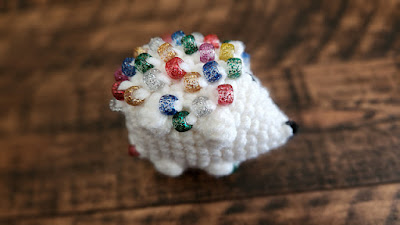
Beaded Fidget Hedgehog

This is a great pattern for using up scrap yarn from your stash. Each hedgehog requires only a small amount of yarn (plus a pair of 8 mm safety eyes, about 68 pony beads, and the other supplies). 


For my first two hedgehogs, I used glitter pony beads that I've had in my crafting stash for at least 27 years. I originally purchased the beads to adorn some Pocahontas costumes for Halloween/dress-up playtime that I sewed for my daughters back in the 1990s. 

My daughters on Halloween in the 1990s wearing the beaded costumes.

Now, all these years later, I can give them each an adorable hedgehog made with the same beads along with a printed photo of them wearing the Pocahontas costumes when they were little. That's a nifty full-circle moment in my book! 😁

So tiny and cute!

Little hedgehog feet.

Little hedgehog bum.

The pattern also has a link to an Etsy listing where you can opt to purchase a printable "carrier" for gifting your hedgehogs, which gives them a cute finishing touch.

Saturday, December 10, 2022

Rustic Tree Ornaments

We live on a lovely little cul-de-sac with six neighbors, and every year at Christmas we exchange small gifts. This year we are gifting pint jars of locally produced jam, but I wanted a little something extra to tie onto the jars, and this pattern for Rustic Tree Ornaments by Regina P Designs was the perfect finishing touch.


Each tree requires only a small amount of yarn, and I can complete the crochet portion of the work in a mere 20 minutes or so, making it possible to whip up several of these in a single evening.


Each one also uses a small amount of 24-gauge floral wire and about 7 or 8 beads.


I'm using 10mm beads made of olive wood harvested in the holy land to add a layer of deeper meaning to the ornaments. I found the beads on Amazon. The "certificate of authenticity" was included with the beads. I scanned that into a digital file and then printed it onto Avery stickers that are 2 inches by 3 inches, so I could add the stickers to the reverse side of the gift tags (which are printed on Avery business cards).


Monday, November 28, 2022

Country Cottage Mini Stockings

I needed a gift-card holder for Chip and Renee's Christmas present, and this cute mini stocking is just right for that. The Country Cottage Mini Stocking pattern by The Turtle Trunk is free on their blog. After doing its duty to deliver the gift card to Chip and Renee, the stocking can become an ornament on their Christmas tree for many years to come.


The stocking works up fast and uses just a tiny amount of yarn. You can make these in all sorts of color combinations. They are addicting!


Because these are so fast and easy to make, I decided to go ahead and make one for each of my grandnieces and grandnephews to use as Christmas money-holders. I've been having fun making lots of the little mini stockings as well as a bunch of Rustic Tree Ornaments by Regina P Designs to tie onto the gifts we're giving to our neighbors. And I even made a couple of machine-knitted mini wreath ornaments by following this tutorial by Yay for Yarn on YouTube. (My wreaths are 40 rows.)

For a fun and personalized finishing touch, I got some silvertone alphabet beads and added a name to each ornament.


Sunday, June 2, 2013

Dangle lotus earrings free pattern

I came across the chart for this simple but pretty crochet hoop earring quite by accident on Pinterest at http://pinterest.com/flordecactus/crochet-earrings/


However, I was unable to locate the pattern chart at what was listed as being the originating site (crochet-plaisir-over-blog.com).

As you can see in the photos, I made my first pair of earrings without the beads indicated in the chart.


I tend to find it easier to work from written instructions rather than charts, so I transcribed the chart below.

CROCHET DANGLE EARRINGS WITH BEADS

Supplies: 1 pair of 3cm diameter latchback hoop earrings; size 3 cotton thread; size C (2.75mm) hook; 10 beads of your choice (5 for each earring), optional. (If not using beads, see alternate instructions below.)

String 5 beads onto cotton thread. Leaving a long tail, make a slipknot in the thread and place slipknot on the hook.

Row 1: Working around the earring hoop, sc 38. Turn.

Row 2: Sl 7; ch 6; sl in 5th sc from ch. Ch 6; dc in 5th sc from ch. Ch 6; dc in 5th sc from ch. Ch 6; sl in 5th sc from ch. Ch 6; sl in 5th sc from ch. Turn.

Row 3: In first ch loop: (sc, hdc, 3 dc, place bead, dc, hdc, sc.) Repeat ( to ) in second ch loop. In third ch loop: sc, hdc, 2 dc, 2 tc, place bead, 2 tc, 2 dc, hdc, sc. In fourth ch loop: ((sc, hdc, dc, place bead, 3 dc, hdc, sc.)) Repeat (( to )) in fifth ch loop. Sl to join to foundation sc row. FO. Weave in ends. Repeat process for second earring.

CROCHET DANGLE EARRINGS WITHOUT BEADS

Supplies: 1 pair of 3cm diameter latchback hoop earrings; size 3 cotton thread; size C (2.75mm) hook.

Leaving a long tail, make a slipknot in the thread and place slipknot on the hook.

Row 1: Working around the earring hoop, sc 38. Turn.

Row 2: Sl 7; ch 6; sl in 5th sc from ch. Ch 6; dc in 5th sc from ch. Ch 6; dc in 5th sc from ch. Ch 6; sl in 5th sc from ch. Ch 6; sl in 5th sc from ch. Turn.

Row 3: In first ch loop: (sc, hdc, 4 dc, hdc, sc.) Repeat ( to ) in second ch loop. In third ch loop: sc, hdc, 2 dc, 4 tc, 2 dc, hdc, sc. Repeat ( to ) in fourth and fifth ch loops. Sl to join to foundation sc row. FO. Weave in ends. Repeat process for second earring.

Wednesday, May 1, 2013

Beaded chemo cap free pattern

This is the Seamless Beaded Cancer Cap by Amy Depew. I was looking for a chemo cap pattern that incorporated beads to give it a fancier look than just the yarn by itself, and Amy's pattern was the perfect solution.


Amy also includes detailed instructions (including a video tutorial) for how to place the beads and get them to stay on the outside of the hat, which was very helpful. When you're crocheting in the round, those darn beads tend to want to slip to the inside of your work -- and we definitely don't want that to happen.