Showing posts with label softie. Show all posts

Monday, July 28, 2025

A Chicken for Suzanne

My dear friend Suzanne is a self-proclaimed "chicken gal" and suburbanite-of-necessity who longs to return to her farmgirl days living in the country with a yard full of chickens.


What better way to celebrate her upcoming birthday than sending an Emotional Support Chicken for her to hug and hold while she dreams her sweet farmgirl dreams?


The Emotional Support Chicken by Annette Corsino is just a downright fun pattern to knit, and I think it looks best when executed in tweedy-ish yarn colorways that are reminiscent of the feathers of real chickens. When I saw the lovely marled colorways of KnitPal Cotton to the Core, I just knew they would produce some lovely chickens well worth adding to any metaphorical flock. For this hen, I'm using Caramel Brown as color A and Fresh Peach as color B.


This yarn is on the lighter side for being labeled as a worsted weight - definitely much lighter than the stuff that Red Heart labels as worsted weight. In my opinion, it's closer to being DK weight. I'm still using the needle size specified in the pattern, though, so we'll see how big this hen ends up being compared to the other ones I've knitted with Red Heart. 😅 


I hope Suzanne loves her new chicken, and if she gives it a name, I will update this post to let all y'all know what it is! 💜🐔💜


I'm pretty sure that Suzanne's chicken is the first one of these that I've managed to sew together according to the way the pattern designer intended. Yay!

Thursday, July 24, 2025

Mini Simple Stardew Valley Chicken

I discovered that this pattern makes an adorable chick-sized mini chicken if you use a few scraps of standard 4-weight yarn, a 5 mm hook, and 8 mm safety eyes. This is the Simple Stardew Valley Chicken free pattern, which can be found on Ravelry.


They are so quick and easy to make that you can whip up a whole tiny flock in just an evening. I made all three of these in just a few hours. 


Each chick measures about 3.5 inches long by about 2.5 inches tall (not including the comb). The kawaii safety eyes came from this kit on Amazon. You can view more info about the yarns I used for these on my Ravelry project page.


The pattern was originally designed to be made with chenille blanket yarn, which produces a much larger softie (example photo from the pattern below).


Wednesday, July 2, 2025

Tooth Fairy Pillow pocket lovey

This tooth fairy pillow is going to be a gift for my wonderful dental hygienist, Carra.


In recent years, I've developed awful sensitivity in my teeth from enamel damage incurred from grinding my teeth and/or clenching my jaw during sleep. I started wearing a mouth guard at night, but not until after the damage was already done.

Ever since my teeth were damaged, having dental cleanings done has been terribly painful, to the point where I even considered not going to the dentist at all anymore (yeah, of course, I know that skipping dental visits wouldn't have made my situation any better, obviously, but ugh). I even felt that I had to change dental practices because my previous dentist didn't seem to be sufficiently sympathetic to my pain and wasn't really working with me to follow a plan to manage it.

My new hygienist, Carra (and, really, the entire team at Dr. Shelton's), has been nothing short of AMAZING. Carra has been very sympathetic and gentle with me at every visit and always gives me and my teeth the most wonderful care.

I always try to profusely thank Carra each time I see her, to let her know how much I appreciate her wonderful "bedside manner," as it were, but in addition to saying thank you, I wanted to give her a small, tangible token to express my gratitude, and thus I went searching for a crochet tooth pattern that was both super adorable and also sort of representative of who she is in her career. To me, Carra is my personal tooth fairy angel! 👼

This free Tooth Fairy Pillow pattern by Heather Corinne Smith is just right in every way. (She also has a video tutorial you can follow.) The design makes a tooth softie/lovey of a nice size (mine is about 6 inches tall, not including the hanging loop, by 6 inches wide), and the kawaii embroidered facial features are just so cute. The pocket on the back (about 3.75 inches wide by 2.5 inches tall) is the perfect size for holding a Dutch Bros gift card and sticker to add an extra touch of sweetness to the gift. I finished mine by adding a bow made of a small scrap of hot pink ribbon (it was only about 8 inches long to start with, so it was barely long enough, but it worked!!) that I had in my stash and followed this quick tutorial on YouTube to tie it, then I carefully sewed it to the tooth using a needle and thread.

Back with pocket

This turned out so cute, and I think Carra is going to love it. So if you love your dental hygienist as much as I love mine, maybe you should make one of these for your hygienist, too!

Wednesday, November 20, 2024

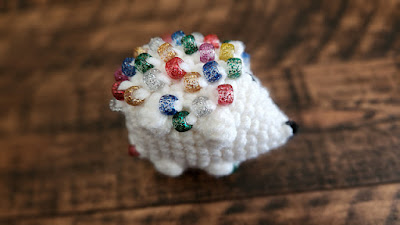
Beaded Fidget Hedgehog

This is a great pattern for using up scrap yarn from your stash. Each hedgehog requires only a small amount of yarn (plus a pair of 8 mm safety eyes, about 68 pony beads, and the other supplies). 


For my first two hedgehogs, I used glitter pony beads that I've had in my crafting stash for at least 27 years. I originally purchased the beads to adorn some Pocahontas costumes for Halloween/dress-up playtime that I sewed for my daughters back in the 1990s. 

My daughters on Halloween in the 1990s wearing the beaded costumes.

Now, all these years later, I can give them each an adorable hedgehog made with the same beads along with a printed photo of them wearing the Pocahontas costumes when they were little. That's a nifty full-circle moment in my book! 😁

So tiny and cute!

Little hedgehog feet.

Little hedgehog bum.

The pattern also has a link to an Etsy listing where you can opt to purchase a printable "carrier" for gifting your hedgehogs, which gives them a cute finishing touch.

Sunday, October 16, 2022

Join the free Halloween CAL

Melanie Grobler of M and M Crochet Designs is hosting a free Halloween Crochet Along (CAL) on her blog and Facebook group. This was a lovely and fun CAL to be a part of, where we were creating two of Melanie's Melly Teddy Ragdolls: Gabby Ghost and Bobby Bat. If you would like to be part of it, too, head on over to her sites and check out the patterns. If you start now, there is still time for you to finish one or both of the ragdolls by Halloween!


My dolls differ from Melanie's written pattern in a few ways: My Gabby Ghost has no nose or mouth. (I like her face with just the eyes, eyelashes, and cheeks.) My Bobby Bat is mostly purple but with black wings and some other different color choices. On both dolls I opted not to stuff the hands or feet. (Again, just a personal preference for the ragdoll aesthetic.) And my dolls both have 12mm button eyes instead of safety eyes. If you want more details about my yarn choices, check out my Ravelry project page.


I made these using a 4mm crochet hook, but my hands would have been more comfortable if I had used a 4.5mm hook. I do own a hook that size, but the set it's part of has been missing since we moved two years ago, and I'm just stubborn enough not to buy another one because I know the set will turn up again once I'm able to fully unpack my craft room boxes. So, in the meantime, I'm making do with a different set of hooks that used to be my traveling set. Le sigh!!😉


Gabby's pumpkin is crocheted from the CAL pattern, but I made the pumpkin accompanying Bobby on my 22-needle Addi Pro circular knitting machine. I crocheted the stem and vines according to the CAL pattern, which worked out fine.


Join the free Halloween 2022 Crochet-A-Long at the following links:

Introduction

Shortcut to Part 1

Shortcut to Part 2

Shortcut to Part 3

Shortcut to Part 4

Shortcut to Part 5

Shortcut to Part 6


Thursday, December 20, 2018

Orbit the Magical, Mystical Dragon CAL free pattern

I haven't attempted much amigurumi, but when I saw the free crochet-a-long for Orbit the Dragon  that started in June, I knew I had to try to make him.


I had to do some sleuthing to figure out the color name of the variegated yarn I’m using for the main body of my dragon because the skein was gifted to me without a label on it. I figured it was probably something by Red Heart, so I clicked around on the Red Heart site until I found a match. This one works well as the main body color for this pattern because the color changes are very short - about every 2 inches - which contributes to the mystical body “scales” appearance.

I kept up with the CAL until the end when it was time to assemble the pieces. That was the part that scared me so I procrastinated doing the assembly for months. But I wanted to give Orbit to my daughter for Christmas, so when Dec. 20th rolled around I knew I couldn’t put it off any longer. Aughhh! But I took my time and followed the instructions carefully and Orbit turned out just as cute as expected. Yay!

Week 1:

Week 2: 

Week 3:

Starting assembly:


Orbit assembled!


Color breakdown:

Head, body, nostrils: Red Heart in Monet Print
Eyes: Red Heart in Soft White and Black
Cheeks: Red Heart With Love in Bubble Gum
Horns: Red Heart in Soft White and Monet Print
Belly: Red Heart in Perfect Pink
Fins: Red Heart in Honeydew
Paws: Red Heart in Perfect Pik
Legs: Red Heart in Monet Print
Tail: Red Heart in Monet Print
Ears: Red Heart in Monet