Showing posts with label holiday. Show all posts

Monday, August 11, 2025

Halloween Snow Heart Beanie

Oooh, it's almost my favorite time of the year again!


Designer Leesa Nixon recently shared a photo on her socials of the Beetlejuice/Halloween colors version of her Snow Heart Beanie (paid pattern), and I just knew that I needed to make one for myself in a messy-bun/ponytail style, because Halloween is probably my favorite holiday, too!!


These Sour Apple poms by Dannisdesignscrafts on Etsy add the perfect finishing touch! This is a really fun and quick pattern to crochet, and it doesn't require very much of each color of yarn. Love it!

Monday, December 2, 2024

Memorial Christmas ornament idea

I saw this idea online for a Christmas tree ornament that's made using canning lids and rings, rustic twine, perhaps some small beads or other seasonally decorative pieces (like the holly and berries in the photos below), some foam board or cardboard for backing, a hot glue gun, and small pieces of fabric, such as from a loved one's shirt.


These look like they would be fairly quick and easy to make. And they would also make meaningful gifts if the fabric comes from someone who's close to the person you're making the ornament for.

Saturday, December 10, 2022

Rustic Tree Ornaments

We live on a lovely little cul-de-sac with six neighbors, and every year at Christmas we exchange small gifts. This year we are gifting pint jars of locally produced jam, but I wanted a little something extra to tie onto the jars, and this pattern for Rustic Tree Ornaments by Regina P Designs was the perfect finishing touch.


Each tree requires only a small amount of yarn, and I can complete the crochet portion of the work in a mere 20 minutes or so, making it possible to whip up several of these in a single evening.


Each one also uses a small amount of 24-gauge floral wire and about 7 or 8 beads.


I'm using 10mm beads made of olive wood harvested in the holy land to add a layer of deeper meaning to the ornaments. I found the beads on Amazon. The "certificate of authenticity" was included with the beads. I scanned that into a digital file and then printed it onto Avery stickers that are 2 inches by 3 inches, so I could add the stickers to the reverse side of the gift tags (which are printed on Avery business cards).


Monday, November 28, 2022

Country Cottage Mini Stockings

I needed a gift-card holder for Chip and Renee's Christmas present, and this cute mini stocking is just right for that. The Country Cottage Mini Stocking pattern by The Turtle Trunk is free on their blog. After doing its duty to deliver the gift card to Chip and Renee, the stocking can become an ornament on their Christmas tree for many years to come.


The stocking works up fast and uses just a tiny amount of yarn. You can make these in all sorts of color combinations. They are addicting!


Because these are so fast and easy to make, I decided to go ahead and make one for each of my grandnieces and grandnephews to use as Christmas money-holders. I've been having fun making lots of the little mini stockings as well as a bunch of Rustic Tree Ornaments by Regina P Designs to tie onto the gifts we're giving to our neighbors. And I even made a couple of machine-knitted mini wreath ornaments by following this tutorial by Yay for Yarn on YouTube. (My wreaths are 40 rows.)

For a fun and personalized finishing touch, I got some silvertone alphabet beads and added a name to each ornament.


Sunday, October 16, 2022

Join the free Halloween CAL

Melanie Grobler of M and M Crochet Designs is hosting a free Halloween Crochet Along (CAL) on her blog and Facebook group. This was a lovely and fun CAL to be a part of, where we were creating two of Melanie's Melly Teddy Ragdolls: Gabby Ghost and Bobby Bat. If you would like to be part of it, too, head on over to her sites and check out the patterns. If you start now, there is still time for you to finish one or both of the ragdolls by Halloween!


My dolls differ from Melanie's written pattern in a few ways: My Gabby Ghost has no nose or mouth. (I like her face with just the eyes, eyelashes, and cheeks.) My Bobby Bat is mostly purple but with black wings and some other different color choices. On both dolls I opted not to stuff the hands or feet. (Again, just a personal preference for the ragdoll aesthetic.) And my dolls both have 12mm button eyes instead of safety eyes. If you want more details about my yarn choices, check out my Ravelry project page.


I made these using a 4mm crochet hook, but my hands would have been more comfortable if I had used a 4.5mm hook. I do own a hook that size, but the set it's part of has been missing since we moved two years ago, and I'm just stubborn enough not to buy another one because I know the set will turn up again once I'm able to fully unpack my craft room boxes. So, in the meantime, I'm making do with a different set of hooks that used to be my traveling set. Le sigh!!😉


Gabby's pumpkin is crocheted from the CAL pattern, but I made the pumpkin accompanying Bobby on my 22-needle Addi Pro circular knitting machine. I crocheted the stem and vines according to the CAL pattern, which worked out fine.


Join the free Halloween 2022 Crochet-A-Long at the following links:

Introduction

Shortcut to Part 1

Shortcut to Part 2

Shortcut to Part 3

Shortcut to Part 4

Shortcut to Part 5

Shortcut to Part 6


Saturday, October 30, 2021

BaaBaa Black Sheep Last-Minute Halloween costume

I wanted to make a quick and easy hat to serve as a last-minute costume I could wear while handing out Halloween candy. I remembered having this sweet pattern, Baa Baa by Melissa Mall, and thought it would make a great prop to wear. All I have to do to finish my costume is draw on a black nose, wear a comfy black T-shirt and black leggings, and I'll be set as the best (OK, the ONLY) Black Sheep on my block. 


I deviated from the pattern by making the hat with an open top (messy-bun style), a larger stitch count (to accommodate my big cabesa), and with a bottom band made of HDCs. On the ears I also added an extra increase row and two extra straight rows (for adult sizing). I also worked the body of the hat with the wrong side (inside) facing me, because doing it that way means you don't have to push the textured "bumps" out to the right side of the hat. With the stitch combination used in the pattern, the bumps naturally bump out to the side of the fabric facing away from you as you're working, so doing that part with the wrong side facing you saves you from having to do that extra step to get the texture to show where you want it.


This makes a great last-minute costume hat because it works up quickly. I made this in a single evening with small amounts of Red Heart Super Saver in the Black and Charcoal colorways and a 6mm hook. Baaaaaaaa!

Next Halloween, if I manage to plan ahead a bit further, I'd love to work up a Cookie Monster costume along the lines of one I saw a picture of just this morning by Agnes Hsu of hello, Wonderful. She made this for her son, who is just super adorable. She tells you all about how to make this costume on her blog.

Cookie Monster has always been my favorite Muppet, from way back when I was a child growing up watching "Sesame Street," so I would LOVE to dress up in a Cookie Monster costume. I even crocheted a Cookie Monster hat for Caleb, way back in the day.

OK, I couldn't resist crocheting a quick Cookie Monster character hat based on my Loopy Chemo Cap pattern, just in case I don't have enough time to make an adult size of that amazing Cookie Monster costume above.


I used my Addi Pro 22-needle knitting machine to make the eyeballs, and then added one round of SC for the pupils. Whatcha think? 


Monday, March 1, 2021

Heart-shaped Valentine Wreath

I started working on this project on Valentine's Day itself, so I didn't finish it in time to display the wreath for the holiday this year. But I'll store it carefully so it will be ready for next year! 😆


I didn't count the rows on this project (my Sentro 40 doesn't have a counter on it), but I started with a few rows of waste yarn and then simply knitted through one entire skein of Walmart Mainstays 100% acrylic yarn in Pink Multi on medium tension. Finish off with another few rows of waste yarn before casting off from the machine. The full skein produced a knitted tube that's about 50 inches long, and I counted it having a gauge of about 4 stitches per inch, so we can do the math and estimate this tube being about 200-ish rows long. The tube from the 40-pin machine is about 6 inches wide.


To shape the wreath I used this 13.5-inch heart-shaped wreath form that I bought on Amazon. If you want to make a project like mine, any similar size wreath form should work well.


Full disclosure: My Sentro hated this yarn for every single stitch, but the colorway is just so fun that I kept going. (It wasn't bad enough to make me stop knitting. The machine just behaved stiffly, and I had to watch every single stitch like a hawk to make sure they were seating properly, so it was EXTREMELY slow going, but it wasn't any harder to crank than normal, so I felt safe enough to continue.) Actually, I first tried this yarn on my Addi King Size ... and the Addi hated this yarn, too. So be warned. But, dang, the finished product is just super cute!

Another reason to be irritated with this yarn is that my skein had three splice/knots all within what I estimate was the first 70 rows, which seems excessive. However, after that the rest of the skein was splice/knot free, so maybe I just picked a dud skein.

To add the knitted tube to the wreath form, I dropped one stitch on opposite sides of the tube, wrapped the tube around the wreath form, and then (using a 5mm crochet hook) joined the dropped stitches from alternating sides using a slip stitch crochet technique (catching two strands from each side at a time) similar to the technique used in this video by Shelby Acosta. (Shelby catches four strands from each side while joining, whereas I only caught two strands from each side, but otherwise the technique is the same.) The join itself adds a nice bit of contrast to the variegated yarn, so after finishing off the join I twisted it around on the wreath form until the joined stitches were visible on the front side of the wreath.

I whip-stitched the tube ends together at the bottom of the wreath, tied a few knots to secure the ends, and that was it.

Now all that's left to do is to add a hanging loop, and also to decide whether I want to add any trim pieces to make my wreath even cuter. Some white pompoms or even some silk flowers or greenery might look nice. What do you think?


Saturday, December 19, 2020

Circle Hot Pad pattern - totally giftable

I consider myself a tight crocheter, but I did have to go down two hook sizes to match the designer's gauge on this Circle Hot Pad by Esther Thompson. As she said, gauge isn't very important for this potholder/trivet, but you do want to have a nice firm fabric to protect surfaces or your hands from the heat. This was very quick to make and is so cute and totally giftable. The Hobby Lobby Crafter's Secret Cotton in the Desert Gold colorway looks modern and chic. There is a free version of this pattern on the designer's website.


I added a hanging loop by chaining 10 at the end of the last round, slip stitching the chain to the trivet next to where I started chaining, then turning and working 20 SC's back over the chain. A 1-inch wooden or metal ring sewn to the trivet would also look nice as a hanging loop. 


There was also just enough of the main color (Desert Gold) left to make a coordinating 4-inch-diameter coaster in 6 rounds. I made it double-layered like the trivet, but for the coaster I slip stitched it together with the ivory yarn for a bit of contrast on the colorful side. 

The multicolored balls of this Crafter's Secret cotton are 57 grams, whereas the solid color balls are 71 grams. So, using the solid color as the contrast color for this project, you have enough of the solid color to make two trivets (if you don't use any to make a coaster, the way I did).

I gifted the colorful trivet set to my niece Renee, and I made another set to give to my sister Juanita in the Hobby Lobby Crafter's Secret Cotton in the more neutral-looking colorway called The City.


Monday, September 2, 2019

Little Rustic Pumpkin

Took me a while to get around to it, but I finally added the vines and stem. Pumpkin portion of pattern works up super quickly. This will be a lovely addition to fall decor around the house.


This is based on the free Little Rustic Pumpkin pattern by Rebecca Langford of Yarn and Chai

For the stem, using the green yarn, I FSC'd 22 then worked in continuous decreasing rounds (alternating SC, SC2tog) until 5 stitches were left. Then I SC'd in continuous 5-stitch rounds until stem was about the same length as a 12-inch pipe cleaner. I twisted two brown craft pipe cleaners together and threaded them into the slim cylinder of stitches to give coil-able structure to the pumpkin stem. I stitched the end of the stem closed then joined the yarn again at the base and worked some points onto the circle around the base of the stem. Stitched the triangle end of the stem to the top of the pumpkin and finished off. Voila!


Before adding stem

Sunday, November 30, 2014

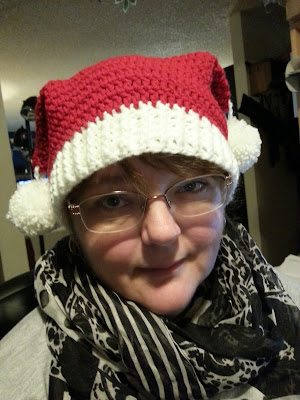
Santa Sack Hat free pattern

New free pattern alert! This Santa Sack Hat has a comfortably loose, slouchy fit and no side seams on the crown for a smooth appearance.


I admired Penny’s cute double-tailed Santa hat that she wears in a Christmas episode of the popular American sitcom “The Big Bang Theory.” This hat isn’t an exact replica, but its dual pompoms do provide a touch of whimsy.


I have a large head, 22.5 inches, so to achieve a loose fit, I worked a foundation chain with 88 stitches. To make different sizes, simply work a foundation chain until it’s a length that fits loosely around your intended wearer’s head. The foundation chain needs to have an even number of stitches, so if your foundation has an odd number, either add one or remove one to make an even number of stitches.

Hat is worked from the bottom up.