Showing posts with label cover. Show all posts

Sunday, April 6, 2025

Memory pillow


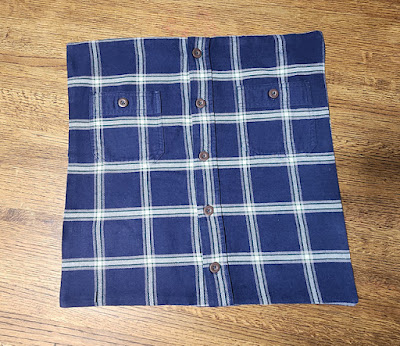
When my father-in-law died in 2019, one of his daughters, my sister-in-law Linda, saved one of his heavy plaid flannel Wrangler shirts with the idea of making it into a memory pillow, and I was honored when Linda asked me if I would be willing to make the pillow for her.

With a quick Google search for "memory pillow" or "how to make memory pillow," you will easily find many examples and tutorials for how to make one like this.

I was fairly sure how to go about it, but I watched this video tutorial by Lesley Chandler on YouTube to have the steps clear in my mind before starting.

To make one of these, you need to know the basic skills for working with a sewing machine. You're basically cutting two squares out of the shirt and then sewing them together to make a cover that will fit a square pillow form. If you're using a button-front shirt like I did, you don't even need to leave a gap in the sewing for turning the pieces right-side out, because the shirt's button front can serve that purpose. And, in the future, you can also open the buttons to remove the pillow form any time you want to launder the pillow cover, so it's a win-win.

Begin by laying the shirt out flat, with all the buttons buttoned, on a large tabletop. Iron the shirt to help the fabric lie evenly if it has any wrinkles. I measured the distance across the front between the sleeve seams to get an idea of what the largest size pillow cover that the shirt would make. It was about 18 inches between the sleeve seams across the front. 


I had an extra 18-inch square Ikea feather pillow form on hand that I wanted to use for this project. Knowing that the finished pillow cover will be less than the full dimensions of the cut fabric (because of the amount taken up by the seam allowances), I figured that my finished pillow cover would juuuust barely be large enough to work with that pillow form. But square pillow forms come in different sizes, so you should be able to find one that will fit your particular pillow cover.


You can make the cutting easier by first cutting a piece of newspaper into the shape/dimensions to act as the pattern. Since the distance between the sleeve seams was 18 inches, I decided to cut an 18-inch square to be my pattern. 

I laid the shirt out flat on a cutting mat on my work table and positioned the pattern on top. I adjusted the position of the pattern until I had it where I wanted it, using the placement of the shirt pockets as a guide to where the pattern should be placed. When I was happy with the placement, I pinned the pattern in place and used my fabric scissors to carefully cut around the pattern. You could use a rotary cutter and ruler if you're comfortable with those. I have those tools but didn't want to risk making a bad cut on this precious shirt.


After the pieces are cut, set aside the pattern and excess fabric. Turn the pillow cover squares so the right sides are facing each other and pin them together. Then sew them together using an appropriate seam allowance, carefully easing the machine through the bulkier areas across the button placket. I used about a 1/4-inch seam allowance for this.


After sewing all the way around, trim the excess fabric at the corners. Then unbutton the shirt's buttons and turn the pillow cover right-side out, using a blunt tool to help poke out the corners. Rebutton the buttons and press the sewn pillow cover again to smooth the seams.


The final step is to open the buttons again and place the pillow form inside. Button the buttons, and you now have a wonderful memory pillow of your loved one's shirt that you can hug whenever you want to.


In her video tutorial, Lesley Chandler shared that there are sellers on Etsy who make custom iron-on patches with a lovely little verse that can be added to a memory pillow project. She suggested this one and placed it on a bottom-front corner of her pillow. I think the patch would also work on a bottom corner of the back side of the pillow. 


I wasn't sure if Linda would want a patch like that on her pillow, however, so I sent her a link to it so she could see what it was and read about it, and then decide if she wanted it. She could always opt to add a patch to her pillow cover later, because the only equipment needed to add it is an iron.

After completing the memory pillow, I looked at the fabric scraps left over and decided there was plenty of fabric left to make a small memento for each of my father-in-law's four children, including Linda, my husband, and their other two sisters. I figured a keychain wristlet would be lovely and useful, and I already had the clasp hardware on hand.

I like this tutorial by Devi Therkildsen on YouTube for making "seamless" fabric wristlets that work with the type of clasp hardware I have on hand. Each wristlet requires a piece of fabric that's 12 inches long by 4 inches wide, and also a piece of lightweight interfacing of the same size if your fabric is lightweight. (I didn't use interfacing on these flannel wristlets because the fabric itself was already heavy enough to be durable.) You can see the four finished wristlets next to the finished memory pillow in the lead photo of this post.

Tuesday, February 2, 2021

CPAP hose sleeve re-knit

A few years ago, I hand-knit a sleeve/cozy for the hose on my CPAP machine. It used one whole skein of Big Twist Sincerely Ombres in Gray Denim. I knit it flat on size 7 needles, then (without breaking the yarn) left a long tail and used a 5mm crochet hook to single-crochet the long seam together on the inside, which would make it easier for me to undo the work and reuse the yarn later if I decided to redo the hose sleeve, since that was my first attempt at knitting one.


It was around that same time when I first started hearing about the wonderful circular knitting machines like the Addi, Sentro, etc., and after spending some time studying what the machines could do, I was certain I could reknit this hose sleeve using a 22-needle machine. It would be a couple of years before I'd decide to invest in the Addi Express Professional, but that time finally came, and this is the first item I knitted on it.

I cast on with waste yarn for about 12-13 rows then started knitting with some Grey Heather Red Heart Super Saver. When I hand-knit the hose sleeve, it was only 17 stitches wide, and since the Addi has 22 needles, I wanted to be sure the reknit sleeve would be long enough, so I knit with the gray Red Heart yarn for 48 rows (about 11 inches). Then I changed to the Big Twist yarn and continued knitting. The counter read 358 rows when I stopped knitting with the Big Twist yarn and switched back to waste yarn for another 12-13 rows before casting off.

I had left a long tail (about 6 yards) before starting the Red Heart yarn in the machine. I used that long tail to pick up and SC in each stitch from the waste yarn on the cast-on end. Then I continued to SC in each stitch around in a continuous spiral (without joining at the end of rounds) until the yarn ran out. There was enough yarn for about 4 rounds of SC on that end. I finished off with the gray yarn and then removed the waste yarn from that end of the hose cover.

At the other end of the hose cover I had also left a long tail of the Big Twist yarn. I used that tail to pick up and SC in each stitch from the waste yarn. Then I chained 16 to form a long loop for the frame of my mask to slip through (to help hold the hose sleeve in place during use), then SC in the next stitch to join the loop to the edge of the hose sleeve, and SC in the next 10 stitches and chained 16 again for the second mask loop. I joined that loop with a SC in the next stitch and SC in all the stitches until I was back to where the first loop chain began. I put a SC in each chain of the loop, then continued with SC around the edge of the hose sleeve until reaching the second loop chain. I repeated putting a SC in each chain and then continued in SC along the edge of the hose sleeve until the yarn was about to run out and finished off there.

I think the extra stitches in the width of the Addi-knit hose sleeve will make it a little bit easier to put on and take off this version of the hose sleeve compared to my hand-knit version. These yarns are nice and soft (after machine washing and drying), so they make a nice hose cover.

Sunday, June 16, 2019

CPAP Hose II free recipe/pattern

Experimenting with another crochet CPAP hose cover design for 72-inch hose. My brother-in-law is new to using a CPAP and needs something to help make the experience more comfortable for him. This Red Heart Velvety yarn is super, super soft, but also machine washable/dryable, so it should work well.

Using 6mm hook, FSC 16 sts (about 6 inches long), then continue working in continuous rounds. I made the first round after foundation row in SC then switched to HDC to help the rest of the project grow faster. At my gauge two rows of HDC equaled about 1 inch in height. Working this way one skein yielded about 47 inches of tube, a little over half as long as I wanted, so I had to break into a second skein to reach the desired finished length.

I placed a marker to indicate when my tube had reached a length that was about half as long as the finished tube should be (for me this was after 2 rows SC plus 80 rows HDC). It’s important to measure the actual length of your work to determine where you’re at rather than to rely on row counts for length, just to make sure you end up with a finished tube that’s the right size. Once you’ve marked the halfway point, you can fold the tube at the marker as you work the second half to more easily figure the length of the second half. (At least for me this is easier than constantly using a tape measure to figure out where I’m at.)

Continue working until the tube you’re crocheting measures about 76 inches long. In my experience these hose covers work better if they’re a little longer than the hose itself. Switch to 5mm hook and finish with 4 rounds of FPDC/BPDC for a ribbing effect, then fasten off and weave in ends.


For better performance sew a couple of rows of silicone-striped grip elastic to the inside of the hose cover at the ribbed end (cut elastic to 3.5-inch lengths). This will be the end closest to the user. The grip elastic will cinch the cover against the hose, and the silicone grip will prevent the cover from slipping down the hose and away from the user. The whole point of using a hose cover is to keep the cold plastic away from the CPAP user. Well, that and a hose cover cuts down on air noise and prevents condensation buildup.


Placing the grip elastic at only one end also makes it easier to feed a fresh hose into the cover from the end without the elastic when it’s time to change the hose.