Showing posts with label easy. Show all posts

Tuesday, August 19, 2025

Ric-Rac UGA Fan Messy Bun Beanie

Ever since I made one of these beanies for my grandniece Jill almost four years ago, I've been wanting to make one for myself in a messy-bun style (open top). So when Jill's mom, my niece Renee, announced that she would be hosting a party to celebrate the kickoff of Georgia's new football season, I knew that now was the time to grab my yarn and get hooking on this essential accessory. GOOOOOO Dawgs! Sic 'em! Woof! Woof! Woof! Woof! Woof! 🏈


I used scraps of yarn I had in my stash to make this, so, naturally, I ran out of the main red color when I was stitching the brim. I switched to another scrap of red that was a fairly close match to the first red, but there is a tiny bit of difference in the colors. But since this hat is for me, I'm OK with that. 😊


The hat works up quickly, and the cluster V-stitch is super easy while giving the stripes their distinct "ric-rac" look. I use this tutorial on YouTube by Hooked by Robin whenever I need a refresher on how to work the cluster V-stitch. The design is great for showing off the colors of any fandom, and the slouchy, stretchy nature of the beanie is amazingly comfortable for all-game-day wear. The 5/6 ribbed brim in alternating FPDC/BPDC stitches also provides complete, cozy coverage of your ears, which is wonderful on windy autumn/winter game days.

As you can tell by my latest posts, I'm on a beanie-making kick lately, thanks to the approach of fall, my favoritest season in the whole, wide world!! Plus, most crochet hats work up super fast, so it doesn't take long to have your latest favorite hat ready to wear. 

And because crochet hats work up quickly, it also means that I can usually finish one before the arthritis in my hands forces me to take a break from stitching. 👍


Thursday, July 24, 2025

Mini Simple Stardew Valley Chicken

I discovered that this pattern makes an adorable chick-sized mini chicken if you use a few scraps of standard 4-weight yarn, a 5 mm hook, and 8 mm safety eyes. This is the Simple Stardew Valley Chicken free pattern, which can be found on Ravelry.


They are so quick and easy to make that you can whip up a whole tiny flock in just an evening. I made all three of these in just a few hours. 


Each chick measures about 3.5 inches long by about 2.5 inches tall (not including the comb). The kawaii safety eyes came from this kit on Amazon. You can view more info about the yarns I used for these on my Ravelry project page.


The pattern was originally designed to be made with chenille blanket yarn, which produces a much larger softie (example photo from the pattern below).


Wednesday, July 2, 2025

Tooth Fairy Pillow pocket lovey

This tooth fairy pillow is going to be a gift for my wonderful dental hygienist, Carra.


In recent years, I've developed awful sensitivity in my teeth from enamel damage incurred from grinding my teeth and/or clenching my jaw during sleep. I started wearing a mouth guard at night, but not until after the damage was already done.

Ever since my teeth were damaged, having dental cleanings done has been terribly painful, to the point where I even considered not going to the dentist at all anymore (yeah, of course, I know that skipping dental visits wouldn't have made my situation any better, obviously, but ugh). I even felt that I had to change dental practices because my previous dentist didn't seem to be sufficiently sympathetic to my pain and wasn't really working with me to follow a plan to manage it.

My new hygienist, Carra (and, really, the entire team at Dr. Shelton's), has been nothing short of AMAZING. Carra has been very sympathetic and gentle with me at every visit and always gives me and my teeth the most wonderful care.

I always try to profusely thank Carra each time I see her, to let her know how much I appreciate her wonderful "bedside manner," as it were, but in addition to saying thank you, I wanted to give her a small, tangible token to express my gratitude, and thus I went searching for a crochet tooth pattern that was both super adorable and also sort of representative of who she is in her career. To me, Carra is my personal tooth fairy angel! 👼

This free Tooth Fairy Pillow pattern by Heather Corinne Smith is just right in every way. (She also has a video tutorial you can follow.) The design makes a tooth softie/lovey of a nice size (mine is about 6 inches tall, not including the hanging loop, by 6 inches wide), and the kawaii embroidered facial features are just so cute. The pocket on the back (about 3.75 inches wide by 2.5 inches tall) is the perfect size for holding a Dutch Bros gift card and sticker to add an extra touch of sweetness to the gift. I finished mine by adding a bow made of a small scrap of hot pink ribbon (it was only about 8 inches long to start with, so it was barely long enough, but it worked!!) that I had in my stash and followed this quick tutorial on YouTube to tie it, then I carefully sewed it to the tooth using a needle and thread.

Back with pocket

This turned out so cute, and I think Carra is going to love it. So if you love your dental hygienist as much as I love mine, maybe you should make one of these for your hygienist, too!

Sunday, October 27, 2024

Quick and easy Halloween decor craft

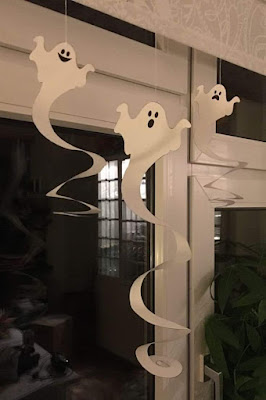
With Halloween less than a week away, here's a super easy decoration idea that you can use to decorate your front porch or anywhere you need a bit of spooky ambience.


All you need to make these adorable little ghosts is a printer, some paper for the printer, and some scissors. You can even let your littles color a sheet of ghosts for some extra fun.


Click here to download the printable PDF. 


Tuesday, July 2, 2024

Easy, perfect DIY bow

My friend Pam would have loved this. She used to be the hairbow-making queen! 💜


@thejibrizyshow How To Tie The Perfect Bow #bow #tie #nickiminaj #icecream #fyp ♬ original sound - The Jibrizy Show

Saturday, January 6, 2024

Taylor's Beanie

When Taylor Swift wore that crocheted beanie to watch her boyfriend, Travis Kelce, play football with the Kansas City Chiefs, all of the online yarnie groups went BA-NA-NAS with people wanting to know how to make the same hat. It's the Taylor Effect, y'all.


Anyway, if you love a Swiftie, like I do, then you simply MUST make them one of these beanies. It works up quickly with simple stitches, so it's an easy project that will bring a huge thrill to your Swiftie's heart, because in no time at all they will be able to rock this hat just like Taylor did.


To replicate Taylor's look, it's important to use a bright white yarn for the main color and a rich, vibrant red with blue undertones for the stripe.


You will notice that I have the jersey number "wrong" on the beanie I made. That's because my Swiftie also loves a football player, and he happens to wear jersey number 84 (whereas Travis Kelce wears number 87). 

For the fur pom, I found an affordable pack of faux-fur poms on Amazon.

Photo showing Taylor's faux fur pompom


I am working on writing this pattern, which will be available as a free download on Ravelry. I will link to the pattern page here once it's available. Ravelry pattern link: https://www.ravelry.com/patterns/library/taylors-beanie-3


Wednesday, December 6, 2023

Mini Dino in chenille

These adorable mini dinos are so fun and fast and easy to make. The free pattern is Mini Dino by MerryMakes. A member of my family gifted me this skein of bulky chenille yarn, so naturally I had to see how this pattern would work up in the bulky yarn using an 8mm hook. (There wasn't a label on the skein, so I don't know what brand or colorway this yarn is.)


For the eyes I used a pair of 20mm black buttons from this set I found on Amazon


This mini dino is made by following the same pattern as the smaller dinos, same stitch and row counts. The only difference is the size of the yarn and hook, which produced a dinosaur about 12 inches tall.


Monday, July 24, 2023

Condensation fighter

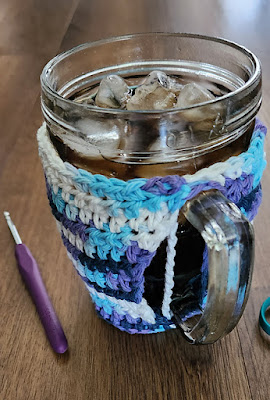
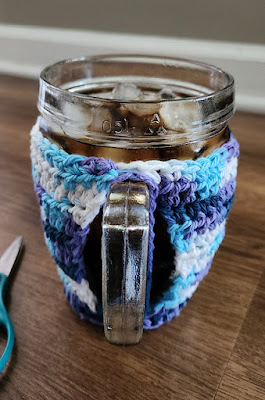
This is just another quick cotton cup cozy I whipped up to fit my glass filled with a refreshing drink with ice. 

I hate dealing with condensation on the outside of my glass, so I use a lot of cotton cup cozies in the summer. 


No pattern for this; I just crocheted this to fit the size of my glass. The cozy is secured with straps that fit over the handle in pretty much the same way a face mask's straps fit over a person's ears. 


A woman in a crafting group shared her idea for securing a cup cozy this way, no buttons or other fasteners required, and I thought it was very clever, so I wanted to try making a cozy that way too. 

Here's a link to my Ravelry project page.


Sunday, April 16, 2023

Meet Pierre

A while back, I bought a Woobles kit for Pierre Penguin at my local little yarn shop, and today I finally made him. 😊


Isn't he adorable? Here's a link to my Ravelry project page, which has info about the yarn colors, etc. The kit comes with everything you need to crochet your own little Pierre, and if your local LYS doesn't carry the Woobles kits you can also buy them online, but you can also buy the Woobles Easy Peasy Yarn in 13 different, bright, amigurumi-ready colors on Amazon.

Pierre kind of reminds me of the old Weebles toys. Am I the only person who remembers the Weebles?? 😆


Sunday, October 9, 2022

Simple Sachet Aromatherapy Set

An easy set to crochet with cotton yarn for bedside aromatherapy. I often have nasal congestion when I first lie down at bedtime, which can make it difficult to breathe, and thus to relax and fall asleep. I've found that using eucalyptus or peppermint essential oils can help make it easier for me to breathe, so I came up with the idea to crochet this aromatherapy sachet and stand set to place on my bedside table. (Actually, I use a CPAP machine at night, which I keep in a drawer of my nightstand, so I place this sachet a few inches away from the air intake of my machine, so the fragrance can reach it easily, and it works well.) You can somewhat control how strong the scent is by placing the sachet closer or farther away from you.


I will do my best to describe the process I used to create this, but please keep in mind that it's entirely possible that my descriptions and instructions might not make sense to you. I'm including photos of the finished items not only to show you what the finished product looks like, but also to help you visualize the steps you'll be doing along the way if you want to try to re-create my design. If my instructions don't make sense to you, please feel free to use my idea as a jumping-off point for your own creation that you make in whatever way that makes the best sense to you. Using just the sachet round by itself without the stand works just fine, too.


Materials: Cotton yarn, worsted weight (I used Lily Sugar n Cream in white), 5mm crochet hook, scissors, yarn needle 

For aromatherapy disc (worked in rounds, make 2):

Setup: Ch 4. Sl in 1st ch to join in a circle.

Round 1: DC 12 in circle. Join with sl in top of 1st st. (12 DC)

Round 2: 2 DC in each st. Join with a sl in top of 1st st. (24 DC)

Finish off and weave in ends but leave a long tail on one of the discs for sewing the two discs together.

Hold the two discs together with wrong sides facing and use a whip stitch or running stitch to sew the two discs together using the long tail. Finish off and weave in tail.

For base (worked flat, make 2):

Setup: FSC 12. Ch 1; turn.

Row 1: SC in each st across. Ch 1; turn. (12 SC)

Rows 2-5: Repeat row 1. (12 SC)

Finish by SCing evenly around all 4 sides, placing 2 or 3 SCs in each corner. Join with a sl to 1st SC. (Mine has about 40 SC all the way around.)

Finish off and weave in ends but leave a long tail on one of the bases for sewing the two bases together.

Before sewing the two base pieces together, work "stand" on the right side of one base.

For stand:

We are going to use a surface crochet technique to build a "stand" on the top of one of the base pieces; the stand will be where you can place the aromatherapy disc during use.

Stand foundation row: Place a slipknot on hook. Working into the spaces between stitches on the base piece, and staying about 3 stitches in from the edges, work surface SCs in the shape of the outline of a rectangle, placing 2 SCs in each corner. My sample ended up with 25 surface SCs in this foundation row. Join with a sl in the 1st SC. Now we will continue to SC rows on top of the foundation row in joined rounds to build the "sides" of the stand.

Rows 2-4: Ch 1. SC in the top of each SC from the previous row. Join with a sl in 1st SC. (About 25 SC in each round, depending on how many SCs you have in your foundation row.) Finish off and weave in the ends from the stand.

Now we will sew the two base pieces together. Hold the two bases together with wrong sides facing and use a whip stitch or running stitch to sew the two bases together using the long tail. Finish off and weave in tail.


Monday, March 28, 2022

Cozy candles

I used SlipStitchery's Halloween Witch Jar Covers pattern as initial inspiration for these quick and easy flameless (battery operated) candle cozies. I worked each cozy in a different stitch and different colorway for some variety in them as a grouping.


I still intend to make some of the actual Halloween Witch Jar Covers sometime, too! 😊


Sunday, January 16, 2022

Light, wide infinity scarf

Another quick and easy machine-knit infinity scarf. Cast on with waste yarn, then switch to project yarn and knit through the entire skein, leaving about a 60-inch tail for grafting the ends together.


I wanted this scarf to be as wide as possible, so I used the Sentro 48 to knit it. I got 252 rows from one full skein of the Lion Brand Mandala Ombre in the Chi colorway. Finished scarf is about 54 inches long.


Although Lion Brand calls this a size 4 yarn on the label, it feels more like a DK (3) weight, and this weight works into a lovely tubular scarf that will keep the wearer plenty cozy and warm despite the fiber's light weight.


You can see how to seamlessly graft the ends of the tube together by watching a tutorial video like this one, although there are many tutorials available for this technique online.

I gifted this scarf to my daughter, LadyU! 

And I made another one for Rose, whose favorite color is orange. It can be difficult to find pretty yarns that include the color orange, so this Lion Brand Mandala Ombre in the Serenity colorway jumped out at me as being a great choice. I hope she likes it!


I also knitted this one on the Sentro 48 and got 267 rows from the skein (not sure why there's such a difference in the number of rows between the different colorways). Finished scarf is also about 54 inches long.


Friday, December 24, 2021

A new blanket for Wendy

I started making this blanket without a recipient in mind just because I had the yarn on hand and felt like using it because it is a very pretty colorway. (Originally I bought this yarn for a different project but then lost interest in that one.) And the Red Heart Ombre yarns lend themselves nicely to the Which Way Filet blanket pattern by Fiber Spider.


As the blanket was coming together I started to think that it might be a nice one for Wendy, since she's now a teenager and had outgrown the more "baby style" blanket I previously made her. This blanket pattern, with the limitless potential and endless possibilities suggested by its winding paths, is perfect for a brilliant teen like Wendy. 

My only worry was that I didn't know whether turquoise was a color that Wendy liked. But then I got to sit beside Wendy at dinner early in December, and I don't know how we got on the subject, but I was able to ask her what her favorite color was, and I was THRILLED when she said TURQUOISE!! Woo-hoo!! So now I know that she's going to love this new blanket.


I made her older sister a more grown-up-looking blanket last Christmas, and now it's Wendy's turn to get a new, grown-up-style blanket to last her for many years to come. Finished it just in the nick of time to give it to her for Christmas this year.

Wednesday, November 3, 2021

Tag It luggage tag free pattern

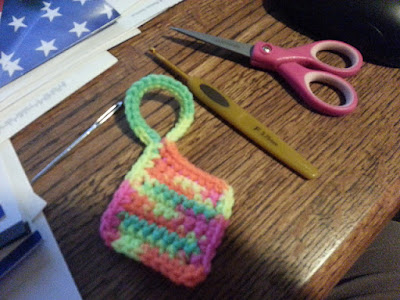
We have been using these little tags on our luggage for nearly 10 years now. The tags are soft and pliable, so they won't scratch the bags, and their bright colors definitely help make it easier to pick out which suitcases are ours as they pass by on the luggage carousel!

New tag made in 2021 next to an old tag from 2013

We recently added a new suitcase to our collection, so naturally I pulled out my remnant of Day Glow and whipped up another tag before our next trip.

One of my first tags made in 2013

This is the quick and easy crochet Tag It pattern by Tamara Kelly, aka Moogly, which is available for free on her blog.

One of my first tags made in 2013

As I said, I like to use Red Heart in the Day Glow colorway to make these (the bright colors are so easy to see). If you want to have a contrasting color for the edging, Red Heart in the Glow Worm colorway complements the Day Glow nicely.

If you have to attach these to a large handle on your luggage, I suggest using a 4mm hook and starting with a chain of 35.


Tuesday, November 2, 2021

Cookie Monster costume hat

Cookie Monster is my all-time favorite Muppet, so I wanted to make a messy-bun-style hat of this character. I started mine too late to wear it for Halloween this year, but I'll totally be ready next year!


I used a variation of the Loopy Chemo Cap pattern from my free Chemo Cap Bundle. Instead of starting at the very top of the hat, I started with 40 foundation HDCs (the equivalent of round 4) and then continued to work the pattern as written from there.


I used the Addi Pro 22-needle knitting machine to make the white part of Cookie Monster's eyeballs. My first attempt turned out looking super lumpy and squished, which led me to conclude that the eyes needed a bit of polyfil stuffing to help them hold their round shape.


To make the eyeballs: Cast on with white yarn and knit for 19 rows. Cut a long tail and use a bent-tip needle to cast the stitches off the machine. Gently stretch the knitted piece, and then gently cinch the ends. Fold one end inside the other (same as when you're making a beanie). Pull the yarn tails through the "top" of the cinched ends and knot securely. (This cinched end will be the front of the eyeball; you will later cover this cinched end with a crocheted black pupil.) Thread one tail onto a yarn needle. Grab one handful of polyfil and poke the needle through the center of the polyfil, then slide the polyfil down the yarn tail until it's sitting inside the "cup" of the eyeball. Using the tail on the yarn needle, pick up the bar in the middle of every third stitch along the top of the folded edge (these stitches will be used to cinch closed what is currently the folded end of the eyeball). Gently pull on the yarn tail to cinch the folded end closed, then stitch across the cinched opening to secure. Thread the other yarn tail onto the needle and poke it through the center of the eyeball and out the other side that you just cinched closed. Being careful not to pull too hard and squish/flatten the eyeball, knot the yarn tails together again several times to secure. Leave the long white tails for now so you can use them later to sew the eyeball onto the hat.


Using black yarn, crochet a small "pupil" for each eyeball by working 6 SC into a magic circle. Use the invisible joining technique to finish the outer edge. Tightly cinch the center of each pupil and knot to secure. Leave a long tail to sew each pupil onto the front of each eyeball, centered over the front cinched end. Knot to secure and hide black yarn tails inside the center of the eyeball.


Using the long white yarn tails, attach the eyeballs to the hat and knot several times to secure. Weave in ends and wear your Cookie Monster hat with pride!