Showing posts with label cozy. Show all posts

Monday, July 24, 2023

Condensation fighter

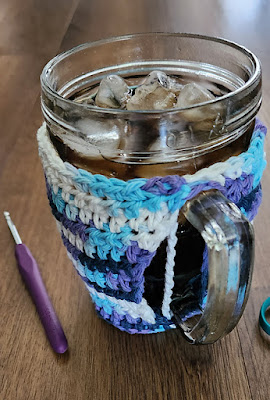
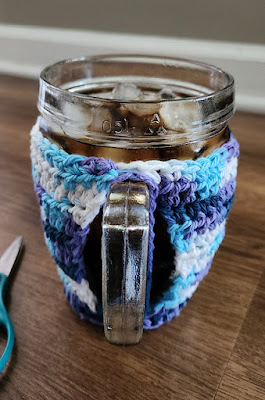
This is just another quick cotton cup cozy I whipped up to fit my glass filled with a refreshing drink with ice. 

I hate dealing with condensation on the outside of my glass, so I use a lot of cotton cup cozies in the summer. 


No pattern for this; I just crocheted this to fit the size of my glass. The cozy is secured with straps that fit over the handle in pretty much the same way a face mask's straps fit over a person's ears. 


A woman in a crafting group shared her idea for securing a cup cozy this way, no buttons or other fasteners required, and I thought it was very clever, so I wanted to try making a cozy that way too. 

Here's a link to my Ravelry project page.


Wednesday, May 18, 2022

Taking the cake

I wanted a crocheted carrier for transporting cakes inside my cake-taker, so I whipped this up using some cotton yarn scraps. 

Didn't use a pattern, but the stitch I used for the base resembles the boho stitch used in the It's Shawl Good Cardigan paid pattern by Ashlea Konecny. The sides/handles are made with a traditional chain-loop/SC mesh.


Monday, March 28, 2022

Cozy candles

I used SlipStitchery's Halloween Witch Jar Covers pattern as initial inspiration for these quick and easy flameless (battery operated) candle cozies. I worked each cozy in a different stitch and different colorway for some variety in them as a grouping.


I still intend to make some of the actual Halloween Witch Jar Covers sometime, too! 😊


Thursday, December 2, 2021

Ric-rac UGA fan slouchy hat

Made this for our Georgia Bulldog, Jill. I recently saw some designs (such as the ZiggyZag Vixen Slouchy Hat by Faith Holbrook) made with the ric-rac stitch (or cluster V-stitch) and really liked the look (it also looks great worked flat as a blanket, etc.), so I just had to try it

This slouchy hat design lends itself nicely to working with team or school colors. Very quick and easy to make.


I made the pompom removable, so the hat can be safely washed without it.

I also made this quick little coffee cozy for Jill, since she loooves coffee. 


I made this in YOslst, also called HDC slip stitch. 16 stitches tall. 


Apropos feltie came from TheWiredPlanner on Etsy.


Friday, October 8, 2021

Happy Halloweeeeen!

Heidi Yates of Snappy Tots has generously shared the pattern of her Frankenlight design for free on her blog. Go check it out! Her pattern makes a decorative cozy that fits over a pint- or quart-size canning jar and results in a super-cool decoration to add to your Halloween display.

I crochet a lot tighter than Heidi does, so I had to go up a few hook sizes to get a Franken-cozy size that would fit over a quart-size canning jar. 😊 But it worked out fine for me to follow the rest of the pattern as written (same stitch counts and row counts).

I love the technique Heidi uses to make Frankie's hair; it's much faster and easier than bobble stitch (in my opinion) and gives terrific texture. I used 9mm ball buttons for Frankie's freaky pupils, and I used this waterproof solar LED light string/lid/hanger for the top of the jar.

I think Frankenstein is the OG zombie, so I love this idea to make him into a hanging solar luminary as part of my Halloween holiday decor. (I've always preferred The Munsters to The Addams Family, bah-ha-ha.)

This turned out so cute that I had to make a few more of these in other characters to add to my Halloween display.

Next up I made this jack-o-lantern based on the same concept of Heidi's pattern. After completing the bottom rounds I worked the sides in a standard granny stitch for 11 rounds, then switched to the green and the smaller hook for the top edging. I added a curly green vine and the traditional black "cutouts" for the eyes and mouth, with some embroidered "teeth."


Finally, I based this ghost luminary on the same concept of Heidi's pattern. After completing the bottom rounds I worked the sides in a standard DC-ch 1 mesh for 11 rounds, plus a couple of rounds of SC for the top edging.


I deviated from Heidi's pattern for the base on all my Halloween luminaries, because I wanted the crochet to be open to allow light to shine through the bottom when these are hanging up. On this white one, I like the way the base of my ghost cozy resembles a spider's web. Maybe I could make another one of these in white and trim it with a plastic spider?!


For the ghost face and arms, I turned to the Emojipedia's Ghost Emoji page for inspiration, thinking it would be cute if I could make my ghost resemble the emoji.


Saturday, August 28, 2021

Another Big Mug Hug free pattern

I live in a humid climate, and I like to drink iced coffee every morning in my big mug. But my cold drinks always end up "sweating" with condensation, so I like to use cotton cozies to keep the drippiness to a minimum and water rings off my tables.

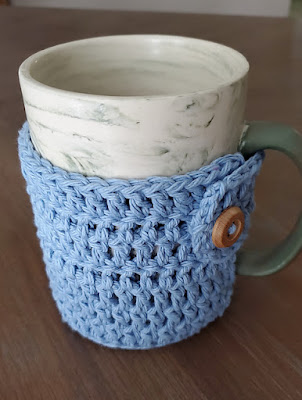
This is a quick and easy pattern I worked up to fit my large, square-bottomed morning coffee mug.

Another Big Mug Hug

U.S. crochet terms

Materials: Worsted weight 100% cotton yarn, 5.5mm crochet hook, yarn needle, scissors. (My sample uses Lily Sugar n Cream in the Light Blue colorway.)

Base is worked in continuous spiral (don't join at end of rounds).

Round 1: In magic circle, HDC 8. (8 HDC)

Round 2: 2 HDC in each st. (16 HDC)

Round 3: 2 HDC in next st, 1 HDC in next st. Repeat around. (24 HDC)

Round 4: 2 HDC in next st, 1 HDC in each of next 2 sts. Repeat around. (32 HDC)

Round 5: 2 HDC in next st, 1 HDC in each of next 8 sts. Repeat around. (36 HDC)

SC in next st, then sl into back loop only of next st to join.

Base of cozy is complete. Work next round in back loops only to turn the corner and start working the sides. Sides are worked in joined rounds.

Round 6: Ch 2. DC in BLO of each st around. Join with sl to top of 1st DC. (36 DC)

Round 7: Ch 2. DC in each st around. Join with sl to top of 1st DC. (36 DC)

Round 8: Ch 2. DC in all but the last st. Leave last st unworked and do not join to 1st st. Turn work. This is leaving an opening for the bottom of your mug handle to pass through. (35 DC)

Round 9: Ch 2. DC in each st back to beginning of row. Turn work. (35 DC)

Round 10: Ch 2. DC in each st to end of row. (35 DC) Now we are going to add stitches to make the tab for the button closure. Continue row by FDC 6 times. (Row is now 41 sts long)

Round 11: Ch 2. DC in each st to end of row. (41 DC)

Round 12: Ch 2. DC in each st to end of row. (41 DC)

Finish off. Weave in ends. Slip cozy over your mug, placing the long tab through the mug handle. Because DC stitches are so tall, you will use the space between the DC stitch in the center row at the end of the tab and the next stitch in as the buttonhole. Mark where that space sits over the body of the cozy and sew a button in that spot. (My button is about 3/4-inch diameter or about 18mm.) Refer to photos if you need guidance for button placement. Your cozy is now ready to use. Enjoy!


Friday, August 6, 2021

Handy little earbuds pocket - free pattern

Here's a super-quick to make little pocket to help keep your wired earbuds wrangled and hopefully less tangled.

I keep a set of wired earbuds near my chair in the living room so they are handy whenever I want to listen to a video on my laptop or phone while my husband is next to me watching TV. That way I can listen to my thing without competing with the sound coming from the TV.

But the problem with wired earbuds is: How do you keep them neatly coiled and out of the way when you aren't using them? I would wrap the wire around my hand into a neat roll, but after I set it down, the wire would inevitably come unrolled and turn into a tangled mess.

So eventually I thought if I crocheted a little pocket to tuck my rolled-up earbuds into, it would hold everything together until I was ready to use them again.

You could make this with just about any yarn or hook size, but I used a worsted weight cotton (Lily Sugar 'n Cream Ombres in the Faded Denim colorway) and a 6mm hook. If you use lighter or heavier yarn, you would need to alter the stitch count to make a pocket that's approximately 2.5 inches in diameter at its widest point.

Setup: I started with a magic circle and worked in a continuous spiral (no joining at the end of rounds).

Row 1: 6 SC in magic circle. Use a stitch marker to keep track of the beginning of the rounds and move up when you start each new round. (6 SC)

Row 2: 2 SC in each st around. (12 SC)

Row 3: 2 SC in next st, 1 SC in next st. Repeat around. (18 SC)

Row 4: 2 SC in next st, 1 SC in each of next 2 sts. Repeat around. (24 SC)

Rows 5-6: 1 SC in each st around. (24 SC)

Row 7: Dec SC over next 2 sts, 1 SC in each of next 2 sts. Repeat around. (18 SC)

Row 8: Dec SC over next 2 sts, 1 SC in next st. Repeat around. (12 SC)

Row 9: SC in each st around. (12 SC)

Finishing: Sl in next st. Use an invisible join technique and finish off. Weave in ends. Enjoy your handy little earbuds pocket. 


Monday, April 19, 2021

Soap Gripper free pattern

Back in August 2015 I was wanting to make a simple Soap Gripper to keep the soap from slipping out of my hand while bathing. For my first attempt I used a 6mm hook and some white Lily Sugar & Cream cotton yarn and came up with this:


This little sack is so well fitted to the bar of soap it contains, however, that it's actually difficult to generate suds with it while bathing. From this I have learned that some positive ease is a good thing in a soap holder.
 

The close fit does make it very easy to get a secure grip on the bar of soap, though. And if you're giving away a bar of soap (perhaps homemade?) as a gift, then this little holder is one way you can choose to present it.
 

I posted about this project on Ravelry and closed by saying that if anyone reading about it was interested in replicating the project, I would post my construction notes "below." BUT time went by, and, wouldn't you know it, before long I forgot all about posting my construction notes. And then I lost the little white Soap Gripper itself, so my ability to count its stitches and describe how it was made was also lost.
 
So today I tried to remedy that oversight by posting the following:

Well, I obviously forgot to add my notes here for how I made the white Soap Gripper shown in the photos. Sorry about that! I can tell from the photos that it was mostly worked in SC, and it looks like I started with a few chains at the closed end (to give it a more oval shape rather than working all the starting row of stitches into the center of a circle), then I ended with what appears to be a row or two of DCs alternating front-post and back-post for a ribbing effect at the open end. I can't tell for sure how many stitches around this was ... maybe 24. So if you want make one that closely approximates the white one in the top photos, I'd suggest you try these steps.

However, as I said before, it didn't take long for my husband and me to conclude that we prefer a tiny bit more positive ease in our Soap Grippers (to make lathering easier), and my husband also prefers a more open mesh (rather than the tight, closed fabric that the SC stitch gives).

So I've subsequently been making Soap Grippers for us as follows:
 

Using 100% cotton yarn, worsted weight (4) and a 5mm or 5.5mm hook. (The variegated blue yarn shown in my sample photos is Lily Sugar n'Cream Ombres in the Faded Denim colorway.)

Setup/round 1: In a magic circle, ch 1 then work the following stitches into the center of the circle (or chain 2 then work the following stitches into the second chain from the hook): 1 SC, 1 HDC, 6 DC. (8 stitches)

We will work subsequent rounds in a continuous spiral, without joining at the end of rounds, for a seamless appearance until the ribbing at the cuff. Use a stitch marker to keep track of the beginning of the round.

Round 2: 2 DC in each st. (16 DC)

Round 3: 2 DC in first st, 1 DC in next st. (2 DC in next st, 1 DC in the st after that.) Repeat from ( to ) around. (24 DC)

Rounds 4-9: DC in each st around. (24 DC)

To smooth out the edge: HDC in next stitch; SC in next st after that; SL in next st after that.

Now we will work some "ribbing" at the open end of the Soap Gripper. (These rounds are joined at the end.)

Round 10: Ch 2. FPDC in 1st st; BPDC in next st. (FPDC in next st; BPDC in next st after that.) Repeat from ( to ) around. Join with a sl to top of 1st st.

Round 11: Ch 2. FPDC in FPDC from previous row; BPDC in BPDC from previous row. Repeat around. Join with a sl to top of 1st st.

Finish off; weave in ends. Add a bar of soap and enjoy your new Soap Gripper.
 

For a slightly different looking mesh effect, instead of working stitches into the tops of stitches from the previous round, as directed above, you can opt to work stitches in between the stitches from the previous round.

These Soap Grippers are super quick and easy to make and are very useful to keep the soap from slipping out of your hand while bathing. After using, place Soap Gripper (with the soap still inside) on a soap drying rack and allow to dry. When your bar of soap is nearly depleted, add a new bar of soap and continue using. The Soap Gripper helps you to get every last bit of use out of your bars/slivers of soap, which is frugal and saves you money!


Tuesday, February 2, 2021

CPAP hose sleeve re-knit

A few years ago, I hand-knit a sleeve/cozy for the hose on my CPAP machine. It used one whole skein of Big Twist Sincerely Ombres in Gray Denim. I knit it flat on size 7 needles, then (without breaking the yarn) left a long tail and used a 5mm crochet hook to single-crochet the long seam together on the inside, which would make it easier for me to undo the work and reuse the yarn later if I decided to redo the hose sleeve, since that was my first attempt at knitting one.


It was around that same time when I first started hearing about the wonderful circular knitting machines like the Addi, Sentro, etc., and after spending some time studying what the machines could do, I was certain I could reknit this hose sleeve using a 22-needle machine. It would be a couple of years before I'd decide to invest in the Addi Express Professional, but that time finally came, and this is the first item I knitted on it.

I cast on with waste yarn for about 12-13 rows then started knitting with some Grey Heather Red Heart Super Saver. When I hand-knit the hose sleeve, it was only 17 stitches wide, and since the Addi has 22 needles, I wanted to be sure the reknit sleeve would be long enough, so I knit with the gray Red Heart yarn for 48 rows (about 11 inches). Then I changed to the Big Twist yarn and continued knitting. The counter read 358 rows when I stopped knitting with the Big Twist yarn and switched back to waste yarn for another 12-13 rows before casting off.

I had left a long tail (about 6 yards) before starting the Red Heart yarn in the machine. I used that long tail to pick up and SC in each stitch from the waste yarn on the cast-on end. Then I continued to SC in each stitch around in a continuous spiral (without joining at the end of rounds) until the yarn ran out. There was enough yarn for about 4 rounds of SC on that end. I finished off with the gray yarn and then removed the waste yarn from that end of the hose cover.

At the other end of the hose cover I had also left a long tail of the Big Twist yarn. I used that tail to pick up and SC in each stitch from the waste yarn. Then I chained 16 to form a long loop for the frame of my mask to slip through (to help hold the hose sleeve in place during use), then SC in the next stitch to join the loop to the edge of the hose sleeve, and SC in the next 10 stitches and chained 16 again for the second mask loop. I joined that loop with a SC in the next stitch and SC in all the stitches until I was back to where the first loop chain began. I put a SC in each chain of the loop, then continued with SC around the edge of the hose sleeve until reaching the second loop chain. I repeated putting a SC in each chain and then continued in SC along the edge of the hose sleeve until the yarn was about to run out and finished off there.

I think the extra stitches in the width of the Addi-knit hose sleeve will make it a little bit easier to put on and take off this version of the hose sleeve compared to my hand-knit version. These yarns are nice and soft (after machine washing and drying), so they make a nice hose cover.

Saturday, November 28, 2020

Quick and easy CPAP hose cozy

Knitting machines with 22 needles are the perfect size to knit cozies to cover a CPAP air hose. 

I didn't precisely count the rows on this project on the Sentro 22, but it's pretty close to 390 rows of knitting (about 72 inches) with a few rounds of SC (5.5mm hook) on each end for stability.

Red Heart Super Saver Neon Stripes colorway

I'll probably also add two straps with ends secured by small buttons at one end of the cozy so the straps can hold the wearer's mask end of the hose up close to the mask to keep the cozy from slipping down during use.

It only took about an hour to machine knit this piece. Attempting to knit the same thing by hand would have taken me weeks (and probably at least 12 hours) of work. So having a knitting machine available is a huge help to me for projects like this. I do love to hand knit (and there are lovely stitches you can hand knit that a machine like this will never be able to replicate), but I have chronic pain issues that severely limit how much hand knitting I can do.

**UPDATE**

I knitted another one of these using the Red Heart Super Saver Jumbo Stripes in the Bright Stripe colorway on my Addi 22, which has a row counter on it (hallelujah!!). On the Addi, I was getting about 5 rows per inch. At that gauge, it takes 360 rows to make a 72-inch-long tube, so that's how many rows I made the Bright Stripe cozy, plus leaving extra yarn at each end to crochet the edging and straps. (I forgot that I usually prefer to make the tubes more like 74 inches long to better fit the CPAP air hose ... so in that case the knitted tube should have been 370 rows. Mental note for next time!!)

Making a tube this long works best if you can mount your knitting machine on a table where the work can hang free down the middle, such as my Workmate table shown in the photos. Even at that height, I still had to tuck in the end of the tube for about the last 100 rows to keep it from dragging on the floor.


The mask-end straps are each 16 chains long, then slip stitch back across the chain to reinforce.


The colors are pretty similar between the Neon Stripes and the Bright Stripe colorways, but I think I like the Bright Stripe better because it doesn't have a black band in between every other color stripe. I guess whichever one would be better just depends on what you want your project to look like. They are both fun and funky colorways.


Thursday, March 19, 2020

Big Mug Hug - free pattern

I've been wanting to make a mug cozy that was big enough to fit our oversized, square-bottomed mugs. The cozy needed to be made with cotton yarn so it would be microwave-safe. After all, it's so much easier to put the cozy on the mug when it's empty, and THEN filling the mug with water, and THEN zapping it in the microwave for tea. 


Who wants to pick up a mug filled with scalding-hot water and then try to slip on a cozy without sloshing the water and burning yourself? Not me.

This cozy is quick to make and extra-thick thanks to the post stitches used on the cozy sides, and because the cozy covers the base of the mug it also protects your tabletop. It's easy to put on and remove thanks to the handy button loop.

Big Mug Hug

U.S. crochet terms

Materials: Worsted weight 100% cotton yarn, 5.5mm crochet hook, yarn needle, scissors. (My sample uses Peaches n Creme Ombre in the Blue Moon Ombre colorway.)

Start off working in the round:

Setup/row 1: In a magic circle, ch 2, DC 10. Join with sl at top of first DC. (10) [ch 2 doesn't count as a stitch in this pattern]

Row 2: Ch 2, 2 DC in each st around. Join with sl at top of first DC. (20)

Row 3: Ch 2, [2 DC in first st, 1 DC in next st.] Repeat around. Join with sl at top of first DC. (30)

Row 4: Ch 2, 2 DC in first st, 1 DC in each of next 15 sts. 2 DC in next st, 1 DC in each st to end. Join with sl at top of first DC. (32)

Now continue working back and forth in rows (do not join at end of rows for the rest of the pattern):

Row 5: Ch 2, FPDC in each st across. Turn. (32)

Row 6: Ch 2, BPDC in each st across. Turn. (32)

Repeat rows 5 and 6 until the cozy sides are a total of 10 rows tall. 

Row 15: Ch 1. Turn. HDC in each st across. (32 HDC)

Finishing: Sew a button in a top corner of the cozy as shown in photos. Slip cozy over your mug, hold the sides snugly around your mug the way you want it to fit, and then measure how long of a chain you need to reach from the other top corner of the cozy (the corner without the button) to the button and back to the other corner. Add a crochet chain of that length to the top corner without the button. Tie ends of chain to cozy to secure. Weave in ends, slip the cozy onto your mug, and enjoy.


Saturday, July 20, 2019

Basic Pint Jar Cozy free pattern

I sometimes like to have cold overnight oatmeal in a pint jar for breakfast, but my hand gets so cold holding the jar while I’m eating. I needed a quick, basic jar cozy to insulate my hand from the cold, so I whipped up this design before breakfast this morning. The lavender yarn is even color-coordinated with the blueberries in my oatmeal. 😍


This quick, basic cozy will fit most pint-size canning jars but can also be easily adjusted to fit other jar sizes. Just try the cozy on your jar as you crochet and adjust the stitch and row count for a custom fit.

Row 1: In magic ring, ch 2 (ch 2 doesn’t count as a stitch throughout), DC 10. Sl to top of 1st DC to join. (10 DC)

Row 2: Ch 2, 2 DC in each DC around. Sl to top of 1st DC to join. (20 DC)

Row 3: Ch 2, 2 DC in 1st st, 1 DC in next st. Work 2 DC in next st followed by 1 DC in the st after that around. Sl to top of 1st DC to join. (30 DC)

Row 4: Ch 2, DC in each st around. Sl to top of 1st DC to join. (30 DC)

Repeat row 4 four more times. You can customize the height of your cozy to fit the jar the way you want it to. Just try the cozy on your jar as you complete each round until you like the way it looks. For my jar, a total of 8 rounds of DC looked best, followed by two finishing rounds, as follows:

Finishing row 1: Ch 1. HDC in each st around. Sl to top of 1st HDC to join. (30 HDC)

Finishing row 2: Ch 1. SC in third loop of each HDC from previous round. Sl to top of 1st SC to join. (30 SC)

Break yarn, weave in ends, and enjoy your cold breakfast in a jar without freezing your hands! 🥄


Here’s my recipe for easy (keto-ish) overnight blueberry oatmeal:

3/4 cup Greek yogurt (I use whole 5% fat)
1/2 cup milk
1/4 cup steel-cut oats (I use Bob’s Red Mill Irish style)
1 tablespoon agave liquid sweetener (or whatever liquid sweetener you prefer, to taste)
Frozen whole blueberries, approximately 3/4 cup

Place all ingredients except blueberries in a pint jar and stir until well combined. Add frozen blueberries to fill remaining space in jar and stir carefully until blueberries are incorporated. (The berries will thaw in the jar overnight.) Cap jar and place in refrigerator overnight (for at least 8 hours). The next morning, remove jar from refrigerator, slip on your newly made crochet jar cozy (this step is VERY important!! LOL), and enjoy a healthy breakfast.

Saturday, November 17, 2018

CPAP hose sleeve

This is my first attempt at making a CPAP hose sleeve. Even though this is a simple project I looked at some other similar projects to get ideas for how to go about it. I was originally thinking of knitting this seamlessly in the round but decided it would be easier for me to work this first one flat and seam it. 


This yarn and needle combination swatched at about 5 stitches/6 rows per inch. I'm using Big Twist Sincerely Ombres in the Gray Denim colorway and 4.5mm needles.


The CPAP hose end caps are about 3.5 inches in circumference at the widest point and the main hose tubing about 2.75 inches in circumference with a length of 72 inches (6 feet). 


Initially I cast on 15 stitches and worked in 2x1 ribbing for 24 rows/4 inches then switched to stockinette for the main body of the sleeve. But I decided I needed to add a couple more stitches to the sides to act as selvage for when I sewed the sides together to make the tube, so I ripped out what I had done and started over by casting on 17 stitches. The first stitch on each side would be a selvage worked in garter stitch. Again I did 24 rows/4 inches in 2x1 ribbing then switched to stockinette for the main body. I continued in stockinette (plus the selvage stitches) until the length measured about 68 inches, then I finished the other end with 24 rows/4 inches of ribbing.


To seam the length, without breaking the yarn I switched to a crochet hook, chained 1 and then single crocheted the length closed to form a long, thin tube. My thinking was in doing it this way it would be easy to "unzip" the seam and recover the yarn if I needed/wanted to redo this project later.

Friday, October 6, 2017

How to sew quilted bowl cozy

My daughter, LadyU, shared this quick video tutorial showing how to sew a quilted bowl cozy. It's a relatively easy item to craft if you have a sewing machine. These cozies are so cool, and they also are nice for a cold bowl of ice cream. I've also seen them crocheted with cotton yarn. 🙂