Showing posts with label addi. Show all posts

Wednesday, January 17, 2024

Coboo infinity scarf

Running one entire skein of Coboo through the Addi 46 knitting machine with firm tension resulted in 184 rows, plus a tail that was just long enough to graft the ends together for a child's infinity scarf that is 42 inches long. 


I followed this YouTube tutorial by Calumet Knits for grafting the scarf ends together.

I made this for my great-granddaughter, who loves pink. I originally wanted it to be a pocket scarf, but I would have needed another skein of the Coboo yarn to add enough length to make pockets. But I think the infinity scarf still turned out OK. The yarn fiber is so light that it made it difficult to get my grafting tension just right.

Tuesday, November 2, 2021

Cookie Monster costume hat

Cookie Monster is my all-time favorite Muppet, so I wanted to make a messy-bun-style hat of this character. I started mine too late to wear it for Halloween this year, but I'll totally be ready next year!


I used a variation of the Loopy Chemo Cap pattern from my free Chemo Cap Bundle. Instead of starting at the very top of the hat, I started with 40 foundation HDCs (the equivalent of round 4) and then continued to work the pattern as written from there.


I used the Addi Pro 22-needle knitting machine to make the white part of Cookie Monster's eyeballs. My first attempt turned out looking super lumpy and squished, which led me to conclude that the eyes needed a bit of polyfil stuffing to help them hold their round shape.


To make the eyeballs: Cast on with white yarn and knit for 19 rows. Cut a long tail and use a bent-tip needle to cast the stitches off the machine. Gently stretch the knitted piece, and then gently cinch the ends. Fold one end inside the other (same as when you're making a beanie). Pull the yarn tails through the "top" of the cinched ends and knot securely. (This cinched end will be the front of the eyeball; you will later cover this cinched end with a crocheted black pupil.) Thread one tail onto a yarn needle. Grab one handful of polyfil and poke the needle through the center of the polyfil, then slide the polyfil down the yarn tail until it's sitting inside the "cup" of the eyeball. Using the tail on the yarn needle, pick up the bar in the middle of every third stitch along the top of the folded edge (these stitches will be used to cinch closed what is currently the folded end of the eyeball). Gently pull on the yarn tail to cinch the folded end closed, then stitch across the cinched opening to secure. Thread the other yarn tail onto the needle and poke it through the center of the eyeball and out the other side that you just cinched closed. Being careful not to pull too hard and squish/flatten the eyeball, knot the yarn tails together again several times to secure. Leave the long white tails for now so you can use them later to sew the eyeball onto the hat.


Using black yarn, crochet a small "pupil" for each eyeball by working 6 SC into a magic circle. Use the invisible joining technique to finish the outer edge. Tightly cinch the center of each pupil and knot to secure. Leave a long tail to sew each pupil onto the front of each eyeball, centered over the front cinched end. Knot to secure and hide black yarn tails inside the center of the eyeball.


Using the long white yarn tails, attach the eyeballs to the hat and knot several times to secure. Weave in ends and wear your Cookie Monster hat with pride!


Wednesday, September 8, 2021

A housewarming gift

I had a hank of some old, heavy worsted weight green yarn that either came from my mother's stash or else the big bag of random yarn balls that Mika gave me when she and her wife moved to Wisconsin.

Now that Mika and Emmy are buying their first house, I wanted to make them something as a housewarming gift. Since green and black are colors they are planning to utilize in their decor, the idea for this knitted pumpkin/floral display started to form in my mind.

The yarn was too heavy to run through my Sentro machine, so I tried it on the Addi instead, and, of course, the Addi was able to handle it just fine. (Addi only grumbled a tiny bit about how heavy the yarn was.)

There was enough yarn in the hank to get a tube of 114 rows, plus leaving a long tail (about 3 yards long) for finishing and sewing the pumpkin's sections.

Fold the tube inside itself in half, as for making a double-thick beanie. Cinch and secure the ends. Stuff the interior. Then using the long tail, wrap around the outside and through the center to create "sections" of the pumpkin. As you create the sections, the bottom will cinch itself closed. You can secure the bottom with a few extra stitches, if needed.

I cinched the ends while keeping a finger in the top hole so it would remain open after assembling the pumpkin. Leaving the hole slightly open this way will allow me to use the pumpkin as a "vase" for holding some silk flowers, which I think will make a lovely display. 


I also cut a stem from piece of black faux leather, making it about 6 inches long by 3/4-inch wide. I used a yarn needle to punch 2 holes near the stem ends, and used those holes to sew the yarns ends through after tying down the pumpkin's sections. Having a stem there means the pumpkin could also be displayed plain, without flowers.

The flowers I'm using are in autumn colors, but Mika and Emmy should be able to switch out the flowers throughout the years to match the changing seasons, if they wish. I cut the flower stems at about 4-5 inches long and bent them to help the flowers curve toward the pumpkin after inserting the stems into the hole at the top and working around the leather stem.


Monday, March 15, 2021

Lots-a hanger covers

Crocheted or knitted hanger covers are so quick and easy to make and are perfect for making your plastic tubular hangers slip-resistant. These are quick projects that can be great for busting down your yarn stash because they only require small amounts of yarn, and they produce a useful finished object. I mean, who doesn't need a collection of yarn-covered hangers in their closet to keep their nice blouses (etc.) from falling onto the floor? 😊


The crocheted Hanger Cover free pattern by Frugal Knitting Haus is a great, basic option for dressing up your everyday hangers. These look equally great whether worked in solid colors or variegated yarns.

The strip you crochet is six stitches wide (about 2 inches) by about 36 inches long. When you finish off, cut a long tail (about 2.25 times the length of the finished work) and use the tail to sew the cover to the hanger with a wide whip stitch (about 3-4 stitches per inch). No need to be fussy about it because the sewing stitches will blend into and be disguised by the cover. Knot the tails together and hide them inside the work for an easy finish.

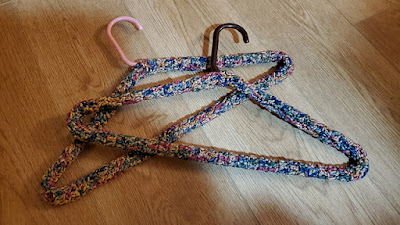
Another easy way to make hanger covers is by using a 22-needle knitting machine, such as the Addi Pro.

You can make a matching set of multiple hangers all from one skein of yarn, or you can do like I did above and just grab whatever pieces of yarn you have available for a unique, scrappy hanger.

Using a 22-needle machine, cast on with a few rows of waste yarn. Change to your working yarn and knit 160 to 170 rows to fit most tubular plastic hangers. Leave about a 2-yard tail before cutting the working yarn and drop it into the center. Change to waste yarn and work a few more rows then cast off from the machine. Gently stretch the knitted piece.

Using a 5mm crochet hook, close the end of the tube with the short tail and remove the waste yarn, pulling the short tail through the last loop to secure it. (Don't hide this tail inside yet.) Then close the end of the tube with the long tail, pulling the long tail through the last loop to secure it.

Thread the long yarn tail onto a large needle. Hold the knitted strip so the end wraps around the hanger and whip-stitch the long edges of the knitted piece together. Stretch the knitting until the ends of each side meet just below the hook of the hanger and whip-stitch or mattress-stitch the ends together for a neat appearance. Knot the tails together to secure and then hide the tails inside the knitting for an easy finish. Now your covered hanger is finished and ready to use.

The striped machine-knit hanger cover in the photo above was made with 160 rows, which was just long enough to fit snugly on the hanger. It might have been better if I'd made it 170 rows, which is what I did in the machine-knit hanger cover in the photo below. 


Sunday, February 21, 2021

Panthers Pride

I made this set to gift to the Perry Panther in our family, Daniel. These were both machine-knit. I made the scarf on my Addi King Size (46 pins), and the hat is made on my Sentro 48. The stripe pattern is based on the Years 3/4 scarves in Harry Potter. Perry High School's colors are maroon and gold, so I used Red Heart Super Saver in the Burgundy (main color) and Saffron (contrast color) colorways. I might decide to add some fringe to the scarf later.


Hat recipe on Sentro 48: Main color 30 rows. Stripes section: 2 rows contrast color; 4 rows main color; 2 rows contrast color. Finish hat by continuing in main color for another 72 rows. 110 rows total.


Scarf recipe on Addi 46: Starting/ending block 15 rows main color. Stripes section: 2 rows contrast color; 6 rows main color; 2 rows contrast color. Large block 30 rows main color. Repeat alternating sections of "stripes section" and "large block" five more times (for a total of six large blocks), ending with a "stripes section." Repeat "starting/ending block" to finish. 280 rows total. (Can add more large block sections alternating with stripes sections for a longer scarf, if desired.)


Perry High School's team colors are very similar to Gryffindor House. 😊


Tuesday, February 2, 2021

CPAP hose sleeve re-knit

A few years ago, I hand-knit a sleeve/cozy for the hose on my CPAP machine. It used one whole skein of Big Twist Sincerely Ombres in Gray Denim. I knit it flat on size 7 needles, then (without breaking the yarn) left a long tail and used a 5mm crochet hook to single-crochet the long seam together on the inside, which would make it easier for me to undo the work and reuse the yarn later if I decided to redo the hose sleeve, since that was my first attempt at knitting one.


It was around that same time when I first started hearing about the wonderful circular knitting machines like the Addi, Sentro, etc., and after spending some time studying what the machines could do, I was certain I could reknit this hose sleeve using a 22-needle machine. It would be a couple of years before I'd decide to invest in the Addi Express Professional, but that time finally came, and this is the first item I knitted on it.

I cast on with waste yarn for about 12-13 rows then started knitting with some Grey Heather Red Heart Super Saver. When I hand-knit the hose sleeve, it was only 17 stitches wide, and since the Addi has 22 needles, I wanted to be sure the reknit sleeve would be long enough, so I knit with the gray Red Heart yarn for 48 rows (about 11 inches). Then I changed to the Big Twist yarn and continued knitting. The counter read 358 rows when I stopped knitting with the Big Twist yarn and switched back to waste yarn for another 12-13 rows before casting off.

I had left a long tail (about 6 yards) before starting the Red Heart yarn in the machine. I used that long tail to pick up and SC in each stitch from the waste yarn on the cast-on end. Then I continued to SC in each stitch around in a continuous spiral (without joining at the end of rounds) until the yarn ran out. There was enough yarn for about 4 rounds of SC on that end. I finished off with the gray yarn and then removed the waste yarn from that end of the hose cover.

At the other end of the hose cover I had also left a long tail of the Big Twist yarn. I used that tail to pick up and SC in each stitch from the waste yarn. Then I chained 16 to form a long loop for the frame of my mask to slip through (to help hold the hose sleeve in place during use), then SC in the next stitch to join the loop to the edge of the hose sleeve, and SC in the next 10 stitches and chained 16 again for the second mask loop. I joined that loop with a SC in the next stitch and SC in all the stitches until I was back to where the first loop chain began. I put a SC in each chain of the loop, then continued with SC around the edge of the hose sleeve until reaching the second loop chain. I repeated putting a SC in each chain and then continued in SC along the edge of the hose sleeve until the yarn was about to run out and finished off there.

I think the extra stitches in the width of the Addi-knit hose sleeve will make it a little bit easier to put on and take off this version of the hose sleeve compared to my hand-knit version. These yarns are nice and soft (after machine washing and drying), so they make a nice hose cover.

Monday, January 25, 2021

Sack Saver Stuffie free recipe machine knitting

This is a quick, easy, and useful knit for storing extra used plastic grocery bags, which you can reuse later as trash can liners, etc. This Sack Saver Stuffie will keep your plastic bags neatly contained and stashed away until you need them. It has a hanging loop and an opening at each end for quick access to add/remove the bags.


Using the Addi Express King Size machine (or similar size) cast on with waste yarn and work for 5 to 6 rows. Drop the waste yarn and start working in the main color (I used Red Heart Super Saver in Neon Stripes colorway as my main color). Work 60 rows in main color, then drop main color and continue working in the contrast color (I used Red Heart Super Saver in Black as my contrast color). Work in contrast color for 60 rows; do not cut yarn. Drop contrast color into center of machine and continue working in waste yarn again for 5 to 6 rows. Cast off project from machine.

Gently stretch the project, then fold the contrast color side of the tube inside of the main color side of the tube so the cast on/cast off edges are aligned. Using a 5mm crochet hook, join the contrast color edge stitches to the main color stitches, alternating one stitch from each side until all stitches are secured all the way around. Pull the short tail from the start of the main color section through the last loop on your crochet hook to secure. Remove waste yarn.

Gently stretch the project a little more. Position the contrast color working yarn (still attached to its skein) to continue working around the edge you just used your crochet hook to secure. Being careful to work around two strands of yarn from the project for each stitch, SC around this edge of the tube (you should have 46 SC around). Join the end of the round of SC with a sl in the 1st SC. Ch 1. Holding a large ponytail elastic against the top of the round of SC stitches you just made, SC over the ponytail elastic and into the top of the SC stitches you just worked, placing 1 SC in each SC from the previous round. Continue all the way around to secure the ponytail elastic inside the crochet stitches. Join the end of the round with a sl in the 1st SC. Don't break yarn yet.

To make the hanging loop, ch 10 and sl to join the chain in the same st right beside where you started chaining. Sl into the next st over on top edge of tube, then turn your work and SC back over the 10 chains to make the hanging loop sturdier. Sl to the next st over from where you started making the hanging loop. Finish off with a secure knot. Hide yarn tails in between the knitted layers.

Turn the work so the folded/open end of the tube is facing you. Place a slipknot of the contrast color yarn on your crochet hook and (being careful to always work into two strands at the folded end of the knitted tube) join this yarn to the folded edge. Ch 1 and evenly work 46 SC around the folded edge. At the end of the round join with a sl to the 1st SC. Ch 1 and (as before) hold a large ponytail elastic against the top of the round of SC stitches you just made and SC over the ponytail elastic and into the top of the SC stitches you just worked. Place 1 SC in each SC from the previous round. Continue all the way around to secure the ponytail elastic inside the crochet stitches. Join the end of the round with a sl in the 1st SC. Finish off with a secure knot. Hide yarn tails in between the knitted layers.

All done! This Sack Saver Stuffie will easily store dozens of used plastic grocery bags.


Friday, January 22, 2021

Puff Hat Addi Express King Size

It took me a week to complete this project because I never had much time on any given day to work on it. If you had a couple of hours available to focus on the project, it would only take one day to finish this.


Designer Claudia Bostic shared her free pattern to make these Puff Hats in the files of the Addi Circular Knitting Machines group on Facebook. This design is a good alternative for making beanies to fit larger size heads.

Since this was my first attempt at making the pattern, it didn't turn out 100% perfectly, but it's not bad for a first try. I attempted to use the kitchener stitch to graft the ends of the large (bottom) tube, based on instructions from Yay for Yarn's tutorial on YouTube. (Grafting the ends of the large tube is an optional technique; you can join the ends of that tube using any method you prefer.)

Thursday, January 14, 2021

Pocket Scarf Addi King

Jojo Juju has a video tutorial for how to make a nice, simple pocket scarf. Her techniques are what I used for this design. The only difference is I knitted my scarf to 410 rows on the Addi King before folding the ends up and stitching the sides to form pockets.

I also sketched out my idea before starting. I thought I was getting about 5 rows per inch with this yarn on the Addi, so I did the math to make my scarf about 64 inches long, plus another 9 inches at each end for the pockets. However, after knitting the tube for the scarf I discovered that the gauge I had was closer to 4 rows per inch, so this turned out longer than I intended. Next time I need to measure my gauge more carefully. 😆


I turned up closer to 10 inches at each end for the pockets, and that feels just right. After sewing the pockets the scarf measures about 78 inches long. That's long enough to fit my husband comfortably! LOL! But it fits me pretty well, too. The Addi knits a tube of about 7 inches wide in this yarn.

I might add fringe to the ends later, but the scarf looks nice even without fringe or tassels.

Just for interest's sake: Working with a tight tension, I got about 297 rows from one skein of the Red Heart Ombre in True Blue. This project needed 345 grams of the yarn, or about 1 1/4 skeins.


Friday, January 1, 2021

My First Addi Kingsize Hat

Happy New Year! This is the very first item I knitted on my new Addi Express King Size machine. I used an old hank of what I'm guessing is some Red Heart yarn in a nice red color that I had in my stash (no label). 


Jojo's video says if you want to make a double-layered adult size hat like this you should knit between 140-150 rows, but my yarn hank ran out at 137 rows. That's probably close enough to make a usable hat since this feels like a Red Heart yarn that's on the heavier side of size 4.


Finished hat is about 15 inches long, with the cuff unrolled. Being able to knit and finish an entire hat in less than an hour is miraculous. I will be able to make so many hats to donate to the needy this way that I wouldn't be able to do otherwise. Love these knitting machines.

Total weight: 114 grams


Saturday, November 28, 2020

Quick and easy CPAP hose cozy

Knitting machines with 22 needles are the perfect size to knit cozies to cover a CPAP air hose. 

I didn't precisely count the rows on this project on the Sentro 22, but it's pretty close to 390 rows of knitting (about 72 inches) with a few rounds of SC (5.5mm hook) on each end for stability.

Red Heart Super Saver Neon Stripes colorway

I'll probably also add two straps with ends secured by small buttons at one end of the cozy so the straps can hold the wearer's mask end of the hose up close to the mask to keep the cozy from slipping down during use.

It only took about an hour to machine knit this piece. Attempting to knit the same thing by hand would have taken me weeks (and probably at least 12 hours) of work. So having a knitting machine available is a huge help to me for projects like this. I do love to hand knit (and there are lovely stitches you can hand knit that a machine like this will never be able to replicate), but I have chronic pain issues that severely limit how much hand knitting I can do.

**UPDATE**

I knitted another one of these using the Red Heart Super Saver Jumbo Stripes in the Bright Stripe colorway on my Addi 22, which has a row counter on it (hallelujah!!). On the Addi, I was getting about 5 rows per inch. At that gauge, it takes 360 rows to make a 72-inch-long tube, so that's how many rows I made the Bright Stripe cozy, plus leaving extra yarn at each end to crochet the edging and straps. (I forgot that I usually prefer to make the tubes more like 74 inches long to better fit the CPAP air hose ... so in that case the knitted tube should have been 370 rows. Mental note for next time!!)

Making a tube this long works best if you can mount your knitting machine on a table where the work can hang free down the middle, such as my Workmate table shown in the photos. Even at that height, I still had to tuck in the end of the tube for about the last 100 rows to keep it from dragging on the floor.


The mask-end straps are each 16 chains long, then slip stitch back across the chain to reinforce.


The colors are pretty similar between the Neon Stripes and the Bright Stripe colorways, but I think I like the Bright Stripe better because it doesn't have a black band in between every other color stripe. I guess whichever one would be better just depends on what you want your project to look like. They are both fun and funky colorways.