Showing posts with label ybsfree. Show all posts

Friday, September 24, 2021

A tribute to my Purple Warrior, Miss Pam

I designed a gift pack of three chemo beanies in honor of my bestie and purple warrior Miss Pam, who is battling pancreatic cancer. In the photo collage above, the designs are called, from left to right, the Smooth & Simple Chemo Cap, the Sleek & Stretchy Surface Braid Chemo Cap, and the fun and funky Loopy Chemo Cap. It took a few months and a lot of work, but I finally have all the hats made (and also a Purple Power Throw blanket for some extra snuggly comfort) and ready to deliver to keep my friend warm and cozy this winter!

November is Pancreatic Cancer Awareness Month, so I'm releasing my free pattern pack on Ravelry now to give everyone an opportunity to download the patterns and get stitching on some chemo caps in time for that event.

Making and donating chemo caps to cancer patients is a charitable endeavor that is near and dear to my heart. My hope is that you will use these free patterns to donate caps to patients in need in your area as well.

In my experience, Red Heart Super Saver (and other similar acrylic yarns) can be an acceptable choice for chemo caps because even though it's stiff and scratchy when new, after running it through the washer and dryer, it comes out very soft. The machine drying step is key. (The yarn still feels stiff after coming out of the washing machine. It's only after machine drying that the yarn will soften up.) It's an individual thing whether a particular patient can tolerate the feel of the acrylic yarn. I would say for all-day wear, a natural fiber like cotton would probably feel more comfortable and breathable. 

Prototypes in my photos are displayed on a 21-inch circumference wig form.

A note about sizing: My pattern instructions are based on the type of yarn (a heavy worsted/aran) and size of hook I was using, but even if you use the exact same supplies as I did, your individual tension might produce a different size finished hat. I tend to crochet tightly; if you crochet loosely, "your mileage may vary," as they say. So if you have a specific hat/head size in mind for a specific person, it's important to know what the circumference is of their head, and it's also important for you to measure the diameter of the top of your hat when you reach the end of the increasing rounds (since these are top-down patterns) to have a better estimate of the size of the finished hat before you do all the work of the sides of the hat and then end up disappointed because it turned out either too tight or too loose for the intended wearer. (You can always do the math: diameter x 3.14 = circumference.)

In the photo below of the top of my purple prototype hat with the measuring tape, you can see that the diameter at the end of my round 7 is about 6.5 inches. If you multiply that measurement by pi (3.14), it will give you the approximate circumference of the finished hat, or about 20.5 inches, in my case. Since I wanted a hat to fit a bald head that's about 21 inches in circumference, this should be just about right.


Depending on your unique tension and the yarn you're using, you might find that you need to end up with more or fewer stitches to end up with a finished hat that's the correct size for your intended wearer. Or you might be able to achieve the correct size by changing the size of hook you're using but keeping the same number of stitches mentioned in the pattern.

The nice thing about these patterns is they are very basic and easily changed to accommodate different sizes. Just keep increasing until the top of your hat reaches the diameter you need, and then stop increasing and continue working the sides of the hat at that particular stitch count. Work the length of the sides until they are as long as you need, and then finish off. My materials list and stitch counts are only a jumping-off point for you to create a hat that works for you.

Click here to download my three-pack of quick and easy chemo caps at Ravelry, and please remember to make a few to donate to your local cancer center. Thank you so much, and happy stitching!

And just for fun, here's a photo of the Purple Power Throw blanket I also made for Miss Pam:

The throw uses the stitch pattern from the Sunny Cardi pattern, except I modified it to have the rounds begin/end in a corner by utilizing the technique for beginning/ending rounds found in the Lazy Diamond Boho Pocket Shawl. I love the way it turned out. Having the rounds begin/end in the corner looks so much neater than my original version of this blanket, my I Am the Storm Throw.

Love you so much, bestie. Keep on being strong.


Tuesday, September 7, 2021

JuliChu V-stitch Headband Re-created

About 10 years ago I discovered a lovely pattern for a V-Stitch Headband by JuliChu Crochet. JuliChu had a pattern page for it on Ravelry, which linked to the actual pattern on her blog site. I made the headband several times, loved it, and then moved on to other things for a while. 


In 2019 I decided I wanted to make another one of these headbands, but when I tried to go to JuliChu's blog from her Ravelry pattern page, to my dismay I discovered that her blog had been taken down. NOoooOOooOOOooo!!! 


Long story short: I learned from this experience that if I ever again find myself in love with a pattern that's only available on the designer's blog, I will always download a copy of the instructions to keep in my personal files, just in case. But I hadn't done that with JuliChu's V-stitch headband pattern.

I reached out to manmadecreationz on Ravelry, since he had project pages showing that he had also made JuliChu's V-stitch headband many times, with the hope that maybe he had been smarter than I and had downloaded a copy of JuliChu's pattern. Alas, although he replied to my message and thought that perhaps he might have a copy of the pattern saved, which he would share with me if he could find it, he never got back to me with the actual pattern, so I had to conclude that he hadn't downloaded it either. 

I even tried using the Internet Wayback Machine to see if it would recover the pattern page from Juli's blog, but no luck there, either.

It took me a few more years to find the time (and many failed attempts) to try to re-create JuliChu's design, but I think I just might have finally cracked it. I'm not saying this is an exact replica of JuliChu's design, but after carefully examining the stitches of a headband I made previously from her pattern, I believe this comes pretty close. You can give it a go and decide for yourself.


I like the way the shorter height of the edge stitches (versus the height of the V-stitches in the center of each row) creates a curve in the fabric, which conforms to the roundness of the human head nicely.

In my sample photos, the variegated blue headband is made from JuliChu's original pattern, and the solid blue headband is my re-creation of her pattern. As you can see, the solid blue headband turned out a bit wider than the original. But bear in mind that my original headband has also been repeatedly washed and worn, whereas my new headband is fresh off the hook, so those factors have an effect on the current appearance of the pieces.

This pattern re-creation is dedicated to JuliChu Crochet. We may never know why she took down her blog, but whatever her reasons, we still love her brilliant designs and hope to continue sharing them for many years to come.

JuliChu's V-stitch Headband Re-created

US crochet terms
5mm hook
Worsted/aran-weight yarn

Special stitches:
V-stitch: In st indicated - DC, ch 1, DC.
HDC2tog: HDC two together to decrease by 1 HDC. YO, insert hook in indicated st, YO and pull up a loop (3 loops on hook), YO, insert hook in next st, YO and pull up a loop (5 loops on hook), YO and pull through all loops. (1 HDC decreased)

Note: The “ch 1; turn” never counts as a stitch.

Increasing section:

Row 1: Starting with a long (12-14 inches)  tail below your slipknot (you can use this length to sew the button on later), FHDC 6. Alternatively, if you don’t like working FHDC stitches, chain 7, turn, HDC in 2rd ch from hook and in each ch to end. Ch 1; turn. (6 HDC)

Row 2: 2 HDC in first st; HDC to end of row. Ch 1; turn. (7 HDC)

Row 3: 2 HDC in first st; HDC to end of row. Ch 1; turn. (8 HDC)

Row 4: 2 HDC in first st; HDC to end of row. Ch 1; turn. (9 HDC)

Row 5: 2 HDC in first st; HDC to end of row. Ch 1; turn. (10 HDC)

Row 6: 2 HDC in first st; HDC to end of row. Ch 1; turn. (11 HDC)

Row 7: 2 HDC in first st; HDC to end of row. Ch 1; turn. (12 HDC)

Now we will begin the V-stitch section:

Row 8: SC in first 2 sts; [V-stitch in next st; SC in next st]. Repeat [] to last 3 st; SC in each st to end of row. Ch 1; turn. (8 SCs and 4 V-stitches)

Row 9: SC in first 2 sts; V-stitch in next SC; [SC in next ch space from V-stitch in row below; V-stitch in next SC from row below]. Repeat [] until last V-stitch and 2 SC remain from previous row; SC in ch space of V-stitch, SC in last 2 sts. Ch 1; turn. (8 SCs and 4 V-stitches)

Repeat row 9 until headband length measures about 18 inches from the first row (unstretched), then begin decreasing section. Even better: If you have the intended wearer’s head circumference measurement, use that to determine how many times to repeat row 9 before working the decrease section. The length of the initial increasing section you made will be about the same as the length of the decreasing section. Therefore, to estimate the total length of your headband (before you work the decreasing section) add the length of the increasing section to the total length you have, and compare that to the wearer’s head measurement to determine when you should begin working the decreasing section. Keep in mind that the headband will stretch a bit when worn, so if you want the headband to fit snugly, aim to make the total length about 1 inch less than the wearer’s head circumference.

Decreasing section:

Row 1: Working ONLY into the SC and ch-1 spaces of the previous row, HDC in each st across. Ch 1; turn. (12 HDC)

Row 2: HDC2tog over first 2 sts; HDC in each st across. Ch 1; turn. (11 HDC)

Row 3: HDC2tog over first 2 sts; HDC in each st across. Ch 1; turn. (10 HDC)

Row 4: HDC2tog over first 2 sts; HDC in each st across. Ch 1; turn. (9 HDC)

Row 5: HDC2tog over first 2 sts; HDC in each st across. Ch 1; turn. (8 HDC)

Row 6: HDC2tog over first 2 sts; HDC in each st across. Ch 1; turn. (7 HDC)

Row 7: HDC2tog over first 2 sts; HDC in each st across. (6 HDC) Do not ch 1-turn. Instead, we will now make a chain space for the buttonhole. Ch 4; turn. Join end of ch to top of 1st HDC of row 7 with a sl st. Ch 1; turn.

Edging: Now we will work a row of HDC around the entire headband to give the edges a clean, finished look. Begin by working 10 HDC in the ch-6 space for the buttonhole. Continue working HDCs around the sides of the headband, placing stitches as evenly as possible. When you get to the “corners” at the end where the project began, work 2 to 3 HDCs in the corners. When you have worked all the way around back to the start of the HDC edging stitches, join using the invisible join method and finish off. (On my sample, I got 8 to 9 HDCs along the side of the increase/decrease sections and 46 HDCs along each side of the V-stitch section.)

Use the long starting tail to sew a 1-inch button on the end opposite the buttonhole, weave in ends, button the headband closed, and enjoy wearing your new headband.


Saturday, August 28, 2021

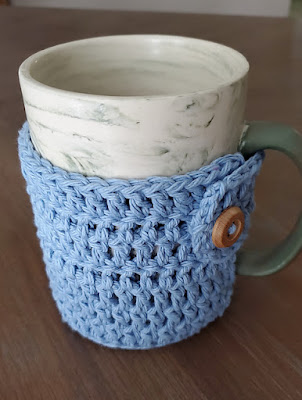
Another Big Mug Hug free pattern

I live in a humid climate, and I like to drink iced coffee every morning in my big mug. But my cold drinks always end up "sweating" with condensation, so I like to use cotton cozies to keep the drippiness to a minimum and water rings off my tables.

This is a quick and easy pattern I worked up to fit my large, square-bottomed morning coffee mug.

Another Big Mug Hug

U.S. crochet terms

Materials: Worsted weight 100% cotton yarn, 5.5mm crochet hook, yarn needle, scissors. (My sample uses Lily Sugar n Cream in the Light Blue colorway.)

Base is worked in continuous spiral (don't join at end of rounds).

Round 1: In magic circle, HDC 8. (8 HDC)

Round 2: 2 HDC in each st. (16 HDC)

Round 3: 2 HDC in next st, 1 HDC in next st. Repeat around. (24 HDC)

Round 4: 2 HDC in next st, 1 HDC in each of next 2 sts. Repeat around. (32 HDC)

Round 5: 2 HDC in next st, 1 HDC in each of next 8 sts. Repeat around. (36 HDC)

SC in next st, then sl into back loop only of next st to join.

Base of cozy is complete. Work next round in back loops only to turn the corner and start working the sides. Sides are worked in joined rounds.

Round 6: Ch 2. DC in BLO of each st around. Join with sl to top of 1st DC. (36 DC)

Round 7: Ch 2. DC in each st around. Join with sl to top of 1st DC. (36 DC)

Round 8: Ch 2. DC in all but the last st. Leave last st unworked and do not join to 1st st. Turn work. This is leaving an opening for the bottom of your mug handle to pass through. (35 DC)

Round 9: Ch 2. DC in each st back to beginning of row. Turn work. (35 DC)

Round 10: Ch 2. DC in each st to end of row. (35 DC) Now we are going to add stitches to make the tab for the button closure. Continue row by FDC 6 times. (Row is now 41 sts long)

Round 11: Ch 2. DC in each st to end of row. (41 DC)

Round 12: Ch 2. DC in each st to end of row. (41 DC)

Finish off. Weave in ends. Slip cozy over your mug, placing the long tab through the mug handle. Because DC stitches are so tall, you will use the space between the DC stitch in the center row at the end of the tab and the next stitch in as the buttonhole. Mark where that space sits over the body of the cozy and sew a button in that spot. (My button is about 3/4-inch diameter or about 18mm.) Refer to photos if you need guidance for button placement. Your cozy is now ready to use. Enjoy!


Friday, August 6, 2021

Handy little earbuds pocket - free pattern

Here's a super-quick to make little pocket to help keep your wired earbuds wrangled and hopefully less tangled.

I keep a set of wired earbuds near my chair in the living room so they are handy whenever I want to listen to a video on my laptop or phone while my husband is next to me watching TV. That way I can listen to my thing without competing with the sound coming from the TV.

But the problem with wired earbuds is: How do you keep them neatly coiled and out of the way when you aren't using them? I would wrap the wire around my hand into a neat roll, but after I set it down, the wire would inevitably come unrolled and turn into a tangled mess.

So eventually I thought if I crocheted a little pocket to tuck my rolled-up earbuds into, it would hold everything together until I was ready to use them again.

You could make this with just about any yarn or hook size, but I used a worsted weight cotton (Lily Sugar 'n Cream Ombres in the Faded Denim colorway) and a 6mm hook. If you use lighter or heavier yarn, you would need to alter the stitch count to make a pocket that's approximately 2.5 inches in diameter at its widest point.

Setup: I started with a magic circle and worked in a continuous spiral (no joining at the end of rounds).

Row 1: 6 SC in magic circle. Use a stitch marker to keep track of the beginning of the rounds and move up when you start each new round. (6 SC)

Row 2: 2 SC in each st around. (12 SC)

Row 3: 2 SC in next st, 1 SC in next st. Repeat around. (18 SC)

Row 4: 2 SC in next st, 1 SC in each of next 2 sts. Repeat around. (24 SC)

Rows 5-6: 1 SC in each st around. (24 SC)

Row 7: Dec SC over next 2 sts, 1 SC in each of next 2 sts. Repeat around. (18 SC)

Row 8: Dec SC over next 2 sts, 1 SC in next st. Repeat around. (12 SC)

Row 9: SC in each st around. (12 SC)

Finishing: Sl in next st. Use an invisible join technique and finish off. Weave in ends. Enjoy your handy little earbuds pocket. 


Monday, April 19, 2021

Soap Gripper free pattern

Back in August 2015 I was wanting to make a simple Soap Gripper to keep the soap from slipping out of my hand while bathing. For my first attempt I used a 6mm hook and some white Lily Sugar & Cream cotton yarn and came up with this:


This little sack is so well fitted to the bar of soap it contains, however, that it's actually difficult to generate suds with it while bathing. From this I have learned that some positive ease is a good thing in a soap holder.
 

The close fit does make it very easy to get a secure grip on the bar of soap, though. And if you're giving away a bar of soap (perhaps homemade?) as a gift, then this little holder is one way you can choose to present it.
 

I posted about this project on Ravelry and closed by saying that if anyone reading about it was interested in replicating the project, I would post my construction notes "below." BUT time went by, and, wouldn't you know it, before long I forgot all about posting my construction notes. And then I lost the little white Soap Gripper itself, so my ability to count its stitches and describe how it was made was also lost.
 
So today I tried to remedy that oversight by posting the following:

Well, I obviously forgot to add my notes here for how I made the white Soap Gripper shown in the photos. Sorry about that! I can tell from the photos that it was mostly worked in SC, and it looks like I started with a few chains at the closed end (to give it a more oval shape rather than working all the starting row of stitches into the center of a circle), then I ended with what appears to be a row or two of DCs alternating front-post and back-post for a ribbing effect at the open end. I can't tell for sure how many stitches around this was ... maybe 24. So if you want make one that closely approximates the white one in the top photos, I'd suggest you try these steps.

However, as I said before, it didn't take long for my husband and me to conclude that we prefer a tiny bit more positive ease in our Soap Grippers (to make lathering easier), and my husband also prefers a more open mesh (rather than the tight, closed fabric that the SC stitch gives).

So I've subsequently been making Soap Grippers for us as follows:
 

Using 100% cotton yarn, worsted weight (4) and a 5mm or 5.5mm hook. (The variegated blue yarn shown in my sample photos is Lily Sugar n'Cream Ombres in the Faded Denim colorway.)

Setup/round 1: In a magic circle, ch 1 then work the following stitches into the center of the circle (or chain 2 then work the following stitches into the second chain from the hook): 1 SC, 1 HDC, 6 DC. (8 stitches)

We will work subsequent rounds in a continuous spiral, without joining at the end of rounds, for a seamless appearance until the ribbing at the cuff. Use a stitch marker to keep track of the beginning of the round.

Round 2: 2 DC in each st. (16 DC)

Round 3: 2 DC in first st, 1 DC in next st. (2 DC in next st, 1 DC in the st after that.) Repeat from ( to ) around. (24 DC)

Rounds 4-9: DC in each st around. (24 DC)

To smooth out the edge: HDC in next stitch; SC in next st after that; SL in next st after that.

Now we will work some "ribbing" at the open end of the Soap Gripper. (These rounds are joined at the end.)

Round 10: Ch 2. FPDC in 1st st; BPDC in next st. (FPDC in next st; BPDC in next st after that.) Repeat from ( to ) around. Join with a sl to top of 1st st.

Round 11: Ch 2. FPDC in FPDC from previous row; BPDC in BPDC from previous row. Repeat around. Join with a sl to top of 1st st.

Finish off; weave in ends. Add a bar of soap and enjoy your new Soap Gripper.
 

For a slightly different looking mesh effect, instead of working stitches into the tops of stitches from the previous round, as directed above, you can opt to work stitches in between the stitches from the previous round.

These Soap Grippers are super quick and easy to make and are very useful to keep the soap from slipping out of your hand while bathing. After using, place Soap Gripper (with the soap still inside) on a soap drying rack and allow to dry. When your bar of soap is nearly depleted, add a new bar of soap and continue using. The Soap Gripper helps you to get every last bit of use out of your bars/slivers of soap, which is frugal and saves you money!


Monday, March 1, 2021

Heart-shaped Valentine Wreath

I started working on this project on Valentine's Day itself, so I didn't finish it in time to display the wreath for the holiday this year. But I'll store it carefully so it will be ready for next year! 😆


I didn't count the rows on this project (my Sentro 40 doesn't have a counter on it), but I started with a few rows of waste yarn and then simply knitted through one entire skein of Walmart Mainstays 100% acrylic yarn in Pink Multi on medium tension. Finish off with another few rows of waste yarn before casting off from the machine. The full skein produced a knitted tube that's about 50 inches long, and I counted it having a gauge of about 4 stitches per inch, so we can do the math and estimate this tube being about 200-ish rows long. The tube from the 40-pin machine is about 6 inches wide.


To shape the wreath I used this 13.5-inch heart-shaped wreath form that I bought on Amazon. If you want to make a project like mine, any similar size wreath form should work well.


Full disclosure: My Sentro hated this yarn for every single stitch, but the colorway is just so fun that I kept going. (It wasn't bad enough to make me stop knitting. The machine just behaved stiffly, and I had to watch every single stitch like a hawk to make sure they were seating properly, so it was EXTREMELY slow going, but it wasn't any harder to crank than normal, so I felt safe enough to continue.) Actually, I first tried this yarn on my Addi King Size ... and the Addi hated this yarn, too. So be warned. But, dang, the finished product is just super cute!

Another reason to be irritated with this yarn is that my skein had three splice/knots all within what I estimate was the first 70 rows, which seems excessive. However, after that the rest of the skein was splice/knot free, so maybe I just picked a dud skein.

To add the knitted tube to the wreath form, I dropped one stitch on opposite sides of the tube, wrapped the tube around the wreath form, and then (using a 5mm crochet hook) joined the dropped stitches from alternating sides using a slip stitch crochet technique (catching two strands from each side at a time) similar to the technique used in this video by Shelby Acosta. (Shelby catches four strands from each side while joining, whereas I only caught two strands from each side, but otherwise the technique is the same.) The join itself adds a nice bit of contrast to the variegated yarn, so after finishing off the join I twisted it around on the wreath form until the joined stitches were visible on the front side of the wreath.

I whip-stitched the tube ends together at the bottom of the wreath, tied a few knots to secure the ends, and that was it.

Now all that's left to do is to add a hanging loop, and also to decide whether I want to add any trim pieces to make my wreath even cuter. Some white pompoms or even some silk flowers or greenery might look nice. What do you think?


Monday, January 25, 2021

Sack Saver Stuffie free recipe machine knitting

This is a quick, easy, and useful knit for storing extra used plastic grocery bags, which you can reuse later as trash can liners, etc. This Sack Saver Stuffie will keep your plastic bags neatly contained and stashed away until you need them. It has a hanging loop and an opening at each end for quick access to add/remove the bags.


Using the Addi Express King Size machine (or similar size) cast on with waste yarn and work for 5 to 6 rows. Drop the waste yarn and start working in the main color (I used Red Heart Super Saver in Neon Stripes colorway as my main color). Work 60 rows in main color, then drop main color and continue working in the contrast color (I used Red Heart Super Saver in Black as my contrast color). Work in contrast color for 60 rows; do not cut yarn. Drop contrast color into center of machine and continue working in waste yarn again for 5 to 6 rows. Cast off project from machine.

Gently stretch the project, then fold the contrast color side of the tube inside of the main color side of the tube so the cast on/cast off edges are aligned. Using a 5mm crochet hook, join the contrast color edge stitches to the main color stitches, alternating one stitch from each side until all stitches are secured all the way around. Pull the short tail from the start of the main color section through the last loop on your crochet hook to secure. Remove waste yarn.

Gently stretch the project a little more. Position the contrast color working yarn (still attached to its skein) to continue working around the edge you just used your crochet hook to secure. Being careful to work around two strands of yarn from the project for each stitch, SC around this edge of the tube (you should have 46 SC around). Join the end of the round of SC with a sl in the 1st SC. Ch 1. Holding a large ponytail elastic against the top of the round of SC stitches you just made, SC over the ponytail elastic and into the top of the SC stitches you just worked, placing 1 SC in each SC from the previous round. Continue all the way around to secure the ponytail elastic inside the crochet stitches. Join the end of the round with a sl in the 1st SC. Don't break yarn yet.

To make the hanging loop, ch 10 and sl to join the chain in the same st right beside where you started chaining. Sl into the next st over on top edge of tube, then turn your work and SC back over the 10 chains to make the hanging loop sturdier. Sl to the next st over from where you started making the hanging loop. Finish off with a secure knot. Hide yarn tails in between the knitted layers.

Turn the work so the folded/open end of the tube is facing you. Place a slipknot of the contrast color yarn on your crochet hook and (being careful to always work into two strands at the folded end of the knitted tube) join this yarn to the folded edge. Ch 1 and evenly work 46 SC around the folded edge. At the end of the round join with a sl to the 1st SC. Ch 1 and (as before) hold a large ponytail elastic against the top of the round of SC stitches you just made and SC over the ponytail elastic and into the top of the SC stitches you just worked. Place 1 SC in each SC from the previous round. Continue all the way around to secure the ponytail elastic inside the crochet stitches. Join the end of the round with a sl in the 1st SC. Finish off with a secure knot. Hide yarn tails in between the knitted layers.

All done! This Sack Saver Stuffie will easily store dozens of used plastic grocery bags.


Friday, January 8, 2021

Round Basket for Square Coasters free recipe

I'm still in the middle of a severe flare of lateral epicondylitis that started around Dec. 18 (I guess I did too much crocheting trying to finish off a few Christmas gifts), so my ability to do any crocheting or hand knitting has been very limited until my arms settle down, but I wanted to see if I could get this useful basket crocheted within a reasonable amount of time, so I gave this small project a try. It only took a couple of hours to complete.

This basket is to hold and protect our set of four square Thirstystone coasters, which are about 3.75 inches square, when they aren't in use. You can use these instructions as a jumping-off point to make a basket in just about any size you wish, so this post is more of a "recipe" than an actual pattern.

Yarn is held double, using two different colors for a bit of a tweed look. I used Red Heart Super Saver in Grey Heather and Red Heart Super Saver Ombre in True Blue (only small amounts of each yarn are needed, depending on how big you want your finished basket to be) and worked with a 6.5mm hook.

I like how working the two strands of yarn in this tight gauge results in a basket that's firm enough to hold its shape. The feel reminds me of felted work, although it is not felted.

For base of basket: Ch 5; join with sl to 1st ch to form a ring. Working in ring, SC then HDC 9 times (10 sts). This basket is worked in continuous rounds, so do not join at end of rounds. Use a stitch marker to keep track of beginning of rounds and move marker up as you go. 

To start 2nd round, work 2 HDC in 1st st and 2 HDC in each other st around (20 HDC). 

For 3rd round, work 2 HDC in 1st st, 1 HDC in next st, and repeat this way around (30 HDC). 

For 4th round, work 2 HDC in 1st st, 1 HDC in each of next 2 sts, and repeat this way around (40 HDC). 

For 5th round, work 2 HDC in 1st st, 1 HDC in each of next 3 sts, and repeat this way until you are halfway around the circle (for a total of 45 HDC). Sl into the back loop only of the next st; this will become the new beginning point of the rounds.

For sides of basket: For the first round of the basket sides work all sts in back loops only of sts in previous round. As before, work in continuous rounds without joining at the end of rounds. Use a stitch marker to keep track of beginning of rounds and move marker up as you work. Work 1 SC in next st, then 1 HDC in each remaining st around (45 sts). 

Continue on working subsequent continuous rounds of 45 HDC until sides of basket are as tall as you want them. My basket is 8 rounds tall (counting from after the base rounds).

To finish off, SC in next st; sl in each of next 2 sts. Break yarn; work invisible join; and weave in ends. Alternatively you could also work a round of reverse SC (aka crab stitch) to finish the top edge of your basket with a rope-like edging. (My arm was hurting, so I just finished my basket off without adding an edging to the top as soon as it was big enough to fit our coasters.)

Thursday, December 3, 2020

Winter in the South - new free pattern

Hello, everyone! I just published a new free pattern at Ravelry for my Winter in the South hat, so click on this link to head on over to Ravelry and download your free copy. I sincerely hope you enjoy this comfy, wearable design, and if you're inclined to give it a heart or make a project page where we can all see the lovely hat you made, that would just make my day. 😊

 Winter in the South is a top-down, seamless, slouchy ponytail/messy bun beanie made in an airy double-crochet mesh that’s perfect for winter conditions that are chilly but less-than frigid. I used Hobby Lobby I Love This Yarn for the sample in the photos, but most any worsted/aran weight size 4 yarn should be suitable. My sample hat used slightly less than half of the skein of ILTY.


This is a copyrighted, free crochet pattern offered by Yarncraft by Susan in adult/one size only. Written with standard U.S. crochet terms.


Thursday, March 19, 2020

Big Mug Hug - free pattern

I've been wanting to make a mug cozy that was big enough to fit our oversized, square-bottomed mugs. The cozy needed to be made with cotton yarn so it would be microwave-safe. After all, it's so much easier to put the cozy on the mug when it's empty, and THEN filling the mug with water, and THEN zapping it in the microwave for tea. 


Who wants to pick up a mug filled with scalding-hot water and then try to slip on a cozy without sloshing the water and burning yourself? Not me.

This cozy is quick to make and extra-thick thanks to the post stitches used on the cozy sides, and because the cozy covers the base of the mug it also protects your tabletop. It's easy to put on and remove thanks to the handy button loop.

Big Mug Hug

U.S. crochet terms

Materials: Worsted weight 100% cotton yarn, 5.5mm crochet hook, yarn needle, scissors. (My sample uses Peaches n Creme Ombre in the Blue Moon Ombre colorway.)

Start off working in the round:

Setup/row 1: In a magic circle, ch 2, DC 10. Join with sl at top of first DC. (10) [ch 2 doesn't count as a stitch in this pattern]

Row 2: Ch 2, 2 DC in each st around. Join with sl at top of first DC. (20)

Row 3: Ch 2, [2 DC in first st, 1 DC in next st.] Repeat around. Join with sl at top of first DC. (30)

Row 4: Ch 2, 2 DC in first st, 1 DC in each of next 15 sts. 2 DC in next st, 1 DC in each st to end. Join with sl at top of first DC. (32)

Now continue working back and forth in rows (do not join at end of rows for the rest of the pattern):

Row 5: Ch 2, FPDC in each st across. Turn. (32)

Row 6: Ch 2, BPDC in each st across. Turn. (32)

Repeat rows 5 and 6 until the cozy sides are a total of 10 rows tall. 

Row 15: Ch 1. Turn. HDC in each st across. (32 HDC)

Finishing: Sew a button in a top corner of the cozy as shown in photos. Slip cozy over your mug, hold the sides snugly around your mug the way you want it to fit, and then measure how long of a chain you need to reach from the other top corner of the cozy (the corner without the button) to the button and back to the other corner. Add a crochet chain of that length to the top corner without the button. Tie ends of chain to cozy to secure. Weave in ends, slip the cozy onto your mug, and enjoy.


Tuesday, November 12, 2019

Veterans Day Parade Camo Beanie or Messy Bun Hat free pattern

I love this Red Heart Super Saver Woodsy colorway because it reminds me of the old forest/jungle Army BDUs my husband (a Vietnam War veteran) used to wear. These colors work up to make a nice hat to wear to keep your head warm (and is long enough to cover your ears) while watching your community’s Veterans Day parade or participating in other similar celebrations in chilly November to honor and remember the many military personnel who have died in wars.


I suggest pinning a red remembrance poppy to your hat. I've read that there is no right or wrong way to wear the poppy. Some people pin them to their left lapel to position the poppy close to their heart; others wear it on the right lapel to position the poppy close to what would be the 11th hour mark if your body were viewed as the face of a clock. (If your poppy has a leaf, the leaf should also be positioned at 11 o'clock.) A Google search will provide links to multiple articles you can read about the history and etiquette of the remembrance poppy. Here's a poppy article by the American Legion.


M and L sizes of the hat use just about one full skein of RHSS in Woodsy. For size XL part of a second skein likely will be required. Other worsted or aran weight varigated yarns with short color changes (about 4-6 inches long) should give a similar result.


It's very easy to make this simple, slouchy, relaxed-fit hat as a beanie or in a messy-bun/ponytail style. Size M measures about 10 inches across the bottom when held flat, which should stretch to fit an average teen or adult’s head (20-22 inches). Size L measures about 11 inches across the bottom, which should comfortably fit heads 22-24 inches. Size XL measures about 12 inches across the bottom, to fit heads 24-26 inches.


You can copy what I did by following the easy steps below, or you can use my instructions as a jumping-off point to make a custom hat to suit your own taste. The hats are made using the hdc in the third loop stitch, which gives a sideways knit look on the obverse side and a sideways garter stitch look on the reverse side.

Supplies: 1-2 skeins Red Heart Super Saver (4) yarn in Woodsy, 5.0 mm (H) crochet hook, one large ponytail elastic (optional for messy-bun/ponytail version)

Beanie hat instructions


Setup for a beanie in all sizes: In a magic ring, hdc 10. When you reach the end of the round do not join with a slip stitch; continue working the rest of the hat in continuous rounds. Use a stitch marker in the first stitch of the round and move marker up on each successive round. (10 hdc)

Round 2: Work 2 hdc3lp (hdc in the third loop) in each hdc from the previous round. (20 hdc3lp)

Round 3: Work 2 hdc3lp in the first hdc from the previous round; work 1 hdc3lp in the next hdc from the previous round. * Work 2 hdc3lp in the next st, 1 hdc3lp in the next st. ** Repeat from * to ** to end of round. (30 hdc3lp)

Round 4: Work 2 hdc3lp in the first hdc from the previous round; work 1 hdc3lp in each of the next 2 hdc from the previous round. * Work 2 hdc3lp in the next st, 1 hdc3lp in each of the next 2 sts. ** Repeat from * to ** to end of round. (40 hdc3lp)

Round 5: Work 2 hdc3lp in the first hdc from the previous round; work 1 hdc3lp in each of the next 3 hdc from the previous round. * Work 2 hdc3lp in the next st, 1 hdc3lp in each of the next 3 sts. ** Repeat from * to ** to end of round. (50 hdc3lp)

Round 6: Work 2 hdc3lp in the first hdc from the previous round; work 1 hdc3lp in each of the next 4 hdc from the previous round. * Work 2 hdc3lp in the next st, 1 hdc3lp in each of the next 4 sts. ** Repeat from * to ** to end of round. (60 hdc3lp)

Round 7: Work 2 hdc3lp in the first hdc from the previous round; work 1 hdc3lp in each of the next 5 hdc from the previous round. * Work 2 hdc3lp in the next st, 1 hdc3lp in each of the next 5 sts. ** Repeat from * to ** to end of round. (70 hdc3lp)

Round 8: Work 2 hdc3lp in the first hdc from the previous round; work 1 hdc3lp in each of the next 6 hdc from the previous round. * Work 2 hdc3lp in the next st, 1 hdc3lp in each of the next 6 sts. ** Repeat from * to ** to end of round. (80 hdc3lp)

Stop increasing at 80 sts for size M. Sizes L and XL will increase again on round 9.

Round 9: For size M, work 1 hdc3lp in each st around. (80 hdc3lp).

For size L, work 2 hdc3lp in the first hdc from the previous round; work 1 hdc3lp in each of the next 19 hdc from the previous round.  * Work 2 hdc3lp in the next st, 1 hdc3lp in each of the next 19 sts. ** Repeat from * to ** to end of round. (84 hdc3lp)

For size XL, work 2 hdc3lp in the first hdc from the previous round; work 1 hdc3lp in each of the next 9 hdc from the previous round.  * Work 2 hdc3lp in the next st, 1 hdc3lp in each of the next 9 sts. ** Repeat from * to ** to end of round. (88 hdc3lp)

Rounds 10-29 (31, 33): Work 1 hdc3lp in each st around. (80, 84, 88 hdc3lp)

Finishing: To taper down to a smooth edge, work 1 sc in the third loop of the next hdc from the previous round, then slip stitch into the third loop of each of the next two hdcs from the previous round. Finish off, weave in ends.

Messy-bun/ponytail hat instructions


These instructions pick up at what would be round 4 for the beanie style hat.

Setup: Place a slipknot on your hook and slip stitch around a large ponytail elastic to attach. Chain 1 and work 40 hdc tightly around the ponytail elastic. (Alternatively you could start with 40 FHDC.) When you reach the end of the round do not join with a slip stitch; continue working the rest of the hat in continuous rounds. Use a stitch marker in the first stitch of the round and move marker up on each successive round. (40 hdc)

Round 2: Work 1 hdc3lp (hdc in the third loop) in each hdc from the previous round. (40 hdc3lp)

Round 3: Work 2 hdc3lp in the first hdc from the previous round; work 1 hdc3lp in each of the next 3 hdc from the previous round. * Work 2 hdc3lp in the next st, 1 hdc3lp in each of the next 3 sts. ** Repeat from * to ** to end of round. (50 hdc3lp)

Round 4: Work 2 hdc3lp in the first hdc from the previous round; work 1 hdc3lp in each of the next 4 hdc from the previous round. * Work 2 hdc3lp in the next st, 1 hdc3lp in each of the next 4 sts. ** Repeat from * to ** to end of round. (60 hdc3lp)

Round 5: Work 2 hdc3lp in the first hdc from the previous round; work 1 hdc3lp in each of the next 5 hdc from the previous round. * Work 2 hdc3lp in the next st, 1 hdc3lp in each of the next 5 sts. ** Repeat from * to ** to end of round. (70 hdc3lp)

Round 6: Work 2 hdc3lp in the first hdc from the previous round; work 1 hdc3lp in each of the next 6 hdc from the previous round. * Work 2 hdc3lp in the next st, 1 hdc3lp in each of the next 6 sts. ** Repeat from * to ** to end of round. (80 hdc3lp)

Stop increasing at 80 sts for size M. Sizes L and XL will increase again on round 7.

Round 7: For size M, work 1 hdc3lp in each st around. (80 hdc3lp).

For size L, work 2 hdc3lp in the first hdc from the previous round; work 1 hdc3lp in each of the next 19 hdc from the previous round.  * Work 2 hdc3lp in the next st, 1 hdc3lp in each of the next 19 sts. ** Repeat from * to ** to end of round. (84 hdc3lp)

For size XL, work 2 hdc3lp in the first hdc from the previous round; work 1 hdc3lp in each of the next 9 hdc from the previous round.  * Work 2 hdc3lp in the next st, 1 hdc3lp in each of the next 9 sts. ** Repeat from * to ** to end of round. (88 hdc3lp)

Rounds 8-26 (28, 30): Work 1 hdc3lp in each st around. (80, 84, 88 hdc3lp)

Finishing: To taper down to a smooth edge, work 1 sc in the third loop of the next hdc from the previous round, then slip stitch into the third loop of each of the next two hdcs from the previous round. Finish off, weave in ends.


I hope you enjoy making and wearing (or gifting) this hat!


Saturday, July 20, 2019

Basic Pint Jar Cozy free pattern

I sometimes like to have cold overnight oatmeal in a pint jar for breakfast, but my hand gets so cold holding the jar while I’m eating. I needed a quick, basic jar cozy to insulate my hand from the cold, so I whipped up this design before breakfast this morning. The lavender yarn is even color-coordinated with the blueberries in my oatmeal. 😍


This quick, basic cozy will fit most pint-size canning jars but can also be easily adjusted to fit other jar sizes. Just try the cozy on your jar as you crochet and adjust the stitch and row count for a custom fit.

Row 1: In magic ring, ch 2 (ch 2 doesn’t count as a stitch throughout), DC 10. Sl to top of 1st DC to join. (10 DC)

Row 2: Ch 2, 2 DC in each DC around. Sl to top of 1st DC to join. (20 DC)

Row 3: Ch 2, 2 DC in 1st st, 1 DC in next st. Work 2 DC in next st followed by 1 DC in the st after that around. Sl to top of 1st DC to join. (30 DC)

Row 4: Ch 2, DC in each st around. Sl to top of 1st DC to join. (30 DC)

Repeat row 4 four more times. You can customize the height of your cozy to fit the jar the way you want it to. Just try the cozy on your jar as you complete each round until you like the way it looks. For my jar, a total of 8 rounds of DC looked best, followed by two finishing rounds, as follows:

Finishing row 1: Ch 1. HDC in each st around. Sl to top of 1st HDC to join. (30 HDC)

Finishing row 2: Ch 1. SC in third loop of each HDC from previous round. Sl to top of 1st SC to join. (30 SC)

Break yarn, weave in ends, and enjoy your cold breakfast in a jar without freezing your hands! 🥄


Here’s my recipe for easy (keto-ish) overnight blueberry oatmeal:

3/4 cup Greek yogurt (I use whole 5% fat)
1/2 cup milk
1/4 cup steel-cut oats (I use Bob’s Red Mill Irish style)
1 tablespoon agave liquid sweetener (or whatever liquid sweetener you prefer, to taste)
Frozen whole blueberries, approximately 3/4 cup

Place all ingredients except blueberries in a pint jar and stir until well combined. Add frozen blueberries to fill remaining space in jar and stir carefully until blueberries are incorporated. (The berries will thaw in the jar overnight.) Cap jar and place in refrigerator overnight (for at least 8 hours). The next morning, remove jar from refrigerator, slip on your newly made crochet jar cozy (this step is VERY important!! LOL), and enjoy a healthy breakfast.

Sunday, June 16, 2019

CPAP Hose II free recipe/pattern

Experimenting with another crochet CPAP hose cover design for 72-inch hose. My brother-in-law is new to using a CPAP and needs something to help make the experience more comfortable for him. This Red Heart Velvety yarn is super, super soft, but also machine washable/dryable, so it should work well.

Using 6mm hook, FSC 16 sts (about 6 inches long), then continue working in continuous rounds. I made the first round after foundation row in SC then switched to HDC to help the rest of the project grow faster. At my gauge two rows of HDC equaled about 1 inch in height. Working this way one skein yielded about 47 inches of tube, a little over half as long as I wanted, so I had to break into a second skein to reach the desired finished length.

I placed a marker to indicate when my tube had reached a length that was about half as long as the finished tube should be (for me this was after 2 rows SC plus 80 rows HDC). It’s important to measure the actual length of your work to determine where you’re at rather than to rely on row counts for length, just to make sure you end up with a finished tube that’s the right size. Once you’ve marked the halfway point, you can fold the tube at the marker as you work the second half to more easily figure the length of the second half. (At least for me this is easier than constantly using a tape measure to figure out where I’m at.)

Continue working until the tube you’re crocheting measures about 76 inches long. In my experience these hose covers work better if they’re a little longer than the hose itself. Switch to 5mm hook and finish with 4 rounds of FPDC/BPDC for a ribbing effect, then fasten off and weave in ends.


For better performance sew a couple of rows of silicone-striped grip elastic to the inside of the hose cover at the ribbed end (cut elastic to 3.5-inch lengths). This will be the end closest to the user. The grip elastic will cinch the cover against the hose, and the silicone grip will prevent the cover from slipping down the hose and away from the user. The whole point of using a hose cover is to keep the cold plastic away from the CPAP user. Well, that and a hose cover cuts down on air noise and prevents condensation buildup.


Placing the grip elastic at only one end also makes it easier to feed a fresh hose into the cover from the end without the elastic when it’s time to change the hose.


Sunday, June 9, 2019

Granny Squared Into Highlighter Hell Throw free pattern

I found a couple more skeins of the unidentified colorway aka “Highlighter Hell” (what I call it) by Red Heart, so I decided to use it along with some plain white to make an infinite granny square throw for my daughter who loooves these (horrifically) bright colors. 😉


After trying to work this continuous granny square in full rounds of a single color, I discovered that there was not a good way to carry the next color up for the subsequent round without leaving a long loop on the reverse side where I changed colors (see below). I was afraid that the only way to “fix” this would be to add a lightweight flannel backing to cover the reverse side and hide the loops.


I pondered this problem for a while and concluded that the best way to avoid it would be to use a two-color spiral method, so I went searching for a pattern and found The Continuous 2 Color Granny Crochet Tutorial by Fiber Spider on YouTube. Ta-da!! This method is an absolutely brilliant way to work a two-color continuous granny stitch blanket without having to tie off after every single round (and have eleventy-bazillion ends to weave in when you’re done, plus all those ends would equal a lot of wasted inches of yarn), and it eliminates the big-loop-from-carrying-up-the-yarn problem I was having. Like I said: Brilliant!!


Here's a comparison of the obverse view of working the blanket in full rounds of each color (left) vs. the half-rounds used in the Fiber Spider method (right). As you can see, the different methods are undetectable to the eye, but Fiber Spider's method results in a blanket that is fully reversible and looks tidy on both sides:


I just kept working rounds on the throw until I ran out of the Highlighter Hell color. Then I used some highlighter orange yarn from my stash to work a border of one round SC followed by one round RSC or crab stitch. Finished size is about 44 inches square.


Works when they were still in progress ...