This meme by Nicki of Nicki's Homemade Crafts made both me and my husband laugh out loud. Too funny!
Tuesday, November 28, 2023
But it fits!
Thursday, November 16, 2023
Giant Timothy T-rex
I had this one skein of colorful Red Heart Super Saver Color Block yarn in the Party Time colorway that I wanted to use to make something for Rose. Orange is featured prominently in the colorful skein, and orange is one of Rose's favorite colors.
At first I tried to see if there was enough yarn to make something to wear, like a "Housecoat of Many Colors" sort of thing. But the one skein wasn't enough for that, and apparently the colorway was discontinued, so I couldn't buy more.
![]() |
Not enough yarn to make a cardigan or blanket |
So then I had another idea: Why not make a giant Timothy T-rex for Rose by holding the colorful yarn double with a neutral gray and using an 8mm hook? And that's how this giant Timothy was born.
![]() |
Timothy and friends |
The pattern specifies to use 10mm safety eyes, but I didn't have any safety eyes on hand, so I used two 25mm black buttons from this kit that I found on Amazon. It has black buttons in a bunch of different sizes, so they are useful for lots of various projects. So far I have used these buttons for eyes on a few recent amigurumis: my Zoey Zebra and also my Halloween Melly Teddy Ragdolls Gabby Ghost and Bobby Bat.
Holding the two colors of yarn together and working at this large gauge with an 8mm hook, my finished Timothy stands about 15 inches tall. I hope he will make a nice, snuggly companion for Rose!
Thursday, October 26, 2023
Adult Crochet V-Neck Vest Cardigan-Style
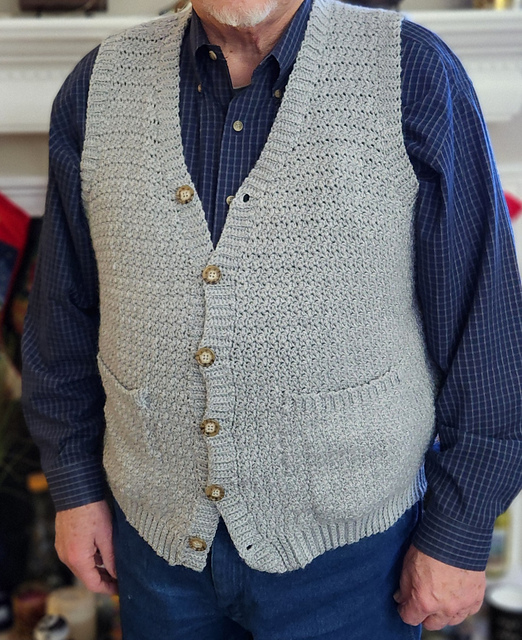
After making this Yarnspirations pattern as written for a pullover vest, now I decided to see if I could adapt it to also make a cardigan-style vest for my husband. It is made with Bernat Softee Baby Solids & Marls yarn in the Flannel colorway. (Here's a link to my post about the pullover vest.)
Since this design is worked from the bottom up, the lower part of the torso will be seamless from the bottom edge up to where we divide for the armholes, which I think will look nice, and it also means that the only seams to sew will be the joins at the top of the shoulders.
![]() |
Main body done, including pocket openings |
I also added pockets to the front panels, and the button placket is completed with six tortoiseshell buttons that are 7/8-inch across.
![]() |
After 2 skeins about 12.5 inches tall |
This project took me most of a year to complete only because I had a lot of big projects at work and just a whole lot of other things going on all year, which greatly reduced my time for crocheting. Normally, a project this size would take a few weeks to finish. Thankfully, things settled down enough for me to finish this in time to give it to my husband for Christmas.
![]() |
After 1 skein about 6.5 inches tall |
Tuesday, September 12, 2023
Neo and Scoop Mini-Dinos free pattern
Since the beginning of the year I have been in the middle of several large, long-term projects and felt like I needed to give myself a mental break and make something that works up super fast but also gives a finished product that is super satisfying.
This Mini-Dino designed by Mary of the MerryMakes blog turned out to be just the project that my weary heart needed. He is SO STINKIN' CUTE!!! And he was really fast and easy to make. I wuv him!!! I also love that Mary has a video tutorial that walks us through every step of the creation process.
I made mine with a 5.5mm hook, which is a larger hook than the pattern specifies, but I tend to crochet tighter than the average bear anyhow, so I think it worked out fine. At the gauge I was working, my dino turned out to be about 6.5 inches tall. For comparison, Mary's Mini-Dinos work up to be about 5 inches tall when made with worsted weight yarn and a 4mm hook. I was also using the yarn-over single crochet technique rather than the more traditional yarn-under single crochet technique that a lot of amigurumi makers use. Mary also works her dinos using the yarn-over single crochet, but I've read that if you use the yarn-under single crochet, your finished item will be slightly shorter than if you used the yarn-over single crochet.
The pattern also specifies to use 6mm safety eyes, but I didn't have any safety eyes on hand, so I used two 10mm black buttons from this kit that I found on Amazon last year. It has black buttons in a bunch of different sizes, so they are useful for lots of various projects. So far I have used these buttons for eyes on a few recent amigurumis: my Zoey Zebra and also my Halloween Melly Teddy Ragdolls Gabby Ghost and Bobby Bat.
Just because he is soooo adorable, here's another picture of Neo posing on the coffee table with my Round Basket for Square Coasters. 😍
Neo turned out so cute that I decided he needed a friend, so I used a small scrap of Red Heart Super Saver in the Zebra colorway to make his friend Scoop. Scoop looks like newsprint from a newspaper, so that's how she got her name.

Wednesday, August 9, 2023
Raffie Sun Hat free pattern
This sun hat pattern by Kinga Erdem is drop-dead gorgeous, so I just had to make one. The Raffie Sun Hat pattern is available for free on Kinga's blog, My Hobby Is Crochet.
But I did have to adjust the pattern somewhat to make it in a messy-bun style to accommodate my everyday hairstyle. I used the Peekaboo Sun Hat design by Susanna Biyae as my guide for that. The Peekaboo Sun Hat pattern is available for free on Susanna's blog, Fosbas Designs.
I think I used a thinner raffia than Kinga used for hers, so it wasn't possible for me to meet gauge using the suggested hook size. I went up two hook sizes and also worked the top of the hat to 75 stitches to get to the size I need. My polyester raffia yarn came from Amazon.
The cluster-stitch pattern for the sides of the hat crown needs a stitch count in a multiple of 3, so changing the stitch count is fairly easy. Kinga works hers in the round (so the right side of the work is always facing you), but for mine I was doing mine in rows (to make the back of the hat open). Fortunately for me, it was possible to work the cluster-stitch pattern she uses simply by reversing the order of the cluster stitches on the wrong-side rows (to keep the clusters "leaning" the same direction). Easy peasy. Working the rows this way probably changes the look of the cluster-stitch pattern somewhat, but I think it turned out great.
The wire rope I used to reinforce the brim came from Home Depot. This product was recommended by Jess Coppom in her free Fedora Crochet Sun Hat pattern, which is available on her blog, Make And Do Crew.
The last thing to figure out is the hat band. I used a 4mm hook and chained 150, which was long enough to wrap around the crown of the hat with ends long enough to tie in a loose square knot. I don't know if I'll leave it like that or if I'll maybe try adding some beads to dress it up a bit without being too busy.
My husband and I have a lovely vacation coming up, and I'm super excited to get to take this gorgeous sun hat along to wear during our adventures.