Showing posts with label vest. Show all posts

Thursday, October 26, 2023

Adult Crochet V-Neck Vest Cardigan-Style

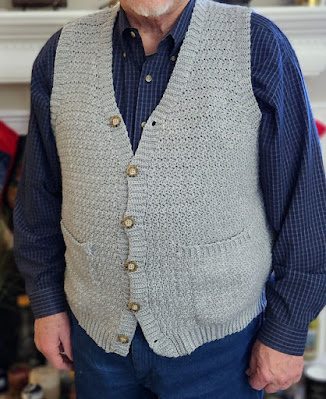
After making this Yarnspirations pattern as written for a pullover vest, now I decided to see if I could adapt it to also make a cardigan-style vest for my husband. It is made with Bernat Softee Baby Solids & Marls yarn in the Flannel colorway. (Here's a link to my post about the pullover vest.)


Since this design is worked from the bottom up, the lower part of the torso will be seamless from the bottom edge up to where we divide for the armholes, which I think will look nice, and it also means that the only seams to sew will be the joins at the top of the shoulders. 

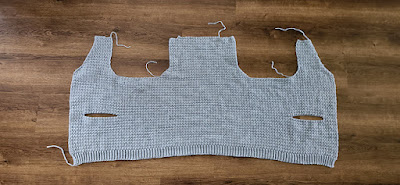
Main body done, including pocket openings

I also added pockets to the front panels, and the button placket is completed with six tortoiseshell buttons that are 7/8-inch across.

After 2 skeins about 12.5 inches tall

This project took me most of a year to complete only because I had a lot of big projects at work and just a whole lot of other things going on all year, which greatly reduced my time for crocheting. Normally, a project this size would take a few weeks to finish. Thankfully, things settled down enough for me to finish this in time to give it to my husband for Christmas.

After 1 skein about 6.5 inches tall


Monday, February 20, 2023

Haiku Cardi


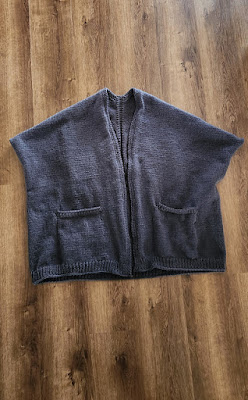
Finished cardi

It would have been helpful to me if the pattern had provided more of an overview description of the process of how the cardigan will come together, because although I do enjoy patterns with unconventional construction techniques, If I had realized before starting this that the fit of the cardigan would be closer to that of a cocoon-style cardigan with a sort of dolman-type sleeve, I might not have opted to work this pattern, because I generally don't care for cocoons or dolman sleeves.


Nevertheless, I am glad that I made this cardigan. It is a paid pattern designed by Svetlana Volkova. At about 21 inches length, measured from the top of the shoulder, I decided to add pockets of 29 stitches wide by 44 rows deep. I knitted the pocket linings in contrasting black yarn.


Some ways I deviated from the written pattern include making simple kfb increases instead of M1R/M1L increases and adding the pockets. I like the oversized fit even if the cardigan is somewhat less constructed than I had expected before starting the project. Total stitches after rejoining below armholes: 253.

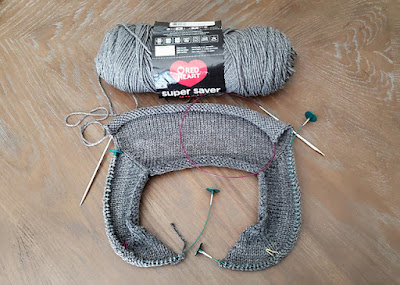
This cardigan begins in the center-back and works upward from there in the shape of a triangle. When the triangle is large enough, the point of the triangle is at the back of the wearer's neck, and the wide side of the triangle wraps around the waist. The slanted sides of the triangle are then worked separately to finish the upper back on each side and wrap around the shoulder and become the upper front on each side. The front sides are then rejoined to the back to form the arm holes and stitches picked up along the bottom of the triangle. Then all stitches are knitted together to make the bottom part of the cardigan.

I do like how this project turned out, but I think if I make it again I will incorporate garter stitch instead of ribbing, because the ribbed front placket on this one wants to fold over toward the stockinette. Hopefully washing and blocking will fix that issue, but I'm thinking that using garter stitch plackets would naturally lie better than the ribbing.


Wednesday, January 18, 2023

Adult Crochet V-Neck Vest

I'm making this in size 48 men's, but because I'm using a lighter-weight fiber than the pattern calls for (and because I crochet tightly), my gauge is 101 stitches for 24 inches across (which aligns with the stitch count for the largest size on the pattern, so I'll basically follow the stitch count instructions for that size).


Working the panels from the bottom up, one skein of the Bernat Softee Baby yarn went for about 14 inches, measured from the bottom edge of the ribbing. 


This design mainly uses the crochet lemon-peel stitch for the body of the vest, which gives a nice, pebbly-textured, reversible fabric that doesn't scream "I was crocheted." And although the fabric doesn't look holey, it does have quite a lot of small holes that lend breathability to it. (See my photo below with the sunshine showing through the vest panel.) This is a nice stitch for a masculine/unisex garment because it is comfortably ventilated while not looking "lacey."


I originally had wanted to knit a textured top-down V-neck pullover vest in a 3-weight yarn as an alternative to the cardigan-style vest that I knitted for my husband as a gift at Christmas 2021. After looking through a lot of patterns, I finally settled on the Ink (paid) pattern by Fiona Hamilton-MacLaren, which, as its description says, is a "cosy fitted vest with an all over texture pattern. The ribbed stitch pattern pulls the fabric in, but gives loads of stretch."

It's a beautiful design, and I really, really wanted to be able to make it. But the problem I was encountering is that it's not a pattern that I could put down and then easily pick back up again a few days later, even when I used a row counter and kept careful notes about where I left off. I was imploding my brain trying to keep track of where in the stitch pattern I needed to start each row, and spent a lot of time tinking (unknitting) rows where I started out wrong but it took me a full row or two to realize that my stitches had gone amiss. I was frustrated but also really sad at how difficult it was for me. I'm not saying Ink is a difficult design; the stitches are easy, mostly just knits and purls, and it's the way those basic stitches fit together that creates the beautiful, ribbed texture. I believe the problem rests with me and my inability to wrap my head around how it all fits together after putting the project down for a few days. I think I just need to attempt Ink again at a time when I can devote more uninterrupted concentration to it.

So after admitting defeat (albeit temporarily) with Ink, I started looking to see if I could find a top-down crocheted men's vest pattern with nice texture and a traditional fit. It wasn't until I altered my search criteria to accept bottom-up patterns that I found this Adult Crochet V-Neck Vest free pattern by Yarnspirations Design Studio. I usually prefer to make top-down garments, but the overall look of this vest fits with what I wanted to make, so I decided to give the bottom-up design a go. 

The downside of the lemon-peel stitch, compared to other, taller crochet stitches, is that it grows slowly, which can feel tedious (particularly when you're working from the bottom up). But if you just keep plugging along, the vest eventually will come together.

This is going to be a gift for my husband, as I said (probably for Christmas 2023), and if you've been reading my blog for a while, you already know that he strongly discourages me from making anything for him. He grumped vociferously when I asked him to stand up so I could measure the bottom ribbing at his waist when I started working the first piece for this vest. But sometimes my creative impulses just compel me to make him something. And I do believe that this has turned out to be a very nice vest for him that will fit comfortably and be nice and cozy. After Christmas, I'll add a photo of him wearing it to this post.

Edited to add: Here's the photo of him wearing it! It fits him perfectly. 😊


Instead of following the pattern instructions for the neck edging, I decided to try working 1 round in DC (including the decrease at the bottom front) followed by 2 rounds of alternating FPDC/BPDC to give the appearance of ribbing. That technique often works well for that effect, but I didn't like how it ended up looking here. So I ripped out that neck edging and redid it using the same technique that was used for the armhole edging.

I worked the armhole edging almost as described in the pattern, except instead of making the ribbing and then sewing it on, I worked the ribbing joining it to the armhole as I went using the join-as-you-go technique similar to what is shown in this video


To do that for the neck opening means the ribbing will begin/end at the bottom front. The ends will be "square" (not tapered) and will be sewn together overlapping, which is a common feature of knitted neck ribbing seen on some V-neck sweaters.


Saturday, November 26, 2022

Scrappy Ombre Wrap vest

This is a paid pattern by Salena Baca Crochet. Her Ombre Wrap pattern is designed to be a shawl, but I'm going to see if it's possible to add armholes to this to convert it into a lovely vest.


I decided to use some pink and purple scraps from my yarn stash to make this, and I tied them all together with a unifying color: the Taupe colorway of Big Twist yarn. 

For the pockets, I found a pattern for a mesh square in keeping with the feel of the base shawl's mesh fabric. It's by Jayda in Stitches on YouTube at this link. If you're trying to make a similar project but don't like the tutorial I found for a mesh square pocket, you can browse on YouTube for another mesh square pattern. There are many others on there.


My squares are 9 rounds in the mesh pattern plus a round of SC for the edging (HDC across the top edge), making a pocket of about 11 inches square. I worked 2 SC edge stitches over the chain spaces and skipped working anything in the DC stitches, to help keep the pocket edges from developing a "ruffled" or lettuce-edge look, with 3 stitches in each corner space. (Sometimes working slightly fewer edging stitches along a crocheted edge is better to help everything lie flat than working stitches one-to-one.)


I like the way the pockets turned out. My only problem is that I genuinely suck at sewing on patch pockets. I try the piece on, and I carefully pin the pockets in place so they are positioned evenly, and then when I'm all done sewing the pockets on, they're always uneven. Grrrrr!!! Oh well.

Saturday, December 11, 2021

A winter vest pour homme

Based on the Improv pattern by Karen Templer, my plan for this is to be a seamless, top-down, cardigan-style vest worked mostly in simple, classic stockinette with K1P1 edging at armholes and button placket/front (worked with the smaller-size needles) and some traditional tortoiseshell buttons. I'm making this for my husband, who needs a replacement for the old aran vest that he reaches for during the chilliest weeks of winter to give him an extra bit of warmth. 


My initial plan was to make this without pockets, but then I realized his original vest has pockets, so I should probably try to add pockets to the new vest by following Marly Bird's tutorial for inset pockets. Another technique that is new to me for this project is picking up stitches along a knitted edge (to add ribbing).


The biggest challenge/question for me, since I'm very slow at hand knitting (and I often have days where I simply cannot knit at all due to chronic pain issues), is whether I'll manage to finish this in time to give it to my husband for Christmas. I cast on for this project on Sept. 21, which gave me about three months to work to meet that goal. Fingers crossed it gets done in time!!! (Spoiler alert: I finished it on Dec. 11! Yay!)


My husband is a person who, even though he supports my enjoyment of knitting/crochet/etc., he has firmly stated right from the beginning his preference that I NOT ever make anything for him because he will refuse to wear it. 


Over time, his declaration has proved to be not entirely true (he has occasionally worn a hat or mitts or a cowl that I've made, sometimes explicitly for him and sometimes not, and he has loved to tatters the blue scarf I knitted for him), but I've always known to generally avoid directing any of my crafting energies toward making items for him.


But when it comes to this vest, I feel like this is a different situation: He has worn the same store-bought knitted vest during winter for decades, and now that THAT vest is wearing out, he's going to need a replacement. I know he prefers neutral, classic design and lines and fit for stuff like this, so I'm attempting to incorporate those values here. I think the trickiest part for me will be achieving the correct fit. As I've worked I've been constantly measuring, checking and rechecking gauge, and comparing size to other items in his wardrobe. Because if this doesn't fit right, I know he won't wear it.


That being said, I've worked out most of this project without using a pattern (other than getting started at the shoulders with Improv), so although I'm familiar with the general principles of garment construction (after decades of sewing/knitting/crochet experience), I'm still nervous to see how the final product for this turns out.


After following the guidelines from Improv for how to begin working a top-down cardigan, I split off stitches to work each of the front panels and the back panel separately, gradually increasing the widths as the lengths grew, then rejoined all the panels below the armhole openings and knit until the bottom of the vest was the right length. I made the armholes slightly oversized, because I knew he wouldn't like to have his arm movement constricted by too-tight armholes.


After rejoining the panels below the armholes, I decided to work the 18 stitches that I cast on below the armholes on each side in garter stitch to give the side panels below the arms a bit of textural differentiation in the torso.


I finished knitting the ribbing at the bottom of the vest the day after Thanksgiving. Two days later, I picked up and knitted the front edging, which extends from side to side behind the neck and includes the buttonholes on the left front. To me it's almost magical the way you can have a curled, gnarled mess of stockinette, but then when you add the edging/ribbing, suddenly the stockinette fabric uncurls and looks gorgeous. I know that's just the way stockinette is (it curls if there's no edge treatment), but it's still fascinating to see it all come together.


Here's the store-bought ye olde aran vest that has served Montie well for many years:

Tuesday, August 18, 2020

Boho Summer Cotton Swingy Shawlivest

I like the look of the four-row repeated stitch pattern of the Boho Summer Cardigan (there is a free version of the pattern on YouTube), which got me wondering whether I could use that stitch pattern in the shape of a Swingy Shawlivest

I'm making this one with cotton yarn for wear during the warm summer months. This was an experiment in melding two different patterns, and you can see by the way the center increase veers off at an angle (rather than staying centered) that it didn't turn out totally perfect, but it's still completely wearable and comfortable and will be fine for me. If I wanted to do this again to give to someone else, I'd have to recalculate how to keep the center increase in the center. 😉

Decided to finish this one with crocheted rope-twist fringe along the bottom to complement the boho style. There are many tutorials on YouTube for how to make this type of fringe. I like this one and this one

For 6-inch fringe: SC into first st. ( * SC into next st and pull up a loop that's 16 inches long. Using your finger, twist the loop 40 times. Place end of loop back on hook and sl in same SC where you started the long loop. SC in next st. Pull the twisted loop open and then drop it to allow the rope twist to settle evenly along its length. ** ) Repeat from * to  ** across hem, ending with a SC in the last st. Finish off and weave in all ends. 

Some people twist the loop while it's on their hook, and if it works for you to do it that way, great. But I find it easier for me to twist the loop on my finger. I'm always dropping the loop when I try to twist it while it's on my hook. So use whichever method works best for you. 

Since my loops are 16 inches long, that means each strand of fringe actually uses 32 inches of yarn, which is only 4 inches less than a yard. Keep that in mind if you want to make fringe this way; it requires a LOT of yardage. Generally more yardage than cut fringe would require. But the upside of the rope-twisted fringe is it can safely go into the washer and dryer. 

To make 3-inch fringe, work the same as above but only pull up an 8-inch loop and twist it 20 times. I suppose to get a 4.5-inch fringe you would pull up a 12-inch loop and twist it 30 times. (etc.)

Total yarn weight used: 928 grams, including fringe. 

Saturday, August 1, 2020

True Blue Swingy Shawlivest

I love the look of ombre/gradient yarns, so I wanted to try using one to make another Swingy Shawlivest, since I practically live in these vests all winter - they are so comfortable. 

Here's a link to my Ravelry project page. Vest total yarn weight: 1,000 grams. Estimated actual yardage totals the length of about 3.5 skeins, but I needed portions from another two skeins to match the stripes in the armhole section, so at least 6 skeins are needed to complete the project with this yarn.


Sunday, June 14, 2020

Zebra Fringed Barn Jacket

When I was in first grade I had a classmate who wore a rabbit fur coat that all the girls in my class simply adored. (This was in the 1970s, OK, so wearing fur wasn’t yet culturally verboten.) All I can remember about this girl now is that her name was Elaina and she was of Russian descent. She spoke English with a Russian accent, and to the rest of us 6-year-olds who had never heard a foreign accent like that before, all the words she spoke sounded deliciously exotic to our ears.


As I recall her jacket was made with either a white-mottled-with-black rabbit fur or dalmatian rabbit fur. It was mostly white with black spots. In my mind’s eye the jacket looks more like the mottled rabbit fur photo below than the dalmatian rabbit (notice how the mottling creates some areas that look gray in the transition spaces between the black and white), although I remember her jacket having more white all over than this mottled swatch shows, but memory can be a funny (and incorrect) thing at times.


Anyway, I had several skeins of the Red Heart Zebra colorway yarn on hand, and looking at the colors reminded me of Elaina’s rabbit fur jacket - which, by the way, she never let any of us other girls in class try on (LOL) - so I decided to try to make a vest for myself using this yarn - and then I could pretend I was wearing Elaina’s sumptuous jacket any time I wanted to! :-)


This is a variegated yarn with moderately short color changes. (White about 13-15 inches, gray about 10-12 inches, black about 30 inches.) Personally I think variegated yarns with short color changes look better when worked in crochet vs. knitting.

I started this project back in July 2019 working it as an improvised top-down raglan vest in a granny stitch and got most of the way done with it but then decided I didn’t like the way the vest looked on me. Ultimately I decided to rip it out and start over using the On Point Poncho (paid) pattern as the shape inspiration for a long, fringed barn jacket. Fingers crossed that I like the way it turns out this time …


OK, I’ve reworked the jacket to the point where I can safely say that I do like it much better now by doing the On Point Poncho pattern as a cardigan. The body and fringe (two 14-inch strands folded together and placed in every-other stitch across the bottom hem, resulting in 7-inch fringe) are complete, and now I just have to decide how long to make the sleeves. I think I’ll finish them at 3/4 length (19 rows plus 1 row of SC edging) with minimal tapering (to 60 stitches around).


Total yarn weight: 945 grams or about 4.77 skeins / 976.0 yards.

Sunday, March 29, 2020

Going Gray Swingy Shawlivest

I wanted to try making another Swingy Shawlivest, but this time with pockets. 


The pockets are lined with fabric and are about 6 inches wide by 7 inches tall. I worked the pockets in an edc post stitch faux rib to sort of resemble the pattern of the vest fabric beneath but with a solid fabric to conceal the pocket lining.


It's nice to have pockets, but I decided if I make another Swingy Shawlivest with pockets, I'll make the pockets bigger next time. Maybe 8 inches by 9 inches or so. Here's a link to my Ravelry project page.


Wednesday, March 11, 2020

Swingy Shawlivest with pineapple hem for LadyU

For her birthday, my daughter LadyU was hoping for a loose-fitting crocheted sleeveless poncho type of garment of about hip length, preferably from a pattern that incorporated pineapples and an asymmetrical hem. She said her favorite colors are pale teal, purples, and blues, or greens on the blue side of their color scale. She texted me a couple of photos showing some similar pieces that she liked, but I was having trouble finding a pattern designed to be anything close to what she was describing.


So I texted her a photo of my Swingy Shawlivest and asked if it would be something she might wear. I mean, I totally live in mine all winter long -- it's like my own personal blankie to keep me toasty all day and night. She said she liked the look of the vest and if I could add a row of pineapples along the hem that would make it perfect for her. That is how this project came about.


Based on her color preferences I knew the Caron Simply Soft Paints yarn in the Oceana colorway, which I've worked with many times before, would be ideal.


I worked her Swingy Shawlivest following the pattern through row 40 then started working the pineapple border starting at row 19 of the chart from the Cute Halter Top pattern.


I had looked around for some time trying to find a pineapple border that looked the way I wanted it to -- with a bottom edge that let the pineapples hang with individual "teeth" along the bottom edge (as in LadyU's second concept photo) rather than a totally straight bottom edge. The bottom edge of the halter top pattern fit the bill.


I worked on most of this project while I was on vacation, so when I ran out of yarn on the very last pineapple (UGH! yarn chicken fail) I had to set it aside for a few days until I got home and could order another skein (of which I only used a few inches).


And so, naturally, since I had to buy another skein of the Oceana yarn but only used a tiny bit of it to finish the Shawlivest, it just seemed logical to use part of the rest of that extra skein to machine knit a coordinating turban twist headband for LadyU. (80 rows on the Sentro 40, gauge of about 4 sts/4 rows to the inch on medium tension.) This gives her two pieces that she can wear either together or separately. 😊