Showing posts with label button. Show all posts

Saturday, February 17, 2024

Kawaii Pop Tart

Using my Addi King Size 46-needle knitting machine, I made this kawaii amigurumi Hot Fudge Sundae Pop Tart toy.

I don't eat stuff like pop tarts anymore, but back in the day, the hot fudge sundae flavor was my favorite.


Recipe is 60 rows of crust/base color and 60 rows of frosting color. For a 48-needle machine, make it 65 rows of each. Since my pop tart is a Hot Fudge Sundae Pop Tart, I used a dark brown yarn (Red Heart Super Saver in Coffee) for the crust color and a white yarn (Red Heart Super Saver in White) for the frosting layer. I recommend using waste yarn to cast on and cast off from the machine because it makes it easier to close the tubes later.

Crochet each end of the tube closed and remove the waste yarn. Then fold your tube in half, putting the crust color on one side and the frosting color on the other side. Using the crust color and a 5mm crochet hook, work half-double crochet stitches around the outside edge of the pop tart, first to join the ends of the tubes together (across the short side), then around the corner (placing at least 2 HDCs in each corner), then down one long side (joining the crust layer to the frosting layer), then around the next corner, then across the other short side (where the tube is folded), then around the third corner. At this point, lightly stuff the pop tart, just barely enough to give the center some loft (don't make it at all firm). After stuffing the center, continue crocheting around the last (long) side (again, joining the crust layer to the frosting layer) until you're back to where you started. Don't forget to work a couple extra stitches in that last corner. Then join to the first HDC stitch and fasten off.

I did 65 rows in my sample piece of a Hot Fudge Sundae Pop Tart on my 46-needle machine, and the aspect ratio is a bit tall compared to what a real pop tart looks like, so I adjusted my recipe to be 60 rows of each color on the 46-needle machines, which should work better, and 65 rows of each color on the 48-needle machines.

For the eyes, I used a couple of 10mm eyes from this kit that I bought on Amazon. I embroidered the little mouth using a small length of Red Heart yarn in black.

For the colorful sprinkles, I found this skein of Ice Yarns Lorena Print in purple/pink/yellow/green/turquoise, which are the exact same colors as the sprinkles on the real Hot Fudge Sundae Pop Tarts. And for the chocolatey swirls, I embroidered chain stitches using more of the Red Heart yarn in the Coffee (brown) colorway.

Inspo photo


Thursday, October 26, 2023

Adult Crochet V-Neck Vest Cardigan-Style

After making this Yarnspirations pattern as written for a pullover vest, now I decided to see if I could adapt it to also make a cardigan-style vest for my husband. It is made with Bernat Softee Baby Solids & Marls yarn in the Flannel colorway. (Here's a link to my post about the pullover vest.)


Since this design is worked from the bottom up, the lower part of the torso will be seamless from the bottom edge up to where we divide for the armholes, which I think will look nice, and it also means that the only seams to sew will be the joins at the top of the shoulders. 

Main body done, including pocket openings

I also added pockets to the front panels, and the button placket is completed with six tortoiseshell buttons that are 7/8-inch across.

After 2 skeins about 12.5 inches tall

This project took me most of a year to complete only because I had a lot of big projects at work and just a whole lot of other things going on all year, which greatly reduced my time for crocheting. Normally, a project this size would take a few weeks to finish. Thankfully, things settled down enough for me to finish this in time to give it to my husband for Christmas.

After 1 skein about 6.5 inches tall


Tuesday, September 12, 2023

Neo and Scoop Mini-Dinos free pattern

Since the beginning of the year I have been in the middle of several large, long-term projects and felt like I needed to give myself a mental break and make something that works up super fast but also gives a finished product that is super satisfying. 


This Mini-Dino designed by Mary of the MerryMakes blog turned out to be just the project that my weary heart needed. He is SO STINKIN' CUTE!!! And he was really fast and easy to make. I wuv him!!! I also love that Mary has a video tutorial that walks us through every step of the creation process.


I made mine with a 5.5mm hook, which is a larger hook than the pattern specifies, but I tend to crochet tighter than the average bear anyhow, so I think it worked out fine. At the gauge I was working, my dino turned out to be about 6.5 inches tall. For comparison, Mary's Mini-Dinos work up to be about 5 inches tall when made with worsted weight yarn and a 4mm hook. I was also using the yarn-over single crochet technique rather than the more traditional yarn-under single crochet technique that a lot of amigurumi makers use. Mary also works her dinos using the yarn-over single crochet, but I've read that if you use the yarn-under single crochet, your finished item will be slightly shorter than if you used the yarn-over single crochet.

The pattern also specifies to use 6mm safety eyes, but I didn't have any safety eyes on hand, so I used two 10mm black buttons from this kit that I found on Amazon last year. It has black buttons in a bunch of different sizes, so they are useful for lots of various projects. So far I have used these buttons for eyes on a few recent amigurumis: my Zoey Zebra and also my Halloween Melly Teddy Ragdolls Gabby Ghost and Bobby Bat.

Just because he is soooo adorable, here's another picture of Neo posing on the coffee table with my Round Basket for Square Coasters. 😍

Neo turned out so cute that I decided he needed a friend, so I used a small scrap of Red Heart Super Saver in the Zebra colorway to make his friend Scoop. Scoop looks like newsprint from a newspaper, so that's how she got her name.


Saturday, September 10, 2022

Crochet candy corn owl beanie free pattern

Just in time for looking cute on crisp autumn days, this is a messy-bun version of Sarah Zimmerman's Candy Corn Hat, free pattern on Sarah's blog Repeat Crafter Me at this link


I didn't have any yellow worsted or aran weight yarn in my stash, so I used some yellow Fixler Brothers Quick Knit sport weight held double, and it turned out just fine. You can read the details about the other yarns I used at my Ravelry project page.


The pattern didn't say what size of safety eyes to use for the owl's pupils, so I used 25mm (1 inch) black buttons instead, from a set I found on Amazon at this link.


My favorite resource for buying safety eyes is 6060 on Etsy, but in the case of this hat project, it was easier for me to use buttons.

Saturday, December 11, 2021

A winter vest pour homme

Based on the Improv pattern by Karen Templer, my plan for this is to be a seamless, top-down, cardigan-style vest worked mostly in simple, classic stockinette with K1P1 edging at armholes and button placket/front (worked with the smaller-size needles) and some traditional tortoiseshell buttons. I'm making this for my husband, who needs a replacement for the old aran vest that he reaches for during the chilliest weeks of winter to give him an extra bit of warmth. 


My initial plan was to make this without pockets, but then I realized his original vest has pockets, so I should probably try to add pockets to the new vest by following Marly Bird's tutorial for inset pockets. Another technique that is new to me for this project is picking up stitches along a knitted edge (to add ribbing).


The biggest challenge/question for me, since I'm very slow at hand knitting (and I often have days where I simply cannot knit at all due to chronic pain issues), is whether I'll manage to finish this in time to give it to my husband for Christmas. I cast on for this project on Sept. 21, which gave me about three months to work to meet that goal. Fingers crossed it gets done in time!!! (Spoiler alert: I finished it on Dec. 11! Yay!)


My husband is a person who, even though he supports my enjoyment of knitting/crochet/etc., he has firmly stated right from the beginning his preference that I NOT ever make anything for him because he will refuse to wear it. 


Over time, his declaration has proved to be not entirely true (he has occasionally worn a hat or mitts or a cowl that I've made, sometimes explicitly for him and sometimes not, and he has loved to tatters the blue scarf I knitted for him), but I've always known to generally avoid directing any of my crafting energies toward making items for him.


But when it comes to this vest, I feel like this is a different situation: He has worn the same store-bought knitted vest during winter for decades, and now that THAT vest is wearing out, he's going to need a replacement. I know he prefers neutral, classic design and lines and fit for stuff like this, so I'm attempting to incorporate those values here. I think the trickiest part for me will be achieving the correct fit. As I've worked I've been constantly measuring, checking and rechecking gauge, and comparing size to other items in his wardrobe. Because if this doesn't fit right, I know he won't wear it.


That being said, I've worked out most of this project without using a pattern (other than getting started at the shoulders with Improv), so although I'm familiar with the general principles of garment construction (after decades of sewing/knitting/crochet experience), I'm still nervous to see how the final product for this turns out.


After following the guidelines from Improv for how to begin working a top-down cardigan, I split off stitches to work each of the front panels and the back panel separately, gradually increasing the widths as the lengths grew, then rejoined all the panels below the armhole openings and knit until the bottom of the vest was the right length. I made the armholes slightly oversized, because I knew he wouldn't like to have his arm movement constricted by too-tight armholes.


After rejoining the panels below the armholes, I decided to work the 18 stitches that I cast on below the armholes on each side in garter stitch to give the side panels below the arms a bit of textural differentiation in the torso.


I finished knitting the ribbing at the bottom of the vest the day after Thanksgiving. Two days later, I picked up and knitted the front edging, which extends from side to side behind the neck and includes the buttonholes on the left front. To me it's almost magical the way you can have a curled, gnarled mess of stockinette, but then when you add the edging/ribbing, suddenly the stockinette fabric uncurls and looks gorgeous. I know that's just the way stockinette is (it curls if there's no edge treatment), but it's still fascinating to see it all come together.


Here's the store-bought ye olde aran vest that has served Montie well for many years:


Friday, November 19, 2021

Alpine stitch balaclava

At least five years ago, my daughter LadyU asked me to make her a balaclava she could wear while walking the dogs during winter. It took me a long while to finally get around to making it for her, but hopefully she will like it! (There has been a bit of a long saga predating today's project.)


Inspired by the Alpine Ninja balaclava, I used the Crochet with GG video tutorial at this link to learn how to make the alpine stitch in the round (top down), but I worked the top of this hat differently than was shown in the video.

Top part of hat (above the opening for the wearer's face) is worked with a J/6mm hook; bottom part of hat (cowl) is worked with a K/6.5mm hook.

I prefer to work hats top-down, but I don't like patterns where the top stitch count increases so rapidly that the top of the hat curls ferociously until you work far enough down the sides that it helps to tame the curling a bit. That was what was happening on this one when I tried to follow the stitch counts in the video tutorial. So instead I started with 10 sts and made standard increases on that count (next row 20, next row 30, etc.).

My goal was to end up with a total of 72 sts after all the increases, but somehow I ended up with 76 sts on the last increase row; I figured that was close enough (the most important thing was to end up with an even number of sts for the alpine stitch to work). The crown is worked with alternating FPDC and BPDC sts because it's easier to do increases with that combo of sts than it is to try to do increases in the alpine stitch, and I like how the alternating FPDC/BPDC more closely resembles the texture of the alpine stitch at the crown (it looks better than making the crown with all plain DC).

I didn't actually keep count while working the crown, but I think the crown here is 22 rows in purple (the first 6 or 7 rows are alternating FPDC/BPDC increases, then I switched to alpine stitch). If you want to change colors where the balaclava splits to make the face opening, it's important to end the first color on an alpine stitch row where you're working the FPDC/DC sts. The next row is a SC row. I was beginning/ending rounds at the center back. Place stitch markers at each side of the face opening. Then on the SC row,  join your new color and SC to first marker; FSC for however many sts you need to skip to reach the next marker; at the next marker, SC normally to the end of the round. This way when you continue the following row in alpine stitch (FPDC/DC), the color change will look better because the post stitches are reaching across an SC row of the same color (rather than an SC row of a different color).

That's just the way I wanted the color change on this hat to look. It probably could look cool to do the color change over a contrasting SC row as well (so if that's the way you want to do it on your project, go for it!). I also increased the stitch count for the cowl portion to 78 for a bit more ease around the wearer's face.

It only took a few days to complete the crocheted portion of this project. The part that subsequently took months to do was searching for an acceptable pair of buttons to sew onto the folded tab as the last finishing touch. Originally I wanted to use a pair of Pokemon character buttons, but I wasn't able to find any I liked or that would be suitable here. So finally I settled on these washable coconut wood buttons, which I think look nice with the project.

Updated to add a removable 3.5-inch pom:


Saturday, August 28, 2021

Another Big Mug Hug free pattern

I live in a humid climate, and I like to drink iced coffee every morning in my big mug. But my cold drinks always end up "sweating" with condensation, so I like to use cotton cozies to keep the drippiness to a minimum and water rings off my tables.

This is a quick and easy pattern I worked up to fit my large, square-bottomed morning coffee mug.

Another Big Mug Hug

U.S. crochet terms

Materials: Worsted weight 100% cotton yarn, 5.5mm crochet hook, yarn needle, scissors. (My sample uses Lily Sugar n Cream in the Light Blue colorway.)

Base is worked in continuous spiral (don't join at end of rounds).

Round 1: In magic circle, HDC 8. (8 HDC)

Round 2: 2 HDC in each st. (16 HDC)

Round 3: 2 HDC in next st, 1 HDC in next st. Repeat around. (24 HDC)

Round 4: 2 HDC in next st, 1 HDC in each of next 2 sts. Repeat around. (32 HDC)

Round 5: 2 HDC in next st, 1 HDC in each of next 8 sts. Repeat around. (36 HDC)

SC in next st, then sl into back loop only of next st to join.

Base of cozy is complete. Work next round in back loops only to turn the corner and start working the sides. Sides are worked in joined rounds.

Round 6: Ch 2. DC in BLO of each st around. Join with sl to top of 1st DC. (36 DC)

Round 7: Ch 2. DC in each st around. Join with sl to top of 1st DC. (36 DC)

Round 8: Ch 2. DC in all but the last st. Leave last st unworked and do not join to 1st st. Turn work. This is leaving an opening for the bottom of your mug handle to pass through. (35 DC)

Round 9: Ch 2. DC in each st back to beginning of row. Turn work. (35 DC)

Round 10: Ch 2. DC in each st to end of row. (35 DC) Now we are going to add stitches to make the tab for the button closure. Continue row by FDC 6 times. (Row is now 41 sts long)

Round 11: Ch 2. DC in each st to end of row. (41 DC)

Round 12: Ch 2. DC in each st to end of row. (41 DC)

Finish off. Weave in ends. Slip cozy over your mug, placing the long tab through the mug handle. Because DC stitches are so tall, you will use the space between the DC stitch in the center row at the end of the tab and the next stitch in as the buttonhole. Mark where that space sits over the body of the cozy and sew a button in that spot. (My button is about 3/4-inch diameter or about 18mm.) Refer to photos if you need guidance for button placement. Your cozy is now ready to use. Enjoy!


Thursday, March 19, 2020

Big Mug Hug - free pattern

I've been wanting to make a mug cozy that was big enough to fit our oversized, square-bottomed mugs. The cozy needed to be made with cotton yarn so it would be microwave-safe. After all, it's so much easier to put the cozy on the mug when it's empty, and THEN filling the mug with water, and THEN zapping it in the microwave for tea. 


Who wants to pick up a mug filled with scalding-hot water and then try to slip on a cozy without sloshing the water and burning yourself? Not me.

This cozy is quick to make and extra-thick thanks to the post stitches used on the cozy sides, and because the cozy covers the base of the mug it also protects your tabletop. It's easy to put on and remove thanks to the handy button loop.

Big Mug Hug

U.S. crochet terms

Materials: Worsted weight 100% cotton yarn, 5.5mm crochet hook, yarn needle, scissors. (My sample uses Peaches n Creme Ombre in the Blue Moon Ombre colorway.)

Start off working in the round:

Setup/row 1: In a magic circle, ch 2, DC 10. Join with sl at top of first DC. (10) [ch 2 doesn't count as a stitch in this pattern]

Row 2: Ch 2, 2 DC in each st around. Join with sl at top of first DC. (20)

Row 3: Ch 2, [2 DC in first st, 1 DC in next st.] Repeat around. Join with sl at top of first DC. (30)

Row 4: Ch 2, 2 DC in first st, 1 DC in each of next 15 sts. 2 DC in next st, 1 DC in each st to end. Join with sl at top of first DC. (32)

Now continue working back and forth in rows (do not join at end of rows for the rest of the pattern):

Row 5: Ch 2, FPDC in each st across. Turn. (32)

Row 6: Ch 2, BPDC in each st across. Turn. (32)

Repeat rows 5 and 6 until the cozy sides are a total of 10 rows tall. 

Row 15: Ch 1. Turn. HDC in each st across. (32 HDC)

Finishing: Sew a button in a top corner of the cozy as shown in photos. Slip cozy over your mug, hold the sides snugly around your mug the way you want it to fit, and then measure how long of a chain you need to reach from the other top corner of the cozy (the corner without the button) to the button and back to the other corner. Add a crochet chain of that length to the top corner without the button. Tie ends of chain to cozy to secure. Weave in ends, slip the cozy onto your mug, and enjoy.


Sunday, December 1, 2019

Sheepish Pajama Stuffie Pillow

Today happens to be my ninth Ravelry-versary (I joined the site on Dec. 1, 2010). And today I completed my 253rd project post there - a Sheepish Pajama Stuffie Pillow that I'm inordinately proud of. (I know - I'm weird. My husband already told me.)

For some years now I’ve had a project concept rolling around in my head where I wanted to make a stuffie pillow cover to keep my pajamas in during the day (instead of just folding them and leaving them on top of the bed - tacky, amirite??).


I found this Aran Fleck colorway by Red Heart and thought it would be perfect for crafting my sheep pillow’s “fleece” because the flecks in the yarn, to me, represent the random bits of grass and leaves and twigs that would naturally get tangled in a sheep’s fleece as it forages across the countryside. So figuring out which yarn to use for my project was not an issue.

What proved to be more difficult, however, was HOW to knit or crochet the actual pillow cover. I started and ripped back and started and ripped back I don’t know how many times (remember, I said this project has taken years for me to get it off the ground). My original idea was to crochet a pillow cover using the bobble stitch, because solid rows of bobble stitch totally look like fluffy sheep’s fleece. But every time I got going on a bobble stitch piece, I ended up with something that was either way too large (working flat) or way too wavy (working in the round), and I just wasn’t happy with any of them, and there didn’t seem to be any patterns out there where someone else had figured out the process in a way that would fit what I wanted my pajama pillow cover to be.

I came across a pattern by Purl Soho for a knitted Bobble Sheep Pillow that is SO adorable, and on first glance it appears to be just about the right size to be a pajama stuffie pillow cover. But the pattern is written for a heavier yarn than the Red Heart I have, and I just didn’t have the energy to try to convert the pattern to be the correct size at the gauge I’d be working in. Sigh! Maybe another time.

There are also many cute sheep hat crochet patterns out there (like this one, or this one, or this one), but again, none was easily translated into a pillow form that satisfied what I was looking for.

I had recently done some crochet projects (like this lovely autumn Little Rustic Pumpkin, pattern here) using the HDC in the third loop stitch, which, when worked flat, produces a fabric that strongly resembles knitted ribbing. I thought about it for a while and finally concluded that although it wouldn’t produce the cute, bobble-y, fluffy sheep-fleece look I had originally wanted, a sheep pillow done in ribbing would still look sufficiently sheep-y (texture-y) to get the job done. So I decided to give the crocheted ribbing fabric a chance.


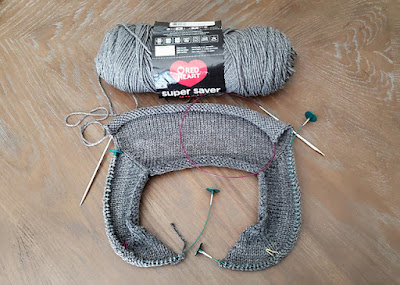
I used a 7-inch by 12-inch microbead bolster pillow as a size guide for the body of the pajama stuffie pillow cover. (The finished cover fits over that bolster pillow perfectly. LOL)


In the Aran Fleck yarn, first I crocheted a flat circle using all FPDC stitches until it was about 7 inches in diameter. This would be one end of the pajama stuffie pillow cover. Working in the back loops only, I worked one row of HDC around the circle without joining at the end of the row and continued working back and forth in rows in the HDC-third-loop stitch until the body of the pillow cover was about 12 inches long. At this point I cut the yarn and crocheted another flat circle using all FPDC stitches (trying to work the second circle from the outside edge toward the center using decreases just didn’t want to look right … it might be possible to do it that way, but it was easier for me to break the yarn and work the second circle from the center outward). Without cutting the yarn I HDC’d around the circle catching the front loops only of the last row of the body stitches to join the second circle to the body.


This gave me a tube-shaped pillow cover that opens down its full length. To add a placket for buttoning, I joined the yarn along one edge of the opening and SC’d evenly across. Turned work and HDC’d across. Turned work and HDC’d across, chaining 1 and skipping a stitch where I wanted to place a button. Turned work and worked a final row of HDC across, including in the chain spaces. Finish off, weave in ends, and sew on buttons to line up with the buttonholes, and that’s all there is to making the body of the Sheepish Pajama Stuffie Pillow.


Originally I intended to use a zipper to close the pillow cover, but in the end I went with buttons (again, trying to keep it as simple as possible … remind me sometime to tell you the story of how I actually did throw a white zipper for this project into my shopping cart at the store, but when we got to the checkout the conveyor belt actually ATE my zipper - the belt just swallowed it where it turns and feeds down inside the cabinet - so I decided then and there that perhaps I wasn’t meant to use a zipper for this). I bought the buttons at Amazon.


For the face, using the black yarn, I emulated Kim Guzman’s (Crochet Kim) design for her Farmhouse Love My Sheep Pillow, free pattern found at this link. For her design Kim sews the face piece directly onto the front of her pillow as a sort of 3-D applique, lightly stuffing the face before stitching the opening closed. But for me, using a 5.5mm hook, the head turned out to be a bit taller than the end of my pillow cover, so I crocheted a second head piece and whip-stitched the two together, lightly stuffing the head before stitching the opening closed.


I wanted my sheep to be “sleeping,” so I embroidered sleeping eyes onto the face with a scrap of white yarn before sewing the two head pieces together, and I also stitched the ears to the front head piece (using the yarn tails left after working the ears) before sewing the head pieces together to make it easier to attach the ears where I wanted them.


I stuffed the pajama stuffie pillow cover with the microbead bolster pillow to plump it up for the photo shoot, but now my Sheepish Pajama Stuffie Pillow cover is ready to take its place on my bed to keep my pajamas stashed away and neatly out of sight. 😄