Showing posts with label free. Show all posts

Thursday, July 18, 2024

Pink blanket for great-grandaughter

This is going to be a Christmas gift for my great-granddaughter Lilliana, who loooves pink! The blanket used less than 4 skeins, so I'm using the last part of the fourth skein to also make a matching pink Mini Dino for her. 💜 This is a great design to give as a gift to any young person because it's easy to crochet, and the infinite pathways contained in the blanket represent the infinite potential in every young person's life. I absolutely love that symbolism and message.


I followed the method shown in this video by Fiber Spider. Blanket is worked with 39 pattern rounds followed by 1 round of solid DC and then edged with a border of RSC (reverse single crochet, also known as crab stitch). So, essentially, 40 rounds plus the edging. Here's the link to my Ravelry project page, which has details about the yarn and hook I used.


I've made this design several times, and I like that the rounds begin/end at a corner, but I think if I ever make another one, I'm going to attempt to do it in turned rounds, where there is no obvious right side/wrong side.


Tuesday, September 12, 2023

Neo and Scoop Mini-Dinos free pattern

Since the beginning of the year I have been in the middle of several large, long-term projects and felt like I needed to give myself a mental break and make something that works up super fast but also gives a finished product that is super satisfying. 


This Mini-Dino designed by Mary of the MerryMakes blog turned out to be just the project that my weary heart needed. He is SO STINKIN' CUTE!!! And he was really fast and easy to make. I wuv him!!! I also love that Mary has a video tutorial that walks us through every step of the creation process.


I made mine with a 5.5mm hook, which is a larger hook than the pattern specifies, but I tend to crochet tighter than the average bear anyhow, so I think it worked out fine. At the gauge I was working, my dino turned out to be about 6.5 inches tall. For comparison, Mary's Mini-Dinos work up to be about 5 inches tall when made with worsted weight yarn and a 4mm hook. I was also using the yarn-over single crochet technique rather than the more traditional yarn-under single crochet technique that a lot of amigurumi makers use. Mary also works her dinos using the yarn-over single crochet, but I've read that if you use the yarn-under single crochet, your finished item will be slightly shorter than if you used the yarn-over single crochet.

The pattern also specifies to use 6mm safety eyes, but I didn't have any safety eyes on hand, so I used two 10mm black buttons from this kit that I found on Amazon last year. It has black buttons in a bunch of different sizes, so they are useful for lots of various projects. So far I have used these buttons for eyes on a few recent amigurumis: my Zoey Zebra and also my Halloween Melly Teddy Ragdolls Gabby Ghost and Bobby Bat.

Just because he is soooo adorable, here's another picture of Neo posing on the coffee table with my Round Basket for Square Coasters. 😍

Neo turned out so cute that I decided he needed a friend, so I used a small scrap of Red Heart Super Saver in the Zebra colorway to make his friend Scoop. Scoop looks like newsprint from a newspaper, so that's how she got her name.


Saturday, June 10, 2023

Peekaboo Sun Hat free pattern

I first attempted this pattern in 2020, right before my family decided to move cross-country, so this project got put away for a few years until things started to settle down again. But I never forgot about it because I think it's a great pattern. I wear my hair in a messy bun during the day at least 99% of the time, so I love hat patterns that are designed to accommodate my preferred hairstyle.


Messy bun hats for winter became all the rage a while back (which was great for me), and we saw many variations of beanie patterns designed that way, but there still aren't many summer/sun hats around that are made to work for long-haired people who want to both wear their hair up and also wear a hat for sun protection in summer.


This Peekaboo Sun Hat designed by Susanna Biaye is a very well designed, great solution to that dilemma. I love it.


In 2020, I initially started working the pattern using some leftover Red Heart yarn in my stash, but it didn't take long for me to realize that this heavy worsted acrylic fiber was not going to make a hat that would feel comfortable to wear in the summer heat. Then, as I said before, life got in the way, and this project got shelved.

First try in Red Heart acrylic

When I finally had time to think about trying this pattern again in April 2023, I had decided I wanted to make it using either some thin jute cord or else maybe a raffia paper ribbon.

I had most of a spool of this 2mm jute cord in my crafting stash (leftover from making tags for Christmas ornaments, etc.) and decided to see if I could use it to make the Peekaboo Sun Hat. (One 1,100-foot spool of the jute cord is amply more than enough to make one of these hats.)

The jute is very coarse, but it was surprisingly easy to crochet with using a 5.5mm hook. However, to make the hat more comfortable to wear, I plan to add an interior band (like a sweatband) cut from one of my husband's old T-shirts. I will also tack on a black grosgrain ribbon as a hatband on the exterior. It took me a few weeks after completing the crochet part of this project to finish sewing on the black band by hand.

Because I was working at a different gauge, I had to modify some of the stitch/row counts from the original pattern, but that wasn't too difficult.

The roughness of the jute fiber gives the hat a bit of a broken-in look like you'd see on a gently-worn old straw hat. I think this will be a great hat to wear while working in the garden or even while out hiking.

This is the first time I've ever added a wire to a hat brim for shaping. From the little I've read about the process, it seems that using a thin twisted cable type of galvanized flexible wire is better for hats than a single-ply wire. The thin wire cable is marketed under many descriptive key words; I found what appears to be a suitable product by searching for "picture hanging wire." Each hat brim needs about 50 inches of the wire (or about 1.4 yards), so you obviously don't need to buy a 100-foot roll of the stuff unless you're planning to mass-produce a lot of crocheted sun hats. 

The trickiest part for me, since I'm new to adding wire to hats, was figuring out which gauge of wire would be heavy/strong enough to hold the brim in shape without being too heavy or too thin. Again, from the bit of reading I've done of what other yarncrafters have written about adding wire to hat brims, is that a wire gauge of somewhere between 16 gauge (about 1.6mm or 1/8th-inch thick) to 20 gauge (about 0.9mm or 1/16th-inch thick) is the ideal.

After a lot of clicking around, I found this blog post and pattern for the free Fedora Crochet Sun Hat by Jess Coppom of Make and Do Crew; she suggested this 1/16 in. x 50 ft. Galvanized Steel Uncoated Wire Rope from Home Depot, and I decided to use that wire for my hat brim.

If you look at my photo where I'm in the process of adding the wire to the brim, you'll see how the part of the brim with the wire is lying flat, whereas the part of the brim without the wire is lying crumpled and shapeless. It's fun to see how the simple addition of the wire is a game-changer for shaping the wide brim of the sun hat.


The brim on my hat is about 3.5 inches deep with 144 stitches around. I used a 6.5mm hook for working the last round with the wire added.


Wednesday, January 18, 2023

Adult Crochet V-Neck Vest

I'm making this in size 48 men's, but because I'm using a lighter-weight fiber than the pattern calls for (and because I crochet tightly), my gauge is 101 stitches for 24 inches across (which aligns with the stitch count for the largest size on the pattern, so I'll basically follow the stitch count instructions for that size).


Working the panels from the bottom up, one skein of the Bernat Softee Baby yarn went for about 14 inches, measured from the bottom edge of the ribbing. 


This design mainly uses the crochet lemon-peel stitch for the body of the vest, which gives a nice, pebbly-textured, reversible fabric that doesn't scream "I was crocheted." And although the fabric doesn't look holey, it does have quite a lot of small holes that lend breathability to it. (See my photo below with the sunshine showing through the vest panel.) This is a nice stitch for a masculine/unisex garment because it is comfortably ventilated while not looking "lacey."


I originally had wanted to knit a textured top-down V-neck pullover vest in a 3-weight yarn as an alternative to the cardigan-style vest that I knitted for my husband as a gift at Christmas 2021. After looking through a lot of patterns, I finally settled on the Ink (paid) pattern by Fiona Hamilton-MacLaren, which, as its description says, is a "cosy fitted vest with an all over texture pattern. The ribbed stitch pattern pulls the fabric in, but gives loads of stretch."

It's a beautiful design, and I really, really wanted to be able to make it. But the problem I was encountering is that it's not a pattern that I could put down and then easily pick back up again a few days later, even when I used a row counter and kept careful notes about where I left off. I was imploding my brain trying to keep track of where in the stitch pattern I needed to start each row, and spent a lot of time tinking (unknitting) rows where I started out wrong but it took me a full row or two to realize that my stitches had gone amiss. I was frustrated but also really sad at how difficult it was for me. I'm not saying Ink is a difficult design; the stitches are easy, mostly just knits and purls, and it's the way those basic stitches fit together that creates the beautiful, ribbed texture. I believe the problem rests with me and my inability to wrap my head around how it all fits together after putting the project down for a few days. I think I just need to attempt Ink again at a time when I can devote more uninterrupted concentration to it.

So after admitting defeat (albeit temporarily) with Ink, I started looking to see if I could find a top-down crocheted men's vest pattern with nice texture and a traditional fit. It wasn't until I altered my search criteria to accept bottom-up patterns that I found this Adult Crochet V-Neck Vest free pattern by Yarnspirations Design Studio. I usually prefer to make top-down garments, but the overall look of this vest fits with what I wanted to make, so I decided to give the bottom-up design a go. 

The downside of the lemon-peel stitch, compared to other, taller crochet stitches, is that it grows slowly, which can feel tedious (particularly when you're working from the bottom up). But if you just keep plugging along, the vest eventually will come together.

This is going to be a gift for my husband, as I said (probably for Christmas 2023), and if you've been reading my blog for a while, you already know that he strongly discourages me from making anything for him. He grumped vociferously when I asked him to stand up so I could measure the bottom ribbing at his waist when I started working the first piece for this vest. But sometimes my creative impulses just compel me to make him something. And I do believe that this has turned out to be a very nice vest for him that will fit comfortably and be nice and cozy. After Christmas, I'll add a photo of him wearing it to this post.

Edited to add: Here's the photo of him wearing it! It fits him perfectly. 😊


Instead of following the pattern instructions for the neck edging, I decided to try working 1 round in DC (including the decrease at the bottom front) followed by 2 rounds of alternating FPDC/BPDC to give the appearance of ribbing. That technique often works well for that effect, but I didn't like how it ended up looking here. So I ripped out that neck edging and redid it using the same technique that was used for the armhole edging.

I worked the armhole edging almost as described in the pattern, except instead of making the ribbing and then sewing it on, I worked the ribbing joining it to the armhole as I went using the join-as-you-go technique similar to what is shown in this video


To do that for the neck opening means the ribbing will begin/end at the bottom front. The ends will be "square" (not tapered) and will be sewn together overlapping, which is a common feature of knitted neck ribbing seen on some V-neck sweaters.


Saturday, January 7, 2023

Iced Gingerbread Russian brioche messy bun hat

I have made this hat pattern a couple times before (here and here) and really enjoy it. It isn't exactly standard brioche; the technique is easier than brioche but still results in a beautiful, squishy, reversible, two-color project, so I love it.


The color scheme I've chosen here reminds me of iced gingerbread, so that's what I'm calling this hat. 😊


The biggest difference this time is that I stopped decreasing after the 48-stitch section to leave the top of the crown open as a messy bun/ponytail style hat. I used a 5mm crochet hook to cast off the knitted stitches into a round of 48 SC, and then worked one more round of SC with a few decreases to get the final stitch count down to 40 stitches.


The language of the video is Russian, but it's easy to follow along with the designer, Katerina Mushyn, as she knits in the video, so even if you don't speak Russian, don't be afraid to try this pattern. She also provides written instructions in both Russian and English in the video and on her website.


Video tutorial: https://youtu.be/iPabTSvzu04
Written pattern: http://prjaga.com/vyazanie-dlya-zhenshchin/shapka-beret/komplekt-bordo-shapka-i-snud-spicami

It's also helpful to use a row counter that has main/subcounter functionality with this project. I used this free browser-based Row Counter App.


Sunday, December 4, 2022

A demogorgon for Wendy

I am really pleased with how well this Stranger Things Demogorgon free pattern by Andrea Leek turned out. My grandniece Wendy is a huge fan of "Stranger Things," so this will be her birthday present. 


I decided to make the demogorgon in a slightly less demonic chibi ragdoll style. I worked the pattern as written for the legs and arms but subtracted two rows from the torso to shorten it slightly. I worked the head separately so it could be stuffed and closed and then stitched to the top of the unstuffed torso. Legs and arms are also unstuffed.


The toes, fingers, and "flower" face are worked as written in the pattern. Don't worry if the flower seems too full and wants to curl as you make it; it will straighten out as you stitch it to the head. I added more teeth to this one than was shown in the pattern to resemble the original character more closely.


I worked on this back in July and August, so my only problem was having to wait so long for December to get here so I could gift this little guy to Wendy! 

Even though my yarncraft productivity has fallen dramatically in recent years due to my chronic pain issues, it felt great to be able to finish this project. And now I bet Wendy's sister Charlotte will want me to make one for her too! 💜

Sunday, October 16, 2022

Join the free Halloween CAL

Melanie Grobler of M and M Crochet Designs is hosting a free Halloween Crochet Along (CAL) on her blog and Facebook group. This was a lovely and fun CAL to be a part of, where we were creating two of Melanie's Melly Teddy Ragdolls: Gabby Ghost and Bobby Bat. If you would like to be part of it, too, head on over to her sites and check out the patterns. If you start now, there is still time for you to finish one or both of the ragdolls by Halloween!


My dolls differ from Melanie's written pattern in a few ways: My Gabby Ghost has no nose or mouth. (I like her face with just the eyes, eyelashes, and cheeks.) My Bobby Bat is mostly purple but with black wings and some other different color choices. On both dolls I opted not to stuff the hands or feet. (Again, just a personal preference for the ragdoll aesthetic.) And my dolls both have 12mm button eyes instead of safety eyes. If you want more details about my yarn choices, check out my Ravelry project page.


I made these using a 4mm crochet hook, but my hands would have been more comfortable if I had used a 4.5mm hook. I do own a hook that size, but the set it's part of has been missing since we moved two years ago, and I'm just stubborn enough not to buy another one because I know the set will turn up again once I'm able to fully unpack my craft room boxes. So, in the meantime, I'm making do with a different set of hooks that used to be my traveling set. Le sigh!!😉


Gabby's pumpkin is crocheted from the CAL pattern, but I made the pumpkin accompanying Bobby on my 22-needle Addi Pro circular knitting machine. I crocheted the stem and vines according to the CAL pattern, which worked out fine.


Join the free Halloween 2022 Crochet-A-Long at the following links:

Introduction

Shortcut to Part 1

Shortcut to Part 2

Shortcut to Part 3

Shortcut to Part 4

Shortcut to Part 5

Shortcut to Part 6


Saturday, September 10, 2022

Crochet candy corn owl beanie free pattern

Just in time for looking cute on crisp autumn days, this is a messy-bun version of Sarah Zimmerman's Candy Corn Hat, free pattern on Sarah's blog Repeat Crafter Me at this link


I didn't have any yellow worsted or aran weight yarn in my stash, so I used some yellow Fixler Brothers Quick Knit sport weight held double, and it turned out just fine. You can read the details about the other yarns I used at my Ravelry project page.


The pattern didn't say what size of safety eyes to use for the owl's pupils, so I used 25mm (1 inch) black buttons instead, from a set I found on Amazon at this link.


My favorite resource for buying safety eyes is 6060 on Etsy, but in the case of this hat project, it was easier for me to use buttons.

Wednesday, November 3, 2021

Tag It luggage tag free pattern

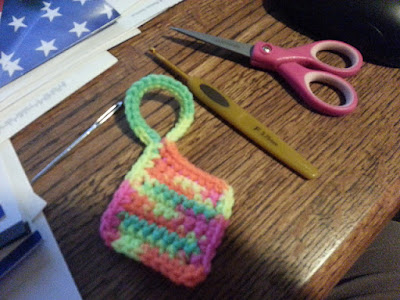
We have been using these little tags on our luggage for nearly 10 years now. The tags are soft and pliable, so they won't scratch the bags, and their bright colors definitely help make it easier to pick out which suitcases are ours as they pass by on the luggage carousel!

New tag made in 2021 next to an old tag from 2013

We recently added a new suitcase to our collection, so naturally I pulled out my remnant of Day Glow and whipped up another tag before our next trip.

One of my first tags made in 2013

This is the quick and easy crochet Tag It pattern by Tamara Kelly, aka Moogly, which is available for free on her blog.

One of my first tags made in 2013

As I said, I like to use Red Heart in the Day Glow colorway to make these (the bright colors are so easy to see). If you want to have a contrasting color for the edging, Red Heart in the Glow Worm colorway complements the Day Glow nicely.

If you have to attach these to a large handle on your luggage, I suggest using a 4mm hook and starting with a chain of 35.