Showing posts with label free-pattern. Show all posts

Thursday, October 2, 2025

Skeleton Doll

This is a fun, easy, and quick-to-make pattern by Ashley of A Crafty Concept for an adorably spooky little crochet skeleton doll, a perfect addition for everyone's handmade Halloween decor!


The written pattern is free on her blog, and she also provides a video tutorial.

Work in progress - paint drying

He reminds me of a simplified version of Jack Skellington, so I have set him on my hearth beside his adoring Sally in pumpkin form. Maybe I can give him a tuxedo coat and bat bow tie later for a little more authenticity (Disney-thentic, ha).

Jack's Lament

There are few who'd deny, at what I do I am the best
For my talents are renowned far and wide
When it comes to surprises in the moonlit night
I excel without ever even trying
With the slightest little effort of my ghostlike charms
I have seen grown men give out a shriek
With the wave of my hand and a well placed moan
I have swept the very bravest off their feet

Yet year after year, it's the same routine
And I grow so weary of the sound of screams
And I, Jack, the Pumpkin King
Have grown so tired of the same old thing

Oh, somewhere deep inside of these bones
An emptiness began to grow
There's something out there, far from my home
A longing that I've never known

I'm the master of fright, and a demon of light
And I'll scare you right out of your pants
To a guy in Kentucky, I'm Mister Unlucky
And I'm known throughout England and France

And since I am dead, I can take off my head
To recite Shakespearean quotations
No animal nor man can scream like I can
With the fury of my recitations

But who here would ever understand
That the Pumpkin King with the skeleton grin
Would tire of his crown, if they only understood
He'd give it all up if he only could

Oh, there's an empty place in my bones
That calls out for something unknown
The fame and praise come year after year
Does nothing for these empty tears 


Wednesday, July 2, 2025

Tooth Fairy Pillow pocket lovey

This tooth fairy pillow is going to be a gift for my wonderful dental hygienist, Carra.


In recent years, I've developed awful sensitivity in my teeth from enamel damage incurred from grinding my teeth and/or clenching my jaw during sleep. I started wearing a mouth guard at night, but not until after the damage was already done.

Ever since my teeth were damaged, having dental cleanings done has been terribly painful, to the point where I even considered not going to the dentist at all anymore (yeah, of course, I know that skipping dental visits wouldn't have made my situation any better, obviously, but ugh). I even felt that I had to change dental practices because my previous dentist didn't seem to be sufficiently sympathetic to my pain and wasn't really working with me to follow a plan to manage it.

My new hygienist, Carra (and, really, the entire team at Dr. Shelton's), has been nothing short of AMAZING. Carra has been very sympathetic and gentle with me at every visit and always gives me and my teeth the most wonderful care.

I always try to profusely thank Carra each time I see her, to let her know how much I appreciate her wonderful "bedside manner," as it were, but in addition to saying thank you, I wanted to give her a small, tangible token to express my gratitude, and thus I went searching for a crochet tooth pattern that was both super adorable and also sort of representative of who she is in her career. To me, Carra is my personal tooth fairy angel! 👼

This free Tooth Fairy Pillow pattern by Heather Corinne Smith is just right in every way. (She also has a video tutorial you can follow.) The design makes a tooth softie/lovey of a nice size (mine is about 6 inches tall, not including the hanging loop, by 6 inches wide), and the kawaii embroidered facial features are just so cute. The pocket on the back (about 3.75 inches wide by 2.5 inches tall) is the perfect size for holding a Dutch Bros gift card and sticker to add an extra touch of sweetness to the gift. I finished mine by adding a bow made of a small scrap of hot pink ribbon (it was only about 8 inches long to start with, so it was barely long enough, but it worked!!) that I had in my stash and followed this quick tutorial on YouTube to tie it, then I carefully sewed it to the tooth using a needle and thread.

Back with pocket

This turned out so cute, and I think Carra is going to love it. So if you love your dental hygienist as much as I love mine, maybe you should make one of these for your hygienist, too!

Monday, September 2, 2024

Dragonscale Dice Bag for Mika

This is the Dragonscale Dice Bag by Jessie Alameda, a free pattern. It's going to be a belated birthday gift for Mika. I bought 200 iridescent black polycarbonate dragonscales for this project from Michelle's SilverGriffonSkies shop on Etsy. Her scales are so beautiful, durable, and lightweight - they are perfect for this dice bag.

These next two photos are of Mika's two favorite sets of polyhedral dice. The first has holographic lettering, and the second has a geode appearance in the right light. If I do say so myself, these dice are going to look AMAZING with this bag! 😍

Mika's dice with iridescent lettering

Mika's geode dice

My usual supplier for dragonscales is The Ring Lord, but they mainly deal in aluminum/metal scales, and for this dice bag, I wanted something a bit lighter, and I also wanted them to be iridescent. The Ring Lord's scales are wonderful, but I don't think they offer iridescent, so that's why I gave my business to a different vendor this time.

This bag is 52 stitches around, so each scale row required 26 scales. I calculated that I could get a maximum number of 8 scale rows from the 200 scales if I worked 5 rounds of 26 scales and then decreased the bag to be 46 stitches around for 3 more scale rows with 23 scales each. That would have left me with 1 unused scale. But I decided that the bag was already tall enough after working 7 scale rows.


This is the first dice bag that I've actually lined with a sewn-in lining. Even though I'm pretty experienced at sewing, it was still a bit scary to do something new like this. But I'm very pleased with how well it turned out, and I think the finished bag is gorgeous.

With grommet added and lining pinned in place

I bought the dark purple two-tone dress taffeta fabric at Amazon. I think it complements the colors of the dragonscales perfectly. I also bought the black cord and the gunmetal gray cord stopper at Amazon. The yarn is fingering weight Estak Royal Cotton. I used a 3.75 mm crochet hook.

Before adding lining

As you can see in my "grommets test" photo below, I had to experiment with a few different sizes and colors before I figured out which one would look best on this bag. 

Grommets test


Thursday, October 26, 2023

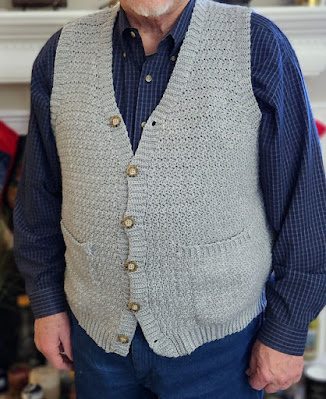
Adult Crochet V-Neck Vest Cardigan-Style

After making this Yarnspirations pattern as written for a pullover vest, now I decided to see if I could adapt it to also make a cardigan-style vest for my husband. It is made with Bernat Softee Baby Solids & Marls yarn in the Flannel colorway. (Here's a link to my post about the pullover vest.)


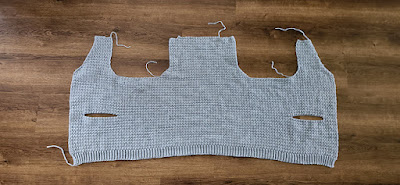
Since this design is worked from the bottom up, the lower part of the torso will be seamless from the bottom edge up to where we divide for the armholes, which I think will look nice, and it also means that the only seams to sew will be the joins at the top of the shoulders. 

Main body done, including pocket openings

I also added pockets to the front panels, and the button placket is completed with six tortoiseshell buttons that are 7/8-inch across.

After 2 skeins about 12.5 inches tall

This project took me most of a year to complete only because I had a lot of big projects at work and just a whole lot of other things going on all year, which greatly reduced my time for crocheting. Normally, a project this size would take a few weeks to finish. Thankfully, things settled down enough for me to finish this in time to give it to my husband for Christmas.

After 1 skein about 6.5 inches tall


Monday, September 2, 2019

Little Rustic Pumpkin

Took me a while to get around to it, but I finally added the vines and stem. Pumpkin portion of pattern works up super quickly. This will be a lovely addition to fall decor around the house.


This is based on the free Little Rustic Pumpkin pattern by Rebecca Langford of Yarn and Chai

For the stem, using the green yarn, I FSC'd 22 then worked in continuous decreasing rounds (alternating SC, SC2tog) until 5 stitches were left. Then I SC'd in continuous 5-stitch rounds until stem was about the same length as a 12-inch pipe cleaner. I twisted two brown craft pipe cleaners together and threaded them into the slim cylinder of stitches to give coil-able structure to the pumpkin stem. I stitched the end of the stem closed then joined the yarn again at the base and worked some points onto the circle around the base of the stem. Stitched the triangle end of the stem to the top of the pumpkin and finished off. Voila!


Before adding stem

Tuesday, January 8, 2019

Chic Aran Headband free pattern

I made this Chic Aran Headband to keep my ears warm. The pattern by Kinga Erdem is free on her blog at My Hobby Is Crochet! (Big cat ears not included. Bah-ha-ha.)


I would say this is an intermediate-level pattern because of a couple of techniques it utilizes: crossed stitches and yarn-over slip stitches. But once you get a feel for these techniques, the pattern itself is quite easy and intuitive.

Thursday, May 26, 2016

Slippers from flip-flops

My dear friend Miss Pam shared this clever idea for how to crochet slippers using flip-flop soles. So cool! I'm going to have to try this. The free pattern is by Jess Coppom of Make And Do Crew.


Sunday, October 12, 2014

Alien mask balaclava costume prop

I started to crochet this Alien Mask (free pattern by Cirsium Crochet) for my grandniece Jill, a tween who loves aliens. 👽

Ran out of yarn about 3/4 of the way through
 

But two things stopped me. First, I ran out of the Red Heart Super Saver yarn in the Spring Green colorway I was using. And second, I sent Jill's mom the in-progress photo of the mask at the point where I ran out of the yarn and asked if she thought Jill's two younger sisters, one who is still just a toddler, might think the mask was too scary if Jill wore it around the house. Jill's mom, who thought the mask looked really cool, reluctantly said, yes, it probably would be too scary for them.

So instead of going out and buying more yarn to finish the mask, I frogged the yarn and will save it for another project. 😂 Maybe I can make it again for Jill later, after her sisters get a bit older.

The pattern really does make an amazing-looking alien mask, though!! If you or someone you love loves aliens, you should give this pattern a try! 

Checking for size


Saturday, September 29, 2012

Minion hat

This minion hat is a work in progress (meaning that I still need to sew on the smile and some strands of hair), but I have to admit — I've never seen the movie, which is making it difficult for me to decide which grandniece or -nephew to give it to. 

Any of you out there who have seen "Despicable Me," do you think it would be OK to give a minion hat to a preschooler? Or would that be considered too "edgy" or something? Please advise! Thanks!


I followed the quick, easy, and free Minion Hat pattern by Elizabeth Mohsin, which is available on Ravelry.

Monday, June 18, 2012

Simple Mesh 'Fishbowl' Project Tote free pattern

More (cotton) yarn therapy: a simple mesh project tote with bamboo handles.


This is my free pattern, Simple Mesh "Fishbowl" Project Tote with Bamboo Handles, available on Ravelry.

Saturday, May 26, 2012

Vulcan/elvish ears to crochet

I saw this picture of some crocheted Vulcan/elvish ears and just had to share it with my friend Mary, who is a big Star Trek fan. This awesome free pattern is called Spock Ears and is available on the Croshame blog.


Wednesday, May 23, 2012

Olivia's Butterfly beanie free pattern

This is an Olivia's Butterfly beanie cap — hopefully soon to be seen on the head of one of my grandnieces. I found the free pattern at this blog: https://vallieskids.blogspot.com/2009/06/olivias-butterfly.html