Showing posts with label dragon. Show all posts

Monday, September 2, 2024

Dragonscale Dice Bag for Mika

This is the Dragonscale Dice Bag by Jessie Alameda, a free pattern. It's going to be a belated birthday gift for Mika. I bought 200 iridescent black polycarbonate dragonscales for this project from Michelle's SilverGriffonSkies shop on Etsy. Her scales are so beautiful, durable, and lightweight - they are perfect for this dice bag.

These next two photos are of Mika's two favorite sets of polyhedral dice. The first has holographic lettering, and the second has a geode appearance in the right light. If I do say so myself, these dice are going to look AMAZING with this bag! 😍

Mika's dice with iridescent lettering

Mika's geode dice

My usual supplier for dragonscales is The Ring Lord, but they mainly deal in aluminum/metal scales, and for this dice bag, I wanted something a bit lighter, and I also wanted them to be iridescent. The Ring Lord's scales are wonderful, but I don't think they offer iridescent, so that's why I gave my business to a different vendor this time.

This bag is 52 stitches around, so each scale row required 26 scales. I calculated that I could get a maximum number of 8 scale rows from the 200 scales if I worked 5 rounds of 26 scales and then decreased the bag to be 46 stitches around for 3 more scale rows with 23 scales each. That would have left me with 1 unused scale. But I decided that the bag was already tall enough after working 7 scale rows.


This is the first dice bag that I've actually lined with a sewn-in lining. Even though I'm pretty experienced at sewing, it was still a bit scary to do something new like this. But I'm very pleased with how well it turned out, and I think the finished bag is gorgeous.

With grommet added and lining pinned in place

I bought the dark purple two-tone dress taffeta fabric at Amazon. I think it complements the colors of the dragonscales perfectly. I also bought the black cord and the gunmetal gray cord stopper at Amazon. The yarn is fingering weight Estak Royal Cotton. I used a 3.75 mm crochet hook.

Before adding lining

As you can see in my "grommets test" photo below, I had to experiment with a few different sizes and colors before I figured out which one would look best on this bag. 

Grommets test


Thursday, February 13, 2020

Dice bag for LadyU

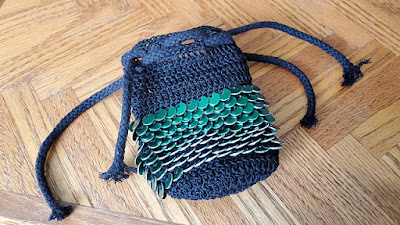
This is the first thread project I've attempted (other than some earrings many years ago). I couldn't find my thread-size hooks (except for a 1mm hook that would be too small) when I wanted to start working on this (I really need to take some time to get my craft supplies organized!!) so I used the smallest hook from my standard Clover ergonomic set — 2.75mm — which turned out fine for my needs. I tend to crochet tightly anyway and so I'm used to having to go up in hook size for most patterns. Gauge really isn't an issue for this project since it's a bag. This is made with Aunt Lydia's Classic Crochet Thread in size 10, color black. The green scales are 0.35-inch anodized aluminum tags from TheRingLord.com.


Besides using a different hook size I deviated from the written pattern in a few other (minor) ways. First I made a double-thick base as described in Jessie Alameda's Dragonscale Dice Bag tutorial. Second I didn't string all the scales onto the thread before starting to work; I crocheted them in place one by one by using my 1mm hook to pull the thread through the opening of each scale when working the scale SC. Third I worked only four rows of DC above the scales before working the row of loops for the drawstring; I felt like the bag was tall enough at that point. Fourth I worked two rows of SC above the drawstring loops.


My biggest challenge for finishing this was figuring out which kind of cord to use as the drawstring. I didn't want to use thread chains (too bumpy to operate smoothly) ... I tried to knit some i-cord using the thread and 2.25mm needles, but that was taking forever and really hurting my hands ... I thought about making some monk's cord using the thread (there are several tutorials for this on YouTube; I've done it before and it isn't hard to do) but I just wasn't feeling it ... so then I went to Walmart to see if they had anything suitable there in the crafts section, but the only black cording they had was cotton and waaay too thick at 3/16-inch. I finally found some 2mm black satin cording at Amazon.

Attempt at i-cord 2.25mm needles

Bag with 3/16-inch cord as drawstring (ugh)

I cut two 20-inch pieces of cord and wove them through the loops at the top of the bag so that the ends came out on opposite sides for cinching the top closed. I tied an overhand knot on each pair of ends at a position to allow the bag to be fully open. Then I strung one bead on each tail, knotting the cord on each side of each bead to hold it in place.


I love how this turned out and hope LadyU feels the same way when she receives it. 😊

Thursday, December 20, 2018

Orbit the Magical, Mystical Dragon CAL free pattern

I haven't attempted much amigurumi, but when I saw the free crochet-a-long for Orbit the Dragon  that started in June, I knew I had to try to make him.


I had to do some sleuthing to figure out the color name of the variegated yarn I’m using for the main body of my dragon because the skein was gifted to me without a label on it. I figured it was probably something by Red Heart, so I clicked around on the Red Heart site until I found a match. This one works well as the main body color for this pattern because the color changes are very short - about every 2 inches - which contributes to the mystical body “scales” appearance.

I kept up with the CAL until the end when it was time to assemble the pieces. That was the part that scared me so I procrastinated doing the assembly for months. But I wanted to give Orbit to my daughter for Christmas, so when Dec. 20th rolled around I knew I couldn’t put it off any longer. Aughhh! But I took my time and followed the instructions carefully and Orbit turned out just as cute as expected. Yay!

Week 1:

Week 2: 

Week 3:

Starting assembly:


Orbit assembled!


Color breakdown:

Head, body, nostrils: Red Heart in Monet Print
Eyes: Red Heart in Soft White and Black
Cheeks: Red Heart With Love in Bubble Gum
Horns: Red Heart in Soft White and Monet Print
Belly: Red Heart in Perfect Pink
Fins: Red Heart in Honeydew
Paws: Red Heart in Perfect Pik
Legs: Red Heart in Monet Print
Tail: Red Heart in Monet Print
Ears: Red Heart in Monet


Thursday, December 7, 2017

Dragonscale Hat and Cowl

I have made this hat before (Lotus Hat), way back when I was brand new to knitting. I loved this pattern because it was super easy to work and a great introduction to following charts that produced an impressive finished product with gorgeous texture.


Last year when my daughter LadyU visited her dad over Christmas in snow country, she discovered that she could really use something like a balaclava to cover her head and face while out walking the dog. Pressed for time, I quickly crocheted up a Warm Winter Ski Mask and mailed it to her. That was good enough to tide her through that visit.


After she returned home, LadyU said she wanted something similar in design to the balaclava but perhaps a bit nicer looking, something along the line of the Valanar Cowl and Hat -- a set with a hat and snug-fitting cowl that can be pulled up over the hat to provide coverage similar to a balaclava.


Well, it took me some time to get back around to making her a set like that, but I finally did it using the Lotus Hat pattern. (My version doesn't provide as much chest protection as the Valanar Cowl, but I figured she could wear another scarf if she needed more coverage there.)


I made the hat following the main pattern instructions (4 mm needles with a CO of 96 stitches), repeating the lace chart three times before working the decrease chart.

I wanted the cowl to be a looser gauge and be about 12 inches long but still have about the same diameter as the hat, so for it I used the 5 mm needles with a CO of 84. (The lovely crosshatch lace will work over any multiple of 12.) I repeated the lace chart eight times, with about 1 inch of 1X1 ribbing (six rows) at each end.