Showing posts with label bag. Show all posts

Monday, September 2, 2024

Dragonscale Dice Bag for Mika

This is the Dragonscale Dice Bag by Jessie Alameda, a free pattern. It's going to be a belated birthday gift for Mika. I bought 200 iridescent black polycarbonate dragonscales for this project from Michelle's SilverGriffonSkies shop on Etsy. Her scales are so beautiful, durable, and lightweight - they are perfect for this dice bag.

These next two photos are of Mika's two favorite sets of polyhedral dice. The first has holographic lettering, and the second has a geode appearance in the right light. If I do say so myself, these dice are going to look AMAZING with this bag! 😍

Mika's dice with iridescent lettering

Mika's geode dice

My usual supplier for dragonscales is The Ring Lord, but they mainly deal in aluminum/metal scales, and for this dice bag, I wanted something a bit lighter, and I also wanted them to be iridescent. The Ring Lord's scales are wonderful, but I don't think they offer iridescent, so that's why I gave my business to a different vendor this time.

This bag is 52 stitches around, so each scale row required 26 scales. I calculated that I could get a maximum number of 8 scale rows from the 200 scales if I worked 5 rounds of 26 scales and then decreased the bag to be 46 stitches around for 3 more scale rows with 23 scales each. That would have left me with 1 unused scale. But I decided that the bag was already tall enough after working 7 scale rows.


This is the first dice bag that I've actually lined with a sewn-in lining. Even though I'm pretty experienced at sewing, it was still a bit scary to do something new like this. But I'm very pleased with how well it turned out, and I think the finished bag is gorgeous.

With grommet added and lining pinned in place

I bought the dark purple two-tone dress taffeta fabric at Amazon. I think it complements the colors of the dragonscales perfectly. I also bought the black cord and the gunmetal gray cord stopper at Amazon. The yarn is fingering weight Estak Royal Cotton. I used a 3.75 mm crochet hook.

Before adding lining

As you can see in my "grommets test" photo below, I had to experiment with a few different sizes and colors before I figured out which one would look best on this bag. 

Grommets test


Monday, July 4, 2022

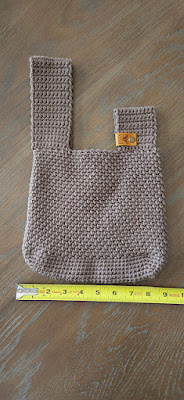
Mosu Japanese Knot Bag

This was my covid isolation project. It is the Mosu Bag by Sweet Softies. They offer a free version of the pattern on their website. I made mine with the Taupe colorway of Big Twist Value yarn and a 5mm crochet hook, and I finished it with a vegan leather Chicago tag by Angie + Britt that says "Bee kind."


Actually, I worked most of the bag all in the first two days, because after that I felt way too sick to have the energy for doing anything at all during the next 10 days or so. Some time after that I started feeling better enough to finish crocheting the straps.

The pattern is very easy and quick to make and would lend itself to lots of creative interpretation. It makes a nice size handbag. 


Saturday, May 16, 2020

Nifty crochet spiral square

An idea popped into my head for crocheting a square-bottomed tote bag, but I wanted to make it in a continuous spiral (like I've done with some round bags I've made) to avoid having an ugly join at the end of each round. So that got me wondering if there was an easy way to crochet a square in a continuous spiral. If so, all I'd have to do is crochet the square bottom until it was as big as I wanted it to be (I'm thinking about a 12-inch-square base would make a good size for a tote), and then stop increasing but just continue working until the sides were as tall as I wanted.


I googled "crochet spiral square" and this video tutorial (below) popped up. It's exactly what I was hoping to find - a quick, easy way to crochet a square shape in a continuous spiral. So nifty! This could work for lots of different things ... coasters, tote bags, placemats, trivets, blankets, cushion covers ... the list goes on and on.


I'm working with stash yarn for this project. I started the spiral square in the Dark Sage yarn then switched to the green vintage Pingouin yarn when the Dark Sage ran out. When the spiral square was about 11 inches on each side I decided the base was plenty big to be a tote bag, which meant it was time to stop increasing and start working the sides of the tote.


I do admire the vintage look of crocheted totes worked in a ripple stitch, so instead of working straight sides I decided to make rippled sides instead. To do that I had to count the stitches on each side to identify the midpoint, which is where the ripple "pinches" or "valleys." The corners I already had from working the square base become the "peaks" in the ripple pattern.


Each side is 32 stitches, not counting the extra stitch at the top of each peak. I stopped working the five-stitch increasing corners used in the spiral square base and started working three-stitch corners for the entirety of the tote bag's sides. So the sides are worked, starting from the top of a peak/corner; DC 15 then work 2 DC2tog (double crochet decrease; you have one decrease on each side of the center of the tote bag's side (this creates the "valley"); DC 15 until the next corner; 3 DC in center-corner stitch from previous row. Continue this way until the sides are as tall as you want.

Six rows after starting the sides of the tote the Pingouin green ran out and I switched to an unlabeled royal blue yarn from my stash. After five blue rows the blue yarn ran out, so I switched to a purple yarn from my stash. I worked six rows in the purple.

To stabilize the top edge of the bag I continued in purple by working a row of SC. Then I turned the bag to work the next row of SC in the opposite direction (to prevent the edge from curling) and added a ch 1 at the top of each peak. I turned the bag again and worked one more round of SC, placing 3 stitches in the ch 1 space at the top of each peak. I finished off and weaved in the ends. So the finished bag is made with a total of about 25 rows.

I added a set of brown microfiber braid purse handles from Everything Mary, which have been sitting in my sewing room for nearly 10 years waiting for the right project to come along to attach them to. I most likely bought the handles at Joann or Michaels.


I ended up gifting this bag to my sister, Linda.

I decided that if I make another bag like this someday, I think next time I would keep the 5-stitch peaks and offset them with two DC3togs in the valleys to make the peak and valley shapes sharper. But overall I think this project turned out well as is.
 
And it wasn't long before I made another one using some leftover Zebra colorway yarn from Red Heart. At first I finished this bag using a set of faux bamboo handles, which looked kind of cute, but the rigidity of those handles made it uncomfortable to wear the bag over my shoulder. 
 

So instead I found these nifty black faux leather 16-inch purse handles on Amazon that have lobster clasps at the ends, making it possible to easily put the straps on/off and use them on another bag, if the need arises. It would have been even better if I could have found these in a 24-inch length (like the straps I used on Linda's bag), so I'll be watching to see if I can find some longer straps eventually. (Update: Found some 24-inch ones at Amazon here.)


Thursday, February 13, 2020

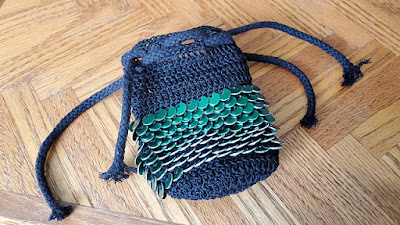
Dice bag for LadyU

This is the first thread project I've attempted (other than some earrings many years ago). I couldn't find my thread-size hooks (except for a 1mm hook that would be too small) when I wanted to start working on this (I really need to take some time to get my craft supplies organized!!) so I used the smallest hook from my standard Clover ergonomic set — 2.75mm — which turned out fine for my needs. I tend to crochet tightly anyway and so I'm used to having to go up in hook size for most patterns. Gauge really isn't an issue for this project since it's a bag. This is made with Aunt Lydia's Classic Crochet Thread in size 10, color black. The green scales are 0.35-inch anodized aluminum tags from TheRingLord.com.


Besides using a different hook size I deviated from the written pattern in a few other (minor) ways. First I made a double-thick base as described in Jessie Alameda's Dragonscale Dice Bag tutorial. Second I didn't string all the scales onto the thread before starting to work; I crocheted them in place one by one by using my 1mm hook to pull the thread through the opening of each scale when working the scale SC. Third I worked only four rows of DC above the scales before working the row of loops for the drawstring; I felt like the bag was tall enough at that point. Fourth I worked two rows of SC above the drawstring loops.


My biggest challenge for finishing this was figuring out which kind of cord to use as the drawstring. I didn't want to use thread chains (too bumpy to operate smoothly) ... I tried to knit some i-cord using the thread and 2.25mm needles, but that was taking forever and really hurting my hands ... I thought about making some monk's cord using the thread (there are several tutorials for this on YouTube; I've done it before and it isn't hard to do) but I just wasn't feeling it ... so then I went to Walmart to see if they had anything suitable there in the crafts section, but the only black cording they had was cotton and waaay too thick at 3/16-inch. I finally found some 2mm black satin cording at Amazon.

Attempt at i-cord 2.25mm needles

Bag with 3/16-inch cord as drawstring (ugh)

I cut two 20-inch pieces of cord and wove them through the loops at the top of the bag so that the ends came out on opposite sides for cinching the top closed. I tied an overhand knot on each pair of ends at a position to allow the bag to be fully open. Then I strung one bead on each tail, knotting the cord on each side of each bead to hold it in place.


I love how this turned out and hope LadyU feels the same way when she receives it. 😊

Tuesday, February 26, 2019

Hanging Litter Basket for RV

This hanging litter bag is intended to be used with a disposable liner. A plastic bag or small paper bag from the grocery store is suggested as a liner.


Using a 5mm hook, in HDC start with a base of 10 sts. Work in continuous rounds increasing 10 sts each round to 100 sts, about 7 inches in diameter. Work in straight continuous rounds for 12 rounds. Decrease 10 sts on next round to 90 sts. Work in straight continuous rounds for 8 rounds. Decrease 10 sts on next round to 80 sts. Work in straight continuous rounds for 4 rounds. Finish top edge with knitted applied i-cord including a 2-inch loop at the end of round.


Litter bag will be about 11 inches tall when finished.


Update: My husband discovered that the plastic tub that our dishwasher pods come in is a perfect fit to be a rigid liner for the hanging litter bag, making it easier to neatly tuck away the top of the plastic litter bag between the crocheted cover and the pods tub. Genius!


Friday, August 16, 2013

Plarn project

Here I am starting my first "plarn" project. 🙂 Naturally, my husband finds it very peculiar for me to want to go to the trouble of crocheting a reusable shopping bag out of used plastic shopping bags. LOL But it will be so much stronger than the individual bags alone, probably last a very long time, and not require any re-manufacturing other than my own handiwork to create.


Monday, June 18, 2012

Simple Mesh 'Fishbowl' Project Tote free pattern

More (cotton) yarn therapy: a simple mesh project tote with bamboo handles.


This is my free pattern, Simple Mesh "Fishbowl" Project Tote with Bamboo Handles, available on Ravelry.