Showing posts with label cowl. Show all posts

Sunday, July 7, 2024

DK Shawlcowl Pullover


I decided to try knitting my Shawlcowl Pullover design in a lighter weight fiber than the pattern calls for. This Hobby Lobby cotton yarn is labeled as size 4, but it's thinner than worsted weight, so to me it feels more like DK. Using the stitch count in the pattern for the large size cowl worked perfectly at this gauge. The finished size of the neck opening is 24 inches. The colorway is Emerald Pine in I Love This Cotton.

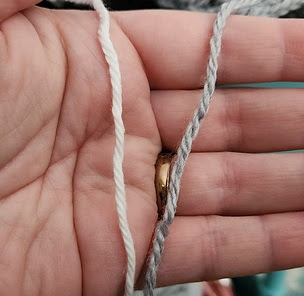
Here's a strand of the cotton yarn, on the left, next to a strand of gray DK yarn for size comparison.


I also decided to add one extra lace repeat and a picot bind off to dress up the edge. I used the twisted stitch version of the 2/4 picot bind off from this video tutorial by Nimble Needles. I'm happy with how it turned out. These Shawlcowls look great just worn as an accessory, but they also make wonderful "stealth bibs" to protect your blouse while you're eating! 😄

With the extra lace repeat and the picot bind-off, I used about 1.25 skeins of yarn.


Sunday, July 16, 2023

Zuzu's Petals - fingering

This is my very first project using fingering weight yarn! And if that weren't a cool enough fact all by itself, the yarn I'm using is a lovely ball that I found at a thrift shop for only 99 cents! How's that for cool?!


The yarn didn't come with a manufacturer's label on it, so I have no idea what brand it is or even what the fiber content is. It kind of feels like it has cotton in it; it might even be 100% cotton, for all I know. I just liked the color - it reminds me of the faded grayish blue of denim blue jeans, and I think it will make a lovely Zuzu's Petals cowlette. This is a paid pattern designed by Carina Spencer.


Because the width of the neck opening was only 16 inches when I reached the end of section 1, I knew I would need to keep adding width to make it be possible to pull the cowlette over my head. I decided to work two more 12-row repeats, hoping that would bring the width to something closer to 20 inches wide, which I figured would be a dimension that would fit better over my head. That meant my final stitch count at the end of section 1 was 151.

End of section 1 with 103 stitches


End of section 1 with 151 stitches

As I got toward the end, I was worried about losing at yarn chicken (running out of yarn, in other words). So I skipped the optional purl round and instead went directly to the cast off. But then, after casting off, I could see that I did actually have enough yarn left on the skein to be able to do the purl round, so I tinked back the cast-off round and added the purl round before casting off again. I just knew that I would always regret not having the purl round in there, if I didn't add it, because it really does help straighten out the edge curling, even before blocking. 

Before blocking

I could have saved myself the trouble of tinking back if I had weighed my skein when working the last few rounds. If I had weighed it, I would have been able to know that I'd have enough to work the last optional purl round before casting off. Live and learn! But it was pretty close!

Blocking

Gauge


Thursday, January 27, 2022

Luna Triangle Cowl

I really like pullover triangle cowls. They look amazing, they are so easy to wear, and they keep your neck, shoulders, and chest nice and cozy. So when I saw the super cute Luna Triangle Cowl paid pattern by Deni Sharpe, I knew I wanted to make one for myself.

I deviated from the pattern in a few ways. First, the pattern is written for bulky (size 5) yarn using an 8mm hook, but I made mine in aran weight (since that's what I had in my stash) with a 6.5mm hook. I also opted to hand knit the ribbed top of the cowl instead of working it in crochet.


The knitted part I did in a lofty and reversible fisherman's rib worked in the round over 80 stitches. I followed the tutorial for this technique at this link. Then I picked up the stitches for the first row of crochet to begin the triangle portion of the cowl. Since I was starting with a different number of stitches for the bottom part of the cowl than was listed in the pattern, I had to adjust the stitch counts for the triangle part of the work.


Friday, November 19, 2021

Alpine stitch balaclava

At least five years ago, my daughter LadyU asked me to make her a balaclava she could wear while walking the dogs during winter. It took me a long while to finally get around to making it for her, but hopefully she will like it! (There has been a bit of a long saga predating today's project.)


Inspired by the Alpine Ninja balaclava, I used the Crochet with GG video tutorial at this link to learn how to make the alpine stitch in the round (top down), but I worked the top of this hat differently than was shown in the video.

Top part of hat (above the opening for the wearer's face) is worked with a J/6mm hook; bottom part of hat (cowl) is worked with a K/6.5mm hook.

I prefer to work hats top-down, but I don't like patterns where the top stitch count increases so rapidly that the top of the hat curls ferociously until you work far enough down the sides that it helps to tame the curling a bit. That was what was happening on this one when I tried to follow the stitch counts in the video tutorial. So instead I started with 10 sts and made standard increases on that count (next row 20, next row 30, etc.).

My goal was to end up with a total of 72 sts after all the increases, but somehow I ended up with 76 sts on the last increase row; I figured that was close enough (the most important thing was to end up with an even number of sts for the alpine stitch to work). The crown is worked with alternating FPDC and BPDC sts because it's easier to do increases with that combo of sts than it is to try to do increases in the alpine stitch, and I like how the alternating FPDC/BPDC more closely resembles the texture of the alpine stitch at the crown (it looks better than making the crown with all plain DC).

I didn't actually keep count while working the crown, but I think the crown here is 22 rows in purple (the first 6 or 7 rows are alternating FPDC/BPDC increases, then I switched to alpine stitch). If you want to change colors where the balaclava splits to make the face opening, it's important to end the first color on an alpine stitch row where you're working the FPDC/DC sts. The next row is a SC row. I was beginning/ending rounds at the center back. Place stitch markers at each side of the face opening. Then on the SC row,  join your new color and SC to first marker; FSC for however many sts you need to skip to reach the next marker; at the next marker, SC normally to the end of the round. This way when you continue the following row in alpine stitch (FPDC/DC), the color change will look better because the post stitches are reaching across an SC row of the same color (rather than an SC row of a different color).

That's just the way I wanted the color change on this hat to look. It probably could look cool to do the color change over a contrasting SC row as well (so if that's the way you want to do it on your project, go for it!). I also increased the stitch count for the cowl portion to 78 for a bit more ease around the wearer's face.

It only took a few days to complete the crocheted portion of this project. The part that subsequently took months to do was searching for an acceptable pair of buttons to sew onto the folded tab as the last finishing touch. Originally I wanted to use a pair of Pokemon character buttons, but I wasn't able to find any I liked or that would be suitable here. So finally I settled on these washable coconut wood buttons, which I think look nice with the project.

Updated to add a removable 3.5-inch pom:


Sunday, February 16, 2020

My first machine-knit infinity scarf / cowl

I’m so excited! After lurking for months on various machine knitting Facebook groups and absorbing lots of helpful wisdom and tips, I finally took the plunge and bought my first knitting machine, a Sentro 40. 

I selected the 40-pin machine as my entry point into the machine knitting world because it was affordably priced, and I think its size is a good compromise between the biggest machines and the tiny machines. I’m also glad I spent months studying the experiences of others via the Facebook groups and also YouTube because that knowledge made it possible for me to hit the ground running (or if not running then at least walking) rather than to have to stumble through the learning curve that these machines invariably have.

My Sentro arrived yesterday, so as soon as I got off from work I assembled the pieces (i.e., put the legs on) and started cranking through one of the little sample balls of yarn that came with it. I already knew the trick for how to cast on because of my earlier research. 😊 On that first run-through I wasn’t paying attention to whether stitches were dropping (many of them did); I was just trying it out and having fun.


This infinity scarf (or cowl if worn double-wrapped) is the second thing I did with my Sentro. I cast on with the gray yarn, but I decided later that it would have been smarter to have cast on with waste yarn because that would give a neater starting edge. Mental note for next time. 😉 Jojo Juju (one of the goddesses of machine knitting on YouTube) recommends about 4-6 rows of waste yarn at the beginning and end of most projects. 

I was a lot more careful about watching for dropped stitches this time. I don’t have enough experience yet to say for sure whether the Sentro was dropping so many stitches because of the yarn I was using, or because of the way I was cranking it (my tension or whatever), or because that’s just a quirk of the Sentro. Time will tell. But even having to stop several times on just about every row to pick up dropped stitches (this video shows one method for how to correct it), it literally took less than two hours of work TOTAL from start to finish to whip out this entire project, which used all of a 315-yard skein of Caron Simply Soft. TWO. HOURS. Including the finishing work. These machines are basically miraculous.

I finished and joined the edges with the faux turban twist knot join used in all those trendy turban head-wrap patterns, like this one. The full skein of yarn yielded a tubular scarf that’s about 6 inches wide (laid flat) by about 60 inches long. I didn’t count how many rows that is (the 40-pin Sentro doesn't come with a row counter); I just used the full skein of yarn.


Which brings me to another, much more personal point about why I wanted to try working with a knitting machine: Chronic joint pain in my hands and arms has gotten bad enough over time that it has become nearly impossible for me to finish any yarncraft projects anymore. I would start a project, work on it for a couple of days, and then have to set it aside for several weeks while I waited for my hands and arms to recover before I could even think about continuing. As you can imagine, this makes for really slow going. But I think having a tool like this knitting machine will make it possible for me to keep creating, which is what I want to do, despite my disability.

Thursday, December 7, 2017

Dragonscale Hat and Cowl

I have made this hat before (Lotus Hat), way back when I was brand new to knitting. I loved this pattern because it was super easy to work and a great introduction to following charts that produced an impressive finished product with gorgeous texture.


Last year when my daughter LadyU visited her dad over Christmas in snow country, she discovered that she could really use something like a balaclava to cover her head and face while out walking the dog. Pressed for time, I quickly crocheted up a Warm Winter Ski Mask and mailed it to her. That was good enough to tide her through that visit.


After she returned home, LadyU said she wanted something similar in design to the balaclava but perhaps a bit nicer looking, something along the line of the Valanar Cowl and Hat -- a set with a hat and snug-fitting cowl that can be pulled up over the hat to provide coverage similar to a balaclava.


Well, it took me some time to get back around to making her a set like that, but I finally did it using the Lotus Hat pattern. (My version doesn't provide as much chest protection as the Valanar Cowl, but I figured she could wear another scarf if she needed more coverage there.)


I made the hat following the main pattern instructions (4 mm needles with a CO of 96 stitches), repeating the lace chart three times before working the decrease chart.

I wanted the cowl to be a looser gauge and be about 12 inches long but still have about the same diameter as the hat, so for it I used the 5 mm needles with a CO of 84. (The lovely crosshatch lace will work over any multiple of 12.) I repeated the lace chart eight times, with about 1 inch of 1X1 ribbing (six rows) at each end.


Sunday, October 2, 2016

Caedwyn Cowlette fingering experiment

I started off just knitting a random garter and stockinette top-down shawl triangle in fingering weight yarn. The yarn is Lion Brand Sock-Ease in the Taffy colorway. As the triangle grew, I decided that I wanted to finish it with the lace in-the-round portion of the Caedwyn Cowlette, so I knit the triangle until it had 158 stitches on each side (which is double the stitch count of the Caedwyn pattern for worsted weight yarn) to set up a base for the lace.


So the top of this cowlette does not follow Corrina's pattern, but the bottom lace portion does.

I don't remember the details now, but I seem to recall having to add a stitch or two in the first row of the lace to get the stitch count to come out right.

In addition to the stitch marker that shows the beginning of the round, I found it helpful to also place stitch markers on either side of the shape that grows out from the bottom front point of the cowlette (you will see where those stitches begin and end in the pattern instructions)


Tuesday, April 22, 2014

Shawlcowl Pullover pattern is free for a limited time

I released my Shawlcowl Pullover pattern on Ravelry on April 10, and the pattern has been receiving lots of yarn love from Ravelry users. The Shawlcowl Pullover is designed to mimic the trendy look of wearing a shawl as a scarf combined with the comfortable ease of wearing a pullover cowl.


If you use this link, you can download a free copy of the pattern through midnight PDT on May 1. On May 2, the price becomes $3.00 USD, so head over to Ravelry and grab your free copy while you still can using coupon code "spring."


Another reason to grab your copy now is that on May 2, everyone who has added Shawlcowl to their Ravelry library will automatically receive an updated version of the pattern that includes the Shawlcowl 2 variation. Shawlcowl 2 has a different neckline edging and a more open look to the feather-and-fan lace border.


This is my first knitting pattern design, and in the process of creating it, I discovered that developing, then testing, then ripping out and reknitting, then writing, then editing, then shooting photos, then editing some more, then test knitting it again ... was A LOT OF WORK!! Which is why I decided to put a very reasonable price on the finished pattern product.


I have gained a great amount of additional respect for people who develop pattern designs for knitting and crochet. These people WORK HARD at their craft, and they deserve our support. I have always enjoyed finding and sharing free patterns online, and of course I will continue to do that, but I have also paid for a significant portion of the patterns in my personal library. The experience I gained while developing the Shawlcowl Pullover has shown me that indie designers have earned every cent that they charge for their work.

Please respect the copyrights of indie designers!

Monday, September 19, 2011

Toy Run accessories

I wanted to make a matched set of accessories to wear during this year's Toy Run. So I crocheted these oversized hand warmers (big enough to fit over my winter riding gloves and based on the pattern found here), ribbed neck cowl (won't blow off or come untied during the ride the way traditional scarves sometimes will) and flowered beanie for apres ride. Just for fun, I crocheted Britta Graham's Easy Peasy Earflap Hat (missing its plaited tassels in this photo) in the same yarn, so now I'm not sure which hat I'll use after the ride, but it will be fun to choose.