Showing posts with label house. Show all posts

Monday, March 15, 2021

Lots-a hanger covers

Crocheted or knitted hanger covers are so quick and easy to make and are perfect for making your plastic tubular hangers slip-resistant. These are quick projects that can be great for busting down your yarn stash because they only require small amounts of yarn, and they produce a useful finished object. I mean, who doesn't need a collection of yarn-covered hangers in their closet to keep their nice blouses (etc.) from falling onto the floor? 😊


The crocheted Hanger Cover free pattern by Frugal Knitting Haus is a great, basic option for dressing up your everyday hangers. These look equally great whether worked in solid colors or variegated yarns.

The strip you crochet is six stitches wide (about 2 inches) by about 36 inches long. When you finish off, cut a long tail (about 2.25 times the length of the finished work) and use the tail to sew the cover to the hanger with a wide whip stitch (about 3-4 stitches per inch). No need to be fussy about it because the sewing stitches will blend into and be disguised by the cover. Knot the tails together and hide them inside the work for an easy finish.

Another easy way to make hanger covers is by using a 22-needle knitting machine, such as the Addi Pro.

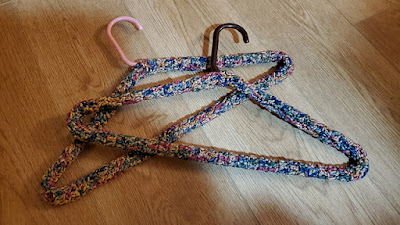
You can make a matching set of multiple hangers all from one skein of yarn, or you can do like I did above and just grab whatever pieces of yarn you have available for a unique, scrappy hanger.

Using a 22-needle machine, cast on with a few rows of waste yarn. Change to your working yarn and knit 160 to 170 rows to fit most tubular plastic hangers. Leave about a 2-yard tail before cutting the working yarn and drop it into the center. Change to waste yarn and work a few more rows then cast off from the machine. Gently stretch the knitted piece.

Using a 5mm crochet hook, close the end of the tube with the short tail and remove the waste yarn, pulling the short tail through the last loop to secure it. (Don't hide this tail inside yet.) Then close the end of the tube with the long tail, pulling the long tail through the last loop to secure it.

Thread the long yarn tail onto a large needle. Hold the knitted strip so the end wraps around the hanger and whip-stitch the long edges of the knitted piece together. Stretch the knitting until the ends of each side meet just below the hook of the hanger and whip-stitch or mattress-stitch the ends together for a neat appearance. Knot the tails together to secure and then hide the tails inside the knitting for an easy finish. Now your covered hanger is finished and ready to use.

The striped machine-knit hanger cover in the photo above was made with 160 rows, which was just long enough to fit snugly on the hanger. It might have been better if I'd made it 170 rows, which is what I did in the machine-knit hanger cover in the photo below. 


Monday, February 24, 2020

Montie's scarf, Chapter 2

I made Montie's first scarf in 2009, which was in my days Before Ravelry (I joined Ravelry on Dec. 1, 2010), so I don't have a Ravelry project page for it. Even so, Montie's scarf was based on my free pattern for Knitted School Scarf based on Harry Potter Hogwarts House Colors, which also existed in my days Before Ravelry. But Montie being Montie, he wanted to put his OWN spin on his scarf, so his request was that I make the stripe sections on each end with three bands of contrasting color while the middle sections have the usual stripe sections with two contrasting bands. He also wanted the contrast stripes to be a bit wider than in the original pattern.


Fast-forward after 11 years of wear and tear and Montie's original scarf (on the left in the above photo) was starting to look a bit ratty with woven ends popping out of place. (This is the one thing I hate about knitting vs. crochet - it's so much easier to keep ends buried in crochet but harder to keep them hidden away in knitting.) I wanted to make a new one for him with the same colors and stripe pattern, except I wanted the new one to be made in a tubular knit style (where the ends can be totally hidden inside!!). You can see the ends poking out of Montie's original scarf in the photo below.


Fortunately Caron still makes the same Dark Country Blue and Sunshine yellow colorways that I used 11 years ago to make the original scarf, so the new one will look nearly identical.

The only difficulty with wanting to reknit another scarf for Montie is how much knitting hurts my hands anymore. So I thought the Sentro knitting machine might be able to help me with this project. I know there are videos on YouTube (like this one and this one, for example) for how to make jogless color changes on the knitting machine, but I haven't figured that technique out yet so I worked this scarf with standard/stepped color changes. I figure I can always make Montie another scarf later when my knitting machine skills are more advanced. 😆

On my first attempt to make the new scarf with the knitting machine I followed the same row counts from the written pattern: I cast on several rows with a waste yarn before starting the first scarf row in blue. I worked a half-height block of 24 rows then a three-stripe section (4 rows in yellow / 6 rows in blue / 4 rows yellow / 6 rows blue / 4 rows yellow). Next a full-height block of 48 rows in blue. Then a two-stripe section (4 rows yellow / 6 rows blue / 4 rows yellow). Then alternated a full-height block in blue followed by a two-stripe section three more times. One more full-height block in blue followed by a three-stripe section and ending with a half-height block in blue. To finish, secure all color changes with knots on the inside of the tube; flat-close the ends of the tube; and secure any remaining ends inside the tube. Scarf is 454 rows total.

Unfortunately at this gauge the 454 rows turned out a scarf that was about 114 inches long, or nearly 9.5 feet. LOL!!! Montie is about 74 inches tall, sooooo ... this scarf is about 3.5 feet too long for him. Bah-ha-ha!

Amazingly, it only took about 4 hours to knit that length on the machine. (And the only reason it took that long was because I was working slowly to be careful with all the color changes and to keep a close eye on it for dropped stitches because this Sentro tries to drop stitches fairly often.) But clearly I was going to have to try again to get the scarf to a more manageable length. The machine produced a fabric of about 4 rows per inch, so to get a finished scarf of a length that's in the ballpark of 74 inches or so I was going to have to fit all the stripes into roughly 300 rows (300/4=75 inches).

My brain doesn't like to math very much, so it took me a couple of days of mulling to come up with a new set of row counts to rework the scarf on the knitting machine. My new plan is to start with a half-height block in blue (16 rows); then a three-stripe section of 2 yellow, 4 blue, 2 yellow, 4 blue, 2 yellow (14 rows); then a full block in blue (32 rows); then a two-stripe section of 2 yellow, 4 blue, 2 yellow (8 rows); [repeat the full block/two-stripes section four more times] (160 rows); one more full block (32 rows); a three-stripe section (14 rows); and lastly a half-block (16 rows). This adds up to 292 rows, which should result in a scarf that's close to 74 inches long.

It took about 2.5 hours to knit the scarf the second time. There is one spot when I was about 3/4 of the way through where I dropped a stitch and didn't see it until a few rows later when the big run opened up. I was about to scream and throw everything into my "to work on again later" pile, but I watched two videos that show how to fix a dropped stitch, this one and this one. I used the crochet hook method in the second video, but you can see in my photo that the fix turned out a little funky. Oh well - this is literally only my second knitting machine project, so I'm not going to freak out over a minor imperfection.


Friday, December 17, 2010

Howarts Houses scarves free pattern

This Slytherin House scarf is Rose Love's Christmas present. (Shhh!!)


Made with Caron Simply Soft yarn (6 ounce skeins) in Dark Sage (green) and Grey Heather (silver), because Slytherin House colors are green and silver. (Rose Love adores Slytherin.)

Knitted School Scarf based on Harry Potter Hogwarts House Colors

Knit pattern by Susan Benitez. Copyright 2010. All rights reserved. Pattern may not be sold or duplicated in any form. The written instructions, templates and illustrations are intended for personal, non-commercial use only. PATTERN UPDATED 5/4/2013 to correct errata.

Gauge

Gauge is not critical to this project.

Abbreviations used

k – knit
p – purl
st – stitch

Materials list

Knitting needles size 5 (3.75 mm).
Worsted weight yarn: 2 skeins for primary color A, 1 skein for contrast stripe B); samples were made using Caron Simply Soft solids in 6-ounce skeins.
For Gryffindor House: Autumn Red 9730 (A) and Sunshine 9755 (B)
For Hufflepuff House: Sunshine 9755 (A) and Black 9727 (B)
For Ravenclaw House: Dark Country Blue 9711 (A) and Gray Heather 9742 (B)
For Slytherin House: Dark Sage 9707 (A) and Gray Heather 9742 (B)

Notes

Scarf finished size is approximately 7 inches wide by 66 inches long, not including the 6-inch fringe on each end. The fabric is knitted in a 2-by-2 rib. Gauge isn't terribly important when you're making a scarf, but this ribbed fabric came out to about 6 stitches per inch for me. You can make your scarf narrower or wider, according to your preference, but the total number of stitches cast on must be divisible by 4 for a 2-by-2 rib knit.

Instructions

For scarf: In A, cast on 48 st.

1. Work one of each of the following sections in order (*, **, ***).

* Half-height block in primary color: In A, work 24 rows in 2-by-2 rib (k2, p2).

** Stripes section: In B, work in 2-by-2 rib (k2, p2) for 3 rows. In A, work in 2-by-2 rib (k2, p2) for 6 rows. In B, work in 2-by-2 rib for 3 rows.

*** Full-height block in primary color: In A, work 48 rows in 2-by-2 rib (k2, p2).

2. Repeat ** and *** sections in alternating order 5 times. At this point, your scarf will have 6 full-height block sections and 6 stripes sections (plus one half-height block * at the beginning).

3. Work one more stripes section **, followed by a final half-height block *. Cast off.

For fringe: Cut 52 12-inch lengths of yarn in each color A and B. Hold together 2 strands (1 of each color). Using a small crochet hook, partially pull the strands through at one end of the scarf, just above the casted row. Pull the loose ends through the loop, making sure strand ends are even, and pull to tighten. I like lots of fringe on my scarves, so I tied 26 fringe knots across each end (which was a snug fit all the way across), but you may use fewer (spacing them a bit further apart) if you wish.

Enjoy your new scarf. Now you can show the world into which Hogwarts house YOU have been sorted!


Update: Here's a scarf I made for Silver using Gryffindor House colors.


And a scarf I made for Mika using Ravenclaw House colors.
And here's a scarf I knitted for Montie using Patriot Guard Riders colors. (I actually ended up stealing this one for myself!)

 
And another scarf for Montie following a special alternate stripes configuration that he requested.