Showing posts with label montie. Show all posts

Saturday, December 11, 2021

A winter vest pour homme

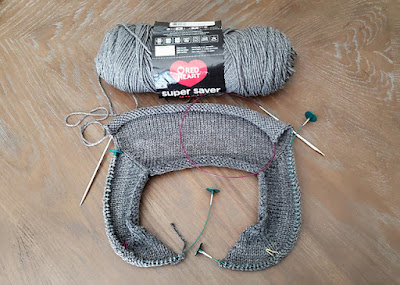
Based on the Improv pattern by Karen Templer, my plan for this is to be a seamless, top-down, cardigan-style vest worked mostly in simple, classic stockinette with K1P1 edging at armholes and button placket/front (worked with the smaller-size needles) and some traditional tortoiseshell buttons. I'm making this for my husband, who needs a replacement for the old aran vest that he reaches for during the chilliest weeks of winter to give him an extra bit of warmth. 


My initial plan was to make this without pockets, but then I realized his original vest has pockets, so I should probably try to add pockets to the new vest by following Marly Bird's tutorial for inset pockets. Another technique that is new to me for this project is picking up stitches along a knitted edge (to add ribbing).


The biggest challenge/question for me, since I'm very slow at hand knitting (and I often have days where I simply cannot knit at all due to chronic pain issues), is whether I'll manage to finish this in time to give it to my husband for Christmas. I cast on for this project on Sept. 21, which gave me about three months to work to meet that goal. Fingers crossed it gets done in time!!! (Spoiler alert: I finished it on Dec. 11! Yay!)


My husband is a person who, even though he supports my enjoyment of knitting/crochet/etc., he has firmly stated right from the beginning his preference that I NOT ever make anything for him because he will refuse to wear it. 


Over time, his declaration has proved to be not entirely true (he has occasionally worn a hat or mitts or a cowl that I've made, sometimes explicitly for him and sometimes not, and he has loved to tatters the blue scarf I knitted for him), but I've always known to generally avoid directing any of my crafting energies toward making items for him.


But when it comes to this vest, I feel like this is a different situation: He has worn the same store-bought knitted vest during winter for decades, and now that THAT vest is wearing out, he's going to need a replacement. I know he prefers neutral, classic design and lines and fit for stuff like this, so I'm attempting to incorporate those values here. I think the trickiest part for me will be achieving the correct fit. As I've worked I've been constantly measuring, checking and rechecking gauge, and comparing size to other items in his wardrobe. Because if this doesn't fit right, I know he won't wear it.


That being said, I've worked out most of this project without using a pattern (other than getting started at the shoulders with Improv), so although I'm familiar with the general principles of garment construction (after decades of sewing/knitting/crochet experience), I'm still nervous to see how the final product for this turns out.


After following the guidelines from Improv for how to begin working a top-down cardigan, I split off stitches to work each of the front panels and the back panel separately, gradually increasing the widths as the lengths grew, then rejoined all the panels below the armhole openings and knit until the bottom of the vest was the right length. I made the armholes slightly oversized, because I knew he wouldn't like to have his arm movement constricted by too-tight armholes.


After rejoining the panels below the armholes, I decided to work the 18 stitches that I cast on below the armholes on each side in garter stitch to give the side panels below the arms a bit of textural differentiation in the torso.


I finished knitting the ribbing at the bottom of the vest the day after Thanksgiving. Two days later, I picked up and knitted the front edging, which extends from side to side behind the neck and includes the buttonholes on the left front. To me it's almost magical the way you can have a curled, gnarled mess of stockinette, but then when you add the edging/ribbing, suddenly the stockinette fabric uncurls and looks gorgeous. I know that's just the way stockinette is (it curls if there's no edge treatment), but it's still fascinating to see it all come together.


Here's the store-bought ye olde aran vest that has served Montie well for many years:


Monday, February 24, 2020

Montie's scarf, Chapter 2

I made Montie's first scarf in 2009, which was in my days Before Ravelry (I joined Ravelry on Dec. 1, 2010), so I don't have a Ravelry project page for it. Even so, Montie's scarf was based on my free pattern for Knitted School Scarf based on Harry Potter Hogwarts House Colors, which also existed in my days Before Ravelry. But Montie being Montie, he wanted to put his OWN spin on his scarf, so his request was that I make the stripe sections on each end with three bands of contrasting color while the middle sections have the usual stripe sections with two contrasting bands. He also wanted the contrast stripes to be a bit wider than in the original pattern.


Fast-forward after 11 years of wear and tear and Montie's original scarf (on the left in the above photo) was starting to look a bit ratty with woven ends popping out of place. (This is the one thing I hate about knitting vs. crochet - it's so much easier to keep ends buried in crochet but harder to keep them hidden away in knitting.) I wanted to make a new one for him with the same colors and stripe pattern, except I wanted the new one to be made in a tubular knit style (where the ends can be totally hidden inside!!). You can see the ends poking out of Montie's original scarf in the photo below.


Fortunately Caron still makes the same Dark Country Blue and Sunshine yellow colorways that I used 11 years ago to make the original scarf, so the new one will look nearly identical.

The only difficulty with wanting to reknit another scarf for Montie is how much knitting hurts my hands anymore. So I thought the Sentro knitting machine might be able to help me with this project. I know there are videos on YouTube (like this one and this one, for example) for how to make jogless color changes on the knitting machine, but I haven't figured that technique out yet so I worked this scarf with standard/stepped color changes. I figure I can always make Montie another scarf later when my knitting machine skills are more advanced. 😆

On my first attempt to make the new scarf with the knitting machine I followed the same row counts from the written pattern: I cast on several rows with a waste yarn before starting the first scarf row in blue. I worked a half-height block of 24 rows then a three-stripe section (4 rows in yellow / 6 rows in blue / 4 rows yellow / 6 rows blue / 4 rows yellow). Next a full-height block of 48 rows in blue. Then a two-stripe section (4 rows yellow / 6 rows blue / 4 rows yellow). Then alternated a full-height block in blue followed by a two-stripe section three more times. One more full-height block in blue followed by a three-stripe section and ending with a half-height block in blue. To finish, secure all color changes with knots on the inside of the tube; flat-close the ends of the tube; and secure any remaining ends inside the tube. Scarf is 454 rows total.

Unfortunately at this gauge the 454 rows turned out a scarf that was about 114 inches long, or nearly 9.5 feet. LOL!!! Montie is about 74 inches tall, sooooo ... this scarf is about 3.5 feet too long for him. Bah-ha-ha!

Amazingly, it only took about 4 hours to knit that length on the machine. (And the only reason it took that long was because I was working slowly to be careful with all the color changes and to keep a close eye on it for dropped stitches because this Sentro tries to drop stitches fairly often.) But clearly I was going to have to try again to get the scarf to a more manageable length. The machine produced a fabric of about 4 rows per inch, so to get a finished scarf of a length that's in the ballpark of 74 inches or so I was going to have to fit all the stripes into roughly 300 rows (300/4=75 inches).

My brain doesn't like to math very much, so it took me a couple of days of mulling to come up with a new set of row counts to rework the scarf on the knitting machine. My new plan is to start with a half-height block in blue (16 rows); then a three-stripe section of 2 yellow, 4 blue, 2 yellow, 4 blue, 2 yellow (14 rows); then a full block in blue (32 rows); then a two-stripe section of 2 yellow, 4 blue, 2 yellow (8 rows); [repeat the full block/two-stripes section four more times] (160 rows); one more full block (32 rows); a three-stripe section (14 rows); and lastly a half-block (16 rows). This adds up to 292 rows, which should result in a scarf that's close to 74 inches long.

It took about 2.5 hours to knit the scarf the second time. There is one spot when I was about 3/4 of the way through where I dropped a stitch and didn't see it until a few rows later when the big run opened up. I was about to scream and throw everything into my "to work on again later" pile, but I watched two videos that show how to fix a dropped stitch, this one and this one. I used the crochet hook method in the second video, but you can see in my photo that the fix turned out a little funky. Oh well - this is literally only my second knitting machine project, so I'm not going to freak out over a minor imperfection.


Sunday, July 20, 2014

Lunch with friends

Today we had lunch with Tony, Annie, and Rose. It was great to spend some time together!

Friday, December 17, 2010

Howarts Houses scarves free pattern

This Slytherin House scarf is Rose Love's Christmas present. (Shhh!!)


Made with Caron Simply Soft yarn (6 ounce skeins) in Dark Sage (green) and Grey Heather (silver), because Slytherin House colors are green and silver. (Rose Love adores Slytherin.)

Knitted School Scarf based on Harry Potter Hogwarts House Colors

Knit pattern by Susan Benitez. Copyright 2010. All rights reserved. Pattern may not be sold or duplicated in any form. The written instructions, templates and illustrations are intended for personal, non-commercial use only. PATTERN UPDATED 5/4/2013 to correct errata.

Gauge

Gauge is not critical to this project.

Abbreviations used

k – knit
p – purl
st – stitch

Materials list

Knitting needles size 5 (3.75 mm).
Worsted weight yarn: 2 skeins for primary color A, 1 skein for contrast stripe B); samples were made using Caron Simply Soft solids in 6-ounce skeins.
For Gryffindor House: Autumn Red 9730 (A) and Sunshine 9755 (B)
For Hufflepuff House: Sunshine 9755 (A) and Black 9727 (B)
For Ravenclaw House: Dark Country Blue 9711 (A) and Gray Heather 9742 (B)
For Slytherin House: Dark Sage 9707 (A) and Gray Heather 9742 (B)

Notes

Scarf finished size is approximately 7 inches wide by 66 inches long, not including the 6-inch fringe on each end. The fabric is knitted in a 2-by-2 rib. Gauge isn't terribly important when you're making a scarf, but this ribbed fabric came out to about 6 stitches per inch for me. You can make your scarf narrower or wider, according to your preference, but the total number of stitches cast on must be divisible by 4 for a 2-by-2 rib knit.

Instructions

For scarf: In A, cast on 48 st.

1. Work one of each of the following sections in order (*, **, ***).

* Half-height block in primary color: In A, work 24 rows in 2-by-2 rib (k2, p2).

** Stripes section: In B, work in 2-by-2 rib (k2, p2) for 3 rows. In A, work in 2-by-2 rib (k2, p2) for 6 rows. In B, work in 2-by-2 rib for 3 rows.

*** Full-height block in primary color: In A, work 48 rows in 2-by-2 rib (k2, p2).

2. Repeat ** and *** sections in alternating order 5 times. At this point, your scarf will have 6 full-height block sections and 6 stripes sections (plus one half-height block * at the beginning).

3. Work one more stripes section **, followed by a final half-height block *. Cast off.

For fringe: Cut 52 12-inch lengths of yarn in each color A and B. Hold together 2 strands (1 of each color). Using a small crochet hook, partially pull the strands through at one end of the scarf, just above the casted row. Pull the loose ends through the loop, making sure strand ends are even, and pull to tighten. I like lots of fringe on my scarves, so I tied 26 fringe knots across each end (which was a snug fit all the way across), but you may use fewer (spacing them a bit further apart) if you wish.

Enjoy your new scarf. Now you can show the world into which Hogwarts house YOU have been sorted!


Update: Here's a scarf I made for Silver using Gryffindor House colors.


And a scarf I made for Mika using Ravenclaw House colors.
And here's a scarf I knitted for Montie using Patriot Guard Riders colors. (I actually ended up stealing this one for myself!)

 
And another scarf for Montie following a special alternate stripes configuration that he requested.