Here is a quick tutorial video by Naztazia showing how to crochet Romanian cord. This cord works up fast and is useful for making lanyards, keychain wristlets, bracelets, tote straps — so many options for this lovely cord. You can use macrame cord, as in the video, but it also works well with most types of yarn.

Showing posts with label quick. Show all posts
Showing posts with label quick. Show all posts
Thursday, June 25, 2026
Thursday, July 24, 2025
Mini Simple Stardew Valley Chicken
I discovered that this pattern makes an adorable chick-sized mini chicken if you use a few scraps of standard 4-weight yarn, a 5 mm hook, and 8 mm safety eyes. This is the Simple Stardew Valley Chicken free pattern, which can be found on Ravelry.

They are so quick and easy to make that you can whip up a whole tiny flock in just an evening. I made all three of these in just a few hours.

Each chick measures about 3.5 inches long by about 2.5 inches tall (not including the comb). The kawaii safety eyes came from this kit on Amazon. You can view more info about the yarns I used for these on my Ravelry project page.

The pattern was originally designed to be made with chenille blanket yarn, which produces a much larger softie (example photo from the pattern below).

Sunday, October 27, 2024
Quick and easy Halloween decor craft
With Halloween less than a week away, here's a super easy decoration idea that you can use to decorate your front porch or anywhere you need a bit of spooky ambience.

All you need to make these adorable little ghosts is a printer, some paper for the printer, and some scissors. You can even let your littles color a sheet of ghosts for some extra fun.

Click here to download the printable PDF.
Saturday, January 6, 2024
Taylor's Beanie
When Taylor Swift wore that crocheted beanie to watch her boyfriend, Travis Kelce, play football with the Kansas City Chiefs, all of the online yarnie groups went BA-NA-NAS with people wanting to know how to make the same hat. It's the Taylor Effect, y'all.

Anyway, if you love a Swiftie, like I do, then you simply MUST make them one of these beanies. It works up quickly with simple stitches, so it's an easy project that will bring a huge thrill to your Swiftie's heart, because in no time at all they will be able to rock this hat just like Taylor did.

To replicate Taylor's look, it's important to use a bright white yarn for the main color and a rich, vibrant red with blue undertones for the stripe.

You will notice that I have the jersey number "wrong" on the beanie I made. That's because my Swiftie also loves a football player, and he happens to wear jersey number 84 (whereas Travis Kelce wears number 87).
For the fur pom, I found an affordable pack of faux-fur poms on Amazon.
 |
| Photo showing Taylor's faux fur pompom |
I am working on writing this pattern, which will be available as a free download on Ravelry. I will link to the pattern page here once it's available. Ravelry pattern link: https://www.ravelry.com/patterns/library/taylors-beanie-3

Wednesday, December 6, 2023
Mini Dino in chenille
These adorable mini dinos are so fun and fast and easy to make. The free pattern is Mini Dino by MerryMakes. A member of my family gifted me this skein of bulky chenille yarn, so naturally I had to see how this pattern would work up in the bulky yarn using an 8mm hook. (There wasn't a label on the skein, so I don't know what brand or colorway this yarn is.)

For the eyes I used a pair of 20mm black buttons from this set I found on Amazon.

This mini dino is made by following the same pattern as the smaller dinos, same stitch and row counts. The only difference is the size of the yarn and hook, which produced a dinosaur about 12 inches tall.


Monday, July 24, 2023
Condensation fighter
This is just another quick cotton cup cozy I whipped up to fit my glass filled with a refreshing drink with ice.

I hate dealing with condensation on the outside of my glass, so I use a lot of cotton cup cozies in the summer.

No pattern for this; I just crocheted this to fit the size of my glass. The cozy is secured with straps that fit over the handle in pretty much the same way a face mask's straps fit over a person's ears.

A woman in a crafting group shared her idea for securing a cup cozy this way, no buttons or other fasteners required, and I thought it was very clever, so I wanted to try making a cozy that way too.

Here's a link to my Ravelry project page.
Wednesday, August 3, 2022
Crochet two-color i-cord
Here's a nifty technique I just saw for crocheting a two-color i-cord. It's super fast and easy and looks really cool, too.
@theknottyboss Two color i-cord - hook by @lovestitchesall #crochetersoftiktok #crochettiktok #crochetstitch #crochethack #crochettutorial #yarntok #yarnlovers #crocheting #crochethook #handmade #amigurumi #crochetdesigner🧶 #hooking #crochetaddiction #crochettip ♬ Stefania (Kalush Orchestra) - KALUSH
Monday, March 28, 2022
Cozy candles
I used SlipStitchery's Halloween Witch Jar Covers pattern as initial inspiration for these quick and easy flameless (battery operated) candle cozies. I worked each cozy in a different stitch and different colorway for some variety in them as a grouping.

I still intend to make some of the actual Halloween Witch Jar Covers sometime, too! 😊

Sunday, January 16, 2022
Light, wide infinity scarf
Another quick and easy machine-knit infinity scarf. Cast on with waste yarn, then switch to project yarn and knit through the entire skein, leaving about a 60-inch tail for grafting the ends together.

I wanted this scarf to be as wide as possible, so I used the Sentro 48 to knit it. I got 252 rows from one full skein of the Lion Brand Mandala Ombre in the Chi colorway. Finished scarf is about 54 inches long.

Although Lion Brand calls this a size 4 yarn on the label, it feels more like a DK (3) weight, and this weight works into a lovely tubular scarf that will keep the wearer plenty cozy and warm despite the fiber's light weight.

You can see how to seamlessly graft the ends of the tube together by watching a tutorial video like this one, although there are many tutorials available for this technique online.
I gifted this scarf to my daughter, LadyU!

And I made another one for Rose, whose favorite color is orange. It can be difficult to find pretty yarns that include the color orange, so this Lion Brand Mandala Ombre in the Serenity colorway jumped out at me as being a great choice. I hope she likes it!

I also knitted this one on the Sentro 48 and got 267 rows from the skein (not sure why there's such a difference in the number of rows between the different colorways). Finished scarf is also about 54 inches long.
Wednesday, November 3, 2021
Tag It luggage tag free pattern
We have been using these little tags on our luggage for nearly 10 years now. The tags are soft and pliable, so they won't scratch the bags, and their bright colors definitely help make it easier to pick out which suitcases are ours as they pass by on the luggage carousel!
 |
| New tag made in 2021 next to an old tag from 2013 |
We recently added a new suitcase to our collection, so naturally I pulled out my remnant of Day Glow and whipped up another tag before our next trip.
 |
| One of my first tags made in 2013 |
This is the quick and easy crochet Tag It pattern by Tamara Kelly, aka Moogly, which is available for free on her blog.
 |
| One of my first tags made in 2013 |
As I said, I like to use Red Heart in the Day Glow colorway to make these (the bright colors are so easy to see). If you want to have a contrasting color for the edging, Red Heart in the Glow Worm colorway complements the Day Glow nicely.
If you have to attach these to a large handle on your luggage, I suggest using a 4mm hook and starting with a chain of 35.

Saturday, October 30, 2021
BaaBaa Black Sheep Last-Minute Halloween costume
I wanted to make a quick and easy hat to serve as a last-minute costume I could wear while handing out Halloween candy. I remembered having this sweet pattern, Baa Baa by Melissa Mall, and thought it would make a great prop to wear. All I have to do to finish my costume is draw on a black nose, wear a comfy black T-shirt and black leggings, and I'll be set as the best (OK, the ONLY) Black Sheep on my block.

I deviated from the pattern by making the hat with an open top (messy-bun style), a larger stitch count (to accommodate my big cabesa), and with a bottom band made of HDCs. On the ears I also added an extra increase row and two extra straight rows (for adult sizing). I also worked the body of the hat with the wrong side (inside) facing me, because doing it that way means you don't have to push the textured "bumps" out to the right side of the hat. With the stitch combination used in the pattern, the bumps naturally bump out to the side of the fabric facing away from you as you're working, so doing that part with the wrong side facing you saves you from having to do that extra step to get the texture to show where you want it.

This makes a great last-minute costume hat because it works up quickly. I made this in a single evening with small amounts of Red Heart Super Saver in the Black and Charcoal colorways and a 6mm hook. Baaaaaaaa!
Next Halloween, if I manage to plan ahead a bit further, I'd love to work up a Cookie Monster costume along the lines of one I saw a picture of just this morning by Agnes Hsu of hello, Wonderful. She made this for her son, who is just super adorable. She tells you all about how to make this costume on her blog.

Cookie Monster has always been my favorite Muppet, from way back when I was a child growing up watching "Sesame Street," so I would LOVE to dress up in a Cookie Monster costume. I even crocheted a Cookie Monster hat for Caleb, way back in the day.
OK, I couldn't resist crocheting a quick Cookie Monster character hat based on my Loopy Chemo Cap pattern, just in case I don't have enough time to make an adult size of that amazing Cookie Monster costume above.

I used my Addi Pro 22-needle knitting machine to make the eyeballs, and then added one round of SC for the pupils. Whatcha think?

Tuesday, August 24, 2021
Coasters in 316 Stitches - free pattern
I love this pattern for making coasters. They are very quick and easy to make. I made this set of four coasters all in one evening. The free pattern, Oval Table Lace Placemat and Coaster, is by Red Heart.
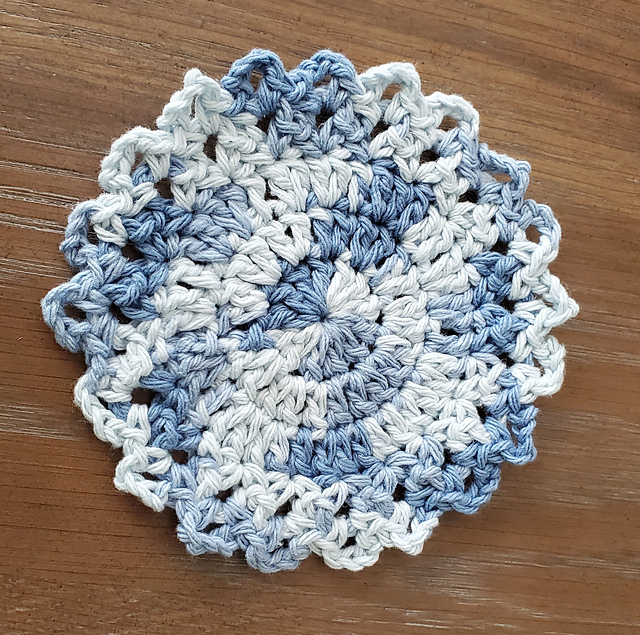
We needed a few new coasters for our breakfast nook table, and I thought this set made in Lily Sugar N Cream cotton in the Faded Denim colorway would look nice.

These coasters are made with a mere five rounds, and just for fun I counted up the total number of stitches as being 316 per coaster.
I also made these coasters back in 2012.
Friday, August 6, 2021
Handy little earbuds pocket - free pattern
Here's a super-quick to make little pocket to help keep your wired earbuds wrangled and hopefully less tangled.

I keep a set of wired earbuds near my chair in the living room so they are handy whenever I want to listen to a video on my laptop or phone while my husband is next to me watching TV. That way I can listen to my thing without competing with the sound coming from the TV.
But the problem with wired earbuds is: How do you keep them neatly coiled and out of the way when you aren't using them? I would wrap the wire around my hand into a neat roll, but after I set it down, the wire would inevitably come unrolled and turn into a tangled mess.
So eventually I thought if I crocheted a little pocket to tuck my rolled-up earbuds into, it would hold everything together until I was ready to use them again.
You could make this with just about any yarn or hook size, but I used a worsted weight cotton (Lily Sugar 'n Cream Ombres in the Faded Denim colorway) and a 6mm hook. If you use lighter or heavier yarn, you would need to alter the stitch count to make a pocket that's approximately 2.5 inches in diameter at its widest point.
Setup: I started with a magic circle and worked in a continuous spiral (no joining at the end of rounds).
Row 1: 6 SC in magic circle. Use a stitch marker to keep track of the beginning of the rounds and move up when you start each new round. (6 SC)
Row 2: 2 SC in each st around. (12 SC)
Row 3: 2 SC in next st, 1 SC in next st. Repeat around. (18 SC)
Row 4: 2 SC in next st, 1 SC in each of next 2 sts. Repeat around. (24 SC)
Rows 5-6: 1 SC in each st around. (24 SC)
Row 7: Dec SC over next 2 sts, 1 SC in each of next 2 sts. Repeat around. (18 SC)
Row 8: Dec SC over next 2 sts, 1 SC in next st. Repeat around. (12 SC)
Row 9: SC in each st around. (12 SC)
Finishing: Sl in next st. Use an invisible join technique and finish off. Weave in ends. Enjoy your handy little earbuds pocket.

Monday, March 15, 2021
Lots-a hanger covers
Crocheted or knitted hanger covers are so quick and easy to make and are perfect for making your plastic tubular hangers slip-resistant. These are quick projects that can be great for busting down your yarn stash because they only require small amounts of yarn, and they produce a useful finished object. I mean, who doesn't need a collection of yarn-covered hangers in their closet to keep their nice blouses (etc.) from falling onto the floor? 😊
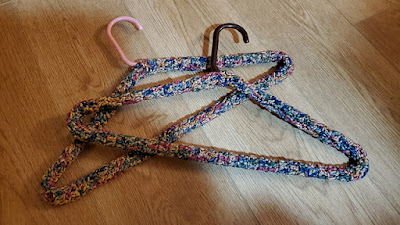
The crocheted Hanger Cover free pattern by Frugal Knitting Haus is a great, basic option for dressing up your everyday hangers. These look equally great whether worked in solid colors or variegated yarns.
The strip you crochet is six stitches wide (about 2 inches) by about 36 inches long. When you finish off, cut a long tail (about 2.25 times the length of the finished work) and use the tail to sew the cover to the hanger with a wide whip stitch (about 3-4 stitches per inch). No need to be fussy about it because the sewing stitches will blend into and be disguised by the cover. Knot the tails together and hide them inside the work for an easy finish.

Another easy way to make hanger covers is by using a 22-needle knitting machine, such as the Addi Pro.
You can make a matching set of multiple hangers all from one skein of yarn, or you can do like I did above and just grab whatever pieces of yarn you have available for a unique, scrappy hanger.
Using a 22-needle machine, cast on with a few rows of waste yarn. Change to your working yarn and knit 160 to 170 rows to fit most tubular plastic hangers. Leave about a 2-yard tail before cutting the working yarn and drop it into the center. Change to waste yarn and work a few more rows then cast off from the machine. Gently stretch the knitted piece.
Using a 5mm crochet hook, close the end of the tube with the short tail and remove the waste yarn, pulling the short tail through the last loop to secure it. (Don't hide this tail inside yet.) Then close the end of the tube with the long tail, pulling the long tail through the last loop to secure it.
Thread the long yarn tail onto a large needle. Hold the knitted strip so the end wraps around the hanger and whip-stitch the long edges of the knitted piece together. Stretch the knitting until the ends of each side meet just below the hook of the hanger and whip-stitch or mattress-stitch the ends together for a neat appearance. Knot the tails together to secure and then hide the tails inside the knitting for an easy finish. Now your covered hanger is finished and ready to use.
The striped machine-knit hanger cover in the photo above was made with 160 rows, which was just long enough to fit snugly on the hanger. It might have been better if I'd made it 170 rows, which is what I did in the machine-knit hanger cover in the photo below.

Friday, January 1, 2021
My First Addi Kingsize Hat
Happy New Year! This is the very first item I knitted on my new Addi Express King Size machine. I used an old hank of what I'm guessing is some Red Heart yarn in a nice red color that I had in my stash (no label).

Jojo's video says if you want to make a double-layered adult size hat like this you should knit between 140-150 rows, but my yarn hank ran out at 137 rows. That's probably close enough to make a usable hat since this feels like a Red Heart yarn that's on the heavier side of size 4.

Finished hat is about 15 inches long, with the cuff unrolled. Being able to knit and finish an entire hat in less than an hour is miraculous. I will be able to make so many hats to donate to the needy this way that I wouldn't be able to do otherwise. Love these knitting machines.
Total weight: 114 grams
Saturday, July 20, 2019
Basic Pint Jar Cozy free pattern
I sometimes like to have cold overnight oatmeal in a pint jar for breakfast, but my hand gets so cold holding the jar while I’m eating. I needed a quick, basic jar cozy to insulate my hand from the cold, so I whipped up this design before breakfast this morning. The lavender yarn is even color-coordinated with the blueberries in my oatmeal. 😍

This quick, basic cozy will fit most pint-size canning jars but can also be easily adjusted to fit other jar sizes. Just try the cozy on your jar as you crochet and adjust the stitch and row count for a custom fit.
Row 1: In magic ring, ch 2 (ch 2 doesn’t count as a stitch throughout), DC 10. Sl to top of 1st DC to join. (10 DC)
Row 2: Ch 2, 2 DC in each DC around. Sl to top of 1st DC to join. (20 DC)
Row 3: Ch 2, 2 DC in 1st st, 1 DC in next st. Work 2 DC in next st followed by 1 DC in the st after that around. Sl to top of 1st DC to join. (30 DC)
Row 4: Ch 2, DC in each st around. Sl to top of 1st DC to join. (30 DC)
Repeat row 4 four more times. You can customize the height of your cozy to fit the jar the way you want it to. Just try the cozy on your jar as you complete each round until you like the way it looks. For my jar, a total of 8 rounds of DC looked best, followed by two finishing rounds, as follows:
Finishing row 1: Ch 1. HDC in each st around. Sl to top of 1st HDC to join. (30 HDC)
Finishing row 2: Ch 1. SC in third loop of each HDC from previous round. Sl to top of 1st SC to join. (30 SC)
Break yarn, weave in ends, and enjoy your cold breakfast in a jar without freezing your hands! 🥄

Here’s my recipe for easy (keto-ish) overnight blueberry oatmeal:
3/4 cup Greek yogurt (I use whole 5% fat)
1/2 cup milk
1/4 cup steel-cut oats (I use Bob’s Red Mill Irish style)
1 tablespoon agave liquid sweetener (or whatever liquid sweetener you prefer, to taste)
Frozen whole blueberries, approximately 3/4 cup
Place all ingredients except blueberries in a pint jar and stir until well combined. Add frozen blueberries to fill remaining space in jar and stir carefully until blueberries are incorporated. (The berries will thaw in the jar overnight.) Cap jar and place in refrigerator overnight (for at least 8 hours). The next morning, remove jar from refrigerator, slip on your newly made crochet jar cozy (this step is VERY important!! LOL), and enjoy a healthy breakfast.
Wednesday, July 3, 2019
Quick baby girl gift idea: Angel Popover Dress free pattern
Gosh, I know I should post here more often, I really do, and I apologize for being so random and infrequent about posting. At least I do a better job at keeping my Ravelry project notebook up to date. Sigh!
We got a surprise phone call on Saturday afternoon from great-granddaughter Lilliana’s dad saying he has a couple of vacation days coming up soon and he wanted to bring his family down for a quick visit. Activating excited great-grandma mode in 3 … 2 … 1!!!

I needed a quick pattern to make Lilliana (now 16 months old) a sweet little dress to celebrate getting to meet her in person for the first time, and the Angel Popover Dress (free pattern) filled that need quite nicely. This size 2T version worked up in just a few hours of work over two evenings.

I threaded a 3/8-inch pink satin ribbon between the stitches of the first row and tied a bow in the center front, added a pink tank top and miniskirt from the store as a liner beneath the lacy white crochet dress, and voila!

Sunday, June 9, 2019
Granny Squared Into Highlighter Hell Throw free pattern
I found a couple more skeins of the unidentified colorway aka “Highlighter Hell” (what I call it) by Red Heart, so I decided to use it along with some plain white to make an infinite granny square throw for my daughter who loooves these (horrifically) bright colors. 😉

After trying to work this continuous granny square in full rounds of a single color, I discovered that there was not a good way to carry the next color up for the subsequent round without leaving a long loop on the reverse side where I changed colors (see below). I was afraid that the only way to “fix” this would be to add a lightweight flannel backing to cover the reverse side and hide the loops.

I pondered this problem for a while and concluded that the best way to avoid it would be to use a two-color spiral method, so I went searching for a pattern and found The Continuous 2 Color Granny Crochet Tutorial by Fiber Spider on YouTube. Ta-da!! This method is an absolutely brilliant way to work a two-color continuous granny stitch blanket without having to tie off after every single round (and have eleventy-bazillion ends to weave in when you’re done, plus all those ends would equal a lot of wasted inches of yarn), and it eliminates the big-loop-from-carrying-up-the-yarn problem I was having. Like I said: Brilliant!!

I just kept working rounds on the throw until I ran out of the Highlighter Hell color. Then I used some highlighter orange yarn from my stash to work a border of one round SC followed by one round RSC or crab stitch. Finished size is about 44 inches square.


After trying to work this continuous granny square in full rounds of a single color, I discovered that there was not a good way to carry the next color up for the subsequent round without leaving a long loop on the reverse side where I changed colors (see below). I was afraid that the only way to “fix” this would be to add a lightweight flannel backing to cover the reverse side and hide the loops.

I pondered this problem for a while and concluded that the best way to avoid it would be to use a two-color spiral method, so I went searching for a pattern and found The Continuous 2 Color Granny Crochet Tutorial by Fiber Spider on YouTube. Ta-da!! This method is an absolutely brilliant way to work a two-color continuous granny stitch blanket without having to tie off after every single round (and have eleventy-bazillion ends to weave in when you’re done, plus all those ends would equal a lot of wasted inches of yarn), and it eliminates the big-loop-from-carrying-up-the-yarn problem I was having. Like I said: Brilliant!!
Here's a comparison of the obverse view of working the blanket in full rounds of each color (left) vs. the half-rounds used in the Fiber Spider method (right). As you can see, the different methods are undetectable to the eye, but Fiber Spider's method results in a blanket that is fully reversible and looks tidy on both sides:


Works when they were still in progress ...

Subscribe to:
Posts (Atom)