Showing posts with label scarf. Show all posts

Sunday, June 29, 2025

Tendril Shawl

The pattern for this Tendril Shawl is available for free on the designer Carmen Heffernan's blog. She also provides a video tutorial that walks you through the setup rows and the first couple of pattern repeats, which is very helpful for getting this project started.


I made mine at a heavier gauge than the original pattern calls for, but it worked out well and produced a lovely shawl/wrap/scarf. My yarn is Hobby Lobby I Love This Cotton in the Emerald Pine colorway, which is labeled as a 4 weight, and I'm using a 5.5 mm hook. I had a few skeins of this colorway left over from my Dressy Swingy Shawlivest project, and I thought they would look good being worked into the Tendril Shawl design. This yarn looks and feels more like a 3 weight despite the fact that it's labeled a 4 weight, and the cotton is so soft and smooth that it's a pleasure to work with.

Finished with gothpixy's edging

I love the sawtooth edge and the beautiful lacy-ness of this shawl. The project grows quickly, which is satisfying, and the four-row repeat becomes fairly intuitive after you've worked it a few times.

Finished size

The only downside to using this particular yarn is that the skeins are pretty short at only 153 yards each, so I was worried I might not have enough yardage on hand to make a full size shawl. The first skein ran out at the beginning of row 36. 

End of first skein

The second skein ran out after making it most of the way across row 52.

End of second skein

My third skein ran out almost at the end of row 64. Thankfully, I had another skein available to finish that row and continue, because the top edge of my shawl was only about 64 inches long at that point. I used the fourth skein to work another two "points" and then do the edging row.

End of third skein

I started working the picot edging row as written in the pattern, but I felt that it was coming out too tight, so I searched through the Tendril Shawl project gallery page until I found gothpixy's project.

Gothpixy suggested an alternate way to work the picot edging that I ended up using for my project. I like their edging better for two reasons: One, it provides a lovely bumpy, wavy edging that finishes the edge really well with an easier method than working traditional picots. And two, it utilizes an extra chain stitch between each bump, so the edging doesn't tighten the edge in the same way that the original pattern's edging row was doing for me. You should check out gothpixy's project to see if maybe you might like their edging better, too!

Getting started

The designer says the finished fingering-weight samples she made measure about 70 inches (178 cm) on the long top edge after 64 rows (65 rows with the final edging applied), which is 16 "points" on the bottom edge, and 32 inches (82 cm) tall/deep on the border edge after blocking. 

I crocheted mine to 18 points, or 72 rows, plus the edging row. My shawl's total length is about 72 inches before blocking.

Wednesday, January 17, 2024

Coboo infinity scarf

Running one entire skein of Coboo through the Addi 46 knitting machine with firm tension resulted in 184 rows, plus a tail that was just long enough to graft the ends together for a child's infinity scarf that is 42 inches long. 


I followed this YouTube tutorial by Calumet Knits for grafting the scarf ends together.

I made this for my great-granddaughter, who loves pink. I originally wanted it to be a pocket scarf, but I would have needed another skein of the Coboo yarn to add enough length to make pockets. But I think the infinity scarf still turned out OK. The yarn fiber is so light that it made it difficult to get my grafting tension just right.

Monday, August 7, 2023

Witchypoo Scarf

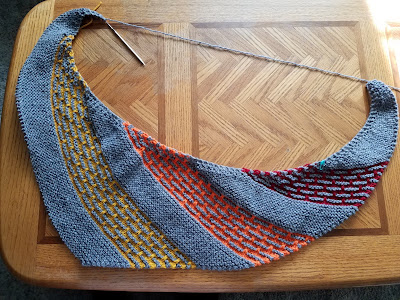
This pattern came to me when I was drifting in that place where I was not quite asleep but not quite awake. It's an easy crescent moon-shaped scarf that can be made with just about any yarn at any gauge. Just in time for Halloween stitching, I present to you the Witchypoo Scarf!


The Witchypoo Scarf can be made in a solid colorway, or a variegated, or an ombre, or in any yarn that your heart desires, but I think making it in two colors really makes the curves of the crescent shape pop visually.

304 stitches on needle

Comprised of mostly mindless, movie-watching-friendly, reversible garter stitch, you only need to pay attention to what you're doing during the first few stitches of each row, where the bottom edging detail is worked as you go.

200 stitches on needle

This pattern is best worked with an interchangeable needle with a long cable (at least 42 inches) to accommodate the large number of stitches.


Seeing the black and purple stripes in my scarf reminds me of the fun witchy-poo striped tights that my daughters used to wear at Halloween, which are memories that bring a smile to my soul. I hope your soul will find reasons to smile, too, as you knit and wear this scarf.

Measuring my gauge

As you can see in the "measuring my gauge" photo above, my gauge is about 4 stitches per inch and 4 rows per inch. Details about the yarn and needles used are on my Ravelry project page.

The scarf grows quickly; the only reason why it took me a couple of months to finish mine is because I was multitasking and working on several other projects at the same time. 😂 

My only question now is: Should I release this scarf design as a paid pattern? Would you be interested in making it if the pattern was available?

Wednesday, December 14, 2022

A pocket scarf for Morgan

Last Christmas I made a reversible beanie for Morgan with the Red Heart Super Saver Zebra colorway on the outside and lined with white.

When I asked Morgan's mom for some gift ideas for this Christmas, she told me that Morgan has worn her zebra hat quite a lot throughout the past year and suggested that I make her a matching scarf for this Christmas. Challenge accepted! 

I got a few more skeins of the Zebra yarn and decided that I wanted to make a pocket scarf for Morgan. But unlike last year, when the hat knitted up like a dream, the yarn this year was being very uncooperative. I had to restart the project four times because of dropped stitches, which was frustrating, but I kept on trying because I knew this was going to be for my grandniece (if I could ever finish it!!).

During the initial failed starts, I alternated between using my Addi King and the Sentro 48, but neither one was working very well with the yarn. I finally settled on making the scarf on the Sentro and went very, verrrry slowly at first, pushing each stitch down by hand as it passed the feeder (like the technique shown in this video), to make absolutely certain that the stitches were seated properly. Then, when I had enough length completed (around 40 rows), I added some aggressive weight using the pot lid trick. The weight made the rest of the project work smoothly. (You just have to stop about every 15-20 rows to stretch the work below the pot lid and then reposition the lid closer to the top of the work to keep it high enough to keep tension on the needles.)


I knitted 320 rows, closed the tube ends, and then turned up 8 inches at each end of the scarf for the pockets and stitched the sides together using the invisible mattress stitch.


The only thing about this project that disappointed me was the way the stripes came out looking so different on the scarf than they were on the hat. The colors on the two projects do match, since it is the same colorway of the same brand of yarn, but I have to wonder if the yarn isn't being made slightly differently now than it was a year ago. (???) It's hard to say. But I hope Morgan will be happy with it! Fingers crossed!


Sunday, December 11, 2022

Butter Mellow pocket scarf

Sunshine, daisies, butter mellow,  
Turn this stupid, fat rat yellow.

That silly "spell" didn't work for Ron Weasley in "Harry Potter and the Sorcerer's Stone" as he tried to turn his rat familiar, Scabbers, yellow, but this butter-yellow yarn from my stash knitted up beautifully to make a cozy pocket scarf for Mika and Emmy. 

The sport-weight fiber worked to a gauge of about 4-5 rows per inch. And since I wanted a scarf 80 inches long (to turn up 10 inches at each end for deep pockets, leaving an overall length of about 60 inches), I made the scarf 400 rows long. (Which actually turned out to be a bit too long, but that was OK; I just made the pockets deeper to compensate.) The yarn is an interesting blend of 55% acrylic, 35% rayon, 5% wool, and 5% vinyon (whatever that is!), but the fiber is safe to machine wash and dry, so it's easy to care for.


Cast on with at least 6 rows of waste yarn in a contrasting color to your project yarn, then add your project yarn and crank until you have the desired number of rows. Cast off with another 6 or more rows of waste yarn, then remove project from the machine. Using a 5mm crochet hook, close each end of the tube as shown in this video by Jojo Juju. Fold each end of the scarf until the pockets are as deep as you want and pin them in place with locking stitch markers. Mattress stitch both sides of each pocket and knot securely. Hide all tails inside the tube, and enjoy your new pocket scarf! 

Jojo also has a full video tutorial for how to machine-knit a pocket scarf, which you can view at this link.

The sport-weight yarn is rated a 2, when usually size 4 yarn is used in the circular knitting machines. For me the trick to getting lightweight yarns like that to work in the machine is to maintain a firm tension.


I had just enough yarn left after knitting the scarf to make a matching beanie of 113 rows.


Wednesday, April 6, 2022

Accessories for Miss Pam's funeral

This post is incredibly difficult for me to write.

My dear, dear friend of nearly 30 years has left this world.

Miss Pam's family asked everyone attending her funeral to wear something purple, because purple is the color of the pancreatic cancer awareness ribbon.


Crocheting the scarf and scrunchie using Red Heart Sassy Lace yarn is very fast and easy. I crocheted the double-wrap infinity scarf in about an hour, and the scrunchie was even faster. I was able to make both items from just one skein of the Sassy lace yarn.


Mikey Sellick of The Crochet Crowd has a video tutorial for how to crochet the Sassy lace scarf. (He also has a knit version for those who prefer to knit it.)


Kinga Erdem of My Hobby Is Crochet has a video tutorial for how to crochet the Sassy lace scruchie. Kinga suggests using about 2.5 meters of the lace for each scrunchie, so I cut off about 10 feet and set that aside for the scrunchie before using the rest of the skein to crochet the scarf.

Miss Pam's family chose a purple butterfly as the symbol to represent Miss Pam's journey. I have another dear friend who is an artist, Artified by Rae, and I commissioned her to create this butterfly for Pam's daughters. If you look closely at the butterfly's wings, you will see Pam's name inscribed there.


Another one of Pam's friends read this about the purple butterfly at her funeral service: "The purple butterfly is a symbol for Pancreatic Cancer. A purple butterfly is one of the rarest of all butterflies to see out in its natural habitat. It is a reminder for you to stay patient and faithful. It urges you to trust in yourself and have courage. Mrs. Pam, you are now and forever our purple butterfly!"

💜💜💜


Sunday, January 16, 2022

Light, wide infinity scarf

Another quick and easy machine-knit infinity scarf. Cast on with waste yarn, then switch to project yarn and knit through the entire skein, leaving about a 60-inch tail for grafting the ends together.


I wanted this scarf to be as wide as possible, so I used the Sentro 48 to knit it. I got 252 rows from one full skein of the Lion Brand Mandala Ombre in the Chi colorway. Finished scarf is about 54 inches long.


Although Lion Brand calls this a size 4 yarn on the label, it feels more like a DK (3) weight, and this weight works into a lovely tubular scarf that will keep the wearer plenty cozy and warm despite the fiber's light weight.


You can see how to seamlessly graft the ends of the tube together by watching a tutorial video like this one, although there are many tutorials available for this technique online.

I gifted this scarf to my daughter, LadyU! 

And I made another one for Rose, whose favorite color is orange. It can be difficult to find pretty yarns that include the color orange, so this Lion Brand Mandala Ombre in the Serenity colorway jumped out at me as being a great choice. I hope she likes it!


I also knitted this one on the Sentro 48 and got 267 rows from the skein (not sure why there's such a difference in the number of rows between the different colorways). Finished scarf is also about 54 inches long.


Sunday, May 23, 2021

True Blue Boomerang Scarf

This is such an easy, mindless knitting pattern, and it gives you a nice, long/shallow, asymmetrical triangle in garter stitch that curves nicely around your neck as either a scarf or a shawl (depending on how big you knit it to be). It's a simple two-row repeat that's very easy to remember.

This one ended up being about 58 inches long finished length from tip to tip. I didn't have a full skein of this yarn (Red Heart Super Saver Ombre in the True Blue colorway) available, so I just knitted until what I had was about to run out and then cast off. 

You can make this with any yarn weight at any gauge, just choose a needle size based on your yarn size that gives you a fabric with a nice drape (not too stiff). To begin, cast on 5 stitches. Row 1: kfb, kfb; knit to last 2 stitches; k2tog. Row 2: knit.

That's all there is to it! Just keep repeating those two rows until your scarf or shawl is as big as you'd like. I recommend using a stretchy cast off, such as: Knit the first stitch; slip the stitch you just knit back onto the left needle; then knit two stitches together through the back loop. Repeat by slipping that stitch back to the left needle and knitting two stitches together through the back loop until all stitches are cast off.

As you can see, I have knit this type of scarf a few times before:


Sunday, February 21, 2021

Panthers Pride

I made this set to gift to the Perry Panther in our family, Daniel. These were both machine-knit. I made the scarf on my Addi King Size (46 pins), and the hat is made on my Sentro 48. The stripe pattern is based on the Years 3/4 scarves in Harry Potter. Perry High School's colors are maroon and gold, so I used Red Heart Super Saver in the Burgundy (main color) and Saffron (contrast color) colorways. I might decide to add some fringe to the scarf later.


Hat recipe on Sentro 48: Main color 30 rows. Stripes section: 2 rows contrast color; 4 rows main color; 2 rows contrast color. Finish hat by continuing in main color for another 72 rows. 110 rows total.


Scarf recipe on Addi 46: Starting/ending block 15 rows main color. Stripes section: 2 rows contrast color; 6 rows main color; 2 rows contrast color. Large block 30 rows main color. Repeat alternating sections of "stripes section" and "large block" five more times (for a total of six large blocks), ending with a "stripes section." Repeat "starting/ending block" to finish. 280 rows total. (Can add more large block sections alternating with stripes sections for a longer scarf, if desired.)


Perry High School's team colors are very similar to Gryffindor House. 😊


Thursday, January 14, 2021

Pocket Scarf Addi King

Jojo Juju has a video tutorial for how to make a nice, simple pocket scarf. Her techniques are what I used for this design. The only difference is I knitted my scarf to 410 rows on the Addi King before folding the ends up and stitching the sides to form pockets.

I also sketched out my idea before starting. I thought I was getting about 5 rows per inch with this yarn on the Addi, so I did the math to make my scarf about 64 inches long, plus another 9 inches at each end for the pockets. However, after knitting the tube for the scarf I discovered that the gauge I had was closer to 4 rows per inch, so this turned out longer than I intended. Next time I need to measure my gauge more carefully. 😆


I turned up closer to 10 inches at each end for the pockets, and that feels just right. After sewing the pockets the scarf measures about 78 inches long. That's long enough to fit my husband comfortably! LOL! But it fits me pretty well, too. The Addi knits a tube of about 7 inches wide in this yarn.

I might add fringe to the ends later, but the scarf looks nice even without fringe or tassels.

Just for interest's sake: Working with a tight tension, I got about 297 rows from one skein of the Red Heart Ombre in True Blue. This project needed 345 grams of the yarn, or about 1 1/4 skeins.


Monday, February 24, 2020

Montie's scarf, Chapter 2

I made Montie's first scarf in 2009, which was in my days Before Ravelry (I joined Ravelry on Dec. 1, 2010), so I don't have a Ravelry project page for it. Even so, Montie's scarf was based on my free pattern for Knitted School Scarf based on Harry Potter Hogwarts House Colors, which also existed in my days Before Ravelry. But Montie being Montie, he wanted to put his OWN spin on his scarf, so his request was that I make the stripe sections on each end with three bands of contrasting color while the middle sections have the usual stripe sections with two contrasting bands. He also wanted the contrast stripes to be a bit wider than in the original pattern.


Fast-forward after 11 years of wear and tear and Montie's original scarf (on the left in the above photo) was starting to look a bit ratty with woven ends popping out of place. (This is the one thing I hate about knitting vs. crochet - it's so much easier to keep ends buried in crochet but harder to keep them hidden away in knitting.) I wanted to make a new one for him with the same colors and stripe pattern, except I wanted the new one to be made in a tubular knit style (where the ends can be totally hidden inside!!). You can see the ends poking out of Montie's original scarf in the photo below.


Fortunately Caron still makes the same Dark Country Blue and Sunshine yellow colorways that I used 11 years ago to make the original scarf, so the new one will look nearly identical.

The only difficulty with wanting to reknit another scarf for Montie is how much knitting hurts my hands anymore. So I thought the Sentro knitting machine might be able to help me with this project. I know there are videos on YouTube (like this one and this one, for example) for how to make jogless color changes on the knitting machine, but I haven't figured that technique out yet so I worked this scarf with standard/stepped color changes. I figure I can always make Montie another scarf later when my knitting machine skills are more advanced. 😆

On my first attempt to make the new scarf with the knitting machine I followed the same row counts from the written pattern: I cast on several rows with a waste yarn before starting the first scarf row in blue. I worked a half-height block of 24 rows then a three-stripe section (4 rows in yellow / 6 rows in blue / 4 rows yellow / 6 rows blue / 4 rows yellow). Next a full-height block of 48 rows in blue. Then a two-stripe section (4 rows yellow / 6 rows blue / 4 rows yellow). Then alternated a full-height block in blue followed by a two-stripe section three more times. One more full-height block in blue followed by a three-stripe section and ending with a half-height block in blue. To finish, secure all color changes with knots on the inside of the tube; flat-close the ends of the tube; and secure any remaining ends inside the tube. Scarf is 454 rows total.

Unfortunately at this gauge the 454 rows turned out a scarf that was about 114 inches long, or nearly 9.5 feet. LOL!!! Montie is about 74 inches tall, sooooo ... this scarf is about 3.5 feet too long for him. Bah-ha-ha!

Amazingly, it only took about 4 hours to knit that length on the machine. (And the only reason it took that long was because I was working slowly to be careful with all the color changes and to keep a close eye on it for dropped stitches because this Sentro tries to drop stitches fairly often.) But clearly I was going to have to try again to get the scarf to a more manageable length. The machine produced a fabric of about 4 rows per inch, so to get a finished scarf of a length that's in the ballpark of 74 inches or so I was going to have to fit all the stripes into roughly 300 rows (300/4=75 inches).

My brain doesn't like to math very much, so it took me a couple of days of mulling to come up with a new set of row counts to rework the scarf on the knitting machine. My new plan is to start with a half-height block in blue (16 rows); then a three-stripe section of 2 yellow, 4 blue, 2 yellow, 4 blue, 2 yellow (14 rows); then a full block in blue (32 rows); then a two-stripe section of 2 yellow, 4 blue, 2 yellow (8 rows); [repeat the full block/two-stripes section four more times] (160 rows); one more full block (32 rows); a three-stripe section (14 rows); and lastly a half-block (16 rows). This adds up to 292 rows, which should result in a scarf that's close to 74 inches long.

It took about 2.5 hours to knit the scarf the second time. There is one spot when I was about 3/4 of the way through where I dropped a stitch and didn't see it until a few rows later when the big run opened up. I was about to scream and throw everything into my "to work on again later" pile, but I watched two videos that show how to fix a dropped stitch, this one and this one. I used the crochet hook method in the second video, but you can see in my photo that the fix turned out a little funky. Oh well - this is literally only my second knitting machine project, so I'm not going to freak out over a minor imperfection.


Sunday, February 16, 2020

My first machine-knit infinity scarf / cowl

I’m so excited! After lurking for months on various machine knitting Facebook groups and absorbing lots of helpful wisdom and tips, I finally took the plunge and bought my first knitting machine, a Sentro 40. 

I selected the 40-pin machine as my entry point into the machine knitting world because it was affordably priced, and I think its size is a good compromise between the biggest machines and the tiny machines. I’m also glad I spent months studying the experiences of others via the Facebook groups and also YouTube because that knowledge made it possible for me to hit the ground running (or if not running then at least walking) rather than to have to stumble through the learning curve that these machines invariably have.

My Sentro arrived yesterday, so as soon as I got off from work I assembled the pieces (i.e., put the legs on) and started cranking through one of the little sample balls of yarn that came with it. I already knew the trick for how to cast on because of my earlier research. 😊 On that first run-through I wasn’t paying attention to whether stitches were dropping (many of them did); I was just trying it out and having fun.


This infinity scarf (or cowl if worn double-wrapped) is the second thing I did with my Sentro. I cast on with the gray yarn, but I decided later that it would have been smarter to have cast on with waste yarn because that would give a neater starting edge. Mental note for next time. 😉 Jojo Juju (one of the goddesses of machine knitting on YouTube) recommends about 4-6 rows of waste yarn at the beginning and end of most projects. 

I was a lot more careful about watching for dropped stitches this time. I don’t have enough experience yet to say for sure whether the Sentro was dropping so many stitches because of the yarn I was using, or because of the way I was cranking it (my tension or whatever), or because that’s just a quirk of the Sentro. Time will tell. But even having to stop several times on just about every row to pick up dropped stitches (this video shows one method for how to correct it), it literally took less than two hours of work TOTAL from start to finish to whip out this entire project, which used all of a 315-yard skein of Caron Simply Soft. TWO. HOURS. Including the finishing work. These machines are basically miraculous.

I finished and joined the edges with the faux turban twist knot join used in all those trendy turban head-wrap patterns, like this one. The full skein of yarn yielded a tubular scarf that’s about 6 inches wide (laid flat) by about 60 inches long. I didn’t count how many rows that is (the 40-pin Sentro doesn't come with a row counter); I just used the full skein of yarn.


Which brings me to another, much more personal point about why I wanted to try working with a knitting machine: Chronic joint pain in my hands and arms has gotten bad enough over time that it has become nearly impossible for me to finish any yarncraft projects anymore. I would start a project, work on it for a couple of days, and then have to set it aside for several weeks while I waited for my hands and arms to recover before I could even think about continuing. As you can imagine, this makes for really slow going. But I think having a tool like this knitting machine will make it possible for me to keep creating, which is what I want to do, despite my disability.