Thursday, July 18, 2024

Pink blanket for great-grandaughter

This is going to be a Christmas gift for my great-granddaughter Lilliana, who loooves pink! The blanket used less than 4 skeins, so I'm using the last part of the fourth skein to also make a matching pink Mini Dino for her. 💜 This is a great design to give as a gift to any young person because it's easy to crochet, and the infinite pathways contained in the blanket represent the infinite potential in every young person's life. I absolutely love that symbolism and message.


I followed the method shown in this video by Fiber Spider. Blanket is worked with 39 pattern rounds followed by 1 round of solid DC and then edged with a border of RSC (reverse single crochet, also known as crab stitch). So, essentially, 40 rounds plus the edging. Here's the link to my Ravelry project page, which has details about the yarn and hook I used.


I've made this design several times, and I like that the rounds begin/end at a corner, but I think if I ever make another one, I'm going to attempt to do it in turned rounds, where there is no obvious right side/wrong side.


Sunday, July 7, 2024

DK Shawlcowl Pullover


I decided to try knitting my Shawlcowl Pullover design in a lighter weight fiber than the pattern calls for. This Hobby Lobby cotton yarn is labeled as size 4, but it's thinner than worsted weight, so to me it feels more like DK. Using the stitch count in the pattern for the large size cowl worked perfectly at this gauge. The finished size of the neck opening is 24 inches. The colorway is Emerald Pine in I Love This Cotton.

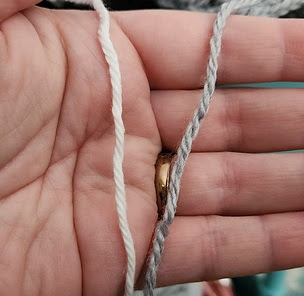
Here's a strand of the cotton yarn, on the left, next to a strand of gray DK yarn for size comparison.


I also decided to add one extra lace repeat and a picot bind off to dress up the edge. I used the twisted stitch version of the 2/4 picot bind off from this video tutorial by Nimble Needles. I'm happy with how it turned out. These Shawlcowls look great just worn as an accessory, but they also make wonderful "stealth bibs" to protect your blouse while you're eating! 😄

With the extra lace repeat and the picot bind-off, I used about 1.25 skeins of yarn.


Tuesday, July 2, 2024

Easy, perfect DIY bow

My friend Pam would have loved this. She used to be the hairbow-making queen! 💜


@thejibrizyshow How To Tie The Perfect Bow #bow #tie #nickiminaj #icecream #fyp ♬ original sound - The Jibrizy Show

Tuesday, March 5, 2024

Machine knit coin purse project

I love the designs by Nicola Allison of Three Magic Sheep Co.! I just came across a TikTok video tutorial she made showing how to make these sweet coin purses using a 40-pin knitting machine. Such a super cute project!


@threemagicsheepco For links to the clasp, beads, and other supplies check out my website! Link in bio Or you can head directly to my Amazon storefront: https://www.amazon.com/shop/threemagicsheepco #howto #circularknittingmachinetutorial #circularknittingmachine #sentroknittingmachine #tutorial #knittingmachinequeens #threemagicsheepco #sentro #knittingmachine ♬ Beautiful Life - Vin Music

Saturday, February 17, 2024

Kawaii Pop Tart

Using my Addi King Size 46-needle knitting machine, I made this kawaii amigurumi Hot Fudge Sundae Pop Tart toy.

I don't eat stuff like pop tarts anymore, but back in the day, the hot fudge sundae flavor was my favorite.


Recipe is 60 rows of crust/base color and 60 rows of frosting color. For a 48-needle machine, make it 65 rows of each. Since my pop tart is a Hot Fudge Sundae Pop Tart, I used a dark brown yarn (Red Heart Super Saver in Coffee) for the crust color and a white yarn (Red Heart Super Saver in White) for the frosting layer. I recommend using waste yarn to cast on and cast off from the machine because it makes it easier to close the tubes later.

Crochet each end of the tube closed and remove the waste yarn. Then fold your tube in half, putting the crust color on one side and the frosting color on the other side. Using the crust color and a 5mm crochet hook, work half-double crochet stitches around the outside edge of the pop tart, first to join the ends of the tubes together (across the short side), then around the corner (placing at least 2 HDCs in each corner), then down one long side (joining the crust layer to the frosting layer), then around the next corner, then across the other short side (where the tube is folded), then around the third corner. At this point, lightly stuff the pop tart, just barely enough to give the center some loft (don't make it at all firm). After stuffing the center, continue crocheting around the last (long) side (again, joining the crust layer to the frosting layer) until you're back to where you started. Don't forget to work a couple extra stitches in that last corner. Then join to the first HDC stitch and fasten off.

I did 65 rows in my sample piece of a Hot Fudge Sundae Pop Tart on my 46-needle machine, and the aspect ratio is a bit tall compared to what a real pop tart looks like, so I adjusted my recipe to be 60 rows of each color on the 46-needle machines, which should work better, and 65 rows of each color on the 48-needle machines.

For the eyes, I used a couple of 10mm eyes from this kit that I bought on Amazon. I embroidered the little mouth using a small length of Red Heart yarn in black.

For the colorful sprinkles, I found this skein of Ice Yarns Lorena Print in purple/pink/yellow/green/turquoise, which are the exact same colors as the sprinkles on the real Hot Fudge Sundae Pop Tarts. And for the chocolatey swirls, I embroidered chain stitches using more of the Red Heart yarn in the Coffee (brown) colorway.

Inspo photo