Showing posts with label lace. Show all posts

Sunday, July 7, 2024

DK Shawlcowl Pullover


I decided to try knitting my Shawlcowl Pullover design in a lighter weight fiber than the pattern calls for. This Hobby Lobby cotton yarn is labeled as size 4, but it's thinner than worsted weight, so to me it feels more like DK. Using the stitch count in the pattern for the large size cowl worked perfectly at this gauge. The finished size of the neck opening is 24 inches. The colorway is Emerald Pine in I Love This Cotton.

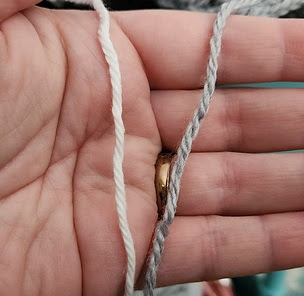
Here's a strand of the cotton yarn, on the left, next to a strand of gray DK yarn for size comparison.


I also decided to add one extra lace repeat and a picot bind off to dress up the edge. I used the twisted stitch version of the 2/4 picot bind off from this video tutorial by Nimble Needles. I'm happy with how it turned out. These Shawlcowls look great just worn as an accessory, but they also make wonderful "stealth bibs" to protect your blouse while you're eating! 😄

With the extra lace repeat and the picot bind-off, I used about 1.25 skeins of yarn.


Sunday, July 16, 2023

Zuzu's Petals - fingering

This is my very first project using fingering weight yarn! And if that weren't a cool enough fact all by itself, the yarn I'm using is a lovely ball that I found at a thrift shop for only 99 cents! How's that for cool?!


The yarn didn't come with a manufacturer's label on it, so I have no idea what brand it is or even what the fiber content is. It kind of feels like it has cotton in it; it might even be 100% cotton, for all I know. I just liked the color - it reminds me of the faded grayish blue of denim blue jeans, and I think it will make a lovely Zuzu's Petals cowlette. This is a paid pattern designed by Carina Spencer.


Because the width of the neck opening was only 16 inches when I reached the end of section 1, I knew I would need to keep adding width to make it be possible to pull the cowlette over my head. I decided to work two more 12-row repeats, hoping that would bring the width to something closer to 20 inches wide, which I figured would be a dimension that would fit better over my head. That meant my final stitch count at the end of section 1 was 151.

End of section 1 with 103 stitches


End of section 1 with 151 stitches

As I got toward the end, I was worried about losing at yarn chicken (running out of yarn, in other words). So I skipped the optional purl round and instead went directly to the cast off. But then, after casting off, I could see that I did actually have enough yarn left on the skein to be able to do the purl round, so I tinked back the cast-off round and added the purl round before casting off again. I just knew that I would always regret not having the purl round in there, if I didn't add it, because it really does help straighten out the edge curling, even before blocking. 

Before blocking

I could have saved myself the trouble of tinking back if I had weighed my skein when working the last few rounds. If I had weighed it, I would have been able to know that I'd have enough to work the last optional purl round before casting off. Live and learn! But it was pretty close!

Blocking

Gauge


Wednesday, April 6, 2022

Accessories for Miss Pam's funeral

This post is incredibly difficult for me to write.

My dear, dear friend of nearly 30 years has left this world.

Miss Pam's family asked everyone attending her funeral to wear something purple, because purple is the color of the pancreatic cancer awareness ribbon.


Crocheting the scarf and scrunchie using Red Heart Sassy Lace yarn is very fast and easy. I crocheted the double-wrap infinity scarf in about an hour, and the scrunchie was even faster. I was able to make both items from just one skein of the Sassy lace yarn.


Mikey Sellick of The Crochet Crowd has a video tutorial for how to crochet the Sassy lace scarf. (He also has a knit version for those who prefer to knit it.)


Kinga Erdem of My Hobby Is Crochet has a video tutorial for how to crochet the Sassy lace scruchie. Kinga suggests using about 2.5 meters of the lace for each scrunchie, so I cut off about 10 feet and set that aside for the scrunchie before using the rest of the skein to crochet the scarf.

Miss Pam's family chose a purple butterfly as the symbol to represent Miss Pam's journey. I have another dear friend who is an artist, Artified by Rae, and I commissioned her to create this butterfly for Pam's daughters. If you look closely at the butterfly's wings, you will see Pam's name inscribed there.


Another one of Pam's friends read this about the purple butterfly at her funeral service: "The purple butterfly is a symbol for Pancreatic Cancer. A purple butterfly is one of the rarest of all butterflies to see out in its natural habitat. It is a reminder for you to stay patient and faithful. It urges you to trust in yourself and have courage. Mrs. Pam, you are now and forever our purple butterfly!"

💜💜💜


Tuesday, August 18, 2020

Boho Summer Cotton Swingy Shawlivest

I like the look of the four-row repeated stitch pattern of the Boho Summer Cardigan (there is a free version of the pattern on YouTube), which got me wondering whether I could use that stitch pattern in the shape of a Swingy Shawlivest

I'm making this one with cotton yarn for wear during the warm summer months. This was an experiment in melding two different patterns, and you can see by the way the center increase veers off at an angle (rather than staying centered) that it didn't turn out totally perfect, but it's still completely wearable and comfortable and will be fine for me. If I wanted to do this again to give to someone else, I'd have to recalculate how to keep the center increase in the center. 😉

Decided to finish this one with crocheted rope-twist fringe along the bottom to complement the boho style. There are many tutorials on YouTube for how to make this type of fringe. I like this one and this one

For 6-inch fringe: SC into first st. ( * SC into next st and pull up a loop that's 16 inches long. Using your finger, twist the loop 40 times. Place end of loop back on hook and sl in same SC where you started the long loop. SC in next st. Pull the twisted loop open and then drop it to allow the rope twist to settle evenly along its length. ** ) Repeat from * to  ** across hem, ending with a SC in the last st. Finish off and weave in all ends. 

Some people twist the loop while it's on their hook, and if it works for you to do it that way, great. But I find it easier for me to twist the loop on my finger. I'm always dropping the loop when I try to twist it while it's on my hook. So use whichever method works best for you. 

Since my loops are 16 inches long, that means each strand of fringe actually uses 32 inches of yarn, which is only 4 inches less than a yard. Keep that in mind if you want to make fringe this way; it requires a LOT of yardage. Generally more yardage than cut fringe would require. But the upside of the rope-twisted fringe is it can safely go into the washer and dryer. 

To make 3-inch fringe, work the same as above but only pull up an 8-inch loop and twist it 20 times. I suppose to get a 4.5-inch fringe you would pull up a 12-inch loop and twist it 30 times. (etc.)

Total yarn weight used: 928 grams, including fringe. 

Friday, June 12, 2020

Virus Blanket for RV free pattern

Well, it took me a little more than a year (only working on it when we were camping in our RV), but I finally finished this afghan. The colors in the afghan coordinate nicely with the color scheme inside our RV, and the finished size makes a nice topper for the queen-size bed to add another layer of warmth on cold nights or to snuggle up with for a nap.


This is the Virus Blanket free pattern by Jonna Martinez. Her free video tutorial is on YouTube. And I like to use the edging from this video by Kiki Crochet on my virus blankets.

Total yarn weight: 1,113 grams, or about 5.59 skeins / 1985.5 yards. Please see my Ravelry project page for details about the yarn colors I used here. 

Sunday, August 4, 2019

The Fairy Slippers Blanket free pattern

This free Fairy Slippers Banket pattern is a variation on the Which Way Filet blanket by Fiber Spider that works up quickly and easily from the center outward.


This Lion Brand Mandala yarn is soft and light, and the colorway is reminiscent of soft rainbow colors that would make a precious, cuddly keepsake blanket for a “rainbow baby.”


I had been hearing the term “rainbow baby” getting used a lot around knitting and crocheting circles, but I didn’t know what it meant, so I finally decided to look it up. According to Google, “A rainbow baby is a name coined for a healthy baby born after losing a baby due to miscarriage, infant loss, stillbirth, or neonatal death. The name ‘rainbow baby’ comes from the idea of a rainbow appearing in the sky after a storm, or after a dark and turbulent time.”


Which means that I am a rainbow baby myself, according to the modern parlance, because my mother delivered me after previously enduring seven miscarriages. I had no idea that I was born under this lovely, colorful label. Ha! 🌈

This filet blanket pattern is also ideal for a rainbow baby because the infinite paths winding and spiraling outward from the center symbolize the infinite potential contained within each new life.

This also means that maybe instead of giving away this baby blanket when it’s done I should just keep it for my rainbow-baby self. 😁 I could get another skein of this Honeydukes colorway, whip up another blanket just like this one, and then sew them together to make a nice and light but colorful, funky, and boxy rainbow poncho!


If I finish this as a baby blanket, I’ll edge it with 1 round SC followed by 1 round RSC. But if I keep this to be a poncho, I’ll end with 1 round SC before sewing the panels together.

Sunday, January 20, 2019

Weathered Glory Patriotic Afghan free pattern

It shouldn’t have taken me five months to crochet this afghan (the virus pattern is usually quick and easy to make) , but I suffered a terrible tendon flare in the elbow of my dominant arm when I was about 80 percent done with the blanket and it took me several months to get back to working on it. Sigh! Anyway, at least it’s done now. Made this in colors to coordinate with the decor in our guest room.


Linked below is a great free video tutorial by Jonna Martinez that details how to make the virus blanket.


Sunday, October 2, 2016

Caedwyn Cowlette fingering experiment

I started off just knitting a random garter and stockinette top-down shawl triangle in fingering weight yarn. The yarn is Lion Brand Sock-Ease in the Taffy colorway. As the triangle grew, I decided that I wanted to finish it with the lace in-the-round portion of the Caedwyn Cowlette, so I knit the triangle until it had 158 stitches on each side (which is double the stitch count of the Caedwyn pattern for worsted weight yarn) to set up a base for the lace.


So the top of this cowlette does not follow Corrina's pattern, but the bottom lace portion does.

I don't remember the details now, but I seem to recall having to add a stitch or two in the first row of the lace to get the stitch count to come out right.

In addition to the stitch marker that shows the beginning of the round, I found it helpful to also place stitch markers on either side of the shape that grows out from the bottom front point of the cowlette (you will see where those stitches begin and end in the pattern instructions)


Wednesday, June 17, 2015

Chocolate Syrup Poncho

I liked the way Rose's Slytherin-By-the-Sea poncho turned out, so I decided to make another one for myself. I know the yarn says it's named "Coffee," but the dark brown color reminds me more of Hershey's Chocolate Syrup.


Here I used an i-cord tab cast on of 4 rows, then picked up 3 stitches in the center for a total of 9 stitches on the needle. Worked following the Sheep Wagon Shawl pattern instructions on the 3 center stitches with the addition of the 3 i-cord stitches on each side. (I-cord: Knit 3 at beginning of row; sl3wyif at the end of each row.)

Joined to work in the round after row 57. Yes, this pattern requires a lot of purling while working flat (have to purl every return row), but that's the price you pay for wanting a design in classic, classy stockinette. Once you join to work in the round, however, you're on all-knitting easy street.


Update 5/14/15: I started out knitting this poncho with size 9 needles (5.5 mm), but the fabric was just turning out to be way too dense. So somewhere around row 70, I ripped the whole thing back and started over with size 10 needles. Painful to lose that much work, but I'm much happier with the fabric the second time around.

Monday, May 4, 2015

Slytherin-By-the-Sea poncho for Rose

Here's a cozy garment stylish enough that even Bellatrix Lestrange herself might wear it! Our friend Rose was sorted into Slytherin House, but when she isn't away studying at Hogwarts, she lives in the chilly, foggy Bay Area ... hence she needed a Slytherin-By-the-Sea poncho to keep her cozy.


I started this project working the same as the Sheep Wagon Shawl but joined to work in the round after row 46 to produce a poncho instead of a wrap.

At the join, I worked another "spine" in the same manner as established between the other stockinette sections to make the join basically invisible and to provide another place for increasing the stitch count.

Since you don't turn your work anymore after joining to work in the round, I continued to emulate the Sheep Wagon Shawl stitch pattern by knitting all rounds and increasing on every-other round. Stockinette without the purling! W'hoo!!

After knitting about 94 total rows/rounds, I used a stretchy knitted cast-off but didn’t break the working yarn. I then continued working with a 5.5 mm crochet hook in the bottom loops of the knitted cast-off edge to crochet the lace edging from Kim Guzman's Cinnamon Fling to give the poncho a lovely finish. To work the lace edging in the round requires a stitch count in a multiple of 15; this poncho has 390 stitches around the hem.


Friday, April 3, 2015

Sheep Wagon Shawl

I was lucky enough to grab the Sheep Wagon Shawl pattern by Joanna Johnson while it was free during its first days on Ravelry. Now the pattern costs $4, but that's still a small price to pay because it's a lovely, well-executed design.

This is the shawl I referred to in my previous post that I worked using Lion Brand Cotton-Ease yarn.


I varied from the original pattern by incorporating some gradient striping based on the chart in the Gradient Mitts (free pattern) to transition from top color (Taupe) to bottom color (Charcoal), making this a simple, two-color striped shawl. I doubled the number of rows in the gradient stripes, so instead of being worked across 30 rows, I worked them across 60 rows, starting after row 62 of the shawl pattern.


Bottom edge stitch count: 535.


Update 4/10/15: I added a crocheted lace border adapted from Kim Guzman’s Cinnamon Fling wrap (free pattern) to accomplish two things. One, to alleviate the inevitable hem curl with stockinette fabric. And two, to add a few more inches in length.


The funny story here is that I ran short of the Charcoal Cotton-Ease yarn. This is visible in the above photo, where you can see a color variation in the bottom knitted rows of the shawl. I wasn't able to find anymore of that shade in my local stores, and I wasn't able to find anymore of it to buy online (not any that was reasonably priced, at least). I was about to give up, but I reached out to yarncraft designer Darleen Hopkins of Crochet by Darleen Hopkins. Darleen has made a lot of her designs using Cotton-Ease, so I explained my problem of running short of the Charcoal yarn. She did have a newer skein of that color and generously offered to sell it to me. We all know how yarn companies like to mess with their dye processes, so naturally the two versions of Charcoal weren't an exact match, but at this point in my big shawl project I was not about to give up! Thank you, thank you, Darleen, for saving me!!!

I was able to complete the Sheep Wagon Shawl pattern to length, but this is how close I came to using the entire skein Darleen sent me - just 1.4 ounces left (including the label band):


So a few days later when I decided to add the crocheted lace border, I opted to do that in black Caron Simply Soft - something STILL AVAILABLE IN MY LOCAL STORE. Hahaha!
Tuesday, February 3, 2015

Trying filet crochet

If you're ever in the mood to mix things up a little, try filet crochet.

This Heart Filet Block 2 free crochet pattern by Belle Tracy is just one example of the endless possibilities to be found in the filet crochet genre.


The block above measures about 10 by 10.5 inches with 1 round of sc border.

Rather than making a lot of individual squares and then assembling them to form a blanket, one could conceivably do a foundation row that's long enough to allow for multiple "squares" to be worked contiguously, which would be a bit of a brain-bender in the beginning but would save a lot of work on the finishing end of the job.

Tuesday, April 22, 2014

Shawlcowl Pullover pattern is free for a limited time

I released my Shawlcowl Pullover pattern on Ravelry on April 10, and the pattern has been receiving lots of yarn love from Ravelry users. The Shawlcowl Pullover is designed to mimic the trendy look of wearing a shawl as a scarf combined with the comfortable ease of wearing a pullover cowl.


If you use this link, you can download a free copy of the pattern through midnight PDT on May 1. On May 2, the price becomes $3.00 USD, so head over to Ravelry and grab your free copy while you still can using coupon code "spring."


Another reason to grab your copy now is that on May 2, everyone who has added Shawlcowl to their Ravelry library will automatically receive an updated version of the pattern that includes the Shawlcowl 2 variation. Shawlcowl 2 has a different neckline edging and a more open look to the feather-and-fan lace border.


This is my first knitting pattern design, and in the process of creating it, I discovered that developing, then testing, then ripping out and reknitting, then writing, then editing, then shooting photos, then editing some more, then test knitting it again ... was A LOT OF WORK!! Which is why I decided to put a very reasonable price on the finished pattern product.


I have gained a great amount of additional respect for people who develop pattern designs for knitting and crochet. These people WORK HARD at their craft, and they deserve our support. I have always enjoyed finding and sharing free patterns online, and of course I will continue to do that, but I have also paid for a significant portion of the patterns in my personal library. The experience I gained while developing the Shawlcowl Pullover has shown me that indie designers have earned every cent that they charge for their work.

Please respect the copyrights of indie designers!

Wednesday, January 15, 2014

Harmony Shawl

It took me a few times restarting the Harmony Shawl pattern by Bodhi Sasa before I figured out that it's essentially alternating rows of shell clusters and V-stitches, where the V-stitches are worked between the shells of the previous row, and the shells are worked in the top of the V-stitches of the previous row.


The pattern is well and carefully written, but because every stitch/step is spelled out, it can become a bit cumbersome for the reader to follow. IMO, using abbreviations for the repetitive stitches (V-stitches and shell clusters) would make the overall pattern easier to read. 


But on the other hand, having every stitch/step explicitly spelled out in detail might make this pattern easier for a beginning crocheter to interpret.

I was looking for a short triangular shawlette or scarf design, and this one yields a very pleasing finished product that can be worn in several different ways (for various stylish looks) and cross multiple seasons.

Sigh. I really do like this shawl pattern. But I ended up cannibalizing the Caron Simply Soft Paints yarn in the Oceana colorway to make the 22.5 degrees pattern instead. I intend to come back to the Harmony Shawl, though, because I think it would make a lovely gift for some of my family members.


Saturday, March 30, 2013

Lotus hat free pattern

I love the gorgeous texture of this pattern. It's the Lotus Hat by UptownPurl.


It requires a bit of skill for you to know how to knit while following a chart -- but that process isn’t too difficult if you take it slowly at first and use a stitch/row counter.


If you aren’t familiar with chart knitting, it may require some practice, so I would rate this pattern's difficulty at medium. (It may not be suitable for beginning knitters, although none of the stitches are difficult to work.) In spite of how the stitches appear to cross, there is no cabling involved here.


I hadn’t previously used the yo technique for lace knitting, but this tutorial by theshizknit was the best one I found to explain it. (Totally easy, by the way!)

I made this pattern with the one extra repeat of the chart to give the hat a bit of slouch. And although I made the blue one to donate, I loved the design so much that I had to make another one for myself in gray.