Saturday, April 10, 2021

Lazy Diamond Boho Pocket Shawl free or paid pattern

Due to my ongoing elbow tendinopathy, I expected it would take months for me to finish this Lazy Diamond Boho Pocket Shawl project that should otherwise be easily completed in about a week (were I able to crochet normally). It didn't end up taking quite that long ... just over a month, actually. But whether you can make it quickly or have to exercise patience, this project will be worth the wait. 


The camera doesn't begin to do justice to the true hue of the Red Heart yarn's Charcoal colorway. In person this deep gray has almost a bluish cast to it that is lovely. 


Pattern designer Crystal White-Van Cleemput shares her entire process for how to make this project in a free YouTube tutorial. But I found myself struggling to follow the video because it was lacking some small details (like stitch counts), so I bought the PDF pattern, and that was very well written and much simpler for me to follow. So if you have difficulty following the video, jump over to Ravelry and buy the PDF.

One skein of the Red Heart Super Saver was almost enough to complete one of the large squares; my first skein ran out on the last round of the fifth repeat. However, I'm working this in a slightly larger gauge with a larger hook, so it might be possible for someone to get an entire large square if they were working this with the hook called for in the pattern.

I'm working this in a slightly different gauge than is written in the pattern, but I believe that that will best suit this heavy worsted weight yarn.

Two skeins is more than enough to make one large square and two small squares (the pockets). Three skeins is enough to make two large squares and at least one small square. Four skeins was not quite enough to make three large squares; the fourth skein ran out on the fourth round of the fifth pattern repeat of the third large square.


Monday, March 15, 2021

Lots-a hanger covers

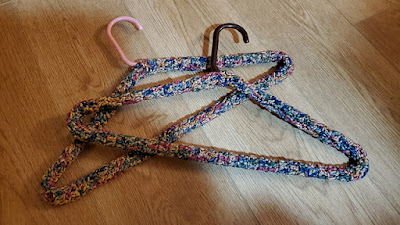
Crocheted or knitted hanger covers are so quick and easy to make and are perfect for making your plastic tubular hangers slip-resistant. These are quick projects that can be great for busting down your yarn stash because they only require small amounts of yarn, and they produce a useful finished object. I mean, who doesn't need a collection of yarn-covered hangers in their closet to keep their nice blouses (etc.) from falling onto the floor? 😊


The crocheted Hanger Cover free pattern by Frugal Knitting Haus is a great, basic option for dressing up your everyday hangers. These look equally great whether worked in solid colors or variegated yarns.

The strip you crochet is six stitches wide (about 2 inches) by about 36 inches long. When you finish off, cut a long tail (about 2.25 times the length of the finished work) and use the tail to sew the cover to the hanger with a wide whip stitch (about 3-4 stitches per inch). No need to be fussy about it because the sewing stitches will blend into and be disguised by the cover. Knot the tails together and hide them inside the work for an easy finish.

Another easy way to make hanger covers is by using a 22-needle knitting machine, such as the Addi Pro.

You can make a matching set of multiple hangers all from one skein of yarn, or you can do like I did above and just grab whatever pieces of yarn you have available for a unique, scrappy hanger.

Using a 22-needle machine, cast on with a few rows of waste yarn. Change to your working yarn and knit 160 to 170 rows to fit most tubular plastic hangers. Leave about a 2-yard tail before cutting the working yarn and drop it into the center. Change to waste yarn and work a few more rows then cast off from the machine. Gently stretch the knitted piece.

Using a 5mm crochet hook, close the end of the tube with the short tail and remove the waste yarn, pulling the short tail through the last loop to secure it. (Don't hide this tail inside yet.) Then close the end of the tube with the long tail, pulling the long tail through the last loop to secure it.

Thread the long yarn tail onto a large needle. Hold the knitted strip so the end wraps around the hanger and whip-stitch the long edges of the knitted piece together. Stretch the knitting until the ends of each side meet just below the hook of the hanger and whip-stitch or mattress-stitch the ends together for a neat appearance. Knot the tails together to secure and then hide the tails inside the knitting for an easy finish. Now your covered hanger is finished and ready to use.

The striped machine-knit hanger cover in the photo above was made with 160 rows, which was just long enough to fit snugly on the hanger. It might have been better if I'd made it 170 rows, which is what I did in the machine-knit hanger cover in the photo below. 


Monday, March 1, 2021

Heart-shaped Valentine Wreath

I started working on this project on Valentine's Day itself, so I didn't finish it in time to display the wreath for the holiday this year. But I'll store it carefully so it will be ready for next year! 😆


I didn't count the rows on this project (my Sentro 40 doesn't have a counter on it), but I started with a few rows of waste yarn and then simply knitted through one entire skein of Walmart Mainstays 100% acrylic yarn in Pink Multi on medium tension. Finish off with another few rows of waste yarn before casting off from the machine. The full skein produced a knitted tube that's about 50 inches long, and I counted it having a gauge of about 4 stitches per inch, so we can do the math and estimate this tube being about 200-ish rows long. The tube from the 40-pin machine is about 6 inches wide.


To shape the wreath I used this 13.5-inch heart-shaped wreath form that I bought on Amazon. If you want to make a project like mine, any similar size wreath form should work well.


Full disclosure: My Sentro hated this yarn for every single stitch, but the colorway is just so fun that I kept going. (It wasn't bad enough to make me stop knitting. The machine just behaved stiffly, and I had to watch every single stitch like a hawk to make sure they were seating properly, so it was EXTREMELY slow going, but it wasn't any harder to crank than normal, so I felt safe enough to continue.) Actually, I first tried this yarn on my Addi King Size ... and the Addi hated this yarn, too. So be warned. But, dang, the finished product is just super cute!

Another reason to be irritated with this yarn is that my skein had three splice/knots all within what I estimate was the first 70 rows, which seems excessive. However, after that the rest of the skein was splice/knot free, so maybe I just picked a dud skein.

To add the knitted tube to the wreath form, I dropped one stitch on opposite sides of the tube, wrapped the tube around the wreath form, and then (using a 5mm crochet hook) joined the dropped stitches from alternating sides using a slip stitch crochet technique (catching two strands from each side at a time) similar to the technique used in this video by Shelby Acosta. (Shelby catches four strands from each side while joining, whereas I only caught two strands from each side, but otherwise the technique is the same.) The join itself adds a nice bit of contrast to the variegated yarn, so after finishing off the join I twisted it around on the wreath form until the joined stitches were visible on the front side of the wreath.

I whip-stitched the tube ends together at the bottom of the wreath, tied a few knots to secure the ends, and that was it.

Now all that's left to do is to add a hanging loop, and also to decide whether I want to add any trim pieces to make my wreath even cuter. Some white pompoms or even some silk flowers or greenery might look nice. What do you think?


Sunday, February 21, 2021

Panthers Pride

I made this set to gift to the Perry Panther in our family, Daniel. These were both machine-knit. I made the scarf on my Addi King Size (46 pins), and the hat is made on my Sentro 48. The stripe pattern is based on the Years 3/4 scarves in Harry Potter. Perry High School's colors are maroon and gold, so I used Red Heart Super Saver in the Burgundy (main color) and Saffron (contrast color) colorways. I might decide to add some fringe to the scarf later.


Hat recipe on Sentro 48: Main color 30 rows. Stripes section: 2 rows contrast color; 4 rows main color; 2 rows contrast color. Finish hat by continuing in main color for another 72 rows. 110 rows total.


Scarf recipe on Addi 46: Starting/ending block 15 rows main color. Stripes section: 2 rows contrast color; 6 rows main color; 2 rows contrast color. Large block 30 rows main color. Repeat alternating sections of "stripes section" and "large block" five more times (for a total of six large blocks), ending with a "stripes section." Repeat "starting/ending block" to finish. 280 rows total. (Can add more large block sections alternating with stripes sections for a longer scarf, if desired.)


Perry High School's team colors are very similar to Gryffindor House. 😊


Friday, February 19, 2021

I Made a TikTok

Well, I finally took the plunge and made a TikTok account. I kept seeing lots of fun videos being promoted by some really creative and inspirational yarncrafters on TikTok and decided I might as well make my own account there, even if it was only to hang out there and watch everyone else's videos. 😆

My TikTok tagline says: "I'm just here to watch all y'all's creative videos!" And that's true! I don't think I'll be uploading very many original videos there ... but who knows. Time will tell.

For now, I only have one video on there. I figured I should have at least one video uploaded to give my TikTok account some legitimacy. 😂

As I explained in the brief description of my TikTok post, the very first time I used my brand new Sentro 48 knitting machine, the counter didn't work. I had just unboxed the machine right before shooting this video. I cast on with some Red Heart yarn and had worked five or six rows when I noticed that the counter wasn't incrementing when the white needle passed the yarn feeder, so I grabbed my phone and shot some wobbly footage of the next time the white needle went by, in case I needed to have video evidence I could share with the seller to show them the counter wasn't working. But, wouldn't you know it, on the very next row after that the counter started working, and it has worked fine for me ever since! So I never had to send a complaint to the seller, and I continue to be totally happy with my Sentro 48 to this day. 😍 In my experience, the Sentro 48 actually runs smoother and quieter than either size of the Addis and also the Sentro 40. (I did briefly try to use a Sentro 22, but the gear was stripped on the one I bought, so I returned it right away and bought the Addi 22 instead.)


@yarncraftbysusan

My brand new Sentro 48 knitting machine. The very first time I used it the counter didn't work but it has worked fine for me ever since. ##knitting

♬ original sound - Yarncraft by Susan