Showing posts with label seamless. Show all posts

Friday, October 7, 2022

Wild-n-crazy Catnip Balls

This super-quick and easy project makes a fairly large cat toy with a diameter of about 3.5 inches. 


This is a great way to use up small yarn scraps. Grab all the wild colors you have on hand and let your creativity flow! Your kitties will thank you. My samples used about 25 yards each. 


Toy is not washable due to the embedded catnip sachet. Store catnip balls in an airtight plastic bag when not in use to help prolong the catnip scent. Gently squeeze toy periodically to help release fresh scent from the catnip. 


Knit 44 rows on a 22-needle circular knitting machine, such as the Addi Pro. 

Cinch each end and fold as to make a double layer beanie. Tie ends together at top of "hat" to secure. 


Make a sachet with a heaping teaspoon of dried catnip knotted inside the toe of a knee-high nylon stocking. Encase the catnip sachet inside a bunch of fiberfill and stuff it into the open end of the knitted ball. 


Pick up stitches around the open end of the knitted ball and pull to cinch the end closed. Knot to secure, then hide any loose yarn ends in center of ball. Now it's playtime for the kittehz! My grandkitties Marshmallow, Sushi, and Princess are gonna love these. Here's a short video of Princess playing with her new ball. 😍


Monday, July 4, 2022

Mosu Japanese Knot Bag

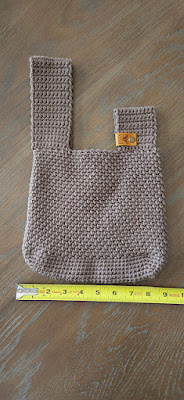
This was my covid isolation project. It is the Mosu Bag by Sweet Softies. They offer a free version of the pattern on their website. I made mine with the Taupe colorway of Big Twist Value yarn and a 5mm crochet hook, and I finished it with a vegan leather Chicago tag by Angie + Britt that says "Bee kind."


Actually, I worked most of the bag all in the first two days, because after that I felt way too sick to have the energy for doing anything at all during the next 10 days or so. Some time after that I started feeling better enough to finish crocheting the straps.

The pattern is very easy and quick to make and would lend itself to lots of creative interpretation. It makes a nice size handbag. 


Wednesday, May 18, 2022

Taking the cake

I wanted a crocheted carrier for transporting cakes inside my cake-taker, so I whipped this up using some cotton yarn scraps. 

Didn't use a pattern, but the stitch I used for the base resembles the boho stitch used in the It's Shawl Good Cardigan paid pattern by Ashlea Konecny. The sides/handles are made with a traditional chain-loop/SC mesh.


Monday, March 28, 2022

Cozy candles

I used SlipStitchery's Halloween Witch Jar Covers pattern as initial inspiration for these quick and easy flameless (battery operated) candle cozies. I worked each cozy in a different stitch and different colorway for some variety in them as a grouping.


I still intend to make some of the actual Halloween Witch Jar Covers sometime, too! 😊


Saturday, December 11, 2021

A winter vest pour homme

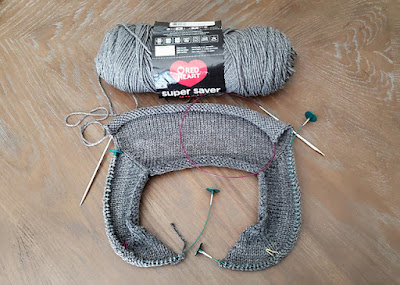
Based on the Improv pattern by Karen Templer, my plan for this is to be a seamless, top-down, cardigan-style vest worked mostly in simple, classic stockinette with K1P1 edging at armholes and button placket/front (worked with the smaller-size needles) and some traditional tortoiseshell buttons. I'm making this for my husband, who needs a replacement for the old aran vest that he reaches for during the chilliest weeks of winter to give him an extra bit of warmth. 


My initial plan was to make this without pockets, but then I realized his original vest has pockets, so I should probably try to add pockets to the new vest by following Marly Bird's tutorial for inset pockets. Another technique that is new to me for this project is picking up stitches along a knitted edge (to add ribbing).


The biggest challenge/question for me, since I'm very slow at hand knitting (and I often have days where I simply cannot knit at all due to chronic pain issues), is whether I'll manage to finish this in time to give it to my husband for Christmas. I cast on for this project on Sept. 21, which gave me about three months to work to meet that goal. Fingers crossed it gets done in time!!! (Spoiler alert: I finished it on Dec. 11! Yay!)


My husband is a person who, even though he supports my enjoyment of knitting/crochet/etc., he has firmly stated right from the beginning his preference that I NOT ever make anything for him because he will refuse to wear it. 


Over time, his declaration has proved to be not entirely true (he has occasionally worn a hat or mitts or a cowl that I've made, sometimes explicitly for him and sometimes not, and he has loved to tatters the blue scarf I knitted for him), but I've always known to generally avoid directing any of my crafting energies toward making items for him.


But when it comes to this vest, I feel like this is a different situation: He has worn the same store-bought knitted vest during winter for decades, and now that THAT vest is wearing out, he's going to need a replacement. I know he prefers neutral, classic design and lines and fit for stuff like this, so I'm attempting to incorporate those values here. I think the trickiest part for me will be achieving the correct fit. As I've worked I've been constantly measuring, checking and rechecking gauge, and comparing size to other items in his wardrobe. Because if this doesn't fit right, I know he won't wear it.


That being said, I've worked out most of this project without using a pattern (other than getting started at the shoulders with Improv), so although I'm familiar with the general principles of garment construction (after decades of sewing/knitting/crochet experience), I'm still nervous to see how the final product for this turns out.


After following the guidelines from Improv for how to begin working a top-down cardigan, I split off stitches to work each of the front panels and the back panel separately, gradually increasing the widths as the lengths grew, then rejoined all the panels below the armhole openings and knit until the bottom of the vest was the right length. I made the armholes slightly oversized, because I knew he wouldn't like to have his arm movement constricted by too-tight armholes.


After rejoining the panels below the armholes, I decided to work the 18 stitches that I cast on below the armholes on each side in garter stitch to give the side panels below the arms a bit of textural differentiation in the torso.


I finished knitting the ribbing at the bottom of the vest the day after Thanksgiving. Two days later, I picked up and knitted the front edging, which extends from side to side behind the neck and includes the buttonholes on the left front. To me it's almost magical the way you can have a curled, gnarled mess of stockinette, but then when you add the edging/ribbing, suddenly the stockinette fabric uncurls and looks gorgeous. I know that's just the way stockinette is (it curls if there's no edge treatment), but it's still fascinating to see it all come together.


Here's the store-bought ye olde aran vest that has served Montie well for many years:


Tuesday, November 2, 2021

Cookie Monster costume hat

Cookie Monster is my all-time favorite Muppet, so I wanted to make a messy-bun-style hat of this character. I started mine too late to wear it for Halloween this year, but I'll totally be ready next year!


I used a variation of the Loopy Chemo Cap pattern from my free Chemo Cap Bundle. Instead of starting at the very top of the hat, I started with 40 foundation HDCs (the equivalent of round 4) and then continued to work the pattern as written from there.


I used the Addi Pro 22-needle knitting machine to make the white part of Cookie Monster's eyeballs. My first attempt turned out looking super lumpy and squished, which led me to conclude that the eyes needed a bit of polyfil stuffing to help them hold their round shape.


To make the eyeballs: Cast on with white yarn and knit for 19 rows. Cut a long tail and use a bent-tip needle to cast the stitches off the machine. Gently stretch the knitted piece, and then gently cinch the ends. Fold one end inside the other (same as when you're making a beanie). Pull the yarn tails through the "top" of the cinched ends and knot securely. (This cinched end will be the front of the eyeball; you will later cover this cinched end with a crocheted black pupil.) Thread one tail onto a yarn needle. Grab one handful of polyfil and poke the needle through the center of the polyfil, then slide the polyfil down the yarn tail until it's sitting inside the "cup" of the eyeball. Using the tail on the yarn needle, pick up the bar in the middle of every third stitch along the top of the folded edge (these stitches will be used to cinch closed what is currently the folded end of the eyeball). Gently pull on the yarn tail to cinch the folded end closed, then stitch across the cinched opening to secure. Thread the other yarn tail onto the needle and poke it through the center of the eyeball and out the other side that you just cinched closed. Being careful not to pull too hard and squish/flatten the eyeball, knot the yarn tails together again several times to secure. Leave the long white tails for now so you can use them later to sew the eyeball onto the hat.


Using black yarn, crochet a small "pupil" for each eyeball by working 6 SC into a magic circle. Use the invisible joining technique to finish the outer edge. Tightly cinch the center of each pupil and knot to secure. Leave a long tail to sew each pupil onto the front of each eyeball, centered over the front cinched end. Knot to secure and hide black yarn tails inside the center of the eyeball.


Using the long white yarn tails, attach the eyeballs to the hat and knot several times to secure. Weave in ends and wear your Cookie Monster hat with pride!


Saturday, August 28, 2021

Another Big Mug Hug free pattern

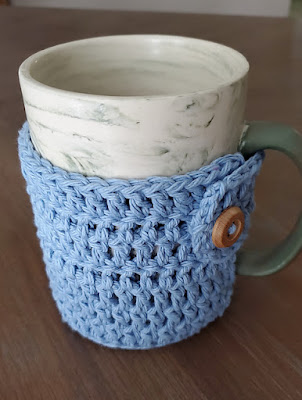
I live in a humid climate, and I like to drink iced coffee every morning in my big mug. But my cold drinks always end up "sweating" with condensation, so I like to use cotton cozies to keep the drippiness to a minimum and water rings off my tables.

This is a quick and easy pattern I worked up to fit my large, square-bottomed morning coffee mug.

Another Big Mug Hug

U.S. crochet terms

Materials: Worsted weight 100% cotton yarn, 5.5mm crochet hook, yarn needle, scissors. (My sample uses Lily Sugar n Cream in the Light Blue colorway.)

Base is worked in continuous spiral (don't join at end of rounds).

Round 1: In magic circle, HDC 8. (8 HDC)

Round 2: 2 HDC in each st. (16 HDC)

Round 3: 2 HDC in next st, 1 HDC in next st. Repeat around. (24 HDC)

Round 4: 2 HDC in next st, 1 HDC in each of next 2 sts. Repeat around. (32 HDC)

Round 5: 2 HDC in next st, 1 HDC in each of next 8 sts. Repeat around. (36 HDC)

SC in next st, then sl into back loop only of next st to join.

Base of cozy is complete. Work next round in back loops only to turn the corner and start working the sides. Sides are worked in joined rounds.

Round 6: Ch 2. DC in BLO of each st around. Join with sl to top of 1st DC. (36 DC)

Round 7: Ch 2. DC in each st around. Join with sl to top of 1st DC. (36 DC)

Round 8: Ch 2. DC in all but the last st. Leave last st unworked and do not join to 1st st. Turn work. This is leaving an opening for the bottom of your mug handle to pass through. (35 DC)

Round 9: Ch 2. DC in each st back to beginning of row. Turn work. (35 DC)

Round 10: Ch 2. DC in each st to end of row. (35 DC) Now we are going to add stitches to make the tab for the button closure. Continue row by FDC 6 times. (Row is now 41 sts long)

Round 11: Ch 2. DC in each st to end of row. (41 DC)

Round 12: Ch 2. DC in each st to end of row. (41 DC)

Finish off. Weave in ends. Slip cozy over your mug, placing the long tab through the mug handle. Because DC stitches are so tall, you will use the space between the DC stitch in the center row at the end of the tab and the next stitch in as the buttonhole. Mark where that space sits over the body of the cozy and sew a button in that spot. (My button is about 3/4-inch diameter or about 18mm.) Refer to photos if you need guidance for button placement. Your cozy is now ready to use. Enjoy!


Friday, August 6, 2021

Handy little earbuds pocket - free pattern

Here's a super-quick to make little pocket to help keep your wired earbuds wrangled and hopefully less tangled.

I keep a set of wired earbuds near my chair in the living room so they are handy whenever I want to listen to a video on my laptop or phone while my husband is next to me watching TV. That way I can listen to my thing without competing with the sound coming from the TV.

But the problem with wired earbuds is: How do you keep them neatly coiled and out of the way when you aren't using them? I would wrap the wire around my hand into a neat roll, but after I set it down, the wire would inevitably come unrolled and turn into a tangled mess.

So eventually I thought if I crocheted a little pocket to tuck my rolled-up earbuds into, it would hold everything together until I was ready to use them again.

You could make this with just about any yarn or hook size, but I used a worsted weight cotton (Lily Sugar 'n Cream Ombres in the Faded Denim colorway) and a 6mm hook. If you use lighter or heavier yarn, you would need to alter the stitch count to make a pocket that's approximately 2.5 inches in diameter at its widest point.

Setup: I started with a magic circle and worked in a continuous spiral (no joining at the end of rounds).

Row 1: 6 SC in magic circle. Use a stitch marker to keep track of the beginning of the rounds and move up when you start each new round. (6 SC)

Row 2: 2 SC in each st around. (12 SC)

Row 3: 2 SC in next st, 1 SC in next st. Repeat around. (18 SC)

Row 4: 2 SC in next st, 1 SC in each of next 2 sts. Repeat around. (24 SC)

Rows 5-6: 1 SC in each st around. (24 SC)

Row 7: Dec SC over next 2 sts, 1 SC in each of next 2 sts. Repeat around. (18 SC)

Row 8: Dec SC over next 2 sts, 1 SC in next st. Repeat around. (12 SC)

Row 9: SC in each st around. (12 SC)

Finishing: Sl in next st. Use an invisible join technique and finish off. Weave in ends. Enjoy your handy little earbuds pocket. 


Monday, January 25, 2021

Sack Saver Stuffie free recipe machine knitting

This is a quick, easy, and useful knit for storing extra used plastic grocery bags, which you can reuse later as trash can liners, etc. This Sack Saver Stuffie will keep your plastic bags neatly contained and stashed away until you need them. It has a hanging loop and an opening at each end for quick access to add/remove the bags.


Using the Addi Express King Size machine (or similar size) cast on with waste yarn and work for 5 to 6 rows. Drop the waste yarn and start working in the main color (I used Red Heart Super Saver in Neon Stripes colorway as my main color). Work 60 rows in main color, then drop main color and continue working in the contrast color (I used Red Heart Super Saver in Black as my contrast color). Work in contrast color for 60 rows; do not cut yarn. Drop contrast color into center of machine and continue working in waste yarn again for 5 to 6 rows. Cast off project from machine.

Gently stretch the project, then fold the contrast color side of the tube inside of the main color side of the tube so the cast on/cast off edges are aligned. Using a 5mm crochet hook, join the contrast color edge stitches to the main color stitches, alternating one stitch from each side until all stitches are secured all the way around. Pull the short tail from the start of the main color section through the last loop on your crochet hook to secure. Remove waste yarn.

Gently stretch the project a little more. Position the contrast color working yarn (still attached to its skein) to continue working around the edge you just used your crochet hook to secure. Being careful to work around two strands of yarn from the project for each stitch, SC around this edge of the tube (you should have 46 SC around). Join the end of the round of SC with a sl in the 1st SC. Ch 1. Holding a large ponytail elastic against the top of the round of SC stitches you just made, SC over the ponytail elastic and into the top of the SC stitches you just worked, placing 1 SC in each SC from the previous round. Continue all the way around to secure the ponytail elastic inside the crochet stitches. Join the end of the round with a sl in the 1st SC. Don't break yarn yet.

To make the hanging loop, ch 10 and sl to join the chain in the same st right beside where you started chaining. Sl into the next st over on top edge of tube, then turn your work and SC back over the 10 chains to make the hanging loop sturdier. Sl to the next st over from where you started making the hanging loop. Finish off with a secure knot. Hide yarn tails in between the knitted layers.

Turn the work so the folded/open end of the tube is facing you. Place a slipknot of the contrast color yarn on your crochet hook and (being careful to always work into two strands at the folded end of the knitted tube) join this yarn to the folded edge. Ch 1 and evenly work 46 SC around the folded edge. At the end of the round join with a sl to the 1st SC. Ch 1 and (as before) hold a large ponytail elastic against the top of the round of SC stitches you just made and SC over the ponytail elastic and into the top of the SC stitches you just worked. Place 1 SC in each SC from the previous round. Continue all the way around to secure the ponytail elastic inside the crochet stitches. Join the end of the round with a sl in the 1st SC. Finish off with a secure knot. Hide yarn tails in between the knitted layers.

All done! This Sack Saver Stuffie will easily store dozens of used plastic grocery bags.


Friday, January 8, 2021

Round Basket for Square Coasters free recipe

I'm still in the middle of a severe flare of lateral epicondylitis that started around Dec. 18 (I guess I did too much crocheting trying to finish off a few Christmas gifts), so my ability to do any crocheting or hand knitting has been very limited until my arms settle down, but I wanted to see if I could get this useful basket crocheted within a reasonable amount of time, so I gave this small project a try. It only took a couple of hours to complete.

This basket is to hold and protect our set of four square Thirstystone coasters, which are about 3.75 inches square, when they aren't in use. You can use these instructions as a jumping-off point to make a basket in just about any size you wish, so this post is more of a "recipe" than an actual pattern.

Yarn is held double, using two different colors for a bit of a tweed look. I used Red Heart Super Saver in Grey Heather and Red Heart Super Saver Ombre in True Blue (only small amounts of each yarn are needed, depending on how big you want your finished basket to be) and worked with a 6.5mm hook.

I like how working the two strands of yarn in this tight gauge results in a basket that's firm enough to hold its shape. The feel reminds me of felted work, although it is not felted.

For base of basket: Ch 5; join with sl to 1st ch to form a ring. Working in ring, SC then HDC 9 times (10 sts). This basket is worked in continuous rounds, so do not join at end of rounds. Use a stitch marker to keep track of beginning of rounds and move marker up as you go. 

To start 2nd round, work 2 HDC in 1st st and 2 HDC in each other st around (20 HDC). 

For 3rd round, work 2 HDC in 1st st, 1 HDC in next st, and repeat this way around (30 HDC). 

For 4th round, work 2 HDC in 1st st, 1 HDC in each of next 2 sts, and repeat this way around (40 HDC). 

For 5th round, work 2 HDC in 1st st, 1 HDC in each of next 3 sts, and repeat this way until you are halfway around the circle (for a total of 45 HDC). Sl into the back loop only of the next st; this will become the new beginning point of the rounds.

For sides of basket: For the first round of the basket sides work all sts in back loops only of sts in previous round. As before, work in continuous rounds without joining at the end of rounds. Use a stitch marker to keep track of beginning of rounds and move marker up as you work. Work 1 SC in next st, then 1 HDC in each remaining st around (45 sts). 

Continue on working subsequent continuous rounds of 45 HDC until sides of basket are as tall as you want them. My basket is 8 rounds tall (counting from after the base rounds).

To finish off, SC in next st; sl in each of next 2 sts. Break yarn; work invisible join; and weave in ends. Alternatively you could also work a round of reverse SC (aka crab stitch) to finish the top edge of your basket with a rope-like edging. (My arm was hurting, so I just finished my basket off without adding an edging to the top as soon as it was big enough to fit our coasters.)

Saturday, September 12, 2020

Sparkle Pumpkin

The Taylor Lynn YouTube tutorial at this link suggests 45 rows for pumpkins made on the Sentro 40, but I made this one 52 rows tall because that was how many rows it took to use up the small hank of this yarn I had on hand. I mean, after all, real pumpkins come in all shapes and sizes, so why not add a few extra rows to this one? 😉

I wasn't sure how this metallic yarn would work in my machine (wasn't sure if the metallic filament would get separated/tangled in the needles, etc.), but the yarn ran through perfectly smoothly. In fact, I'm used to having to constantly monitor the stitches on my machine to make sure none has dropped (because my machine ALWAYS drops at least one stitch during every project), but this yarn ran through without one single stitch dropping. Amazing!

Finished it off with half of a cinnamon stick for a stem. I think the green color will make a nice contrast to more traditional color pumpkins in my fall display.


Update 10/20/2022: Two years later and I'm still tinkering with this pumpkin. 😊 I decided to crochet a stem to replace the cinnamon stick, figuring that the crocheted stem would fit the scale of the pumpkin better and also be child-friendly. The stem is made with a small amount of Big Twist yarn in the Taupe colorway. And then I went on and added some curly vines, one in Taupe, one in Red Heart Super Saver in Saffron, and one in a double strand of Fixler Brothers Quick Knit Sport in 018 (yellow). How you like me NOW?!? 😂


Friday, September 4, 2020

Proud Santa Hats

I started this project right after last Christmas after seeing a photo of something similar online, but for whatever reason I didn't make a project page on Ravelry at that time. So I actually mostly finished making the hats months ago, but they sat on the table in my sewing room waiting for me to weave in the ends and add the pompoms, which I finally did today. 


I made the tail on one hat a little longer and on the other hat a little shorter just for some differentiation between the two. Fiber Spider has a good tutorial on YouTube for how to crochet a seamless, top-down stocking cap. I modeled these caps after most of his instructions and then added the rainbow stripes using HDC in the 3rd loop before finishing with the ribbing in white.


But since I did most of the work on these nearly a year ago, I can't remember anymore what size hook I used or what colorways the yarns are, etc.! Oh well. I'm still excited to get these in the mail to Mika and Emmy so they can wear them this coming holiday season. I hope they like the hats!


Tuesday, August 18, 2020

Boho Summer Cotton Swingy Shawlivest

I like the look of the four-row repeated stitch pattern of the Boho Summer Cardigan (there is a free version of the pattern on YouTube), which got me wondering whether I could use that stitch pattern in the shape of a Swingy Shawlivest

I'm making this one with cotton yarn for wear during the warm summer months. This was an experiment in melding two different patterns, and you can see by the way the center increase veers off at an angle (rather than staying centered) that it didn't turn out totally perfect, but it's still completely wearable and comfortable and will be fine for me. If I wanted to do this again to give to someone else, I'd have to recalculate how to keep the center increase in the center. 😉

Decided to finish this one with crocheted rope-twist fringe along the bottom to complement the boho style. There are many tutorials on YouTube for how to make this type of fringe. I like this one and this one

For 6-inch fringe: SC into first st. ( * SC into next st and pull up a loop that's 16 inches long. Using your finger, twist the loop 40 times. Place end of loop back on hook and sl in same SC where you started the long loop. SC in next st. Pull the twisted loop open and then drop it to allow the rope twist to settle evenly along its length. ** ) Repeat from * to  ** across hem, ending with a SC in the last st. Finish off and weave in all ends. 

Some people twist the loop while it's on their hook, and if it works for you to do it that way, great. But I find it easier for me to twist the loop on my finger. I'm always dropping the loop when I try to twist it while it's on my hook. So use whichever method works best for you. 

Since my loops are 16 inches long, that means each strand of fringe actually uses 32 inches of yarn, which is only 4 inches less than a yard. Keep that in mind if you want to make fringe this way; it requires a LOT of yardage. Generally more yardage than cut fringe would require. But the upside of the rope-twisted fringe is it can safely go into the washer and dryer. 

To make 3-inch fringe, work the same as above but only pull up an 8-inch loop and twist it 20 times. I suppose to get a 4.5-inch fringe you would pull up a 12-inch loop and twist it 30 times. (etc.)

Total yarn weight used: 928 grams, including fringe. 

Saturday, August 1, 2020

True Blue Swingy Shawlivest

I love the look of ombre/gradient yarns, so I wanted to try using one to make another Swingy Shawlivest, since I practically live in these vests all winter - they are so comfortable. 

Here's a link to my Ravelry project page. Vest total yarn weight: 1,000 grams. Estimated actual yardage totals the length of about 3.5 skeins, but I needed portions from another two skeins to match the stripes in the armhole section, so at least 6 skeins are needed to complete the project with this yarn.


Sunday, June 14, 2020

Zebra Fringed Barn Jacket

When I was in first grade I had a classmate who wore a rabbit fur coat that all the girls in my class simply adored. (This was in the 1970s, OK, so wearing fur wasn’t yet culturally verboten.) All I can remember about this girl now is that her name was Elaina and she was of Russian descent. She spoke English with a Russian accent, and to the rest of us 6-year-olds who had never heard a foreign accent like that before, all the words she spoke sounded deliciously exotic to our ears.


As I recall her jacket was made with either a white-mottled-with-black rabbit fur or dalmatian rabbit fur. It was mostly white with black spots. In my mind’s eye the jacket looks more like the mottled rabbit fur photo below than the dalmatian rabbit (notice how the mottling creates some areas that look gray in the transition spaces between the black and white), although I remember her jacket having more white all over than this mottled swatch shows, but memory can be a funny (and incorrect) thing at times.


Anyway, I had several skeins of the Red Heart Zebra colorway yarn on hand, and looking at the colors reminded me of Elaina’s rabbit fur jacket - which, by the way, she never let any of us other girls in class try on (LOL) - so I decided to try to make a vest for myself using this yarn - and then I could pretend I was wearing Elaina’s sumptuous jacket any time I wanted to! :-)


This is a variegated yarn with moderately short color changes. (White about 13-15 inches, gray about 10-12 inches, black about 30 inches.) Personally I think variegated yarns with short color changes look better when worked in crochet vs. knitting.

I started this project back in July 2019 working it as an improvised top-down raglan vest in a granny stitch and got most of the way done with it but then decided I didn’t like the way the vest looked on me. Ultimately I decided to rip it out and start over using the On Point Poncho (paid) pattern as the shape inspiration for a long, fringed barn jacket. Fingers crossed that I like the way it turns out this time …


OK, I’ve reworked the jacket to the point where I can safely say that I do like it much better now by doing the On Point Poncho pattern as a cardigan. The body and fringe (two 14-inch strands folded together and placed in every-other stitch across the bottom hem, resulting in 7-inch fringe) are complete, and now I just have to decide how long to make the sleeves. I think I’ll finish them at 3/4 length (19 rows plus 1 row of SC edging) with minimal tapering (to 60 stitches around).


Total yarn weight: 945 grams or about 4.77 skeins / 976.0 yards.