I love the look of this pullover bandana cowl and just had to make one. It's the Freja halsedisse by Hygge strikke, a paid pattern. It is knitted top-down, starting with the turtleneck. The lovely look of the front/back panels is achieved using a clever combination of increases and bind-offs, which gives the hem almost a lettuce edge.
I wanted my front panel to be longer, so I deviated from the pattern by making fewer bind-offs in the third section to allow for more rows of length. I also wanted to lengthen the back panel to help keep chilly drafts off my back, so instead of binding those stitches off as directed in the pattern, I put the stitches on hold while finishing the front panel, and then reattached the yarn to the back stitches and knitted a smaller version of the front panel in the back.
To go with the ruffle dress for Princess Rosalee, I wanted to include a sweet little cardigan and bonnet, which both utilize the same V-stitch of the Baby Dress Raspberry pattern.
This is the thinnest yarn I have ever worked with, but it is not thread; it's a very thin but soft 3-ply spun yarn. The labelless skein was in a bag of yarn that was gifted to me years ago, so I don't know what brand it is or any other information about it, but it makes 20 wpi. After making both the cardigan and bonnet, I had just a small amount of the yarn left over.
The cardigan is finished with 6 white buttons (3/8-inch diameter), which I found on Amazon. The bonnet is trimmed with white grosgrain ribbon (3/8-inch wide), which I also found on Amazon, plus another one of the buttons applied decoratively on each side to cover and also reinforce the stitching that attaches the ribbon to the bonnet.
The football team at our hometown high school, the Perry Panthers, has school colors of maroon and gold. They also have white away-game jerseys, and also alternate uniforms that are primarily black. I'm trying to utilize all of those colors in this hat.
Previous times when I've made this Messy-Bun Earflap Beanie (or the regular hat style), it has been using a combination of three colors. This time I'm attempting to make it using four colors. I sketched out several different stripe arrangements before settling on this configuration. I think it works pretty well at incorporating all four colors while still keeping the maroon and gold as the dominant colors.
Let's go, Panthers!!! 2023 GHSA 4A Football champions!
Ever since I made one of these beanies for my grandniece Jill almost four years ago, I've been wanting to make one for myself in a messy-bun style (open top). So when Jill's mom, my niece Renee, announced that she would be hosting a party to celebrate the kickoff of Georgia's new football season, I knew that now was the time to grab my yarn and get hooking on this essential accessory. GOOOOOO Dawgs! Sic 'em! Woof! Woof! Woof! Woof! Woof! 🏈
I used scraps of yarn I had in my stash to make this, so, naturally, I ran out of the main red color when I was stitching the brim. I switched to another scrap of red that was a fairly close match to the first red, but there is a tiny bit of difference in the colors. But since this hat is for me, I'm OK with that. 😊
The hat works up quickly, and the cluster V-stitch is super easy while giving the stripes their distinct "ric-rac" look. I use this tutorial on YouTube by Hooked by Robin whenever I need a refresher on how to work the cluster V-stitch. The design is great for showing off the colors of any fandom, and the slouchy, stretchy nature of the beanie is amazingly comfortable for all-game-day wear. The 5/6 ribbed brim in alternating FPDC/BPDC stitches also provides complete, cozy coverage of your ears, which is wonderful on windy autumn/winter game days.
As you can tell by my latest posts, I'm on a beanie-making kick lately, thanks to the approach of fall, my favoritest season in the whole, wide world!! Plus, most crochet hats work up super fast, so it doesn't take long to have your latest favorite hat ready to wear.
And because crochet hats work up quickly, it also means that I can
usually finish one before the arthritis in my hands forces me to take a
break from stitching. 👍
When Taylor Swift wore that crocheted beanie to watch her boyfriend, Travis Kelce, play football with the Kansas City Chiefs, all of the online yarnie groups went BA-NA-NAS with people wanting to know how to make the same hat. It's the Taylor Effect, y'all.
Anyway, if you love a Swiftie, like I do, then you simply MUST make them one of these beanies. It works up quickly with simple stitches, so it's an easy project that will bring a huge thrill to your Swiftie's heart, because in no time at all they will be able to rock this hat just like Taylor did.
To replicate Taylor's look, it's important to use a bright white yarn for the main color and a rich, vibrant red with blue undertones for the stripe.
You will notice that I have the jersey number "wrong" on the beanie I made. That's because my Swiftie also loves a football player, and he happens to wear jersey number 84 (whereas Travis Kelce wears number 87).
For the fur pom, I found an affordable pack of faux-fur poms on Amazon.
Photo showing Taylor's faux fur pompom
I am working on writing this pattern, which will be available as a free download on Ravelry. I will link to the pattern page here once it's available. Ravelry pattern link: https://www.ravelry.com/patterns/library/taylors-beanie-3
This pattern came to me when I was drifting in that place where I was not quite asleep but not quite awake. It's an easy crescent moon-shaped scarf that can be made with just about any yarn at any gauge. Just in time for Halloween stitching, I present to you the Witchypoo Scarf!
The Witchypoo Scarf can be made in a solid colorway, or a variegated, or an ombre, or in any yarn that your heart desires, but I think making it in two colors really makes the curves of the crescent shape pop visually.
304 stitches on needle
Comprised of mostly mindless, movie-watching-friendly, reversible garter stitch, you only need to pay attention to what you're doing during the first few stitches of each row, where the bottom edging detail is worked as you go.
200 stitches on needle
This pattern is best worked with an interchangeable needle with a long cable (at least 42 inches) to accommodate the large number of stitches.
Seeing the black and purple stripes in my scarf reminds me of the fun witchy-poo striped tights that my daughters used to wear at Halloween, which are memories that bring a smile to my soul. I hope your soul will find reasons to smile, too, as you knit and wear this scarf.
Measuring my gauge
As you can see in the "measuring my gauge" photo above, my gauge is about 4 stitches per inch and 4 rows per inch. Details about the yarn and needles used are on my Ravelry project page.
The scarf grows quickly; the only reason why it took me a couple of months to finish mine is because I was multitasking and working on several other projects at the same time. 😂
My only question now is: Should I release this scarf design as a paid pattern? Would you be interested in making it if the pattern was available?
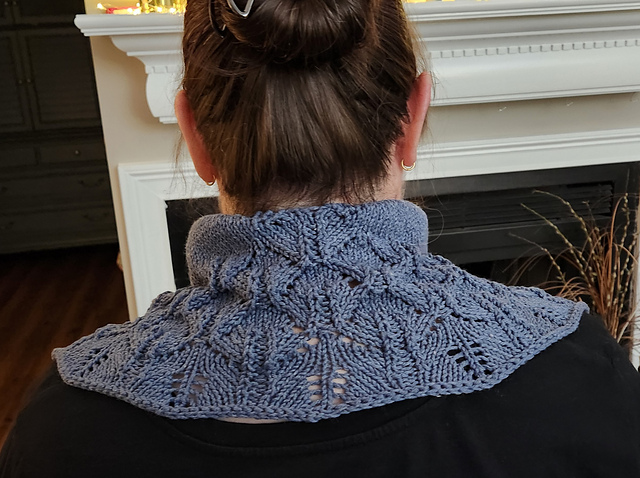
This is my very first project using fingering weight yarn! And if that weren't a cool enough fact all by itself, the yarn I'm using is a lovely ball that I found at a thrift shop for only 99 cents! How's that for cool?!
The yarn didn't come with a manufacturer's label on it, so I have no idea what brand it is or even what the fiber content is. It kind of feels like it has cotton in it; it might even be 100% cotton, for all I know. I just liked the color - it reminds me of the faded grayish blue of denim blue jeans, and I think it will make a lovely Zuzu's Petals cowlette. This is a paid pattern designed by Carina Spencer.
Because the width of the neck opening was only 16 inches when I reached the end of section 1, I knew I would need to keep adding width to make it be possible to pull the cowlette over my head. I decided to work two more 12-row repeats, hoping that would bring the width to something closer to 20 inches wide, which I figured would be a dimension that would fit better over my head. That meant my final stitch count at the end of section 1 was 151.
End of section 1 with 103 stitches
End of section 1 with 151 stitches
As I got toward the end, I was worried about losing at yarn chicken (running out of yarn, in other words). So I skipped the optional purl round and instead went directly to the cast off. But then, after casting off, I could see that I did actually have enough yarn left on the skein to be able to do the purl round, so I tinked back the cast-off round and added the purl round before casting off again. I just knew that I would always regret not having the purl round in there, if I didn't add it, because it really does help straighten out the edge curling, even before blocking.
Before blocking
I could have saved myself the trouble of tinking back if I had weighed my skein when working the last few rounds. If I had weighed it, I would have been able to know that I'd have enough to work the last optional purl round before casting off. Live and learn! But it was pretty close!
It would have been helpful to me if the pattern had provided more of an overview description of the process of how the cardigan will come together, because although I do enjoy patterns with unconventional construction techniques, If I had realized before starting this that the fit of the cardigan would be closer to that of a cocoon-style cardigan with a sort of dolman-type sleeve, I might not have opted to work this pattern, because I generally don't care for cocoons or dolman sleeves.
Nevertheless, I am glad that I made this cardigan. It is a paid pattern designed by Svetlana Volkova. At about 21 inches length, measured from the top of the shoulder, I decided to add pockets of 29 stitches wide by 44 rows deep. I knitted the pocket linings in contrasting black yarn.
Some ways I deviated from the written pattern include making simple kfb increases instead of M1R/M1L increases and adding the pockets. I like the oversized fit even if the cardigan is somewhat less constructed than I had expected before starting the project. Total stitches after rejoining below armholes: 253.
This cardigan begins in the center-back and works upward from there in the shape of a triangle. When the triangle is large enough, the point of the triangle is at the back of the wearer's neck, and the wide side of the triangle wraps around the waist. The slanted sides of the triangle are then worked separately to finish the upper back on each side and wrap around the shoulder and become the upper front on each side. The front sides are then rejoined to the back to form the arm holes and stitches picked up along the bottom of the triangle. Then all stitches are knitted together to make the bottom part of the cardigan.
I do like how this project turned out, but I think if I make it again I will incorporate garter stitch instead of ribbing, because the ribbed front placket on this one wants to fold over toward the stockinette. Hopefully washing and blocking will fix that issue, but I'm thinking that using garter stitch plackets would naturally lie better than the ribbing.
Back in 2018, I had four skeins of this beautiful Lion Brand Amazing yarn in the Violets colorway and tried to use them to make the It's Shawl Good Cardigan by Ashlea Konecny of Heart Hook Home. But these four small skeins just weren't enough to get very far on the project, and the colorway had apparently been discontinued. I tried looking to buy more skeins online, but they were mostly being offered for resale at around $25 each, which was WAY more than the retail price I paid for the ones I had, and I really had no intention of spending upwards of $300 just to acquire enough additional skeins that I would need to finish this shawligan project.
So the project languished in my WIP basket for several years. But that yarn was simply too lovely to just sit around like that, so I finally decided to frog the shawligan project and reuse the yarn in this machine-knit pocket scarf.
After doing that, I decided to start again to crochet the It's Shawl Good Cardigan using a different yarn and a larger hook: Big Twist Solids in the Taupe colorway and a 6.5mm hook.
Ashley and I seem to have a similar design aesthetic, so I really enjoy her patterns and the concepts she invents.
I finished my It's Shawl Good cardigan by adding the pockets from the Lazy Diamond Boho Pocket Shawl. The pockets are about 10 inches square, so they're nice and roomy for keeping hands warm.
I continue to experiment with my Swingy Shawlivest paid pattern. This time I decided to add sleeves to make a Swingy Shawlivest cardigan-style and also added pockets. I love how this turned out. It's so swingy and almost cape-like; I know this is going to keep me nice and cozy come next winter. You can browse my other Swingy Shawlivest blog posts at this link.
I used a regular DC mesh stitch for this one, rather than the EDC in the original pattern.
After working the body of the Shawlivest to the desired length, I continued working a twisted rope fringe across the hem without cutting the yarn.
To make twisted rope fringe: SC into next ch 1 space. Pull up 16-inch loop and twist 40 times before joining with sl st to top of next DC. Repeat across hem. (Mine ended up with 228 fringes.)
Mikey of The Crochet Crowd has a video tutorial showing an even better method (similar to what I did, but he uses slip stitches exclusively, and his version is probably more durable over time that way, so I recommend doing it Mikey's way). You can increase the space between the fringes by just working more slip stitches in between them, if you wish.
It only took me about two weeks to crochet most of this cardigan. But it took me over a year to actually finish the project because I stalled out while doing the twisted fringe. All that twisting was seriously aggravating the elbow tendinopathy in my dominant arm. I managed to work my way across maybe the first 25% of the hem over a period of about 11 months (that was less than 60 fringes in ELEVEN MONTHS, guys ... seriously — ouch!!!), and then I realized that I just couldn't do it anymore.
I showed the project to my husband and shared with him how defeated I felt by my disability. We both felt it would be such a sad thing if I wasn't able to finish it because of that. He asked me to explain to him what my process was for making the twisted fringe, and then in secret my husband went searching around on the internet trying to find something that would help me finish making the fringe without hurting my arm so much.
Before my husband found it, I had no idea a tool like this existed.
He found and bought for me a Maple Quad End Fringe Twister from Etsy seller theknitstore. He knew I didn't need a tool with four twisters on it, since I was only making one fringe at a time on this project, but he decided to get the quad twister anyway (the seller also has a dual end option) so, in his words, I would have more possible options for using the tool when I make other things in the future. What a sweet and thoughtful man I married, right?!?!
When the tool arrived I watched a YouTube video on how to operate it, and even though I was only working with one loop being twisted at a time, the tool made the work SO MUCH easier on my arm. Yes, there's still some manual movement involved, but it wasn't nearly as strenuous as twisting the long loops by hand, and the tool made the process so much faster.
Bottom line: After only being able to make around 60 twisted fringe loops by hand over the course of about 11 months, with the fringe twisting tool I finished the remaining 168 loops in ONLY TWO DAYS with no painful aftereffects from the work. No matter how you slice it, that is a definite win.
After completing the fringe, the only things left to do were to add sleeves and also a couple of patch pockets on the front.
I attached the yarn at the bottom of an armhole to begin working the sleeves. I just crocheted in the same mesh pattern using joined rows. I put in some stitch decreases for the first five rows and then worked the rest of the sleeve straight, and then I finished the sleeve with a few rows of fpdc/bpdc ribbing.
For the pockets I used the pocket pattern from the Lazy Diamond Boho Pocket Shawl, and I think they complement the cardigan nicely. The pockets are about 10 inches square, so they're nice and roomy for keeping hands warm. I might add a fabric liner to the pockets later (useful if I want to keep anything small in there, like coins, which might otherwise fall out between the crochet stitches), but I'll see how I feel about that later.
I really like pullover triangle cowls. They look amazing, they are so easy to wear, and they keep your neck, shoulders, and chest nice and cozy. So when I saw the super cute Luna Triangle Cowl paid pattern by Deni Sharpe, I knew I wanted to make one for myself.
I deviated from the pattern in a few ways. First, the pattern is written for bulky (size 5) yarn using an 8mm hook, but I made mine in aran weight (since that's what I had in my stash) with a 6.5mm hook. I also opted to hand knit the ribbed top of the cowl instead of working it in crochet.
The knitted part I did in a lofty and reversible fisherman's rib worked in the round over 80 stitches. I followed the tutorial for this technique at this link. Then I picked up the stitches for the first row of crochet to begin the triangle portion of the cowl. Since I was starting with a different number of stitches for the bottom part of the cowl than was listed in the pattern, I had to adjust the stitch counts for the triangle part of the work.