Showing posts with label knit flat. Show all posts

Monday, September 5, 2022

Knitting my T-shirt

I bought a funny T-shirt on Amazon that all you knitters out there can probably appreciate.

But after wearing it a few times, I decided that I wanted to try knitting the instructions printed on the shirt to see what it would look like. 

I studied the instructions and decided that the design was worked over multiples of 4 plus 3. So I cast on 35 stitches for my sample and started knitting.

Here's how it knits up. To me it looks like a reversible faux ribbing created by the twisted slip stitches. This stitch sequence could make a very nice scarf. Fun!


Saturday, December 11, 2021

A winter vest pour homme

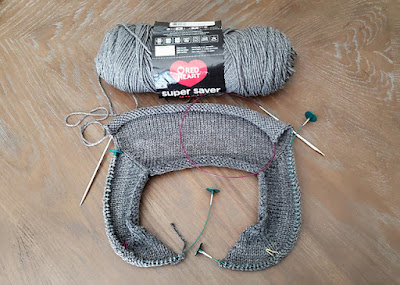
Based on the Improv pattern by Karen Templer, my plan for this is to be a seamless, top-down, cardigan-style vest worked mostly in simple, classic stockinette with K1P1 edging at armholes and button placket/front (worked with the smaller-size needles) and some traditional tortoiseshell buttons. I'm making this for my husband, who needs a replacement for the old aran vest that he reaches for during the chilliest weeks of winter to give him an extra bit of warmth. 


My initial plan was to make this without pockets, but then I realized his original vest has pockets, so I should probably try to add pockets to the new vest by following Marly Bird's tutorial for inset pockets. Another technique that is new to me for this project is picking up stitches along a knitted edge (to add ribbing).


The biggest challenge/question for me, since I'm very slow at hand knitting (and I often have days where I simply cannot knit at all due to chronic pain issues), is whether I'll manage to finish this in time to give it to my husband for Christmas. I cast on for this project on Sept. 21, which gave me about three months to work to meet that goal. Fingers crossed it gets done in time!!! (Spoiler alert: I finished it on Dec. 11! Yay!)


My husband is a person who, even though he supports my enjoyment of knitting/crochet/etc., he has firmly stated right from the beginning his preference that I NOT ever make anything for him because he will refuse to wear it. 


Over time, his declaration has proved to be not entirely true (he has occasionally worn a hat or mitts or a cowl that I've made, sometimes explicitly for him and sometimes not, and he has loved to tatters the blue scarf I knitted for him), but I've always known to generally avoid directing any of my crafting energies toward making items for him.


But when it comes to this vest, I feel like this is a different situation: He has worn the same store-bought knitted vest during winter for decades, and now that THAT vest is wearing out, he's going to need a replacement. I know he prefers neutral, classic design and lines and fit for stuff like this, so I'm attempting to incorporate those values here. I think the trickiest part for me will be achieving the correct fit. As I've worked I've been constantly measuring, checking and rechecking gauge, and comparing size to other items in his wardrobe. Because if this doesn't fit right, I know he won't wear it.


That being said, I've worked out most of this project without using a pattern (other than getting started at the shoulders with Improv), so although I'm familiar with the general principles of garment construction (after decades of sewing/knitting/crochet experience), I'm still nervous to see how the final product for this turns out.


After following the guidelines from Improv for how to begin working a top-down cardigan, I split off stitches to work each of the front panels and the back panel separately, gradually increasing the widths as the lengths grew, then rejoined all the panels below the armhole openings and knit until the bottom of the vest was the right length. I made the armholes slightly oversized, because I knew he wouldn't like to have his arm movement constricted by too-tight armholes.


After rejoining the panels below the armholes, I decided to work the 18 stitches that I cast on below the armholes on each side in garter stitch to give the side panels below the arms a bit of textural differentiation in the torso.


I finished knitting the ribbing at the bottom of the vest the day after Thanksgiving. Two days later, I picked up and knitted the front edging, which extends from side to side behind the neck and includes the buttonholes on the left front. To me it's almost magical the way you can have a curled, gnarled mess of stockinette, but then when you add the edging/ribbing, suddenly the stockinette fabric uncurls and looks gorgeous. I know that's just the way stockinette is (it curls if there's no edge treatment), but it's still fascinating to see it all come together.


Here's the store-bought ye olde aran vest that has served Montie well for many years:


Monday, November 1, 2021

Ribbed crochet messy bun hat with brim

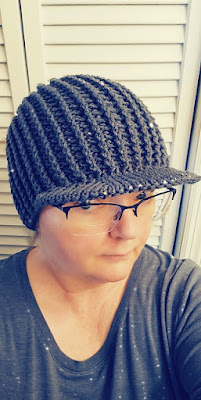
Love the look of this hat - perfect for keeping warm and also stylish, and the brim will be handy on those cold but sunny winter days. It's the Ribbed for Him and Her Messy Bun Optional Hat by Marly Bird.


I deviated from Marly's pattern by working this top down (instead of bottom up), and I also used this YouTube tutorial by "Pleasant Seas" to knit the brim and then added this brim form from tops2toesboutique on Etsy to help the knitted brim hold its shape. It seems like no matter how hard I try I just cannot get the crochet slip-stitch brim technique to work, so for me it's easier to just knit the brim.


I completed all the crochet and knitting for this project in two evenings, but I had to wait a few days for the brim form to arrive in the mail before I could finish off the project.


Wednesday, June 17, 2015

Chocolate Syrup Poncho

I liked the way Rose's Slytherin-By-the-Sea poncho turned out, so I decided to make another one for myself. I know the yarn says it's named "Coffee," but the dark brown color reminds me more of Hershey's Chocolate Syrup.


Here I used an i-cord tab cast on of 4 rows, then picked up 3 stitches in the center for a total of 9 stitches on the needle. Worked following the Sheep Wagon Shawl pattern instructions on the 3 center stitches with the addition of the 3 i-cord stitches on each side. (I-cord: Knit 3 at beginning of row; sl3wyif at the end of each row.)

Joined to work in the round after row 57. Yes, this pattern requires a lot of purling while working flat (have to purl every return row), but that's the price you pay for wanting a design in classic, classy stockinette. Once you join to work in the round, however, you're on all-knitting easy street.


Update 5/14/15: I started out knitting this poncho with size 9 needles (5.5 mm), but the fabric was just turning out to be way too dense. So somewhere around row 70, I ripped the whole thing back and started over with size 10 needles. Painful to lose that much work, but I'm much happier with the fabric the second time around.

Monday, May 4, 2015

Slytherin-By-the-Sea poncho for Rose

Here's a cozy garment stylish enough that even Bellatrix Lestrange herself might wear it! Our friend Rose was sorted into Slytherin House, but when she isn't away studying at Hogwarts, she lives in the chilly, foggy Bay Area ... hence she needed a Slytherin-By-the-Sea poncho to keep her cozy.


I started this project working the same as the Sheep Wagon Shawl but joined to work in the round after row 46 to produce a poncho instead of a wrap.

At the join, I worked another "spine" in the same manner as established between the other stockinette sections to make the join basically invisible and to provide another place for increasing the stitch count.

Since you don't turn your work anymore after joining to work in the round, I continued to emulate the Sheep Wagon Shawl stitch pattern by knitting all rounds and increasing on every-other round. Stockinette without the purling! W'hoo!!

After knitting about 94 total rows/rounds, I used a stretchy knitted cast-off but didn’t break the working yarn. I then continued working with a 5.5 mm crochet hook in the bottom loops of the knitted cast-off edge to crochet the lace edging from Kim Guzman's Cinnamon Fling to give the poncho a lovely finish. To work the lace edging in the round requires a stitch count in a multiple of 15; this poncho has 390 stitches around the hem.


Friday, April 3, 2015

Sheep Wagon Shawl

I was lucky enough to grab the Sheep Wagon Shawl pattern by Joanna Johnson while it was free during its first days on Ravelry. Now the pattern costs $4, but that's still a small price to pay because it's a lovely, well-executed design.

This is the shawl I referred to in my previous post that I worked using Lion Brand Cotton-Ease yarn.


I varied from the original pattern by incorporating some gradient striping based on the chart in the Gradient Mitts (free pattern) to transition from top color (Taupe) to bottom color (Charcoal), making this a simple, two-color striped shawl. I doubled the number of rows in the gradient stripes, so instead of being worked across 30 rows, I worked them across 60 rows, starting after row 62 of the shawl pattern.


Bottom edge stitch count: 535.


Update 4/10/15: I added a crocheted lace border adapted from Kim Guzman’s Cinnamon Fling wrap (free pattern) to accomplish two things. One, to alleviate the inevitable hem curl with stockinette fabric. And two, to add a few more inches in length.


The funny story here is that I ran short of the Charcoal Cotton-Ease yarn. This is visible in the above photo, where you can see a color variation in the bottom knitted rows of the shawl. I wasn't able to find anymore of that shade in my local stores, and I wasn't able to find anymore of it to buy online (not any that was reasonably priced, at least). I was about to give up, but I reached out to yarncraft designer Darleen Hopkins of Crochet by Darleen Hopkins. Darleen has made a lot of her designs using Cotton-Ease, so I explained my problem of running short of the Charcoal yarn. She did have a newer skein of that color and generously offered to sell it to me. We all know how yarn companies like to mess with their dye processes, so naturally the two versions of Charcoal weren't an exact match, but at this point in my big shawl project I was not about to give up! Thank you, thank you, Darleen, for saving me!!!

I was able to complete the Sheep Wagon Shawl pattern to length, but this is how close I came to using the entire skein Darleen sent me - just 1.4 ounces left (including the label band):


So a few days later when I decided to add the crocheted lace border, I opted to do that in black Caron Simply Soft - something STILL AVAILABLE IN MY LOCAL STORE. Hahaha!

Friday, March 27, 2015

HoB Mitts free pattern

I've been itching to make something using Lion Brand's Cotton-Ease yarn ... but it has been nearly impossible to find it. I guess all the yarn stores in my area just don't carry it. Yeah, I know, that doesn't make sense to me, either.

But I finally found some in stock at JoAnn. I'm not too sure about the color (Taupe), but I bought what I hope is enough to make a shawl.

In the meantime, I decided to experiment with a pair of fingerless mitts. This HoB Mitts pattern by Mechee Meador is very nice - quick and easy.


I used a provisional cast-on of 35 stitches so I could add an i-cord edging to the finger opening and also graft the side seam after working the thumb gusset. The other thing I did differently was to work the entire mitt in garter stitch, omitting the stockinette panel.


Thursday, February 12, 2015

Asymmetrical Lines free pattern


Asymmetrical Lines by Miwa Kawamura is a very nice (and free) knitting pattern for a triangular scarf in squishy garter stitch. It's a great way to show off the colors in some striping or variegated yarn.


I had a small amount of the Hobby Lobby Jazz Stripe left over after finishing the Jazzy Infinite Granny Square blanket, so I used that yarn here and added some Boysenberry Red Heart With Love for contrast.


The designer’s third photo is very helpful in figuring out the instructions to the start of part B row 3.

Monday, January 19, 2015

Double Warm Headband pattern modification

The first time I made the 1898 Hat, I thought the lower band portion of the hat would make a great (and warm!) headband. The only tricky part was going to be figuring out how to finish off the top edge to mirror the look of the modified i-cord used on the hat's bottom edge.

So I browsed through the hat's gallery of finished projects until I found one by Sal, who had worked the hat band as a headband, just the way I had pictured it! :-) Sal said all it takes is to work an i-cord bindoff to make the top edge of the headband look like the bottom edge.

Following the hat pattern's directions, work through the part where you pickup the stitches at the top of the band. Then, instead of knitting a crown for a hat, work an i-cord bindoff. To invisibly join the ends of the i-cord bindoff, see this video.


Wednesday, January 14, 2015

1898 Hat free pattern

I recently discovered this wonderful free "1898 Hat" pattern and went a little crazy making up a bunch of these hats.

There are so many reasons to love this design:
  • The double-thick band is extra warm and provides complete protection for the ears.
  • Because the band is worked in garter stitch, it's soft and squishy and kind of feels like you're wearing a lightweight but insulating and ooshy-cushy pillow wrapped around your head.
  • It's easy to vary the finished size of the hat while using the stitch counts as written by simply altering the yarn weight and/or needle size.
  • The style works for practically anyone: male or female, young or old.
  • The crown design can easily be modified to achieve different looks (even though the ones I've made thus far are plain). Find a bunch of creative ideas by browsing the pattern's gallery of finished projects.
  • The construction is very straightforward and not at all difficult. I especially love the modified i-cord technique used at the bottom "crease" of the hat band.

And here it is in I Love This Yarn's Jazzy Stripe colorway:


Tuesday, April 22, 2014

Shawlcowl Pullover pattern is free for a limited time

I released my Shawlcowl Pullover pattern on Ravelry on April 10, and the pattern has been receiving lots of yarn love from Ravelry users. The Shawlcowl Pullover is designed to mimic the trendy look of wearing a shawl as a scarf combined with the comfortable ease of wearing a pullover cowl.


If you use this link, you can download a free copy of the pattern through midnight PDT on May 1. On May 2, the price becomes $3.00 USD, so head over to Ravelry and grab your free copy while you still can using coupon code "spring."


Another reason to grab your copy now is that on May 2, everyone who has added Shawlcowl to their Ravelry library will automatically receive an updated version of the pattern that includes the Shawlcowl 2 variation. Shawlcowl 2 has a different neckline edging and a more open look to the feather-and-fan lace border.


This is my first knitting pattern design, and in the process of creating it, I discovered that developing, then testing, then ripping out and reknitting, then writing, then editing, then shooting photos, then editing some more, then test knitting it again ... was A LOT OF WORK!! Which is why I decided to put a very reasonable price on the finished pattern product.


I have gained a great amount of additional respect for people who develop pattern designs for knitting and crochet. These people WORK HARD at their craft, and they deserve our support. I have always enjoyed finding and sharing free patterns online, and of course I will continue to do that, but I have also paid for a significant portion of the patterns in my personal library. The experience I gained while developing the Shawlcowl Pullover has shown me that indie designers have earned every cent that they charge for their work.

Please respect the copyrights of indie designers!