Showing posts with label garter. Show all posts

Monday, July 28, 2025

A Chicken for Suzanne

My dear friend Suzanne is a self-proclaimed "chicken gal" and suburbanite-of-necessity who longs to return to her farmgirl days living in the country with a yard full of chickens.


What better way to celebrate her upcoming birthday than sending an Emotional Support Chicken for her to hug and hold while she dreams her sweet farmgirl dreams?


The Emotional Support Chicken by Annette Corsino is just a downright fun pattern to knit, and I think it looks best when executed in tweedy-ish yarn colorways that are reminiscent of the feathers of real chickens. When I saw the lovely marled colorways of KnitPal Cotton to the Core, I just knew they would produce some lovely chickens well worth adding to any metaphorical flock. For this hen, I'm using Caramel Brown as color A and Fresh Peach as color B.


This yarn is on the lighter side for being labeled as a worsted weight - definitely much lighter than the stuff that Red Heart labels as worsted weight. In my opinion, it's closer to being DK weight. I'm still using the needle size specified in the pattern, though, so we'll see how big this hen ends up being compared to the other ones I've knitted with Red Heart. 😅 


I hope Suzanne loves her new chicken, and if she gives it a name, I will update this post to let all y'all know what it is! 💜🐔💜


I'm pretty sure that Suzanne's chicken is the first one of these that I've managed to sew together according to the way the pattern designer intended. Yay!

Monday, June 2, 2025

Emotional Support Chicken

I just couldn't resist the allure of the Emotional Support Chicken any longer. Meet Scrappy Henrietta! 😍


This pattern arrived on the knitting scene sometime in 2023 or 2024 (I believe), and the internet practically EXPLODED with excitement.

I added the pattern to my Ravelry favorites for safe-keeping but decided to wait before making one. I noticed, however, as the months went by the way the emotional support chicken consistently remained on the first page of Ravelry's "hot right now" designs, suggesting that the internet's adoration for the ESCs had yet to abate. It was on FIRE.


Eventually, I just couldn't resist the pull of the ESC any more.  


I think the thing that put me over the edge was when I discovered that The Knitting Tree LA had made a companion video for the pattern. Checking out the video was my undoing. 😂

Tail part 1

I grabbed a long old scrap of Hobby Lobby's I Love This Yarn in the Jazzy Stripe colorway (left over from an Infinite Granny Square afghan project) and cast on to follow along with the video, which starts at the tail.

Tail part 2

For part 2 of the tail and the main part of the body, I used a couple of long scraps of Red Heart With Love in the Pewter Gray colorway that were left over from when I made my Autumn Mists vest with no pattern.

Tail and main body

I don't know which yarn I used for the neck and head, but it was one long scrap of an ombre-ish yarn with purple, dark pink, and raspberry colors that is probably something by Red Heart, but I didn't have a label for it anymore.

Neck and head added

I used up the remainder of the raspberry ombre scrap for the top end of the undersection piece, and more of the gray yarn to finish the undersection.

Henrietta got a bit wonky as I was sewing her up, where the two ends of her neck stripes don't line up at the front, but hey. She is still adorable, and I wuv her!! She has 15 mm blue safety eyes from a pack that I bought off Etsy years ago from a seller named 6060, who is no longer active on the site. Whenever I'm installing safety eyes, I always use this tool to help set the backs, because it makes it a lot easier for my arthritic hands to handle the task of snapping them on securely.

You might be able to knit a whole ESC by only watching the video, but I think the video really makes a better accompaniment if you also own the written pattern, so before I reached the end of the first tail section, I bought the pattern: And the emotional support chicken claimed yet another willing (happy) victim. 😂

I followed this up by making a friend for Scrappy Henrietta, another Emotional Support Chicken, Scrappy Patty, in colors to match our guest bedroom.

Scrappy Patty and Scrappy Henrietta

 
Scrappy Patty sitting on the bed in our guest bedroom

Scrappy Patty side view

Sunday, May 23, 2021

True Blue Boomerang Scarf

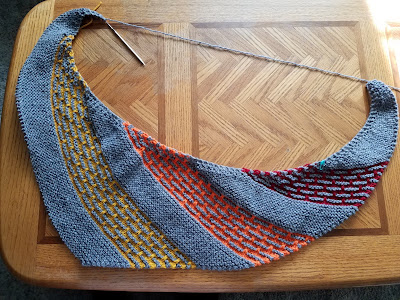
This is such an easy, mindless knitting pattern, and it gives you a nice, long/shallow, asymmetrical triangle in garter stitch that curves nicely around your neck as either a scarf or a shawl (depending on how big you knit it to be). It's a simple two-row repeat that's very easy to remember.

This one ended up being about 58 inches long finished length from tip to tip. I didn't have a full skein of this yarn (Red Heart Super Saver Ombre in the True Blue colorway) available, so I just knitted until what I had was about to run out and then cast off. 

You can make this with any yarn weight at any gauge, just choose a needle size based on your yarn size that gives you a fabric with a nice drape (not too stiff). To begin, cast on 5 stitches. Row 1: kfb, kfb; knit to last 2 stitches; k2tog. Row 2: knit.

That's all there is to it! Just keep repeating those two rows until your scarf or shawl is as big as you'd like. I recommend using a stretchy cast off, such as: Knit the first stitch; slip the stitch you just knit back onto the left needle; then knit two stitches together through the back loop. Repeat by slipping that stitch back to the left needle and knitting two stitches together through the back loop until all stitches are cast off.

As you can see, I have knit this type of scarf a few times before:


Thursday, June 27, 2019

Honeydripper Boomerang Scarf free pattern

I’m living with a lot of stress right now, so I needed a project that could not only use up some of my yarn stash but also was relatively simple to execute without needing a lot of concentration.


I enjoyed seeing all the various shawls people created during Marly Bird’s 2019 Tournament of Stitches, so I decided to adopt the boomerang shape used for that project, but instead of incorporating the mosaic sections I decided to keep it simple by working the entire piece in a two-color garter stitch stripe.


The two yarns I used here are both vintage skeins that date back to my mother’s stash. She very likely purchased these before I was even born. Even though the colors aren’t my favorite, I think they work well together and hopefully will result in a nice-looking scarf that my daughter will enjoy wearing.

My plan was just to keep knitting until I was about to run out of yarn, then cast off. I figured the two full skeins of yarn ought to produce a nice-sized scarf when it was all finished.

Just to mix things up a bit and make the long stretches of garter stitch more interesting toward the end (as well as to add visual interest on one side of the triangle in keeping with the scarf’s Honeydripper theme), when my yarn was about 75% gone I started working occasional honeycomb lace rows. This did add an additional level of detail to the process, but it was easy enough for me to read my knitting and see when it was time to work the lace rows, so I didn’t think this would be too much for my overtaxed brain to cope with.


Continuing with the increases/decreases on every RS row and alternating stripes of color as established, every sixth row (always a WS return row) I would work in honeycomb lace. Placing the lace rows this way ensured that the lace rows would be produced in alternating yarn colors, helping to keep the overall usage of each color as even as possible.


I think I can hear what you’re wondering: Why didn’t I work the whole scarf with the lovely honeycomb lace, or if not the whole scarf, why didn’t I at least start working the lace sooner - like around the halfway point? My only reply to this is: I just did it this way. End of story. If you want to copy my idea you can work as much lace (or as little) as you like. 😊

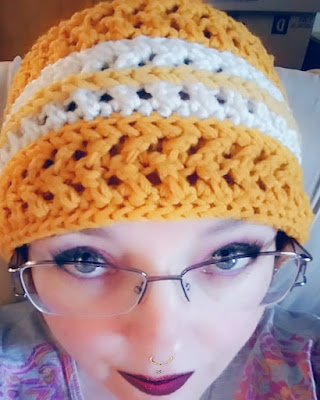
After finishing the scarf (wingspan is about 78 inches) I ended up with a bit more of the darker Inca Gold yarn left than the lighter gold. I decided to see if it was enough to crochet a coordinating Chic Aran Headband to go with the scarf. 😁


Well, I didn’t have quite enough Inca Gold to do the entire headband, and I didn’t have enough of the pale gold to do an entire stripe, so I subbed in some aran white for the center rows 6, 3, 4, and 5. That left me enough Inca Gold to finish the headband, and I embroidered a simple chain stitch as an accent down the center of the white stripe with the pale gold to add a touch of that color to the headband as well. Yay!


Tuesday, August 22, 2017

Moussaillon sideways cardigan free pattern

Finished my lil sideways sweater.

This simply brilliant free pattern is called Moussaillon by Cléonis.

You know how with most patterns (especially patterns for something as complex as a cardigan) you have to repeatedly count (and count AND COUNT) every stitch, every row? With Moussaillon, you can actually relax.

Front left panel complete; left sleeve started


Moussaillon incorporates picot edging and short rows, but don't let these frighten you because it's very easy to see when it's time to add them in the course of your knitting. (What row am I on??? What stitch number is this??? You can put all these concerns to rest because you simply will see where you are at all times.)


 The English translation of the pattern is written by a nonnative English speaker, so some native English speakers may find it difficult to read. But if you are generally familiar with knitting techniques, you shouldn't have much trouble figuring it out. And if you aren't familiar with making picots or short rows, there are dozens of video tutorials on YouTube that can show you how, so you don't have to rely solely on the pattern to explain them to you.

Trying on after finishing front left panel, left sleeve, and left side

A project this size you of course will not be knitting all in one session. With some knitting projects, after you put them down and come back to them later, it can take an agonizingly long time to figure out where you left off if you didn't leave yourself detailed notes/counts/etc. With Moussaillon, it is always easy to see where you are when you return to the project.

When you get to the beginning of a row, will this be a picot row? Just look at where the previous picot is. Are you two rows away from it? Then just begin the row with regular knitting. Are you four rows away from it? Then it's time for a picot here. Simple as that.

I used two stitch markers when making this: one on the top edge to show where I began a new section, and one on the needle to show where to turn for a short row (that way I didn't have to count how many stitches were left on the needle each time it was time to make a short row). How will you know if it's time to make a short row? Well, is the stitch beside your turning marker a regular knit stitch or a wrapped stitch? If it's a regular stitch, it's time to make a short row. If it's a wrapped stitch, knit through to the end of the row. So easy!! I didn't even fuss with picking up the wraps on the knit-through rows because they all but disappear on their own inside the garter stitch fabric.

Yes, Moussaillon DOES require some counting, but the beauty of it is that you don't have to spend your time CONSTANTLY counting and recounting (and getting frustrated when someone else in the room speaks to you and causes you to lose count!). When I finished the first front panel, I counted how many rows wide it was so I could make a note to make the same number of rows when I got to the other front panel. Ditto for the width of the sleeve and the width of the underarm side. To determine the width of the back (as well as the width of the front panels and sleeves), the designer repeatedly suggests that you try on the cardigan and make adjustments based on how you want it to fit. This is very easy to do and gives you excellent feedback on how to personalize the fit.


All in all, I highly recommend this pattern. I plan to make it again and am looking forward to experimenting with different yarn weights/needle sizes and even maybe adding some lacy yarn-overs to change up the look. SO FUN!!!!

Front panel: two rows plus 28 bumps. Sleeve top: 28 bumps. Underarm side: 9 bumps. Back panel: 32 bumps.

Friday, March 27, 2015

HoB Mitts free pattern

I've been itching to make something using Lion Brand's Cotton-Ease yarn ... but it has been nearly impossible to find it. I guess all the yarn stores in my area just don't carry it. Yeah, I know, that doesn't make sense to me, either.

But I finally found some in stock at JoAnn. I'm not too sure about the color (Taupe), but I bought what I hope is enough to make a shawl.

In the meantime, I decided to experiment with a pair of fingerless mitts. This HoB Mitts pattern by Mechee Meador is very nice - quick and easy.


I used a provisional cast-on of 35 stitches so I could add an i-cord edging to the finger opening and also graft the side seam after working the thumb gusset. The other thing I did differently was to work the entire mitt in garter stitch, omitting the stockinette panel.


Thursday, February 12, 2015

Asymmetrical Lines free pattern


Asymmetrical Lines by Miwa Kawamura is a very nice (and free) knitting pattern for a triangular scarf in squishy garter stitch. It's a great way to show off the colors in some striping or variegated yarn.


I had a small amount of the Hobby Lobby Jazz Stripe left over after finishing the Jazzy Infinite Granny Square blanket, so I used that yarn here and added some Boysenberry Red Heart With Love for contrast.


The designer’s third photo is very helpful in figuring out the instructions to the start of part B row 3.

Monday, January 19, 2015

Double Warm Headband pattern modification

The first time I made the 1898 Hat, I thought the lower band portion of the hat would make a great (and warm!) headband. The only tricky part was going to be figuring out how to finish off the top edge to mirror the look of the modified i-cord used on the hat's bottom edge.

So I browsed through the hat's gallery of finished projects until I found one by Sal, who had worked the hat band as a headband, just the way I had pictured it! :-) Sal said all it takes is to work an i-cord bindoff to make the top edge of the headband look like the bottom edge.

Following the hat pattern's directions, work through the part where you pickup the stitches at the top of the band. Then, instead of knitting a crown for a hat, work an i-cord bindoff. To invisibly join the ends of the i-cord bindoff, see this video.


Wednesday, January 14, 2015

1898 Hat free pattern

I recently discovered this wonderful free "1898 Hat" pattern and went a little crazy making up a bunch of these hats.

There are so many reasons to love this design:
  • The double-thick band is extra warm and provides complete protection for the ears.
  • Because the band is worked in garter stitch, it's soft and squishy and kind of feels like you're wearing a lightweight but insulating and ooshy-cushy pillow wrapped around your head.
  • It's easy to vary the finished size of the hat while using the stitch counts as written by simply altering the yarn weight and/or needle size.
  • The style works for practically anyone: male or female, young or old.
  • The crown design can easily be modified to achieve different looks (even though the ones I've made thus far are plain). Find a bunch of creative ideas by browsing the pattern's gallery of finished projects.
  • The construction is very straightforward and not at all difficult. I especially love the modified i-cord technique used at the bottom "crease" of the hat band.

And here it is in I Love This Yarn's Jazzy Stripe colorway:


Tuesday, April 22, 2014

Shawlcowl Pullover pattern is free for a limited time

I released my Shawlcowl Pullover pattern on Ravelry on April 10, and the pattern has been receiving lots of yarn love from Ravelry users. The Shawlcowl Pullover is designed to mimic the trendy look of wearing a shawl as a scarf combined with the comfortable ease of wearing a pullover cowl.


If you use this link, you can download a free copy of the pattern through midnight PDT on May 1. On May 2, the price becomes $3.00 USD, so head over to Ravelry and grab your free copy while you still can using coupon code "spring."


Another reason to grab your copy now is that on May 2, everyone who has added Shawlcowl to their Ravelry library will automatically receive an updated version of the pattern that includes the Shawlcowl 2 variation. Shawlcowl 2 has a different neckline edging and a more open look to the feather-and-fan lace border.


This is my first knitting pattern design, and in the process of creating it, I discovered that developing, then testing, then ripping out and reknitting, then writing, then editing, then shooting photos, then editing some more, then test knitting it again ... was A LOT OF WORK!! Which is why I decided to put a very reasonable price on the finished pattern product.


I have gained a great amount of additional respect for people who develop pattern designs for knitting and crochet. These people WORK HARD at their craft, and they deserve our support. I have always enjoyed finding and sharing free patterns online, and of course I will continue to do that, but I have also paid for a significant portion of the patterns in my personal library. The experience I gained while developing the Shawlcowl Pullover has shown me that indie designers have earned every cent that they charge for their work.

Please respect the copyrights of indie designers!

Sunday, March 23, 2014

Working on a new free pullover scarf pattern

I am currently testing new design for a free knit pullover scarf pattern and plan to be releasing it here and on Ravelry within the next week or so.

I'm excited about the design because I have been rather taken with the pullover scarf concept recently. These items are great because they mimic the look of wearing a shawl wrapped around your neck, but with the ease of pullover. My design incorporates a squishy, texture-rich garter stitch front panel with a classic feather-and-fan trim.

The test pieces are looking good, so I believe this will be a piece you will love to knit and love to wear! So stay tuned! Here's a sneak peek at one of the finished test pieces:

Wednesday, March 5, 2014

Hitchhiker - the full mathy

I received a partial skein of sock-weight two-ply self-striping yarn in blue-green-white in a box of yarn given to me by a friend. And I had no idea what to make with it.

After searching for several years for the perfect pattern to go with this yarn, I found it in the Hitchhiker shawlette designed by Martina Behm (on Ravelry at Maltina).


The 8-row repeat is easy to master to produce a delicious-feeling, ready-to-wear neck wrap, which you can make as short or long as you like.

Sock yarn Hitchhiker project after 15 points completed.
The scarf above ended up at 18.5 points long when the yarn ball ran out, but it's just long enough to wear around one's neck to chase away a chill. I plan to add a small button and loop to fasten it closed and donate it to my local cancer center as a small yarn hug for a patient.

But if your goal is to make a full-size, 42-point Hitchhiker scarf, progress feels like it slows down exponentially after one reaches about the 25th point because by then there are more than 100 stitches on the needle (and still growing).

For an impatient knitter like me, that makes achieving the "full" 42-point version of Hitchhiker rather difficult toward the end. However, if you are able to persevere, the rewards of the finished shawlette are definitely worth it.

Full-size Hitchhiker project after 23 points completed.

A recent yarn blog post by humorist Franklin Habit says: "When a non-knitter asks a question about my knitting, that question is most often, 'How long will it take you to finish that?' or the common variation, 'How long would it take you to make me a (type of knitted thing)?'

"So I explain that a hat may require several evenings, particularly if worked in a complicated technique or a fine yarn. I tell them the average number of stitches in a pair of socks (eight million) or a plain sweater (seven hundred trillion) and that completion of the latter may take months.

"The gasps of astonishment are strong enough to suck the stitch markers right out of a raglan."

After I stopped laughing (because I can especially relate to the "seven hundred trillion" feeling), I started wondering just how many stitches are there in a full-size, 42-point Hitchhiker scarf.

The pattern's array of increases and decreases are standardized, so I figured with the help of a spreadsheet, I could calculate the exact number of stitches in each row of the pattern and then add them all up.

My result? 29,579 stitches!!! (And at a minimum average of 3 seconds per stitch, that works out to at least 25 hours to complete.) So, yeah, knitting (particularly for me) takes some determination.