Showing posts with label cotton. Show all posts

Sunday, June 29, 2025

Tendril Shawl

The pattern for this Tendril Shawl is available for free on the designer Carmen Heffernan's blog. She also provides a video tutorial that walks you through the setup rows and the first couple of pattern repeats, which is very helpful for getting this project started.


I made mine at a heavier gauge than the original pattern calls for, but it worked out well and produced a lovely shawl/wrap/scarf. My yarn is Hobby Lobby I Love This Cotton in the Emerald Pine colorway, which is labeled as a 4 weight, and I'm using a 5.5 mm hook. I had a few skeins of this colorway left over from my Dressy Swingy Shawlivest project, and I thought they would look good being worked into the Tendril Shawl design. This yarn looks and feels more like a 3 weight despite the fact that it's labeled a 4 weight, and the cotton is so soft and smooth that it's a pleasure to work with.

Finished with gothpixy's edging

I love the sawtooth edge and the beautiful lacy-ness of this shawl. The project grows quickly, which is satisfying, and the four-row repeat becomes fairly intuitive after you've worked it a few times.

Finished size

The only downside to using this particular yarn is that the skeins are pretty short at only 153 yards each, so I was worried I might not have enough yardage on hand to make a full size shawl. The first skein ran out at the beginning of row 36. 

End of first skein

The second skein ran out after making it most of the way across row 52.

End of second skein

My third skein ran out almost at the end of row 64. Thankfully, I had another skein available to finish that row and continue, because the top edge of my shawl was only about 64 inches long at that point. I used the fourth skein to work another two "points" and then do the edging row.

End of third skein

I started working the picot edging row as written in the pattern, but I felt that it was coming out too tight, so I searched through the Tendril Shawl project gallery page until I found gothpixy's project.

Gothpixy suggested an alternate way to work the picot edging that I ended up using for my project. I like their edging better for two reasons: One, it provides a lovely bumpy, wavy edging that finishes the edge really well with an easier method than working traditional picots. And two, it utilizes an extra chain stitch between each bump, so the edging doesn't tighten the edge in the same way that the original pattern's edging row was doing for me. You should check out gothpixy's project to see if maybe you might like their edging better, too!

Getting started

The designer says the finished fingering-weight samples she made measure about 70 inches (178 cm) on the long top edge after 64 rows (65 rows with the final edging applied), which is 16 "points" on the bottom edge, and 32 inches (82 cm) tall/deep on the border edge after blocking. 

I crocheted mine to 18 points, or 72 rows, plus the edging row. My shawl's total length is about 72 inches before blocking.

Monday, July 24, 2023

Condensation fighter

This is just another quick cotton cup cozy I whipped up to fit my glass filled with a refreshing drink with ice. 

I hate dealing with condensation on the outside of my glass, so I use a lot of cotton cup cozies in the summer. 


No pattern for this; I just crocheted this to fit the size of my glass. The cozy is secured with straps that fit over the handle in pretty much the same way a face mask's straps fit over a person's ears. 


A woman in a crafting group shared her idea for securing a cup cozy this way, no buttons or other fasteners required, and I thought it was very clever, so I wanted to try making a cozy that way too. 

Here's a link to my Ravelry project page.


Sunday, October 9, 2022

Simple Sachet Aromatherapy Set

An easy set to crochet with cotton yarn for bedside aromatherapy. I often have nasal congestion when I first lie down at bedtime, which can make it difficult to breathe, and thus to relax and fall asleep. I've found that using eucalyptus or peppermint essential oils can help make it easier for me to breathe, so I came up with the idea to crochet this aromatherapy sachet and stand set to place on my bedside table. (Actually, I use a CPAP machine at night, which I keep in a drawer of my nightstand, so I place this sachet a few inches away from the air intake of my machine, so the fragrance can reach it easily, and it works well.) You can somewhat control how strong the scent is by placing the sachet closer or farther away from you.


I will do my best to describe the process I used to create this, but please keep in mind that it's entirely possible that my descriptions and instructions might not make sense to you. I'm including photos of the finished items not only to show you what the finished product looks like, but also to help you visualize the steps you'll be doing along the way if you want to try to re-create my design. If my instructions don't make sense to you, please feel free to use my idea as a jumping-off point for your own creation that you make in whatever way that makes the best sense to you. Using just the sachet round by itself without the stand works just fine, too.


Materials: Cotton yarn, worsted weight (I used Lily Sugar n Cream in white), 5mm crochet hook, scissors, yarn needle 

For aromatherapy disc (worked in rounds, make 2):

Setup: Ch 4. Sl in 1st ch to join in a circle.

Round 1: DC 12 in circle. Join with sl in top of 1st st. (12 DC)

Round 2: 2 DC in each st. Join with a sl in top of 1st st. (24 DC)

Finish off and weave in ends but leave a long tail on one of the discs for sewing the two discs together.

Hold the two discs together with wrong sides facing and use a whip stitch or running stitch to sew the two discs together using the long tail. Finish off and weave in tail.

For base (worked flat, make 2):

Setup: FSC 12. Ch 1; turn.

Row 1: SC in each st across. Ch 1; turn. (12 SC)

Rows 2-5: Repeat row 1. (12 SC)

Finish by SCing evenly around all 4 sides, placing 2 or 3 SCs in each corner. Join with a sl to 1st SC. (Mine has about 40 SC all the way around.)

Finish off and weave in ends but leave a long tail on one of the bases for sewing the two bases together.

Before sewing the two base pieces together, work "stand" on the right side of one base.

For stand:

We are going to use a surface crochet technique to build a "stand" on the top of one of the base pieces; the stand will be where you can place the aromatherapy disc during use.

Stand foundation row: Place a slipknot on hook. Working into the spaces between stitches on the base piece, and staying about 3 stitches in from the edges, work surface SCs in the shape of the outline of a rectangle, placing 2 SCs in each corner. My sample ended up with 25 surface SCs in this foundation row. Join with a sl in the 1st SC. Now we will continue to SC rows on top of the foundation row in joined rounds to build the "sides" of the stand.

Rows 2-4: Ch 1. SC in the top of each SC from the previous row. Join with a sl in 1st SC. (About 25 SC in each round, depending on how many SCs you have in your foundation row.) Finish off and weave in the ends from the stand.

Now we will sew the two base pieces together. Hold the two bases together with wrong sides facing and use a whip stitch or running stitch to sew the two bases together using the long tail. Finish off and weave in tail.


Wednesday, May 18, 2022

Taking the cake

I wanted a crocheted carrier for transporting cakes inside my cake-taker, so I whipped this up using some cotton yarn scraps. 

Didn't use a pattern, but the stitch I used for the base resembles the boho stitch used in the It's Shawl Good Cardigan paid pattern by Ashlea Konecny. The sides/handles are made with a traditional chain-loop/SC mesh.


Saturday, August 28, 2021

Another Big Mug Hug free pattern

I live in a humid climate, and I like to drink iced coffee every morning in my big mug. But my cold drinks always end up "sweating" with condensation, so I like to use cotton cozies to keep the drippiness to a minimum and water rings off my tables.

This is a quick and easy pattern I worked up to fit my large, square-bottomed morning coffee mug.

Another Big Mug Hug

U.S. crochet terms

Materials: Worsted weight 100% cotton yarn, 5.5mm crochet hook, yarn needle, scissors. (My sample uses Lily Sugar n Cream in the Light Blue colorway.)

Base is worked in continuous spiral (don't join at end of rounds).

Round 1: In magic circle, HDC 8. (8 HDC)

Round 2: 2 HDC in each st. (16 HDC)

Round 3: 2 HDC in next st, 1 HDC in next st. Repeat around. (24 HDC)

Round 4: 2 HDC in next st, 1 HDC in each of next 2 sts. Repeat around. (32 HDC)

Round 5: 2 HDC in next st, 1 HDC in each of next 8 sts. Repeat around. (36 HDC)

SC in next st, then sl into back loop only of next st to join.

Base of cozy is complete. Work next round in back loops only to turn the corner and start working the sides. Sides are worked in joined rounds.

Round 6: Ch 2. DC in BLO of each st around. Join with sl to top of 1st DC. (36 DC)

Round 7: Ch 2. DC in each st around. Join with sl to top of 1st DC. (36 DC)

Round 8: Ch 2. DC in all but the last st. Leave last st unworked and do not join to 1st st. Turn work. This is leaving an opening for the bottom of your mug handle to pass through. (35 DC)

Round 9: Ch 2. DC in each st back to beginning of row. Turn work. (35 DC)

Round 10: Ch 2. DC in each st to end of row. (35 DC) Now we are going to add stitches to make the tab for the button closure. Continue row by FDC 6 times. (Row is now 41 sts long)

Round 11: Ch 2. DC in each st to end of row. (41 DC)

Round 12: Ch 2. DC in each st to end of row. (41 DC)

Finish off. Weave in ends. Slip cozy over your mug, placing the long tab through the mug handle. Because DC stitches are so tall, you will use the space between the DC stitch in the center row at the end of the tab and the next stitch in as the buttonhole. Mark where that space sits over the body of the cozy and sew a button in that spot. (My button is about 3/4-inch diameter or about 18mm.) Refer to photos if you need guidance for button placement. Your cozy is now ready to use. Enjoy!


Tuesday, August 24, 2021

Coasters in 316 Stitches - free pattern

I love this pattern for making coasters. They are very quick and easy to make. I made this set of four coasters all in one evening. The free pattern, Oval Table Lace Placemat and Coaster, is by Red Heart.


We needed a few new coasters for our breakfast nook table, and I thought this set made in Lily Sugar N Cream cotton in the Faded Denim colorway would look nice.


These coasters are made with a mere five rounds, and just for fun I counted up the total number of stitches as being 316 per coaster.

I also made these coasters back in 2012.


Saturday, December 19, 2020

Circle Hot Pad pattern - totally giftable

I consider myself a tight crocheter, but I did have to go down two hook sizes to match the designer's gauge on this Circle Hot Pad by Esther Thompson. As she said, gauge isn't very important for this potholder/trivet, but you do want to have a nice firm fabric to protect surfaces or your hands from the heat. This was very quick to make and is so cute and totally giftable. The Hobby Lobby Crafter's Secret Cotton in the Desert Gold colorway looks modern and chic. There is a free version of this pattern on the designer's website.


I added a hanging loop by chaining 10 at the end of the last round, slip stitching the chain to the trivet next to where I started chaining, then turning and working 20 SC's back over the chain. A 1-inch wooden or metal ring sewn to the trivet would also look nice as a hanging loop. 


There was also just enough of the main color (Desert Gold) left to make a coordinating 4-inch-diameter coaster in 6 rounds. I made it double-layered like the trivet, but for the coaster I slip stitched it together with the ivory yarn for a bit of contrast on the colorful side. 

The multicolored balls of this Crafter's Secret cotton are 57 grams, whereas the solid color balls are 71 grams. So, using the solid color as the contrast color for this project, you have enough of the solid color to make two trivets (if you don't use any to make a coaster, the way I did).

I gifted the colorful trivet set to my niece Renee, and I made another set to give to my sister Juanita in the Hobby Lobby Crafter's Secret Cotton in the more neutral-looking colorway called The City.


Tuesday, August 18, 2020

Boho Summer Cotton Swingy Shawlivest

I like the look of the four-row repeated stitch pattern of the Boho Summer Cardigan (there is a free version of the pattern on YouTube), which got me wondering whether I could use that stitch pattern in the shape of a Swingy Shawlivest

I'm making this one with cotton yarn for wear during the warm summer months. This was an experiment in melding two different patterns, and you can see by the way the center increase veers off at an angle (rather than staying centered) that it didn't turn out totally perfect, but it's still completely wearable and comfortable and will be fine for me. If I wanted to do this again to give to someone else, I'd have to recalculate how to keep the center increase in the center. 😉

Decided to finish this one with crocheted rope-twist fringe along the bottom to complement the boho style. There are many tutorials on YouTube for how to make this type of fringe. I like this one and this one

For 6-inch fringe: SC into first st. ( * SC into next st and pull up a loop that's 16 inches long. Using your finger, twist the loop 40 times. Place end of loop back on hook and sl in same SC where you started the long loop. SC in next st. Pull the twisted loop open and then drop it to allow the rope twist to settle evenly along its length. ** ) Repeat from * to  ** across hem, ending with a SC in the last st. Finish off and weave in all ends. 

Some people twist the loop while it's on their hook, and if it works for you to do it that way, great. But I find it easier for me to twist the loop on my finger. I'm always dropping the loop when I try to twist it while it's on my hook. So use whichever method works best for you. 

Since my loops are 16 inches long, that means each strand of fringe actually uses 32 inches of yarn, which is only 4 inches less than a yard. Keep that in mind if you want to make fringe this way; it requires a LOT of yardage. Generally more yardage than cut fringe would require. But the upside of the rope-twisted fringe is it can safely go into the washer and dryer. 

To make 3-inch fringe, work the same as above but only pull up an 8-inch loop and twist it 20 times. I suppose to get a 4.5-inch fringe you would pull up a 12-inch loop and twist it 30 times. (etc.)

Total yarn weight used: 928 grams, including fringe. 

Thursday, March 19, 2020

Big Mug Hug - free pattern

I've been wanting to make a mug cozy that was big enough to fit our oversized, square-bottomed mugs. The cozy needed to be made with cotton yarn so it would be microwave-safe. After all, it's so much easier to put the cozy on the mug when it's empty, and THEN filling the mug with water, and THEN zapping it in the microwave for tea. 


Who wants to pick up a mug filled with scalding-hot water and then try to slip on a cozy without sloshing the water and burning yourself? Not me.

This cozy is quick to make and extra-thick thanks to the post stitches used on the cozy sides, and because the cozy covers the base of the mug it also protects your tabletop. It's easy to put on and remove thanks to the handy button loop.

Big Mug Hug

U.S. crochet terms

Materials: Worsted weight 100% cotton yarn, 5.5mm crochet hook, yarn needle, scissors. (My sample uses Peaches n Creme Ombre in the Blue Moon Ombre colorway.)

Start off working in the round:

Setup/row 1: In a magic circle, ch 2, DC 10. Join with sl at top of first DC. (10) [ch 2 doesn't count as a stitch in this pattern]

Row 2: Ch 2, 2 DC in each st around. Join with sl at top of first DC. (20)

Row 3: Ch 2, [2 DC in first st, 1 DC in next st.] Repeat around. Join with sl at top of first DC. (30)

Row 4: Ch 2, 2 DC in first st, 1 DC in each of next 15 sts. 2 DC in next st, 1 DC in each st to end. Join with sl at top of first DC. (32)

Now continue working back and forth in rows (do not join at end of rows for the rest of the pattern):

Row 5: Ch 2, FPDC in each st across. Turn. (32)

Row 6: Ch 2, BPDC in each st across. Turn. (32)

Repeat rows 5 and 6 until the cozy sides are a total of 10 rows tall. 

Row 15: Ch 1. Turn. HDC in each st across. (32 HDC)

Finishing: Sew a button in a top corner of the cozy as shown in photos. Slip cozy over your mug, hold the sides snugly around your mug the way you want it to fit, and then measure how long of a chain you need to reach from the other top corner of the cozy (the corner without the button) to the button and back to the other corner. Add a crochet chain of that length to the top corner without the button. Tie ends of chain to cozy to secure. Weave in ends, slip the cozy onto your mug, and enjoy.


Friday, January 25, 2019

Lanyard and Pouch for Glucose Monitor free pattern

This is a simple crocheted pouch in a size intended to fit the Freestyle Libre glucose monitor or other devices of comparable size (about 4 inches tall by 2.25 inches wide by 0.5 inches deep). The pouch has a button closure at the top to keep your monitor secure. Having the pouch attached to a lanyard makes it possible to wear your monitor at all times (I mostly wear mine this way while I’m sleeping) and have it within easy reach when you need it. Download the free PDF from Ravelry here.

Pouch is worked in crochet; lanyard i-cord is knitted. You can opt to work the i-cord in crochet, if you prefer, or use some other method to make the lanyard. You may also make the lanyard longer or shorter, depending on what’s most comfortable to you. I like a 32-inch-long lanyard because it’s long enough that I can scan my sensor during the night without having to take off the lanyard or remove my monitor from the pouch. During the overnight hours I usually don’t need to see the monitor’s readout; I just press the monitor’s button through the pouch, scan, and go back to sleep. So here’s a common-sense note: You will have to remove your monitor from the pouch if you need to see the readout after scanning.


I also find that the i-cord stretches out after wearing this for about a week, but popping the pouch into the washer and dryer along with a load of laundry tightens the stitches right back up.


This pouch-on-a-lanyard can also be a fun item for children (only ones who are old enough to safely wear a lanyard around their neck!!) to gather small treasures during nature hikes or shells and stones while walking on the beach, etc. -- just make the lanyard a shorter length to fit your child.

Sunday, October 12, 2014

Simple Vertical Stripe Placemat free pattern

Just published on Ravelry: my new free crochet pattern for a Simple Vertical Stripe Placemat.


This super-easy project works up in just a few hours. I hope you will go check it out!


I made this one with Lily Sugar ’n Cream in Country Side Ombre, which gives the fabric almost an argyle plaid effect that I really like.


Friday, September 13, 2013

X Marks the Spot Granny Square free pattern

I've been wanting to find the granny square patterns that I would need to make an afghan that looks like the one in this photo that I found at Pinterest:


I have no idea who the original creator of the above design is, but I love it, AND I love the monochromatic color scheme.

I figured a good staring place would be to try to locate a pattern for the non-flower squares -- meaning the squares that make up the center of the afghan in the above photo, the ones that look like they have an X going from corner to corner.

And although it's entirely likely that the pattern does exist out there somewhere, I was unable to find it. But working from another photo (see below), I wrote an X Marks the Spot Granny Square pattern that looks similar.


The biggest difference is that the center of the squares in the afghan in the first photo utilize what appears to be a sc/ch sequence around the initial ch ring, which gives the centers a floral look when the next round of "petals" is added. I will try to work that part out in a later revision of my X Marks the Spot Granny Square pattern.

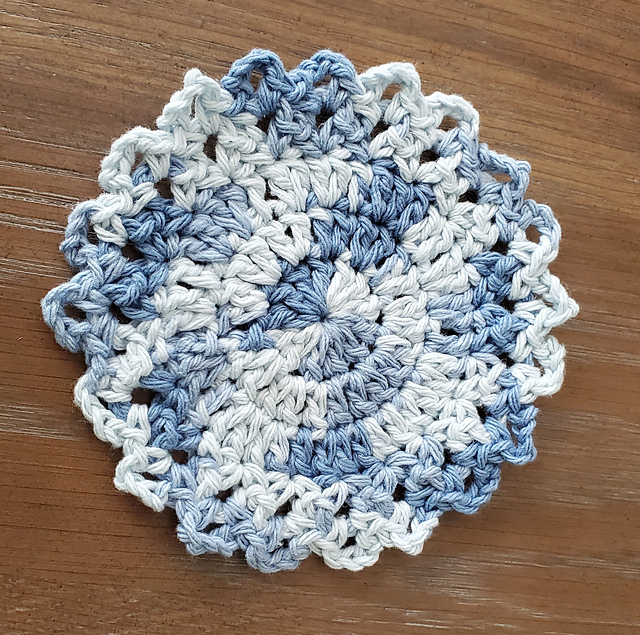
Here is a photo of a finished square made with the version of my X Marks the Spot Granny Square pattern that is found below on this page.


I made it with Lily Sugar & Cream 100 percent cotton worsted weight yarn using an I hook (5.5 mm). Mine came out at 5.75 inches across, although yours may vary depending on your tension, as well as the yarn and hook you choose to use.


Here is a copy of my free pattern.

X Marks the Spot Granny Square pattern


Use whatever yarn weight and hook size that you prefer. As written, in this pattern the ch 2 at the beginning of each round does NOT count as a dc. (If you prefer the initial ch to count as a stitch, ch 3 instead and skip dc at base of ch. At the end of each round, join with a sl to the top of the initial ch 3.)

Special stitches:

* Work corner: (ch 1, 3 dc in next ch 2 space, ch 2, 3 dc in same ch 2 space, ch 1)

Round 1:

Ch 6; join with sl to make a ring. Ch 2. Working stitches into ring, (3 dc, ch 2) 8 times. Join with sl in top of 1st dc. (8 clusters of 3 dc separated by 2 ch in between)

Round 2:

Sl into first ch 2 space (2 sl). Ch 2. Working stitches into ch 2 spaces only, (3 dc in next ch 2 space, * work corner in next ch 2 space) 4 times. Join with sl in top of 1st dc. (4 sides of 1 3-dc cluster each and 4 corners)

Round 3:

Ch 2. Dc at base of ch 2 and in each of next 2 dc. Dc in ch 1 space. (* Work corner, dc in next ch 1 space, dc in next 3 dc, dc in next ch 1 space) 3 times. * Work corner, then dc in next ch 1 space. Join with sl in top of 1st dc. (4 sides of 5 dc each and 4 corners)

Round 4:

Ch 2. Dc at base of ch 2 and in each of next 3 dc. Dc in ch 1 space. . (* Work corner, dc in next ch 1 space, dc in next 5 dc, dc in next ch 1 space) 3 times. * Work corner, then dc in next ch 1 space and dc in next dc. Join with sl in top of 1st dc. (4 sides of 7 dc each and 4 corners)

Round 5:

Ch 2. Dc at base of ch 2 and in each of next 5 dc. Dc in ch 1 space. . (* Work corner, dc in next ch 1 space, dc in next 7 dc, dc in next ch 1 space) 3 times. * Work corner, then dc in next ch 1 space and dc in next 2 dc. Join with sl in top of 1st dc. FO. (4 sides of 9 dc each and 4 corners)