Showing posts with label bottom up. Show all posts

Wednesday, January 18, 2023

Adult Crochet V-Neck Vest

I'm making this in size 48 men's, but because I'm using a lighter-weight fiber than the pattern calls for (and because I crochet tightly), my gauge is 101 stitches for 24 inches across (which aligns with the stitch count for the largest size on the pattern, so I'll basically follow the stitch count instructions for that size).


Working the panels from the bottom up, one skein of the Bernat Softee Baby yarn went for about 14 inches, measured from the bottom edge of the ribbing. 


This design mainly uses the crochet lemon-peel stitch for the body of the vest, which gives a nice, pebbly-textured, reversible fabric that doesn't scream "I was crocheted." And although the fabric doesn't look holey, it does have quite a lot of small holes that lend breathability to it. (See my photo below with the sunshine showing through the vest panel.) This is a nice stitch for a masculine/unisex garment because it is comfortably ventilated while not looking "lacey."


I originally had wanted to knit a textured top-down V-neck pullover vest in a 3-weight yarn as an alternative to the cardigan-style vest that I knitted for my husband as a gift at Christmas 2021. After looking through a lot of patterns, I finally settled on the Ink (paid) pattern by Fiona Hamilton-MacLaren, which, as its description says, is a "cosy fitted vest with an all over texture pattern. The ribbed stitch pattern pulls the fabric in, but gives loads of stretch."

It's a beautiful design, and I really, really wanted to be able to make it. But the problem I was encountering is that it's not a pattern that I could put down and then easily pick back up again a few days later, even when I used a row counter and kept careful notes about where I left off. I was imploding my brain trying to keep track of where in the stitch pattern I needed to start each row, and spent a lot of time tinking (unknitting) rows where I started out wrong but it took me a full row or two to realize that my stitches had gone amiss. I was frustrated but also really sad at how difficult it was for me. I'm not saying Ink is a difficult design; the stitches are easy, mostly just knits and purls, and it's the way those basic stitches fit together that creates the beautiful, ribbed texture. I believe the problem rests with me and my inability to wrap my head around how it all fits together after putting the project down for a few days. I think I just need to attempt Ink again at a time when I can devote more uninterrupted concentration to it.

So after admitting defeat (albeit temporarily) with Ink, I started looking to see if I could find a top-down crocheted men's vest pattern with nice texture and a traditional fit. It wasn't until I altered my search criteria to accept bottom-up patterns that I found this Adult Crochet V-Neck Vest free pattern by Yarnspirations Design Studio. I usually prefer to make top-down garments, but the overall look of this vest fits with what I wanted to make, so I decided to give the bottom-up design a go. 

The downside of the lemon-peel stitch, compared to other, taller crochet stitches, is that it grows slowly, which can feel tedious (particularly when you're working from the bottom up). But if you just keep plugging along, the vest eventually will come together.

This is going to be a gift for my husband, as I said (probably for Christmas 2023), and if you've been reading my blog for a while, you already know that he strongly discourages me from making anything for him. He grumped vociferously when I asked him to stand up so I could measure the bottom ribbing at his waist when I started working the first piece for this vest. But sometimes my creative impulses just compel me to make him something. And I do believe that this has turned out to be a very nice vest for him that will fit comfortably and be nice and cozy. After Christmas, I'll add a photo of him wearing it to this post.

Edited to add: Here's the photo of him wearing it! It fits him perfectly. 😊


Instead of following the pattern instructions for the neck edging, I decided to try working 1 round in DC (including the decrease at the bottom front) followed by 2 rounds of alternating FPDC/BPDC to give the appearance of ribbing. That technique often works well for that effect, but I didn't like how it ended up looking here. So I ripped out that neck edging and redid it using the same technique that was used for the armhole edging.

I worked the armhole edging almost as described in the pattern, except instead of making the ribbing and then sewing it on, I worked the ribbing joining it to the armhole as I went using the join-as-you-go technique similar to what is shown in this video


To do that for the neck opening means the ribbing will begin/end at the bottom front. The ends will be "square" (not tapered) and will be sewn together overlapping, which is a common feature of knitted neck ribbing seen on some V-neck sweaters.


Saturday, January 7, 2023

Iced Gingerbread Russian brioche messy bun hat

I have made this hat pattern a couple times before (here and here) and really enjoy it. It isn't exactly standard brioche; the technique is easier than brioche but still results in a beautiful, squishy, reversible, two-color project, so I love it.


The color scheme I've chosen here reminds me of iced gingerbread, so that's what I'm calling this hat. 😊


The biggest difference this time is that I stopped decreasing after the 48-stitch section to leave the top of the crown open as a messy bun/ponytail style hat. I used a 5mm crochet hook to cast off the knitted stitches into a round of 48 SC, and then worked one more round of SC with a few decreases to get the final stitch count down to 40 stitches.


The language of the video is Russian, but it's easy to follow along with the designer, Katerina Mushyn, as she knits in the video, so even if you don't speak Russian, don't be afraid to try this pattern. She also provides written instructions in both Russian and English in the video and on her website.


Video tutorial: https://youtu.be/iPabTSvzu04
Written pattern: http://prjaga.com/vyazanie-dlya-zhenshchin/shapka-beret/komplekt-bordo-shapka-i-snud-spicami

It's also helpful to use a row counter that has main/subcounter functionality with this project. I used this free browser-based Row Counter App.


Monday, July 4, 2022

Mosu Japanese Knot Bag

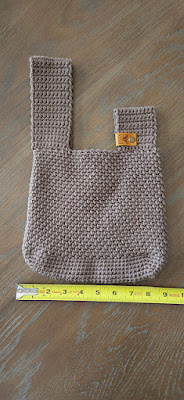
This was my covid isolation project. It is the Mosu Bag by Sweet Softies. They offer a free version of the pattern on their website. I made mine with the Taupe colorway of Big Twist Value yarn and a 5mm crochet hook, and I finished it with a vegan leather Chicago tag by Angie + Britt that says "Bee kind."


Actually, I worked most of the bag all in the first two days, because after that I felt way too sick to have the energy for doing anything at all during the next 10 days or so. Some time after that I started feeling better enough to finish crocheting the straps.

The pattern is very easy and quick to make and would lend itself to lots of creative interpretation. It makes a nice size handbag. 


Wednesday, May 18, 2022

Taking the cake

I wanted a crocheted carrier for transporting cakes inside my cake-taker, so I whipped this up using some cotton yarn scraps. 

Didn't use a pattern, but the stitch I used for the base resembles the boho stitch used in the It's Shawl Good Cardigan paid pattern by Ashlea Konecny. The sides/handles are made with a traditional chain-loop/SC mesh.


Saturday, August 28, 2021

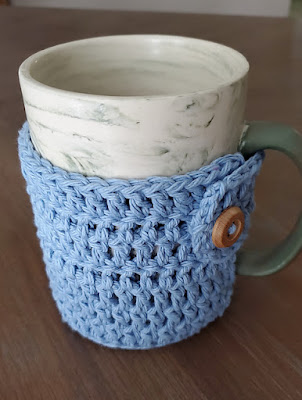
Another Big Mug Hug free pattern

I live in a humid climate, and I like to drink iced coffee every morning in my big mug. But my cold drinks always end up "sweating" with condensation, so I like to use cotton cozies to keep the drippiness to a minimum and water rings off my tables.

This is a quick and easy pattern I worked up to fit my large, square-bottomed morning coffee mug.

Another Big Mug Hug

U.S. crochet terms

Materials: Worsted weight 100% cotton yarn, 5.5mm crochet hook, yarn needle, scissors. (My sample uses Lily Sugar n Cream in the Light Blue colorway.)

Base is worked in continuous spiral (don't join at end of rounds).

Round 1: In magic circle, HDC 8. (8 HDC)

Round 2: 2 HDC in each st. (16 HDC)

Round 3: 2 HDC in next st, 1 HDC in next st. Repeat around. (24 HDC)

Round 4: 2 HDC in next st, 1 HDC in each of next 2 sts. Repeat around. (32 HDC)

Round 5: 2 HDC in next st, 1 HDC in each of next 8 sts. Repeat around. (36 HDC)

SC in next st, then sl into back loop only of next st to join.

Base of cozy is complete. Work next round in back loops only to turn the corner and start working the sides. Sides are worked in joined rounds.

Round 6: Ch 2. DC in BLO of each st around. Join with sl to top of 1st DC. (36 DC)

Round 7: Ch 2. DC in each st around. Join with sl to top of 1st DC. (36 DC)

Round 8: Ch 2. DC in all but the last st. Leave last st unworked and do not join to 1st st. Turn work. This is leaving an opening for the bottom of your mug handle to pass through. (35 DC)

Round 9: Ch 2. DC in each st back to beginning of row. Turn work. (35 DC)

Round 10: Ch 2. DC in each st to end of row. (35 DC) Now we are going to add stitches to make the tab for the button closure. Continue row by FDC 6 times. (Row is now 41 sts long)

Round 11: Ch 2. DC in each st to end of row. (41 DC)

Round 12: Ch 2. DC in each st to end of row. (41 DC)

Finish off. Weave in ends. Slip cozy over your mug, placing the long tab through the mug handle. Because DC stitches are so tall, you will use the space between the DC stitch in the center row at the end of the tab and the next stitch in as the buttonhole. Mark where that space sits over the body of the cozy and sew a button in that spot. (My button is about 3/4-inch diameter or about 18mm.) Refer to photos if you need guidance for button placement. Your cozy is now ready to use. Enjoy!


Friday, August 6, 2021

Handy little earbuds pocket - free pattern

Here's a super-quick to make little pocket to help keep your wired earbuds wrangled and hopefully less tangled.

I keep a set of wired earbuds near my chair in the living room so they are handy whenever I want to listen to a video on my laptop or phone while my husband is next to me watching TV. That way I can listen to my thing without competing with the sound coming from the TV.

But the problem with wired earbuds is: How do you keep them neatly coiled and out of the way when you aren't using them? I would wrap the wire around my hand into a neat roll, but after I set it down, the wire would inevitably come unrolled and turn into a tangled mess.

So eventually I thought if I crocheted a little pocket to tuck my rolled-up earbuds into, it would hold everything together until I was ready to use them again.

You could make this with just about any yarn or hook size, but I used a worsted weight cotton (Lily Sugar 'n Cream Ombres in the Faded Denim colorway) and a 6mm hook. If you use lighter or heavier yarn, you would need to alter the stitch count to make a pocket that's approximately 2.5 inches in diameter at its widest point.

Setup: I started with a magic circle and worked in a continuous spiral (no joining at the end of rounds).

Row 1: 6 SC in magic circle. Use a stitch marker to keep track of the beginning of the rounds and move up when you start each new round. (6 SC)

Row 2: 2 SC in each st around. (12 SC)

Row 3: 2 SC in next st, 1 SC in next st. Repeat around. (18 SC)

Row 4: 2 SC in next st, 1 SC in each of next 2 sts. Repeat around. (24 SC)

Rows 5-6: 1 SC in each st around. (24 SC)

Row 7: Dec SC over next 2 sts, 1 SC in each of next 2 sts. Repeat around. (18 SC)

Row 8: Dec SC over next 2 sts, 1 SC in next st. Repeat around. (12 SC)

Row 9: SC in each st around. (12 SC)

Finishing: Sl in next st. Use an invisible join technique and finish off. Weave in ends. Enjoy your handy little earbuds pocket. 


Friday, January 8, 2021

Round Basket for Square Coasters free recipe

I'm still in the middle of a severe flare of lateral epicondylitis that started around Dec. 18 (I guess I did too much crocheting trying to finish off a few Christmas gifts), so my ability to do any crocheting or hand knitting has been very limited until my arms settle down, but I wanted to see if I could get this useful basket crocheted within a reasonable amount of time, so I gave this small project a try. It only took a couple of hours to complete.

This basket is to hold and protect our set of four square Thirstystone coasters, which are about 3.75 inches square, when they aren't in use. You can use these instructions as a jumping-off point to make a basket in just about any size you wish, so this post is more of a "recipe" than an actual pattern.

Yarn is held double, using two different colors for a bit of a tweed look. I used Red Heart Super Saver in Grey Heather and Red Heart Super Saver Ombre in True Blue (only small amounts of each yarn are needed, depending on how big you want your finished basket to be) and worked with a 6.5mm hook.

I like how working the two strands of yarn in this tight gauge results in a basket that's firm enough to hold its shape. The feel reminds me of felted work, although it is not felted.

For base of basket: Ch 5; join with sl to 1st ch to form a ring. Working in ring, SC then HDC 9 times (10 sts). This basket is worked in continuous rounds, so do not join at end of rounds. Use a stitch marker to keep track of beginning of rounds and move marker up as you go. 

To start 2nd round, work 2 HDC in 1st st and 2 HDC in each other st around (20 HDC). 

For 3rd round, work 2 HDC in 1st st, 1 HDC in next st, and repeat this way around (30 HDC). 

For 4th round, work 2 HDC in 1st st, 1 HDC in each of next 2 sts, and repeat this way around (40 HDC). 

For 5th round, work 2 HDC in 1st st, 1 HDC in each of next 3 sts, and repeat this way until you are halfway around the circle (for a total of 45 HDC). Sl into the back loop only of the next st; this will become the new beginning point of the rounds.

For sides of basket: For the first round of the basket sides work all sts in back loops only of sts in previous round. As before, work in continuous rounds without joining at the end of rounds. Use a stitch marker to keep track of beginning of rounds and move marker up as you work. Work 1 SC in next st, then 1 HDC in each remaining st around (45 sts). 

Continue on working subsequent continuous rounds of 45 HDC until sides of basket are as tall as you want them. My basket is 8 rounds tall (counting from after the base rounds).

To finish off, SC in next st; sl in each of next 2 sts. Break yarn; work invisible join; and weave in ends. Alternatively you could also work a round of reverse SC (aka crab stitch) to finish the top edge of your basket with a rope-like edging. (My arm was hurting, so I just finished my basket off without adding an edging to the top as soon as it was big enough to fit our coasters.)

Friday, January 25, 2019

Lanyard and Pouch for Glucose Monitor free pattern

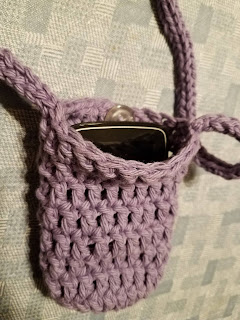
This is a simple crocheted pouch in a size intended to fit the Freestyle Libre glucose monitor or other devices of comparable size (about 4 inches tall by 2.25 inches wide by 0.5 inches deep). The pouch has a button closure at the top to keep your monitor secure. Having the pouch attached to a lanyard makes it possible to wear your monitor at all times (I mostly wear mine this way while I’m sleeping) and have it within easy reach when you need it. Download the free PDF from Ravelry here.

Pouch is worked in crochet; lanyard i-cord is knitted. You can opt to work the i-cord in crochet, if you prefer, or use some other method to make the lanyard. You may also make the lanyard longer or shorter, depending on what’s most comfortable to you. I like a 32-inch-long lanyard because it’s long enough that I can scan my sensor during the night without having to take off the lanyard or remove my monitor from the pouch. During the overnight hours I usually don’t need to see the monitor’s readout; I just press the monitor’s button through the pouch, scan, and go back to sleep. So here’s a common-sense note: You will have to remove your monitor from the pouch if you need to see the readout after scanning.


I also find that the i-cord stretches out after wearing this for about a week, but popping the pouch into the washer and dryer along with a load of laundry tightens the stitches right back up.


This pouch-on-a-lanyard can also be a fun item for children (only ones who are old enough to safely wear a lanyard around their neck!!) to gather small treasures during nature hikes or shells and stones while walking on the beach, etc. -- just make the lanyard a shorter length to fit your child.

Tuesday, November 6, 2018

Huffleclaw/Ravenpuff Hermione cloche

I decided to start this one off a bit differently by using a nice, stretchy cable cast-on in color A. Unlike the provisional cast-on in the pattern, the cable cast-on will remain a part of the finished hat, giving the B side especially a nice touch of twisted-rope contrast at the bottom edge.


This is also the first project I've made while using my new Knit Picks Shorties - and I LOVE them!! They make working a hat brim SOOO much easier. Love, love, love them.

 
Here's a link to my Ravelry project page with details about the yarn colors and needle sizes I used.
 

Full disclosure: My decision to use the cable cast-on for this turned out to not be the best thing to do. The double-knit brim as worked in Katerina's pattern is much stretchier and more comfortable. So don't try my idea! Stick with the provisional cast-on that flows you right into the stretchy double-knit brim.

I made this hat for me, since I identify with Hermione's character, except in my case I would probably be sorted into either Hufflepuff or Ravenclaw. Hence, I straddle the fence and call myself a Huffleclaw/Ravenpuff.


Wednesday, October 31, 2018

Russian brioche hat

Pattern is on Katerina's blog (scroll down for English version). And you don't have to speak Russian to benefit from her companion video, which walks you through each step.


I know the technique she's using here isn't traditional brioche knitting, but I don't know enough about knitting terminology to know what this is called in English so I'm just calling it Russian brioche. It resembles traditional two-color brioche in appearance and squishy, stretchy texture ... so why not call it brioche? 


I love everything about this pattern: The two-color double-knit brim makes a perfect base from which to launch into the two-color Russian brioche crown - and a super-warm, soft and stretchy band to hug the wearer's head. And the crown has the gorgeous look of brioche without the difficulty of knitting in brioche. And it's reversible!!


I'm rating this pattern as "medium" difficulty only because there are a couple of intermediate stitches involved (the double-knit brim and knitting and purling into the row below) and the decreases are a bit challenging, but I'm sure a skilled beginner can manage them if they watch the video closely.

This hat will be one of Silver's gifts this Christmas. Here's the link to my Ravelry project page, which has the details for yarn colors and needle sizes used.


Wednesday, January 15, 2014

Harmony Shawl

It took me a few times restarting the Harmony Shawl pattern by Bodhi Sasa before I figured out that it's essentially alternating rows of shell clusters and V-stitches, where the V-stitches are worked between the shells of the previous row, and the shells are worked in the top of the V-stitches of the previous row.


The pattern is well and carefully written, but because every stitch/step is spelled out, it can become a bit cumbersome for the reader to follow. IMO, using abbreviations for the repetitive stitches (V-stitches and shell clusters) would make the overall pattern easier to read. 


But on the other hand, having every stitch/step explicitly spelled out in detail might make this pattern easier for a beginning crocheter to interpret.

I was looking for a short triangular shawlette or scarf design, and this one yields a very pleasing finished product that can be worn in several different ways (for various stylish looks) and cross multiple seasons.

Sigh. I really do like this shawl pattern. But I ended up cannibalizing the Caron Simply Soft Paints yarn in the Oceana colorway to make the 22.5 degrees pattern instead. I intend to come back to the Harmony Shawl, though, because I think it would make a lovely gift for some of my family members.


Saturday, March 30, 2013

Lotus hat free pattern

I love the gorgeous texture of this pattern. It's the Lotus Hat by UptownPurl.


It requires a bit of skill for you to know how to knit while following a chart -- but that process isn’t too difficult if you take it slowly at first and use a stitch/row counter.


If you aren’t familiar with chart knitting, it may require some practice, so I would rate this pattern's difficulty at medium. (It may not be suitable for beginning knitters, although none of the stitches are difficult to work.) In spite of how the stitches appear to cross, there is no cabling involved here.


I hadn’t previously used the yo technique for lace knitting, but this tutorial by theshizknit was the best one I found to explain it. (Totally easy, by the way!)

I made this pattern with the one extra repeat of the chart to give the hat a bit of slouch. And although I made the blue one to donate, I loved the design so much that I had to make another one for myself in gray.