

Monday, April 26, 2021
Monday, April 19, 2021
Soap Gripper free pattern
Back in August 2015 I was wanting to make a simple Soap Gripper to keep the soap from slipping out of my hand while bathing. For my first attempt I used a 6mm hook and some white Lily Sugar & Cream cotton yarn and came up with this:

This little sack is so well fitted to the bar of soap it contains, however, that it's actually difficult to generate suds with it while bathing. From this I have learned that some positive ease is a good thing in a soap holder.

The close fit does make it very easy to get a secure grip on the bar of soap, though. And if you're giving away a bar of soap (perhaps homemade?) as a gift, then this little holder is one way you can choose to present it.

I posted about this project on Ravelry and closed by saying that if anyone reading about it was interested in replicating the project, I would post my construction notes "below." BUT time went by, and, wouldn't you know it, before long I forgot all about posting my construction notes. And then I lost the little white Soap Gripper itself, so my ability to count its stitches and describe how it was made was also lost.
So today I tried to remedy that oversight by posting the following:
Well, I obviously forgot to add my notes here for how I made the white Soap Gripper shown in the photos. Sorry about that! I can tell from the photos that it was mostly worked in SC, and it looks like I started with a few chains at the closed end (to give it a more oval shape rather than working all the starting row of stitches into the center of a circle), then I ended with what appears to be a row or two of DCs alternating front-post and back-post for a ribbing effect at the open end. I can't tell for sure how many stitches around this was ... maybe 24. So if you want make one that closely approximates the white one in the top photos, I'd suggest you try these steps.
However, as I said before, it didn't take long for my husband and me to conclude that we prefer a tiny bit more positive ease in our Soap Grippers (to make lathering easier), and my husband also prefers a more open mesh (rather than the tight, closed fabric that the SC stitch gives).
So I've subsequently been making Soap Grippers for us as follows:

Using 100% cotton yarn, worsted weight (4) and a 5mm or 5.5mm hook. (The variegated blue yarn shown in my sample photos is Lily Sugar n'Cream Ombres in the Faded Denim colorway.)
Setup/round 1: In a magic circle, ch 1 then work the following stitches into the center of the circle (or chain 2 then work the following stitches into the second chain from the hook): 1 SC, 1 HDC, 6 DC. (8 stitches)
We will work subsequent rounds in a continuous spiral, without joining at the end of rounds, for a seamless appearance until the ribbing at the cuff. Use a stitch marker to keep track of the beginning of the round.
Round 2: 2 DC in each st. (16 DC)
Round 3: 2 DC in first st, 1 DC in next st. (2 DC in next st, 1 DC in the st after that.) Repeat from ( to ) around. (24 DC)
Rounds 4-9: DC in each st around. (24 DC)
To smooth out the edge: HDC in next stitch; SC in next st after that; SL in next st after that.
Now we will work some "ribbing" at the open end of the Soap Gripper. (These rounds are joined at the end.)
Round 10: Ch 2. FPDC in 1st st; BPDC in next st. (FPDC in next st; BPDC in next st after that.) Repeat from ( to ) around. Join with a sl to top of 1st st.
Round 11: Ch 2. FPDC in FPDC from previous row; BPDC in BPDC from previous row. Repeat around. Join with a sl to top of 1st st.
Finish off; weave in ends. Add a bar of soap and enjoy your new Soap Gripper.

For a slightly different looking mesh effect, instead of working stitches into the tops of stitches from the previous round, as directed above, you can opt to work stitches in between the stitches from the previous round.
These Soap Grippers are super quick and easy to make and are very useful to keep the soap from slipping out of your hand while bathing. After using, place Soap Gripper (with the soap still inside) on a soap drying rack and allow to dry. When your bar of soap is nearly depleted, add a new bar of soap and continue using. The Soap Gripper helps you to get every last bit of use out of your bars/slivers of soap, which is frugal and saves you money!

Saturday, April 10, 2021
Lazy Diamond Boho Pocket Shawl free or paid pattern
Due to my ongoing elbow tendinopathy, I expected it would take months for me to finish this Lazy Diamond Boho Pocket Shawl project that should otherwise be easily completed in about a week (were I able to crochet normally). It didn't end up taking quite that long ... just over a month, actually. But whether you can make it quickly or have to exercise patience, this project will be worth the wait.

The camera doesn't begin to do justice to the true hue of the Red Heart yarn's Charcoal colorway. In person this deep gray has almost a bluish cast to it that is lovely.

Pattern designer Crystal White-Van Cleemput shares her entire process for how to make this project in a free YouTube tutorial. But I found myself struggling to follow the video because it was lacking some small details (like stitch counts), so I bought the PDF pattern, and that was very well written and much simpler for me to follow. So if you have difficulty following the video, jump over to Ravelry and buy the PDF.
One skein of the Red Heart Super Saver was almost enough to complete one of the large squares; my first skein ran out on the last round of the fifth repeat. However, I'm working this in a slightly larger gauge with a larger hook, so it might be possible for someone to get an entire large square if they were working this with the hook called for in the pattern.
I'm working this in a slightly different gauge than is written in the pattern, but I believe that that will best suit this heavy worsted weight yarn.
Two skeins is more than enough to make one large square and two small squares (the pockets). Three skeins is enough to make two large squares and at least one small square. Four skeins was not quite enough to make three large squares; the fourth skein ran out on the fourth round of the fifth pattern repeat of the third large square.

Tuesday, March 23, 2021
Sweet Beanie Set
Traditional cinched-top beanie has 45 rows of Red Heart Super Saver Jumbo Stripes in the Parrot Stripe colorway and 65 rows of Red Heart Super Saver in the White colorway.

Sack-style beanie has 45 rows of Parrot Stripe colorway and 55 rows of White.

I finished these with crocheted chain loop pompoms from a free tutorial by A Crocheted Simplicity that are safe to leave on the hats when washing.


Monday, March 15, 2021
Lots-a hanger covers
Crocheted or knitted hanger covers are so quick and easy to make and are perfect for making your plastic tubular hangers slip-resistant. These are quick projects that can be great for busting down your yarn stash because they only require small amounts of yarn, and they produce a useful finished object. I mean, who doesn't need a collection of yarn-covered hangers in their closet to keep their nice blouses (etc.) from falling onto the floor? 😊
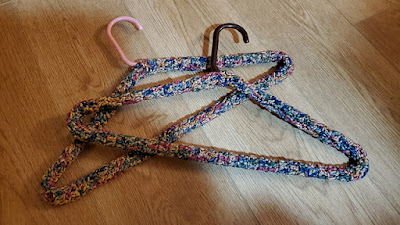
The crocheted Hanger Cover free pattern by Frugal Knitting Haus is a great, basic option for dressing up your everyday hangers. These look equally great whether worked in solid colors or variegated yarns.
The strip you crochet is six stitches wide (about 2 inches) by about 36 inches long. When you finish off, cut a long tail (about 2.25 times the length of the finished work) and use the tail to sew the cover to the hanger with a wide whip stitch (about 3-4 stitches per inch). No need to be fussy about it because the sewing stitches will blend into and be disguised by the cover. Knot the tails together and hide them inside the work for an easy finish.

Another easy way to make hanger covers is by using a 22-needle knitting machine, such as the Addi Pro.
You can make a matching set of multiple hangers all from one skein of yarn, or you can do like I did above and just grab whatever pieces of yarn you have available for a unique, scrappy hanger.
Using a 22-needle machine, cast on with a few rows of waste yarn. Change to your working yarn and knit 160 to 170 rows to fit most tubular plastic hangers. Leave about a 2-yard tail before cutting the working yarn and drop it into the center. Change to waste yarn and work a few more rows then cast off from the machine. Gently stretch the knitted piece.
Using a 5mm crochet hook, close the end of the tube with the short tail and remove the waste yarn, pulling the short tail through the last loop to secure it. (Don't hide this tail inside yet.) Then close the end of the tube with the long tail, pulling the long tail through the last loop to secure it.
Thread the long yarn tail onto a large needle. Hold the knitted strip so the end wraps around the hanger and whip-stitch the long edges of the knitted piece together. Stretch the knitting until the ends of each side meet just below the hook of the hanger and whip-stitch or mattress-stitch the ends together for a neat appearance. Knot the tails together to secure and then hide the tails inside the knitting for an easy finish. Now your covered hanger is finished and ready to use.
The striped machine-knit hanger cover in the photo above was made with 160 rows, which was just long enough to fit snugly on the hanger. It might have been better if I'd made it 170 rows, which is what I did in the machine-knit hanger cover in the photo below.

Subscribe to:
Posts (Atom)