Monday, February 20, 2023

Haiku Cardi


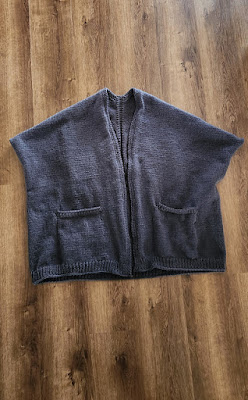
Finished cardi

It would have been helpful to me if the pattern had provided more of an overview description of the process of how the cardigan will come together, because although I do enjoy patterns with unconventional construction techniques, If I had realized before starting this that the fit of the cardigan would be closer to that of a cocoon-style cardigan with a sort of dolman-type sleeve, I might not have opted to work this pattern, because I generally don't care for cocoons or dolman sleeves.


Nevertheless, I am glad that I made this cardigan. It is a paid pattern designed by Svetlana Volkova. At about 21 inches length, measured from the top of the shoulder, I decided to add pockets of 29 stitches wide by 44 rows deep. I knitted the pocket linings in contrasting black yarn.


Some ways I deviated from the written pattern include making simple kfb increases instead of M1R/M1L increases and adding the pockets. I like the oversized fit even if the cardigan is somewhat less constructed than I had expected before starting the project. Total stitches after rejoining below armholes: 253.

This cardigan begins in the center-back and works upward from there in the shape of a triangle. When the triangle is large enough, the point of the triangle is at the back of the wearer's neck, and the wide side of the triangle wraps around the waist. The slanted sides of the triangle are then worked separately to finish the upper back on each side and wrap around the shoulder and become the upper front on each side. The front sides are then rejoined to the back to form the arm holes and stitches picked up along the bottom of the triangle. Then all stitches are knitted together to make the bottom part of the cardigan.

I do like how this project turned out, but I think if I make it again I will incorporate garter stitch instead of ribbing, because the ribbed front placket on this one wants to fold over toward the stockinette. Hopefully washing and blocking will fix that issue, but I'm thinking that using garter stitch plackets would naturally lie better than the ribbing.


Wednesday, January 18, 2023

Adult Crochet V-Neck Vest

I'm making this in size 48 men's, but because I'm using a lighter-weight fiber than the pattern calls for (and because I crochet tightly), my gauge is 101 stitches for 24 inches across (which aligns with the stitch count for the largest size on the pattern, so I'll basically follow the stitch count instructions for that size).


Working the panels from the bottom up, one skein of the Bernat Softee Baby yarn went for about 14 inches, measured from the bottom edge of the ribbing. 


This design mainly uses the crochet lemon-peel stitch for the body of the vest, which gives a nice, pebbly-textured, reversible fabric that doesn't scream "I was crocheted." And although the fabric doesn't look holey, it does have quite a lot of small holes that lend breathability to it. (See my photo below with the sunshine showing through the vest panel.) This is a nice stitch for a masculine/unisex garment because it is comfortably ventilated while not looking "lacey."


I originally had wanted to knit a textured top-down V-neck pullover vest in a 3-weight yarn as an alternative to the cardigan-style vest that I knitted for my husband as a gift at Christmas 2021. After looking through a lot of patterns, I finally settled on the Ink (paid) pattern by Fiona Hamilton-MacLaren, which, as its description says, is a "cosy fitted vest with an all over texture pattern. The ribbed stitch pattern pulls the fabric in, but gives loads of stretch."

It's a beautiful design, and I really, really wanted to be able to make it. But the problem I was encountering is that it's not a pattern that I could put down and then easily pick back up again a few days later, even when I used a row counter and kept careful notes about where I left off. I was imploding my brain trying to keep track of where in the stitch pattern I needed to start each row, and spent a lot of time tinking (unknitting) rows where I started out wrong but it took me a full row or two to realize that my stitches had gone amiss. I was frustrated but also really sad at how difficult it was for me. I'm not saying Ink is a difficult design; the stitches are easy, mostly just knits and purls, and it's the way those basic stitches fit together that creates the beautiful, ribbed texture. I believe the problem rests with me and my inability to wrap my head around how it all fits together after putting the project down for a few days. I think I just need to attempt Ink again at a time when I can devote more uninterrupted concentration to it.

So after admitting defeat (albeit temporarily) with Ink, I started looking to see if I could find a top-down crocheted men's vest pattern with nice texture and a traditional fit. It wasn't until I altered my search criteria to accept bottom-up patterns that I found this Adult Crochet V-Neck Vest free pattern by Yarnspirations Design Studio. I usually prefer to make top-down garments, but the overall look of this vest fits with what I wanted to make, so I decided to give the bottom-up design a go. 

The downside of the lemon-peel stitch, compared to other, taller crochet stitches, is that it grows slowly, which can feel tedious (particularly when you're working from the bottom up). But if you just keep plugging along, the vest eventually will come together.

This is going to be a gift for my husband, as I said (probably for Christmas 2023), and if you've been reading my blog for a while, you already know that he strongly discourages me from making anything for him. He grumped vociferously when I asked him to stand up so I could measure the bottom ribbing at his waist when I started working the first piece for this vest. But sometimes my creative impulses just compel me to make him something. And I do believe that this has turned out to be a very nice vest for him that will fit comfortably and be nice and cozy. After Christmas, I'll add a photo of him wearing it to this post.

Edited to add: Here's the photo of him wearing it! It fits him perfectly. 😊


Instead of following the pattern instructions for the neck edging, I decided to try working 1 round in DC (including the decrease at the bottom front) followed by 2 rounds of alternating FPDC/BPDC to give the appearance of ribbing. That technique often works well for that effect, but I didn't like how it ended up looking here. So I ripped out that neck edging and redid it using the same technique that was used for the armhole edging.

I worked the armhole edging almost as described in the pattern, except instead of making the ribbing and then sewing it on, I worked the ribbing joining it to the armhole as I went using the join-as-you-go technique similar to what is shown in this video


To do that for the neck opening means the ribbing will begin/end at the bottom front. The ends will be "square" (not tapered) and will be sewn together overlapping, which is a common feature of knitted neck ribbing seen on some V-neck sweaters.


Saturday, January 7, 2023

Iced Gingerbread Russian brioche messy bun hat

I have made this hat pattern a couple times before (here and here) and really enjoy it. It isn't exactly standard brioche; the technique is easier than brioche but still results in a beautiful, squishy, reversible, two-color project, so I love it.


The color scheme I've chosen here reminds me of iced gingerbread, so that's what I'm calling this hat. 😊


The biggest difference this time is that I stopped decreasing after the 48-stitch section to leave the top of the crown open as a messy bun/ponytail style hat. I used a 5mm crochet hook to cast off the knitted stitches into a round of 48 SC, and then worked one more round of SC with a few decreases to get the final stitch count down to 40 stitches.


The language of the video is Russian, but it's easy to follow along with the designer, Katerina Mushyn, as she knits in the video, so even if you don't speak Russian, don't be afraid to try this pattern. She also provides written instructions in both Russian and English in the video and on her website.


Video tutorial: https://youtu.be/iPabTSvzu04
Written pattern: http://prjaga.com/vyazanie-dlya-zhenshchin/shapka-beret/komplekt-bordo-shapka-i-snud-spicami

It's also helpful to use a row counter that has main/subcounter functionality with this project. I used this free browser-based Row Counter App.


Wednesday, December 14, 2022

A pocket scarf for Morgan

Last Christmas I made a reversible beanie for Morgan with the Red Heart Super Saver Zebra colorway on the outside and lined with white.

When I asked Morgan's mom for some gift ideas for this Christmas, she told me that Morgan has worn her zebra hat quite a lot throughout the past year and suggested that I make her a matching scarf for this Christmas. Challenge accepted! 

I got a few more skeins of the Zebra yarn and decided that I wanted to make a pocket scarf for Morgan. But unlike last year, when the hat knitted up like a dream, the yarn this year was being very uncooperative. I had to restart the project four times because of dropped stitches, which was frustrating, but I kept on trying because I knew this was going to be for my grandniece (if I could ever finish it!!).

During the initial failed starts, I alternated between using my Addi King and the Sentro 48, but neither one was working very well with the yarn. I finally settled on making the scarf on the Sentro and went very, verrrry slowly at first, pushing each stitch down by hand as it passed the feeder (like the technique shown in this video), to make absolutely certain that the stitches were seated properly. Then, when I had enough length completed (around 40 rows), I added some aggressive weight using the pot lid trick. The weight made the rest of the project work smoothly. (You just have to stop about every 15-20 rows to stretch the work below the pot lid and then reposition the lid closer to the top of the work to keep it high enough to keep tension on the needles.)


I knitted 320 rows, closed the tube ends, and then turned up 8 inches at each end of the scarf for the pockets and stitched the sides together using the invisible mattress stitch.


The only thing about this project that disappointed me was the way the stripes came out looking so different on the scarf than they were on the hat. The colors on the two projects do match, since it is the same colorway of the same brand of yarn, but I have to wonder if the yarn isn't being made slightly differently now than it was a year ago. (???) It's hard to say. But I hope Morgan will be happy with it! Fingers crossed!


Sunday, December 11, 2022

Butter Mellow pocket scarf

Sunshine, daisies, butter mellow,  
Turn this stupid, fat rat yellow.

That silly "spell" didn't work for Ron Weasley in "Harry Potter and the Sorcerer's Stone" as he tried to turn his rat familiar, Scabbers, yellow, but this butter-yellow yarn from my stash knitted up beautifully to make a cozy pocket scarf for Mika and Emmy. 

The sport-weight fiber worked to a gauge of about 4-5 rows per inch. And since I wanted a scarf 80 inches long (to turn up 10 inches at each end for deep pockets, leaving an overall length of about 60 inches), I made the scarf 400 rows long. (Which actually turned out to be a bit too long, but that was OK; I just made the pockets deeper to compensate.) The yarn is an interesting blend of 55% acrylic, 35% rayon, 5% wool, and 5% vinyon (whatever that is!), but the fiber is safe to machine wash and dry, so it's easy to care for.


Cast on with at least 6 rows of waste yarn in a contrasting color to your project yarn, then add your project yarn and crank until you have the desired number of rows. Cast off with another 6 or more rows of waste yarn, then remove project from the machine. Using a 5mm crochet hook, close each end of the tube as shown in this video by Jojo Juju. Fold each end of the scarf until the pockets are as deep as you want and pin them in place with locking stitch markers. Mattress stitch both sides of each pocket and knot securely. Hide all tails inside the tube, and enjoy your new pocket scarf! 

Jojo also has a full video tutorial for how to machine-knit a pocket scarf, which you can view at this link.

The sport-weight yarn is rated a 2, when usually size 4 yarn is used in the circular knitting machines. For me the trick to getting lightweight yarns like that to work in the machine is to maintain a firm tension.


I had just enough yarn left after knitting the scarf to make a matching beanie of 113 rows.