Showing posts with label sweater. Show all posts

Monday, February 20, 2023

Haiku Cardi


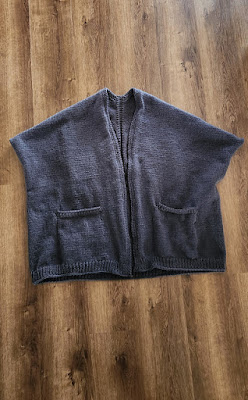
Finished cardi

It would have been helpful to me if the pattern had provided more of an overview description of the process of how the cardigan will come together, because although I do enjoy patterns with unconventional construction techniques, If I had realized before starting this that the fit of the cardigan would be closer to that of a cocoon-style cardigan with a sort of dolman-type sleeve, I might not have opted to work this pattern, because I generally don't care for cocoons or dolman sleeves.


Nevertheless, I am glad that I made this cardigan. It is a paid pattern designed by Svetlana Volkova. At about 21 inches length, measured from the top of the shoulder, I decided to add pockets of 29 stitches wide by 44 rows deep. I knitted the pocket linings in contrasting black yarn.


Some ways I deviated from the written pattern include making simple kfb increases instead of M1R/M1L increases and adding the pockets. I like the oversized fit even if the cardigan is somewhat less constructed than I had expected before starting the project. Total stitches after rejoining below armholes: 253.

This cardigan begins in the center-back and works upward from there in the shape of a triangle. When the triangle is large enough, the point of the triangle is at the back of the wearer's neck, and the wide side of the triangle wraps around the waist. The slanted sides of the triangle are then worked separately to finish the upper back on each side and wrap around the shoulder and become the upper front on each side. The front sides are then rejoined to the back to form the arm holes and stitches picked up along the bottom of the triangle. Then all stitches are knitted together to make the bottom part of the cardigan.

I do like how this project turned out, but I think if I make it again I will incorporate garter stitch instead of ribbing, because the ribbed front placket on this one wants to fold over toward the stockinette. Hopefully washing and blocking will fix that issue, but I'm thinking that using garter stitch plackets would naturally lie better than the ribbing.


Sunday, June 14, 2020

Zebra Fringed Barn Jacket

When I was in first grade I had a classmate who wore a rabbit fur coat that all the girls in my class simply adored. (This was in the 1970s, OK, so wearing fur wasn’t yet culturally verboten.) All I can remember about this girl now is that her name was Elaina and she was of Russian descent. She spoke English with a Russian accent, and to the rest of us 6-year-olds who had never heard a foreign accent like that before, all the words she spoke sounded deliciously exotic to our ears.


As I recall her jacket was made with either a white-mottled-with-black rabbit fur or dalmatian rabbit fur. It was mostly white with black spots. In my mind’s eye the jacket looks more like the mottled rabbit fur photo below than the dalmatian rabbit (notice how the mottling creates some areas that look gray in the transition spaces between the black and white), although I remember her jacket having more white all over than this mottled swatch shows, but memory can be a funny (and incorrect) thing at times.


Anyway, I had several skeins of the Red Heart Zebra colorway yarn on hand, and looking at the colors reminded me of Elaina’s rabbit fur jacket - which, by the way, she never let any of us other girls in class try on (LOL) - so I decided to try to make a vest for myself using this yarn - and then I could pretend I was wearing Elaina’s sumptuous jacket any time I wanted to! :-)


This is a variegated yarn with moderately short color changes. (White about 13-15 inches, gray about 10-12 inches, black about 30 inches.) Personally I think variegated yarns with short color changes look better when worked in crochet vs. knitting.

I started this project back in July 2019 working it as an improvised top-down raglan vest in a granny stitch and got most of the way done with it but then decided I didn’t like the way the vest looked on me. Ultimately I decided to rip it out and start over using the On Point Poncho (paid) pattern as the shape inspiration for a long, fringed barn jacket. Fingers crossed that I like the way it turns out this time …


OK, I’ve reworked the jacket to the point where I can safely say that I do like it much better now by doing the On Point Poncho pattern as a cardigan. The body and fringe (two 14-inch strands folded together and placed in every-other stitch across the bottom hem, resulting in 7-inch fringe) are complete, and now I just have to decide how long to make the sleeves. I think I’ll finish them at 3/4 length (19 rows plus 1 row of SC edging) with minimal tapering (to 60 stitches around).


Total yarn weight: 945 grams or about 4.77 skeins / 976.0 yards.

Friday, February 8, 2013

Hello, Baby Cardigan free pattern

I had a random skein of Caron Simply Soft Paints in Baby Brights Ombre 9801 sitting around and needed to find a project for it.

Then along came the pattern for this sweet baby cardigan at the Spud & Chloe Blog: Hello, Baby. Here's the link to my project page at Ravelry.

When I first stared working the pattern, I struggled a lot with getting the increases on the yoke portion to turn out right. I don’t think the pattern was written poorly; I was just having a difficult time concentrating and getting the correct stitch counts. After starting over four times, though, I finally got the stitch counts right. Whew! It’s such a sweet little cardi, I didn’t want to give up on it.


Update: Now I’m basically just stuck on the last step, which is a knitted-on I-cord edging. I’ve never done I-cord before, so … until I have the time to study up on how it’s done, this project is going to hibernate at 95 percent done. Sigh!


Thursday, December 1, 2011

Finished the top-down cardigan

Except for adding a button closure at the throat, I finally finished the Chevron Lace Top-Down Cardigan sweater. It turned out lovely. I think I will give it to Aunt Mary Ann.