Showing posts with label triangle. Show all posts

Thursday, June 1, 2023

Haiku Cardi crochet style

I decided to experiment with making a crochet version of the Haiku Cardi. For the fabric, I used the stitch pattern from the Genuine Pleasure Shawl, a free pattern designed by Jamie Swiatek, but just about any triangle shawl pattern with repeating rows would do because that is the base shape for the Haiku Cardi. 


The Genuine Pleasure Shawl has a 10-row pattern repeat, but it's easier to memorize than it sounds, so once you get into the rhythm of it, it becomes simple to read your stitches to figure out where you are as you go without having to constantly keep referring back to the pattern.


I made this to be a housecoat/bathrobe/dressing gown for our guest room, so I made the length a bit longer than I would for a regular cardigan, and I also added pockets to the front using the pockets from the Lazy Diamond Boho Pocket Shawl, a paid pattern designed by Crystal White-Van Cleemput, just because they work up quickly and look super cute.


Monday, February 20, 2023

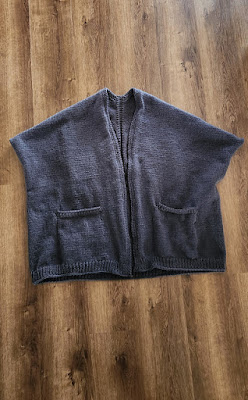
Haiku Cardi


Finished cardi

It would have been helpful to me if the pattern had provided more of an overview description of the process of how the cardigan will come together, because although I do enjoy patterns with unconventional construction techniques, If I had realized before starting this that the fit of the cardigan would be closer to that of a cocoon-style cardigan with a sort of dolman-type sleeve, I might not have opted to work this pattern, because I generally don't care for cocoons or dolman sleeves.


Nevertheless, I am glad that I made this cardigan. It is a paid pattern designed by Svetlana Volkova. At about 21 inches length, measured from the top of the shoulder, I decided to add pockets of 29 stitches wide by 44 rows deep. I knitted the pocket linings in contrasting black yarn.


Some ways I deviated from the written pattern include making simple kfb increases instead of M1R/M1L increases and adding the pockets. I like the oversized fit even if the cardigan is somewhat less constructed than I had expected before starting the project. Total stitches after rejoining below armholes: 253.

This cardigan begins in the center-back and works upward from there in the shape of a triangle. When the triangle is large enough, the point of the triangle is at the back of the wearer's neck, and the wide side of the triangle wraps around the waist. The slanted sides of the triangle are then worked separately to finish the upper back on each side and wrap around the shoulder and become the upper front on each side. The front sides are then rejoined to the back to form the arm holes and stitches picked up along the bottom of the triangle. Then all stitches are knitted together to make the bottom part of the cardigan.

I do like how this project turned out, but I think if I make it again I will incorporate garter stitch instead of ribbing, because the ribbed front placket on this one wants to fold over toward the stockinette. Hopefully washing and blocking will fix that issue, but I'm thinking that using garter stitch plackets would naturally lie better than the ribbing.


Saturday, November 26, 2022

Scrappy Ombre Wrap vest

This is a paid pattern by Salena Baca Crochet. Her Ombre Wrap pattern is designed to be a shawl, but I'm going to see if it's possible to add armholes to this to convert it into a lovely vest.


I decided to use some pink and purple scraps from my yarn stash to make this, and I tied them all together with a unifying color: the Taupe colorway of Big Twist yarn. 

For the pockets, I found a pattern for a mesh square in keeping with the feel of the base shawl's mesh fabric. It's by Jayda in Stitches on YouTube at this link. If you're trying to make a similar project but don't like the tutorial I found for a mesh square pocket, you can browse on YouTube for another mesh square pattern. There are many others on there.


My squares are 9 rounds in the mesh pattern plus a round of SC for the edging (HDC across the top edge), making a pocket of about 11 inches square. I worked 2 SC edge stitches over the chain spaces and skipped working anything in the DC stitches, to help keep the pocket edges from developing a "ruffled" or lettuce-edge look, with 3 stitches in each corner space. (Sometimes working slightly fewer edging stitches along a crocheted edge is better to help everything lie flat than working stitches one-to-one.)


I like the way the pockets turned out. My only problem is that I genuinely suck at sewing on patch pockets. I try the piece on, and I carefully pin the pockets in place so they are positioned evenly, and then when I'm all done sewing the pockets on, they're always uneven. Grrrrr!!! Oh well.

Monday, May 23, 2022

Making the It's Shawl Good cardigan

Back in 2018, I had four skeins of this beautiful Lion Brand Amazing yarn in the Violets colorway and tried to use them to make the It's Shawl Good Cardigan by Ashlea Konecny of Heart Hook Home. But these four small skeins just weren't enough to get very far on the project, and the colorway had apparently been discontinued. I tried looking to buy more skeins online, but they were mostly being offered for resale at around $25 each, which was WAY more than the retail price I paid for the ones I had, and I really had no intention of spending upwards of $300 just to acquire enough additional skeins that I would need to finish this shawligan project.

So the project languished in my WIP basket for several years. But that yarn was simply too lovely to just sit around like that, so I finally decided to frog the shawligan project and reuse the yarn in this machine-knit pocket scarf.

After doing that, I decided to start again to crochet the It's Shawl Good Cardigan using a different yarn and a larger hook: Big Twist Solids in the Taupe colorway and a 6.5mm hook.

Ashley and I seem to have a similar design aesthetic, so I really enjoy her patterns and the concepts she invents. 

I finished my It's Shawl Good cardigan by adding the pockets from the Lazy Diamond Boho Pocket Shawl. The pockets are about 10 inches square, so they're nice and roomy for keeping hands warm.


Thursday, January 27, 2022

Luna Triangle Cowl

I really like pullover triangle cowls. They look amazing, they are so easy to wear, and they keep your neck, shoulders, and chest nice and cozy. So when I saw the super cute Luna Triangle Cowl paid pattern by Deni Sharpe, I knew I wanted to make one for myself.

I deviated from the pattern in a few ways. First, the pattern is written for bulky (size 5) yarn using an 8mm hook, but I made mine in aran weight (since that's what I had in my stash) with a 6.5mm hook. I also opted to hand knit the ribbed top of the cowl instead of working it in crochet.


The knitted part I did in a lofty and reversible fisherman's rib worked in the round over 80 stitches. I followed the tutorial for this technique at this link. Then I picked up the stitches for the first row of crochet to begin the triangle portion of the cowl. Since I was starting with a different number of stitches for the bottom part of the cowl than was listed in the pattern, I had to adjust the stitch counts for the triangle part of the work.


Thursday, June 27, 2019

Honeydripper Boomerang Scarf free pattern

I’m living with a lot of stress right now, so I needed a project that could not only use up some of my yarn stash but also was relatively simple to execute without needing a lot of concentration.


I enjoyed seeing all the various shawls people created during Marly Bird’s 2019 Tournament of Stitches, so I decided to adopt the boomerang shape used for that project, but instead of incorporating the mosaic sections I decided to keep it simple by working the entire piece in a two-color garter stitch stripe.


The two yarns I used here are both vintage skeins that date back to my mother’s stash. She very likely purchased these before I was even born. Even though the colors aren’t my favorite, I think they work well together and hopefully will result in a nice-looking scarf that my daughter will enjoy wearing.

My plan was just to keep knitting until I was about to run out of yarn, then cast off. I figured the two full skeins of yarn ought to produce a nice-sized scarf when it was all finished.

Just to mix things up a bit and make the long stretches of garter stitch more interesting toward the end (as well as to add visual interest on one side of the triangle in keeping with the scarf’s Honeydripper theme), when my yarn was about 75% gone I started working occasional honeycomb lace rows. This did add an additional level of detail to the process, but it was easy enough for me to read my knitting and see when it was time to work the lace rows, so I didn’t think this would be too much for my overtaxed brain to cope with.


Continuing with the increases/decreases on every RS row and alternating stripes of color as established, every sixth row (always a WS return row) I would work in honeycomb lace. Placing the lace rows this way ensured that the lace rows would be produced in alternating yarn colors, helping to keep the overall usage of each color as even as possible.


I think I can hear what you’re wondering: Why didn’t I work the whole scarf with the lovely honeycomb lace, or if not the whole scarf, why didn’t I at least start working the lace sooner - like around the halfway point? My only reply to this is: I just did it this way. End of story. If you want to copy my idea you can work as much lace (or as little) as you like. 😊

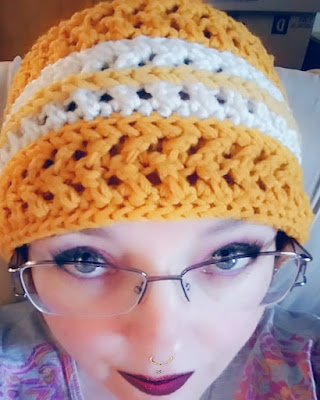
After finishing the scarf (wingspan is about 78 inches) I ended up with a bit more of the darker Inca Gold yarn left than the lighter gold. I decided to see if it was enough to crochet a coordinating Chic Aran Headband to go with the scarf. 😁


Well, I didn’t have quite enough Inca Gold to do the entire headband, and I didn’t have enough of the pale gold to do an entire stripe, so I subbed in some aran white for the center rows 6, 3, 4, and 5. That left me enough Inca Gold to finish the headband, and I embroidered a simple chain stitch as an accent down the center of the white stripe with the pale gold to add a touch of that color to the headband as well. Yay!



Wednesday, March 5, 2014

Hitchhiker - the full mathy

I received a partial skein of sock-weight two-ply self-striping yarn in blue-green-white in a box of yarn given to me by a friend. And I had no idea what to make with it.

After searching for several years for the perfect pattern to go with this yarn, I found it in the Hitchhiker shawlette designed by Martina Behm (on Ravelry at Maltina).


The 8-row repeat is easy to master to produce a delicious-feeling, ready-to-wear neck wrap, which you can make as short or long as you like.

Sock yarn Hitchhiker project after 15 points completed.
The scarf above ended up at 18.5 points long when the yarn ball ran out, but it's just long enough to wear around one's neck to chase away a chill. I plan to add a small button and loop to fasten it closed and donate it to my local cancer center as a small yarn hug for a patient.

But if your goal is to make a full-size, 42-point Hitchhiker scarf, progress feels like it slows down exponentially after one reaches about the 25th point because by then there are more than 100 stitches on the needle (and still growing).

For an impatient knitter like me, that makes achieving the "full" 42-point version of Hitchhiker rather difficult toward the end. However, if you are able to persevere, the rewards of the finished shawlette are definitely worth it.

Full-size Hitchhiker project after 23 points completed.

A recent yarn blog post by humorist Franklin Habit says: "When a non-knitter asks a question about my knitting, that question is most often, 'How long will it take you to finish that?' or the common variation, 'How long would it take you to make me a (type of knitted thing)?'

"So I explain that a hat may require several evenings, particularly if worked in a complicated technique or a fine yarn. I tell them the average number of stitches in a pair of socks (eight million) or a plain sweater (seven hundred trillion) and that completion of the latter may take months.

"The gasps of astonishment are strong enough to suck the stitch markers right out of a raglan."

After I stopped laughing (because I can especially relate to the "seven hundred trillion" feeling), I started wondering just how many stitches are there in a full-size, 42-point Hitchhiker scarf.

The pattern's array of increases and decreases are standardized, so I figured with the help of a spreadsheet, I could calculate the exact number of stitches in each row of the pattern and then add them all up.

My result? 29,579 stitches!!! (And at a minimum average of 3 seconds per stitch, that works out to at least 25 hours to complete.) So, yeah, knitting (particularly for me) takes some determination.