Showing posts with label cardigan. Show all posts

Thursday, June 1, 2023

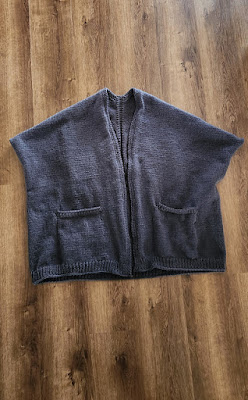
Haiku Cardi crochet style

I decided to experiment with making a crochet version of the Haiku Cardi. For the fabric, I used the stitch pattern from the Genuine Pleasure Shawl, a free pattern designed by Jamie Swiatek, but just about any triangle shawl pattern with repeating rows would do because that is the base shape for the Haiku Cardi. 


The Genuine Pleasure Shawl has a 10-row pattern repeat, but it's easier to memorize than it sounds, so once you get into the rhythm of it, it becomes simple to read your stitches to figure out where you are as you go without having to constantly keep referring back to the pattern.


I made this to be a housecoat/bathrobe/dressing gown for our guest room, so I made the length a bit longer than I would for a regular cardigan, and I also added pockets to the front using the pockets from the Lazy Diamond Boho Pocket Shawl, a paid pattern designed by Crystal White-Van Cleemput, just because they work up quickly and look super cute.


Monday, April 17, 2023

Haiku Cardi revisited

I really like how well my first Haiku Cardi turned out. (See it in the blog post prior to this one, or at my Ravelry project page here.) 

Dye lots are still a thing, y'all - sigh

I wanted to make the pattern again, but this time I utilized garter stitch to emphasize the stitch definition in the triangle section and also to alleviate some issues I had before with the front placket and sleeve edges wanting to curl. The plackets in garter stitch lie much better without any additional persuasion (i.e., aggressive blocking).


I ended up with 275 stitches across the bottom after rejoining the fronts to the back, which is a few more than the pattern called for, but a minor difference like that doesn't really matter in a project like this.

On this project, I learned the hard way that dye lots are still a thing, which is unfortunate, because the only way I had access to this Denim colorway of Red Heart Super Saver was by buying it through the mail.

Left and right fronts done

Of course, I don't know anything about how companies like Red Heart mass-produce their yarn, but it seems to me that in the 21st century, with the preponderance of all things digital, that companies ought to be able to exert better control over their color reproduction, to the point where dye lots are no longer necessary. (I'm only talking here about BIG companies; naturally I wouldn't extend the same expectation onto smaller or indie yarn producers.)

My stockinette gauge

So, anyway, I very clearly was given a skein from a different dye lot, which cuts a visibly darker line at the top of the lower portion of this cardigan. Nothing to be done about it now, so I'll just consider it a "design feature." Bah-ha-haaaa.

Oops!

I also had an "oops!" moment after rejoining the fronts to the back to start working the "skirt" of the cardigan. You can see the "oops" in the above photo, where I accidentally got one row of the garter stitch pattern wrong. Le sigh!! It's OK, though ... not terribly noticeable.

Considering my ongoing chronic pain issues, coupled with the fact that I'm not a particularly fast knitter, I'm amazed that I was actually able to finish knitting two of these in less than four months. 😊 

As I said, I really like how well this project turned out, and using the garter stitch edgings worked particularly well. I'm going to enjoy wearing this.

Monday, February 20, 2023

Haiku Cardi


Finished cardi

It would have been helpful to me if the pattern had provided more of an overview description of the process of how the cardigan will come together, because although I do enjoy patterns with unconventional construction techniques, If I had realized before starting this that the fit of the cardigan would be closer to that of a cocoon-style cardigan with a sort of dolman-type sleeve, I might not have opted to work this pattern, because I generally don't care for cocoons or dolman sleeves.


Nevertheless, I am glad that I made this cardigan. It is a paid pattern designed by Svetlana Volkova. At about 21 inches length, measured from the top of the shoulder, I decided to add pockets of 29 stitches wide by 44 rows deep. I knitted the pocket linings in contrasting black yarn.


Some ways I deviated from the written pattern include making simple kfb increases instead of M1R/M1L increases and adding the pockets. I like the oversized fit even if the cardigan is somewhat less constructed than I had expected before starting the project. Total stitches after rejoining below armholes: 253.

This cardigan begins in the center-back and works upward from there in the shape of a triangle. When the triangle is large enough, the point of the triangle is at the back of the wearer's neck, and the wide side of the triangle wraps around the waist. The slanted sides of the triangle are then worked separately to finish the upper back on each side and wrap around the shoulder and become the upper front on each side. The front sides are then rejoined to the back to form the arm holes and stitches picked up along the bottom of the triangle. Then all stitches are knitted together to make the bottom part of the cardigan.

I do like how this project turned out, but I think if I make it again I will incorporate garter stitch instead of ribbing, because the ribbed front placket on this one wants to fold over toward the stockinette. Hopefully washing and blocking will fix that issue, but I'm thinking that using garter stitch plackets would naturally lie better than the ribbing.


Monday, May 23, 2022

Making the It's Shawl Good cardigan

Back in 2018, I had four skeins of this beautiful Lion Brand Amazing yarn in the Violets colorway and tried to use them to make the It's Shawl Good Cardigan by Ashlea Konecny of Heart Hook Home. But these four small skeins just weren't enough to get very far on the project, and the colorway had apparently been discontinued. I tried looking to buy more skeins online, but they were mostly being offered for resale at around $25 each, which was WAY more than the retail price I paid for the ones I had, and I really had no intention of spending upwards of $300 just to acquire enough additional skeins that I would need to finish this shawligan project.

So the project languished in my WIP basket for several years. But that yarn was simply too lovely to just sit around like that, so I finally decided to frog the shawligan project and reuse the yarn in this machine-knit pocket scarf.

After doing that, I decided to start again to crochet the It's Shawl Good Cardigan using a different yarn and a larger hook: Big Twist Solids in the Taupe colorway and a 6.5mm hook.

Ashley and I seem to have a similar design aesthetic, so I really enjoy her patterns and the concepts she invents. 

I finished my It's Shawl Good cardigan by adding the pockets from the Lazy Diamond Boho Pocket Shawl. The pockets are about 10 inches square, so they're nice and roomy for keeping hands warm.


Sunday, April 10, 2022

Swingy Shawlivest cardigan with pockets

I continue to experiment with my Swingy Shawlivest paid pattern. This time I decided to add sleeves to make a Swingy Shawlivest cardigan-style and also added pockets. I love how this turned out. It's so swingy and almost cape-like; I know this is going to keep me nice and cozy come next winter. You can browse my other Swingy Shawlivest blog posts at this link.


I used a regular DC mesh stitch for this one, rather than the EDC in the original pattern.


After working the body of the Shawlivest to the desired length, I continued working a twisted rope fringe across the hem without cutting the yarn.

To make twisted rope fringe: SC into next ch 1 space. Pull up 16-inch loop and twist 40 times before joining with sl st to top of next DC. Repeat across hem. (Mine ended up with 228 fringes.)

Mikey of The Crochet Crowd has a video tutorial showing an even better method (similar to what I did, but he uses slip stitches exclusively, and his version is probably more durable over time that way, so I recommend doing it Mikey's way). You can increase the space between the fringes by just working more slip stitches in between them, if you wish.


It only took me about two weeks to crochet most of this cardigan. But it took me over a year to actually finish the project because I stalled out while doing the twisted fringe. All that twisting was seriously aggravating the elbow tendinopathy in my dominant arm. I managed to work my way across maybe the first 25% of the hem over a period of about 11 months (that was less than 60 fringes in ELEVEN MONTHS, guys ... seriously — ouch!!!), and then I realized that I just couldn't do it anymore.

I showed the project to my husband and shared with him how defeated I felt by my disability. We both felt it would be such a sad thing if I wasn't able to finish it because of that. He asked me to explain to him what my process was for making the twisted fringe, and then in secret my husband went searching around on the internet trying to find something that would help me finish making the fringe without hurting my arm so much.

What he found was nothing short of magical.

Before my husband found it, I had no idea a tool like this existed.

He found and bought for me a Maple Quad End Fringe Twister from Etsy seller theknitstore. He knew I didn't need a tool with four twisters on it, since I was only making one fringe at a time on this project, but he decided to get the quad twister anyway (the seller also has a dual end option) so, in his words, I would have more possible options for using the tool when I make other things in the future. What a sweet and thoughtful man I married, right?!?!

When the tool arrived I watched a YouTube video on how to operate it, and even though I was only working with one loop being twisted at a time, the tool made the work SO MUCH easier on my arm. Yes, there's still some manual movement involved, but it wasn't nearly as strenuous as twisting the long loops by hand, and the tool made the process so much faster.

Bottom line: After only being able to make around 60 twisted fringe loops by hand over the course of about 11 months, with the fringe twisting tool I finished the remaining 168 loops in ONLY TWO DAYS with no painful aftereffects from the work. No matter how you slice it, that is a definite win.

After completing the fringe, the only things left to do were to add sleeves and also a couple of patch pockets on the front.

I attached the yarn at the bottom of an armhole to begin working the sleeves. I just crocheted in the same mesh pattern using joined rows. I put in some stitch decreases for the first five rows and then worked the rest of the sleeve straight, and then I finished the sleeve with a few rows of fpdc/bpdc ribbing.

For the pockets I used the pocket pattern from the Lazy Diamond Boho Pocket Shawl, and I think they complement the cardigan nicely. The pockets are about 10 inches square, so they're nice and roomy for keeping hands warm. I might add a fabric liner to the pockets later (useful if I want to keep anything small in there, like coins, which might otherwise fall out between the crochet stitches), but I'll see how I feel about that later.

Sunday, June 14, 2020

Zebra Fringed Barn Jacket

When I was in first grade I had a classmate who wore a rabbit fur coat that all the girls in my class simply adored. (This was in the 1970s, OK, so wearing fur wasn’t yet culturally verboten.) All I can remember about this girl now is that her name was Elaina and she was of Russian descent. She spoke English with a Russian accent, and to the rest of us 6-year-olds who had never heard a foreign accent like that before, all the words she spoke sounded deliciously exotic to our ears.


As I recall her jacket was made with either a white-mottled-with-black rabbit fur or dalmatian rabbit fur. It was mostly white with black spots. In my mind’s eye the jacket looks more like the mottled rabbit fur photo below than the dalmatian rabbit (notice how the mottling creates some areas that look gray in the transition spaces between the black and white), although I remember her jacket having more white all over than this mottled swatch shows, but memory can be a funny (and incorrect) thing at times.


Anyway, I had several skeins of the Red Heart Zebra colorway yarn on hand, and looking at the colors reminded me of Elaina’s rabbit fur jacket - which, by the way, she never let any of us other girls in class try on (LOL) - so I decided to try to make a vest for myself using this yarn - and then I could pretend I was wearing Elaina’s sumptuous jacket any time I wanted to! :-)


This is a variegated yarn with moderately short color changes. (White about 13-15 inches, gray about 10-12 inches, black about 30 inches.) Personally I think variegated yarns with short color changes look better when worked in crochet vs. knitting.

I started this project back in July 2019 working it as an improvised top-down raglan vest in a granny stitch and got most of the way done with it but then decided I didn’t like the way the vest looked on me. Ultimately I decided to rip it out and start over using the On Point Poncho (paid) pattern as the shape inspiration for a long, fringed barn jacket. Fingers crossed that I like the way it turns out this time …


OK, I’ve reworked the jacket to the point where I can safely say that I do like it much better now by doing the On Point Poncho pattern as a cardigan. The body and fringe (two 14-inch strands folded together and placed in every-other stitch across the bottom hem, resulting in 7-inch fringe) are complete, and now I just have to decide how long to make the sleeves. I think I’ll finish them at 3/4 length (19 rows plus 1 row of SC edging) with minimal tapering (to 60 stitches around).


Total yarn weight: 945 grams or about 4.77 skeins / 976.0 yards.

Tuesday, August 22, 2017

Moussaillon sideways cardigan free pattern

Finished my lil sideways sweater.

This simply brilliant free pattern is called Moussaillon by Cléonis.

You know how with most patterns (especially patterns for something as complex as a cardigan) you have to repeatedly count (and count AND COUNT) every stitch, every row? With Moussaillon, you can actually relax.

Front left panel complete; left sleeve started


Moussaillon incorporates picot edging and short rows, but don't let these frighten you because it's very easy to see when it's time to add them in the course of your knitting. (What row am I on??? What stitch number is this??? You can put all these concerns to rest because you simply will see where you are at all times.)


 The English translation of the pattern is written by a nonnative English speaker, so some native English speakers may find it difficult to read. But if you are generally familiar with knitting techniques, you shouldn't have much trouble figuring it out. And if you aren't familiar with making picots or short rows, there are dozens of video tutorials on YouTube that can show you how, so you don't have to rely solely on the pattern to explain them to you.

Trying on after finishing front left panel, left sleeve, and left side

A project this size you of course will not be knitting all in one session. With some knitting projects, after you put them down and come back to them later, it can take an agonizingly long time to figure out where you left off if you didn't leave yourself detailed notes/counts/etc. With Moussaillon, it is always easy to see where you are when you return to the project.

When you get to the beginning of a row, will this be a picot row? Just look at where the previous picot is. Are you two rows away from it? Then just begin the row with regular knitting. Are you four rows away from it? Then it's time for a picot here. Simple as that.

I used two stitch markers when making this: one on the top edge to show where I began a new section, and one on the needle to show where to turn for a short row (that way I didn't have to count how many stitches were left on the needle each time it was time to make a short row). How will you know if it's time to make a short row? Well, is the stitch beside your turning marker a regular knit stitch or a wrapped stitch? If it's a regular stitch, it's time to make a short row. If it's a wrapped stitch, knit through to the end of the row. So easy!! I didn't even fuss with picking up the wraps on the knit-through rows because they all but disappear on their own inside the garter stitch fabric.

Yes, Moussaillon DOES require some counting, but the beauty of it is that you don't have to spend your time CONSTANTLY counting and recounting (and getting frustrated when someone else in the room speaks to you and causes you to lose count!). When I finished the first front panel, I counted how many rows wide it was so I could make a note to make the same number of rows when I got to the other front panel. Ditto for the width of the sleeve and the width of the underarm side. To determine the width of the back (as well as the width of the front panels and sleeves), the designer repeatedly suggests that you try on the cardigan and make adjustments based on how you want it to fit. This is very easy to do and gives you excellent feedback on how to personalize the fit.


All in all, I highly recommend this pattern. I plan to make it again and am looking forward to experimenting with different yarn weights/needle sizes and even maybe adding some lacy yarn-overs to change up the look. SO FUN!!!!

Front panel: two rows plus 28 bumps. Sleeve top: 28 bumps. Underarm side: 9 bumps. Back panel: 32 bumps.

Sunday, February 17, 2013

Shalom cardigan free pattern

I rarely venture into the brave world that is knitting or crocheting apparel items. Like many other people out there, I like the relatively quick satisfaction that comes from making hats and other small pieces that can be completed in, say, an evening or two.

But I recently had a rare weekend to myself and took advantage of it by making the Shalom Cardigan in what I estimate was 14 hours of work over two days.


This is an excellent free pattern designed by Meghan McFarlane. The pattern is VERY well written and error free. It includes nice touches that I appreciate, like a total stitch count on rows where additions have occurred. (So I can feel confident that things are progressing according to plan each step of the way!)

This project is great for stash-busting. It’s amazing to be able to create an apparel item from only about 1.5 skeins (or less than approximately 400 yards) of yarn.

Casting on:


Top yoke:


Sleeve openings made, starting on the body:


I like how the Red Heart Coffee Fleck yarn kind of matches my knitting needles:


Friday, February 8, 2013

Hello, Baby Cardigan free pattern

I had a random skein of Caron Simply Soft Paints in Baby Brights Ombre 9801 sitting around and needed to find a project for it.

Then along came the pattern for this sweet baby cardigan at the Spud & Chloe Blog: Hello, Baby. Here's the link to my project page at Ravelry.

When I first stared working the pattern, I struggled a lot with getting the increases on the yoke portion to turn out right. I don’t think the pattern was written poorly; I was just having a difficult time concentrating and getting the correct stitch counts. After starting over four times, though, I finally got the stitch counts right. Whew! It’s such a sweet little cardi, I didn’t want to give up on it.


Update: Now I’m basically just stuck on the last step, which is a knitted-on I-cord edging. I’ve never done I-cord before, so … until I have the time to study up on how it’s done, this project is going to hibernate at 95 percent done. Sigh!


Sunday, August 12, 2012

Another toddler cardi

I couldn't resist making a second cardigan and hat set for my grandniece. The cardi pattern is Crochet Baby Cardigan (formerly Abby's Jacket) and the hat is Flower Power Cap; both patterns are by designer Britta Graham.


These pieces are made with Lily Sugar-n-Cream cotton yarn in Panorama.

Thursday, August 9, 2012

Infinite Granny Square Baby Blankie no pattern needed

This is a simple baby blankie made with ever-increasing rounds in a classic granny square cluster stitch pattern. You can make it as large or as small as you like. I stopped at 30 rounds, making the blanket about 40 inches square, then added a basic shell trim around the edge.


 I made the blanket as part of a set for my grandniece Morgan, with a matching cardigan and hat.

The cardigan is Crochet Baby Cardigan (formerly called Abby's Jacket), and the hat is Flower Power Cap, both designed by Britta Graham.


These pieces were made with Lily Sugar-n-Cream cotton in Kaleidoscope.

Thursday, December 1, 2011

Finished the top-down cardigan

Except for adding a button closure at the throat, I finally finished the Chevron Lace Top-Down Cardigan sweater. It turned out lovely. I think I will give it to Aunt Mary Ann.


Sunday, October 30, 2011

Chevron Lace Top-Down Cardigan free pattern

It's time to take a little break from making hats, and I am so glad I went pattern browsing at Ravelry.com because there I found a link to this easy, one-piece Chevron Lace Top-Down Cardigan pattern, which I have been working on for a couple of days in Red Heart Grey Heather yarn.


The cool thing about this pattern is that you start working from the top in one piece and branch off to finish the sleeves and body. In the above photo, I'm just about far enough along to where I will begin to branch off.