Thursday, June 27, 2019

Honeydripper Boomerang Scarf free pattern

I’m living with a lot of stress right now, so I needed a project that could not only use up some of my yarn stash but also was relatively simple to execute without needing a lot of concentration.


I enjoyed seeing all the various shawls people created during Marly Bird’s 2019 Tournament of Stitches, so I decided to adopt the boomerang shape used for that project, but instead of incorporating the mosaic sections I decided to keep it simple by working the entire piece in a two-color garter stitch stripe.


The two yarns I used here are both vintage skeins that date back to my mother’s stash. She very likely purchased these before I was even born. Even though the colors aren’t my favorite, I think they work well together and hopefully will result in a nice-looking scarf that my daughter will enjoy wearing.

My plan was just to keep knitting until I was about to run out of yarn, then cast off. I figured the two full skeins of yarn ought to produce a nice-sized scarf when it was all finished.

Just to mix things up a bit and make the long stretches of garter stitch more interesting toward the end (as well as to add visual interest on one side of the triangle in keeping with the scarf’s Honeydripper theme), when my yarn was about 75% gone I started working occasional honeycomb lace rows. This did add an additional level of detail to the process, but it was easy enough for me to read my knitting and see when it was time to work the lace rows, so I didn’t think this would be too much for my overtaxed brain to cope with.


Continuing with the increases/decreases on every RS row and alternating stripes of color as established, every sixth row (always a WS return row) I would work in honeycomb lace. Placing the lace rows this way ensured that the lace rows would be produced in alternating yarn colors, helping to keep the overall usage of each color as even as possible.


I think I can hear what you’re wondering: Why didn’t I work the whole scarf with the lovely honeycomb lace, or if not the whole scarf, why didn’t I at least start working the lace sooner - like around the halfway point? My only reply to this is: I just did it this way. End of story. If you want to copy my idea you can work as much lace (or as little) as you like. 😊

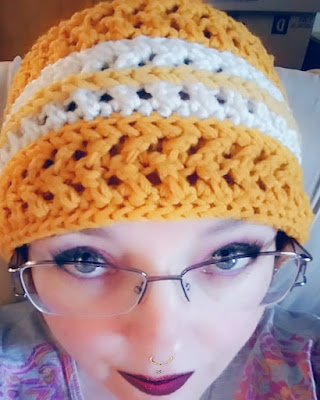
After finishing the scarf (wingspan is about 78 inches) I ended up with a bit more of the darker Inca Gold yarn left than the lighter gold. I decided to see if it was enough to crochet a coordinating Chic Aran Headband to go with the scarf. 😁


Well, I didn’t have quite enough Inca Gold to do the entire headband, and I didn’t have enough of the pale gold to do an entire stripe, so I subbed in some aran white for the center rows 6, 3, 4, and 5. That left me enough Inca Gold to finish the headband, and I embroidered a simple chain stitch as an accent down the center of the white stripe with the pale gold to add a touch of that color to the headband as well. Yay!


Sunday, June 16, 2019

CPAP Hose II free recipe/pattern

Experimenting with another crochet CPAP hose cover design for 72-inch hose. My brother-in-law is new to using a CPAP and needs something to help make the experience more comfortable for him. This Red Heart Velvety yarn is super, super soft, but also machine washable/dryable, so it should work well.

Using 6mm hook, FSC 16 sts (about 6 inches long), then continue working in continuous rounds. I made the first round after foundation row in SC then switched to HDC to help the rest of the project grow faster. At my gauge two rows of HDC equaled about 1 inch in height. Working this way one skein yielded about 47 inches of tube, a little over half as long as I wanted, so I had to break into a second skein to reach the desired finished length.

I placed a marker to indicate when my tube had reached a length that was about half as long as the finished tube should be (for me this was after 2 rows SC plus 80 rows HDC). It’s important to measure the actual length of your work to determine where you’re at rather than to rely on row counts for length, just to make sure you end up with a finished tube that’s the right size. Once you’ve marked the halfway point, you can fold the tube at the marker as you work the second half to more easily figure the length of the second half. (At least for me this is easier than constantly using a tape measure to figure out where I’m at.)

Continue working until the tube you’re crocheting measures about 76 inches long. In my experience these hose covers work better if they’re a little longer than the hose itself. Switch to 5mm hook and finish with 4 rounds of FPDC/BPDC for a ribbing effect, then fasten off and weave in ends.


For better performance sew a couple of rows of silicone-striped grip elastic to the inside of the hose cover at the ribbed end (cut elastic to 3.5-inch lengths). This will be the end closest to the user. The grip elastic will cinch the cover against the hose, and the silicone grip will prevent the cover from slipping down the hose and away from the user. The whole point of using a hose cover is to keep the cold plastic away from the CPAP user. Well, that and a hose cover cuts down on air noise and prevents condensation buildup.


Placing the grip elastic at only one end also makes it easier to feed a fresh hose into the cover from the end without the elastic when it’s time to change the hose.


Sunday, June 9, 2019

Granny Squared Into Highlighter Hell Throw free pattern

I found a couple more skeins of the unidentified colorway aka “Highlighter Hell” (what I call it) by Red Heart, so I decided to use it along with some plain white to make an infinite granny square throw for my daughter who loooves these (horrifically) bright colors. 😉


After trying to work this continuous granny square in full rounds of a single color, I discovered that there was not a good way to carry the next color up for the subsequent round without leaving a long loop on the reverse side where I changed colors (see below). I was afraid that the only way to “fix” this would be to add a lightweight flannel backing to cover the reverse side and hide the loops.


I pondered this problem for a while and concluded that the best way to avoid it would be to use a two-color spiral method, so I went searching for a pattern and found The Continuous 2 Color Granny Crochet Tutorial by Fiber Spider on YouTube. Ta-da!! This method is an absolutely brilliant way to work a two-color continuous granny stitch blanket without having to tie off after every single round (and have eleventy-bazillion ends to weave in when you’re done, plus all those ends would equal a lot of wasted inches of yarn), and it eliminates the big-loop-from-carrying-up-the-yarn problem I was having. Like I said: Brilliant!!


Here's a comparison of the obverse view of working the blanket in full rounds of each color (left) vs. the half-rounds used in the Fiber Spider method (right). As you can see, the different methods are undetectable to the eye, but Fiber Spider's method results in a blanket that is fully reversible and looks tidy on both sides:


I just kept working rounds on the throw until I ran out of the Highlighter Hell color. Then I used some highlighter orange yarn from my stash to work a border of one round SC followed by one round RSC or crab stitch. Finished size is about 44 inches square.


Works when they were still in progress ...