Showing posts with label in the round. Show all posts

Friday, November 19, 2021

Alpine stitch balaclava

At least five years ago, my daughter LadyU asked me to make her a balaclava she could wear while walking the dogs during winter. It took me a long while to finally get around to making it for her, but hopefully she will like it! (There has been a bit of a long saga predating today's project.)


Inspired by the Alpine Ninja balaclava, I used the Crochet with GG video tutorial at this link to learn how to make the alpine stitch in the round (top down), but I worked the top of this hat differently than was shown in the video.

Top part of hat (above the opening for the wearer's face) is worked with a J/6mm hook; bottom part of hat (cowl) is worked with a K/6.5mm hook.

I prefer to work hats top-down, but I don't like patterns where the top stitch count increases so rapidly that the top of the hat curls ferociously until you work far enough down the sides that it helps to tame the curling a bit. That was what was happening on this one when I tried to follow the stitch counts in the video tutorial. So instead I started with 10 sts and made standard increases on that count (next row 20, next row 30, etc.).

My goal was to end up with a total of 72 sts after all the increases, but somehow I ended up with 76 sts on the last increase row; I figured that was close enough (the most important thing was to end up with an even number of sts for the alpine stitch to work). The crown is worked with alternating FPDC and BPDC sts because it's easier to do increases with that combo of sts than it is to try to do increases in the alpine stitch, and I like how the alternating FPDC/BPDC more closely resembles the texture of the alpine stitch at the crown (it looks better than making the crown with all plain DC).

I didn't actually keep count while working the crown, but I think the crown here is 22 rows in purple (the first 6 or 7 rows are alternating FPDC/BPDC increases, then I switched to alpine stitch). If you want to change colors where the balaclava splits to make the face opening, it's important to end the first color on an alpine stitch row where you're working the FPDC/DC sts. The next row is a SC row. I was beginning/ending rounds at the center back. Place stitch markers at each side of the face opening. Then on the SC row,  join your new color and SC to first marker; FSC for however many sts you need to skip to reach the next marker; at the next marker, SC normally to the end of the round. This way when you continue the following row in alpine stitch (FPDC/DC), the color change will look better because the post stitches are reaching across an SC row of the same color (rather than an SC row of a different color).

That's just the way I wanted the color change on this hat to look. It probably could look cool to do the color change over a contrasting SC row as well (so if that's the way you want to do it on your project, go for it!). I also increased the stitch count for the cowl portion to 78 for a bit more ease around the wearer's face.

It only took a few days to complete the crocheted portion of this project. The part that subsequently took months to do was searching for an acceptable pair of buttons to sew onto the folded tab as the last finishing touch. Originally I wanted to use a pair of Pokemon character buttons, but I wasn't able to find any I liked or that would be suitable here. So finally I settled on these washable coconut wood buttons, which I think look nice with the project.

Updated to add a removable 3.5-inch pom:


Tuesday, November 2, 2021

Cookie Monster costume hat

Cookie Monster is my all-time favorite Muppet, so I wanted to make a messy-bun-style hat of this character. I started mine too late to wear it for Halloween this year, but I'll totally be ready next year!


I used a variation of the Loopy Chemo Cap pattern from my free Chemo Cap Bundle. Instead of starting at the very top of the hat, I started with 40 foundation HDCs (the equivalent of round 4) and then continued to work the pattern as written from there.


I used the Addi Pro 22-needle knitting machine to make the white part of Cookie Monster's eyeballs. My first attempt turned out looking super lumpy and squished, which led me to conclude that the eyes needed a bit of polyfil stuffing to help them hold their round shape.


To make the eyeballs: Cast on with white yarn and knit for 19 rows. Cut a long tail and use a bent-tip needle to cast the stitches off the machine. Gently stretch the knitted piece, and then gently cinch the ends. Fold one end inside the other (same as when you're making a beanie). Pull the yarn tails through the "top" of the cinched ends and knot securely. (This cinched end will be the front of the eyeball; you will later cover this cinched end with a crocheted black pupil.) Thread one tail onto a yarn needle. Grab one handful of polyfil and poke the needle through the center of the polyfil, then slide the polyfil down the yarn tail until it's sitting inside the "cup" of the eyeball. Using the tail on the yarn needle, pick up the bar in the middle of every third stitch along the top of the folded edge (these stitches will be used to cinch closed what is currently the folded end of the eyeball). Gently pull on the yarn tail to cinch the folded end closed, then stitch across the cinched opening to secure. Thread the other yarn tail onto the needle and poke it through the center of the eyeball and out the other side that you just cinched closed. Being careful not to pull too hard and squish/flatten the eyeball, knot the yarn tails together again several times to secure. Leave the long white tails for now so you can use them later to sew the eyeball onto the hat.


Using black yarn, crochet a small "pupil" for each eyeball by working 6 SC into a magic circle. Use the invisible joining technique to finish the outer edge. Tightly cinch the center of each pupil and knot to secure. Leave a long tail to sew each pupil onto the front of each eyeball, centered over the front cinched end. Knot to secure and hide black yarn tails inside the center of the eyeball.


Using the long white yarn tails, attach the eyeballs to the hat and knot several times to secure. Weave in ends and wear your Cookie Monster hat with pride!


Saturday, August 28, 2021

Another Big Mug Hug free pattern

I live in a humid climate, and I like to drink iced coffee every morning in my big mug. But my cold drinks always end up "sweating" with condensation, so I like to use cotton cozies to keep the drippiness to a minimum and water rings off my tables.

This is a quick and easy pattern I worked up to fit my large, square-bottomed morning coffee mug.

Another Big Mug Hug

U.S. crochet terms

Materials: Worsted weight 100% cotton yarn, 5.5mm crochet hook, yarn needle, scissors. (My sample uses Lily Sugar n Cream in the Light Blue colorway.)

Base is worked in continuous spiral (don't join at end of rounds).

Round 1: In magic circle, HDC 8. (8 HDC)

Round 2: 2 HDC in each st. (16 HDC)

Round 3: 2 HDC in next st, 1 HDC in next st. Repeat around. (24 HDC)

Round 4: 2 HDC in next st, 1 HDC in each of next 2 sts. Repeat around. (32 HDC)

Round 5: 2 HDC in next st, 1 HDC in each of next 8 sts. Repeat around. (36 HDC)

SC in next st, then sl into back loop only of next st to join.

Base of cozy is complete. Work next round in back loops only to turn the corner and start working the sides. Sides are worked in joined rounds.

Round 6: Ch 2. DC in BLO of each st around. Join with sl to top of 1st DC. (36 DC)

Round 7: Ch 2. DC in each st around. Join with sl to top of 1st DC. (36 DC)

Round 8: Ch 2. DC in all but the last st. Leave last st unworked and do not join to 1st st. Turn work. This is leaving an opening for the bottom of your mug handle to pass through. (35 DC)

Round 9: Ch 2. DC in each st back to beginning of row. Turn work. (35 DC)

Round 10: Ch 2. DC in each st to end of row. (35 DC) Now we are going to add stitches to make the tab for the button closure. Continue row by FDC 6 times. (Row is now 41 sts long)

Round 11: Ch 2. DC in each st to end of row. (41 DC)

Round 12: Ch 2. DC in each st to end of row. (41 DC)

Finish off. Weave in ends. Slip cozy over your mug, placing the long tab through the mug handle. Because DC stitches are so tall, you will use the space between the DC stitch in the center row at the end of the tab and the next stitch in as the buttonhole. Mark where that space sits over the body of the cozy and sew a button in that spot. (My button is about 3/4-inch diameter or about 18mm.) Refer to photos if you need guidance for button placement. Your cozy is now ready to use. Enjoy!


Tuesday, August 24, 2021

Coasters in 316 Stitches - free pattern

I love this pattern for making coasters. They are very quick and easy to make. I made this set of four coasters all in one evening. The free pattern, Oval Table Lace Placemat and Coaster, is by Red Heart.


We needed a few new coasters for our breakfast nook table, and I thought this set made in Lily Sugar N Cream cotton in the Faded Denim colorway would look nice.


These coasters are made with a mere five rounds, and just for fun I counted up the total number of stitches as being 316 per coaster.

I also made these coasters back in 2012.


Friday, August 6, 2021

Handy little earbuds pocket - free pattern

Here's a super-quick to make little pocket to help keep your wired earbuds wrangled and hopefully less tangled.

I keep a set of wired earbuds near my chair in the living room so they are handy whenever I want to listen to a video on my laptop or phone while my husband is next to me watching TV. That way I can listen to my thing without competing with the sound coming from the TV.

But the problem with wired earbuds is: How do you keep them neatly coiled and out of the way when you aren't using them? I would wrap the wire around my hand into a neat roll, but after I set it down, the wire would inevitably come unrolled and turn into a tangled mess.

So eventually I thought if I crocheted a little pocket to tuck my rolled-up earbuds into, it would hold everything together until I was ready to use them again.

You could make this with just about any yarn or hook size, but I used a worsted weight cotton (Lily Sugar 'n Cream Ombres in the Faded Denim colorway) and a 6mm hook. If you use lighter or heavier yarn, you would need to alter the stitch count to make a pocket that's approximately 2.5 inches in diameter at its widest point.

Setup: I started with a magic circle and worked in a continuous spiral (no joining at the end of rounds).

Row 1: 6 SC in magic circle. Use a stitch marker to keep track of the beginning of the rounds and move up when you start each new round. (6 SC)

Row 2: 2 SC in each st around. (12 SC)

Row 3: 2 SC in next st, 1 SC in next st. Repeat around. (18 SC)

Row 4: 2 SC in next st, 1 SC in each of next 2 sts. Repeat around. (24 SC)

Rows 5-6: 1 SC in each st around. (24 SC)

Row 7: Dec SC over next 2 sts, 1 SC in each of next 2 sts. Repeat around. (18 SC)

Row 8: Dec SC over next 2 sts, 1 SC in next st. Repeat around. (12 SC)

Row 9: SC in each st around. (12 SC)

Finishing: Sl in next st. Use an invisible join technique and finish off. Weave in ends. Enjoy your handy little earbuds pocket. 


Thursday, March 19, 2020

Big Mug Hug - free pattern

I've been wanting to make a mug cozy that was big enough to fit our oversized, square-bottomed mugs. The cozy needed to be made with cotton yarn so it would be microwave-safe. After all, it's so much easier to put the cozy on the mug when it's empty, and THEN filling the mug with water, and THEN zapping it in the microwave for tea. 


Who wants to pick up a mug filled with scalding-hot water and then try to slip on a cozy without sloshing the water and burning yourself? Not me.

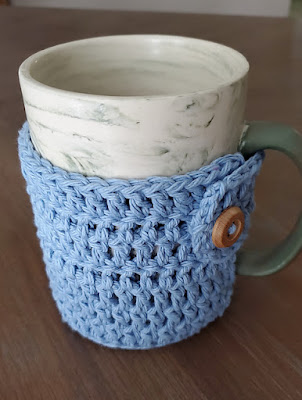
This cozy is quick to make and extra-thick thanks to the post stitches used on the cozy sides, and because the cozy covers the base of the mug it also protects your tabletop. It's easy to put on and remove thanks to the handy button loop.

Big Mug Hug

U.S. crochet terms

Materials: Worsted weight 100% cotton yarn, 5.5mm crochet hook, yarn needle, scissors. (My sample uses Peaches n Creme Ombre in the Blue Moon Ombre colorway.)

Start off working in the round:

Setup/row 1: In a magic circle, ch 2, DC 10. Join with sl at top of first DC. (10) [ch 2 doesn't count as a stitch in this pattern]

Row 2: Ch 2, 2 DC in each st around. Join with sl at top of first DC. (20)

Row 3: Ch 2, [2 DC in first st, 1 DC in next st.] Repeat around. Join with sl at top of first DC. (30)

Row 4: Ch 2, 2 DC in first st, 1 DC in each of next 15 sts. 2 DC in next st, 1 DC in each st to end. Join with sl at top of first DC. (32)

Now continue working back and forth in rows (do not join at end of rows for the rest of the pattern):

Row 5: Ch 2, FPDC in each st across. Turn. (32)

Row 6: Ch 2, BPDC in each st across. Turn. (32)

Repeat rows 5 and 6 until the cozy sides are a total of 10 rows tall. 

Row 15: Ch 1. Turn. HDC in each st across. (32 HDC)

Finishing: Sew a button in a top corner of the cozy as shown in photos. Slip cozy over your mug, hold the sides snugly around your mug the way you want it to fit, and then measure how long of a chain you need to reach from the other top corner of the cozy (the corner without the button) to the button and back to the other corner. Add a crochet chain of that length to the top corner without the button. Tie ends of chain to cozy to secure. Weave in ends, slip the cozy onto your mug, and enjoy.


Sunday, June 9, 2019

Granny Squared Into Highlighter Hell Throw free pattern

I found a couple more skeins of the unidentified colorway aka “Highlighter Hell” (what I call it) by Red Heart, so I decided to use it along with some plain white to make an infinite granny square throw for my daughter who loooves these (horrifically) bright colors. 😉


After trying to work this continuous granny square in full rounds of a single color, I discovered that there was not a good way to carry the next color up for the subsequent round without leaving a long loop on the reverse side where I changed colors (see below). I was afraid that the only way to “fix” this would be to add a lightweight flannel backing to cover the reverse side and hide the loops.


I pondered this problem for a while and concluded that the best way to avoid it would be to use a two-color spiral method, so I went searching for a pattern and found The Continuous 2 Color Granny Crochet Tutorial by Fiber Spider on YouTube. Ta-da!! This method is an absolutely brilliant way to work a two-color continuous granny stitch blanket without having to tie off after every single round (and have eleventy-bazillion ends to weave in when you’re done, plus all those ends would equal a lot of wasted inches of yarn), and it eliminates the big-loop-from-carrying-up-the-yarn problem I was having. Like I said: Brilliant!!


Here's a comparison of the obverse view of working the blanket in full rounds of each color (left) vs. the half-rounds used in the Fiber Spider method (right). As you can see, the different methods are undetectable to the eye, but Fiber Spider's method results in a blanket that is fully reversible and looks tidy on both sides:


I just kept working rounds on the throw until I ran out of the Highlighter Hell color. Then I used some highlighter orange yarn from my stash to work a border of one round SC followed by one round RSC or crab stitch. Finished size is about 44 inches square.


Works when they were still in progress ...

Wednesday, June 17, 2015

Chocolate Syrup Poncho

I liked the way Rose's Slytherin-By-the-Sea poncho turned out, so I decided to make another one for myself. I know the yarn says it's named "Coffee," but the dark brown color reminds me more of Hershey's Chocolate Syrup.


Here I used an i-cord tab cast on of 4 rows, then picked up 3 stitches in the center for a total of 9 stitches on the needle. Worked following the Sheep Wagon Shawl pattern instructions on the 3 center stitches with the addition of the 3 i-cord stitches on each side. (I-cord: Knit 3 at beginning of row; sl3wyif at the end of each row.)

Joined to work in the round after row 57. Yes, this pattern requires a lot of purling while working flat (have to purl every return row), but that's the price you pay for wanting a design in classic, classy stockinette. Once you join to work in the round, however, you're on all-knitting easy street.


Update 5/14/15: I started out knitting this poncho with size 9 needles (5.5 mm), but the fabric was just turning out to be way too dense. So somewhere around row 70, I ripped the whole thing back and started over with size 10 needles. Painful to lose that much work, but I'm much happier with the fabric the second time around.

Monday, May 4, 2015

Slytherin-By-the-Sea poncho for Rose

Here's a cozy garment stylish enough that even Bellatrix Lestrange herself might wear it! Our friend Rose was sorted into Slytherin House, but when she isn't away studying at Hogwarts, she lives in the chilly, foggy Bay Area ... hence she needed a Slytherin-By-the-Sea poncho to keep her cozy.


I started this project working the same as the Sheep Wagon Shawl but joined to work in the round after row 46 to produce a poncho instead of a wrap.

At the join, I worked another "spine" in the same manner as established between the other stockinette sections to make the join basically invisible and to provide another place for increasing the stitch count.

Since you don't turn your work anymore after joining to work in the round, I continued to emulate the Sheep Wagon Shawl stitch pattern by knitting all rounds and increasing on every-other round. Stockinette without the purling! W'hoo!!

After knitting about 94 total rows/rounds, I used a stretchy knitted cast-off but didn’t break the working yarn. I then continued working with a 5.5 mm crochet hook in the bottom loops of the knitted cast-off edge to crochet the lace edging from Kim Guzman's Cinnamon Fling to give the poncho a lovely finish. To work the lace edging in the round requires a stitch count in a multiple of 15; this poncho has 390 stitches around the hem.


Wednesday, January 14, 2015

1898 Hat free pattern

I recently discovered this wonderful free "1898 Hat" pattern and went a little crazy making up a bunch of these hats.

There are so many reasons to love this design:
  • The double-thick band is extra warm and provides complete protection for the ears.
  • Because the band is worked in garter stitch, it's soft and squishy and kind of feels like you're wearing a lightweight but insulating and ooshy-cushy pillow wrapped around your head.
  • It's easy to vary the finished size of the hat while using the stitch counts as written by simply altering the yarn weight and/or needle size.
  • The style works for practically anyone: male or female, young or old.
  • The crown design can easily be modified to achieve different looks (even though the ones I've made thus far are plain). Find a bunch of creative ideas by browsing the pattern's gallery of finished projects.
  • The construction is very straightforward and not at all difficult. I especially love the modified i-cord technique used at the bottom "crease" of the hat band.

And here it is in I Love This Yarn's Jazzy Stripe colorway:


Sunday, November 30, 2014

Santa Sack Hat free pattern

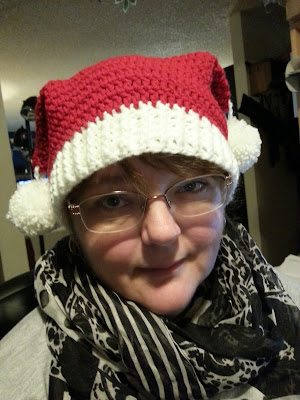
New free pattern alert! This Santa Sack Hat has a comfortably loose, slouchy fit and no side seams on the crown for a smooth appearance.


I admired Penny’s cute double-tailed Santa hat that she wears in a Christmas episode of the popular American sitcom “The Big Bang Theory.” This hat isn’t an exact replica, but its dual pompoms do provide a touch of whimsy.


I have a large head, 22.5 inches, so to achieve a loose fit, I worked a foundation chain with 88 stitches. To make different sizes, simply work a foundation chain until it’s a length that fits loosely around your intended wearer’s head. The foundation chain needs to have an even number of stitches, so if your foundation has an odd number, either add one or remove one to make an even number of stitches.

Hat is worked from the bottom up.


Sunday, October 12, 2014

1-2-3 Flip-brim Beanie free pattern

Two new free patterns released in two days! Wow!

Like a lot of us, I get busy with day-to-day things as well as just simply spending my time actually WORKING on yarncraft projects rather than blogging about them, so it can sometimes be months between my posts. Sigh. But sorry, there are only so many hours in a day. I'm sure you've been there, too, and can understand.


Today I am releasing this pattern for a 1-2-3 Flip-brim Beanie because in the USA, October has become the single biggest month for cancer-awareness causes in the form of the Pink October breast cancer movement.


Cancer (not specifically breast cancer) has profoundly touched my life and the lives of so many people who are close to me, and because of this, I feel moved to make and donate attractive caps each year to support the patients battling this terrible disease at a nearby cancer treatment center.

I offer this pattern for free, forever, in honor of Pink October and all the men and women who have battled and survived or lost the fight to any form of cancer.

If you download this pattern, please consider making and donating at least one of these hats to the patients at your local cancer center. Thank you so much.


The “1-2-3” portion of the name for this beanie comes from the texture that is achieved by working in repeating rounds of sc, hdc, and dc.

These instructions yield a simple but sophisticated cap with about a 20-22 inch circumference, depending on your yarn and tension, which should comfortably fit the head of an average adult - and particularly adults who have lost their hair to the cruel ravages of chemotherapy. The fit is intentionally a bit oversized (although not slouchy per se) for comfortable ease. The brim flips upward as you work the brim instructions and will remain in place on its own.

If you are making this hat to give to a chemo patient, choose a soft, hypoallergenic fiber by following the guidelines provided by Halos of Hope.


Tuesday, April 22, 2014

Shawlcowl Pullover pattern is free for a limited time

I released my Shawlcowl Pullover pattern on Ravelry on April 10, and the pattern has been receiving lots of yarn love from Ravelry users. The Shawlcowl Pullover is designed to mimic the trendy look of wearing a shawl as a scarf combined with the comfortable ease of wearing a pullover cowl.


If you use this link, you can download a free copy of the pattern through midnight PDT on May 1. On May 2, the price becomes $3.00 USD, so head over to Ravelry and grab your free copy while you still can using coupon code "spring."


Another reason to grab your copy now is that on May 2, everyone who has added Shawlcowl to their Ravelry library will automatically receive an updated version of the pattern that includes the Shawlcowl 2 variation. Shawlcowl 2 has a different neckline edging and a more open look to the feather-and-fan lace border.


This is my first knitting pattern design, and in the process of creating it, I discovered that developing, then testing, then ripping out and reknitting, then writing, then editing, then shooting photos, then editing some more, then test knitting it again ... was A LOT OF WORK!! Which is why I decided to put a very reasonable price on the finished pattern product.


I have gained a great amount of additional respect for people who develop pattern designs for knitting and crochet. These people WORK HARD at their craft, and they deserve our support. I have always enjoyed finding and sharing free patterns online, and of course I will continue to do that, but I have also paid for a significant portion of the patterns in my personal library. The experience I gained while developing the Shawlcowl Pullover has shown me that indie designers have earned every cent that they charge for their work.

Please respect the copyrights of indie designers!

Friday, September 13, 2013

X Marks the Spot Granny Square free pattern

I've been wanting to find the granny square patterns that I would need to make an afghan that looks like the one in this photo that I found at Pinterest:


I have no idea who the original creator of the above design is, but I love it, AND I love the monochromatic color scheme.

I figured a good staring place would be to try to locate a pattern for the non-flower squares -- meaning the squares that make up the center of the afghan in the above photo, the ones that look like they have an X going from corner to corner.

And although it's entirely likely that the pattern does exist out there somewhere, I was unable to find it. But working from another photo (see below), I wrote an X Marks the Spot Granny Square pattern that looks similar.


The biggest difference is that the center of the squares in the afghan in the first photo utilize what appears to be a sc/ch sequence around the initial ch ring, which gives the centers a floral look when the next round of "petals" is added. I will try to work that part out in a later revision of my X Marks the Spot Granny Square pattern.

Here is a photo of a finished square made with the version of my X Marks the Spot Granny Square pattern that is found below on this page.


I made it with Lily Sugar & Cream 100 percent cotton worsted weight yarn using an I hook (5.5 mm). Mine came out at 5.75 inches across, although yours may vary depending on your tension, as well as the yarn and hook you choose to use.


Here is a copy of my free pattern.

X Marks the Spot Granny Square pattern


Use whatever yarn weight and hook size that you prefer. As written, in this pattern the ch 2 at the beginning of each round does NOT count as a dc. (If you prefer the initial ch to count as a stitch, ch 3 instead and skip dc at base of ch. At the end of each round, join with a sl to the top of the initial ch 3.)

Special stitches:

* Work corner: (ch 1, 3 dc in next ch 2 space, ch 2, 3 dc in same ch 2 space, ch 1)

Round 1:

Ch 6; join with sl to make a ring. Ch 2. Working stitches into ring, (3 dc, ch 2) 8 times. Join with sl in top of 1st dc. (8 clusters of 3 dc separated by 2 ch in between)

Round 2:

Sl into first ch 2 space (2 sl). Ch 2. Working stitches into ch 2 spaces only, (3 dc in next ch 2 space, * work corner in next ch 2 space) 4 times. Join with sl in top of 1st dc. (4 sides of 1 3-dc cluster each and 4 corners)

Round 3:

Ch 2. Dc at base of ch 2 and in each of next 2 dc. Dc in ch 1 space. (* Work corner, dc in next ch 1 space, dc in next 3 dc, dc in next ch 1 space) 3 times. * Work corner, then dc in next ch 1 space. Join with sl in top of 1st dc. (4 sides of 5 dc each and 4 corners)

Round 4:

Ch 2. Dc at base of ch 2 and in each of next 3 dc. Dc in ch 1 space. . (* Work corner, dc in next ch 1 space, dc in next 5 dc, dc in next ch 1 space) 3 times. * Work corner, then dc in next ch 1 space and dc in next dc. Join with sl in top of 1st dc. (4 sides of 7 dc each and 4 corners)

Round 5:

Ch 2. Dc at base of ch 2 and in each of next 5 dc. Dc in ch 1 space. . (* Work corner, dc in next ch 1 space, dc in next 7 dc, dc in next ch 1 space) 3 times. * Work corner, then dc in next ch 1 space and dc in next 2 dc. Join with sl in top of 1st dc. FO. (4 sides of 9 dc each and 4 corners)