Showing posts with label wearable. Show all posts

Saturday, November 26, 2022

Scrappy Ombre Wrap vest

This is a paid pattern by Salena Baca Crochet. Her Ombre Wrap pattern is designed to be a shawl, but I'm going to see if it's possible to add armholes to this to convert it into a lovely vest.


I decided to use some pink and purple scraps from my yarn stash to make this, and I tied them all together with a unifying color: the Taupe colorway of Big Twist yarn. 

For the pockets, I found a pattern for a mesh square in keeping with the feel of the base shawl's mesh fabric. It's by Jayda in Stitches on YouTube at this link. If you're trying to make a similar project but don't like the tutorial I found for a mesh square pocket, you can browse on YouTube for another mesh square pattern. There are many others on there.


My squares are 9 rounds in the mesh pattern plus a round of SC for the edging (HDC across the top edge), making a pocket of about 11 inches square. I worked 2 SC edge stitches over the chain spaces and skipped working anything in the DC stitches, to help keep the pocket edges from developing a "ruffled" or lettuce-edge look, with 3 stitches in each corner space. (Sometimes working slightly fewer edging stitches along a crocheted edge is better to help everything lie flat than working stitches one-to-one.)


I like the way the pockets turned out. My only problem is that I genuinely suck at sewing on patch pockets. I try the piece on, and I carefully pin the pockets in place so they are positioned evenly, and then when I'm all done sewing the pockets on, they're always uneven. Grrrrr!!! Oh well.

Tuesday, August 18, 2020

Boho Summer Cotton Swingy Shawlivest

I like the look of the four-row repeated stitch pattern of the Boho Summer Cardigan (there is a free version of the pattern on YouTube), which got me wondering whether I could use that stitch pattern in the shape of a Swingy Shawlivest

I'm making this one with cotton yarn for wear during the warm summer months. This was an experiment in melding two different patterns, and you can see by the way the center increase veers off at an angle (rather than staying centered) that it didn't turn out totally perfect, but it's still completely wearable and comfortable and will be fine for me. If I wanted to do this again to give to someone else, I'd have to recalculate how to keep the center increase in the center. 😉

Decided to finish this one with crocheted rope-twist fringe along the bottom to complement the boho style. There are many tutorials on YouTube for how to make this type of fringe. I like this one and this one

For 6-inch fringe: SC into first st. ( * SC into next st and pull up a loop that's 16 inches long. Using your finger, twist the loop 40 times. Place end of loop back on hook and sl in same SC where you started the long loop. SC in next st. Pull the twisted loop open and then drop it to allow the rope twist to settle evenly along its length. ** ) Repeat from * to  ** across hem, ending with a SC in the last st. Finish off and weave in all ends. 

Some people twist the loop while it's on their hook, and if it works for you to do it that way, great. But I find it easier for me to twist the loop on my finger. I'm always dropping the loop when I try to twist it while it's on my hook. So use whichever method works best for you. 

Since my loops are 16 inches long, that means each strand of fringe actually uses 32 inches of yarn, which is only 4 inches less than a yard. Keep that in mind if you want to make fringe this way; it requires a LOT of yardage. Generally more yardage than cut fringe would require. But the upside of the rope-twisted fringe is it can safely go into the washer and dryer. 

To make 3-inch fringe, work the same as above but only pull up an 8-inch loop and twist it 20 times. I suppose to get a 4.5-inch fringe you would pull up a 12-inch loop and twist it 30 times. (etc.)

Total yarn weight used: 928 grams, including fringe. 

Friday, January 25, 2019

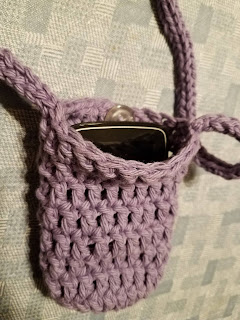
Lanyard and Pouch for Glucose Monitor free pattern

This is a simple crocheted pouch in a size intended to fit the Freestyle Libre glucose monitor or other devices of comparable size (about 4 inches tall by 2.25 inches wide by 0.5 inches deep). The pouch has a button closure at the top to keep your monitor secure. Having the pouch attached to a lanyard makes it possible to wear your monitor at all times (I mostly wear mine this way while I’m sleeping) and have it within easy reach when you need it. Download the free PDF from Ravelry here.

Pouch is worked in crochet; lanyard i-cord is knitted. You can opt to work the i-cord in crochet, if you prefer, or use some other method to make the lanyard. You may also make the lanyard longer or shorter, depending on what’s most comfortable to you. I like a 32-inch-long lanyard because it’s long enough that I can scan my sensor during the night without having to take off the lanyard or remove my monitor from the pouch. During the overnight hours I usually don’t need to see the monitor’s readout; I just press the monitor’s button through the pouch, scan, and go back to sleep. So here’s a common-sense note: You will have to remove your monitor from the pouch if you need to see the readout after scanning.


I also find that the i-cord stretches out after wearing this for about a week, but popping the pouch into the washer and dryer along with a load of laundry tightens the stitches right back up.


This pouch-on-a-lanyard can also be a fun item for children (only ones who are old enough to safely wear a lanyard around their neck!!) to gather small treasures during nature hikes or shells and stones while walking on the beach, etc. -- just make the lanyard a shorter length to fit your child.