One of my friends sent this to me. Said when she saw it, it immediately reminded her of me. I can't imagine WHY. 😉
Friday, January 7, 2022
Friday, December 24, 2021
A new blanket for Wendy
I started making this blanket without a recipient in mind just because I had the yarn on hand and felt like using it because it is a very pretty colorway. (Originally I bought this yarn for a different project but then lost interest in that one.) And the Red Heart Ombre yarns lend themselves nicely to the Which Way Filet blanket pattern by Fiber Spider.
As the blanket was coming together I started to think that it might be a nice one for Wendy, since she's now a teenager and had outgrown the more "baby style" blanket I previously made her. This blanket pattern, with the limitless potential and endless possibilities suggested by its winding paths, is perfect for a brilliant teen like Wendy.
My only worry was that I didn't know whether turquoise was a color that Wendy liked. But then I got to sit beside Wendy at dinner early in December, and I don't know how we got on the subject, but I was able to ask her what her favorite color was, and I was THRILLED when she said TURQUOISE!! Woo-hoo!! So now I know that she's going to love this new blanket.
I made her older sister a more grown-up-looking blanket last Christmas, and now it's Wendy's turn to get a new, grown-up-style blanket to last her for many years to come. Finished it just in the nick of time to give it to her for Christmas this year.
Saturday, December 11, 2021
A winter vest pour homme
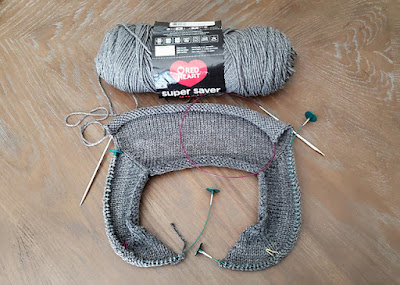
Based on the Improv pattern by Karen Templer, my plan for this is to be a seamless, top-down, cardigan-style vest worked mostly in simple, classic stockinette with K1P1 edging at armholes and button placket/front (worked with the smaller-size needles) and some traditional tortoiseshell buttons. I'm making this for my husband, who needs a replacement for the old aran vest that he reaches for during the chilliest weeks of winter to give him an extra bit of warmth.
My initial plan was to make this without pockets, but then I realized his original vest has pockets, so I should probably try to add pockets to the new vest by following Marly Bird's tutorial for inset pockets. Another technique that is new to me for this project is picking up stitches along a knitted edge (to add ribbing).
The biggest challenge/question for me, since I'm very slow at hand knitting (and I often have days where I simply cannot knit at all due to chronic pain issues), is whether I'll manage to finish this in time to give it to my husband for Christmas. I cast on for this project on Sept. 21, which gave me about three months to work to meet that goal. Fingers crossed it gets done in time!!! (Spoiler alert: I finished it on Dec. 11! Yay!)
My husband is a person who, even though he supports my enjoyment of knitting/crochet/etc., he has firmly stated right from the beginning his preference that I NOT ever make anything for him because he will refuse to wear it.
Over time, his declaration has proved to be not entirely true (he has occasionally worn a hat or mitts or a cowl that I've made, sometimes explicitly for him and sometimes not, and he has loved to tatters the blue scarf I knitted for him), but I've always known to generally avoid directing any of my crafting energies toward making items for him.
But when it comes to this vest, I feel like this is a different situation: He has worn the same store-bought knitted vest during winter for decades, and now that THAT vest is wearing out, he's going to need a replacement. I know he prefers neutral, classic design and lines and fit for stuff like this, so I'm attempting to incorporate those values here. I think the trickiest part for me will be achieving the correct fit. As I've worked I've been constantly measuring, checking and rechecking gauge, and comparing size to other items in his wardrobe. Because if this doesn't fit right, I know he won't wear it.
That being said, I've worked out most of this project without using a pattern (other than getting started at the shoulders with Improv), so although I'm familiar with the general principles of garment construction (after decades of sewing/knitting/crochet experience), I'm still nervous to see how the final product for this turns out.
After following the guidelines from Improv for how to begin working a top-down cardigan, I split off stitches to work each of the front panels and the back panel separately, gradually increasing the widths as the lengths grew, then rejoined all the panels below the armhole openings and knit until the bottom of the vest was the right length. I made the armholes slightly oversized, because I knew he wouldn't like to have his arm movement constricted by too-tight armholes.
After rejoining the panels below the armholes, I decided to work the 18 stitches that I cast on below the armholes on each side in garter stitch to give the side panels below the arms a bit of textural differentiation in the torso.
I finished knitting the ribbing at the bottom of the vest the day after Thanksgiving. Two days later, I picked up and knitted the front edging, which extends from side to side behind the neck and includes the buttonholes on the left front. To me it's almost magical the way you can have a curled, gnarled mess of stockinette, but then when you add the edging/ribbing, suddenly the stockinette fabric uncurls and looks gorgeous. I know that's just the way stockinette is (it curls if there's no edge treatment), but it's still fascinating to see it all come together.
Here's the store-bought ye olde aran vest that has served Montie well for many years:
Thursday, December 2, 2021
Ric-rac UGA fan slouchy hat
Made this for our Georgia Bulldog, Jill. I recently saw some designs (such as the ZiggyZag Vixen Slouchy Hat by Faith Holbrook) made with the ric-rac stitch (or cluster V-stitch) and really liked the look (it also looks great worked flat as a blanket, etc.), so I just had to try it.
This slouchy hat design lends itself nicely to working with team or school colors. Very quick and easy to make.
I made the pompom removable, so the hat can be safely washed without it.
I also made this quick little coffee cozy for Jill, since she loooves coffee.
I made this in YOslst, also called HDC slip stitch. 16 stitches tall.
Apropos feltie came from TheWiredPlanner on Etsy.
Friday, November 19, 2021
Alpine stitch balaclava
At least five years ago, my daughter LadyU asked me to make her a balaclava she could wear while walking the dogs during winter. It took me a long while to finally get around to making it for her, but hopefully she will like it! (There has been a bit of a long saga predating today's project.)
Inspired by the Alpine Ninja balaclava, I used the Crochet with GG video tutorial at this link to learn how to make the alpine stitch in the round (top down), but I worked the top of this hat differently than was shown in the video.
Top part of hat (above the opening for the wearer's face) is worked with a J/6mm hook; bottom part of hat (cowl) is worked with a K/6.5mm hook.
I prefer to work hats top-down, but I don't like patterns where the top stitch count increases so rapidly that the top of the hat curls ferociously until you work far enough down the sides that it helps to tame the curling a bit. That was what was happening on this one when I tried to follow the stitch counts in the video tutorial. So instead I started with 10 sts and made standard increases on that count (next row 20, next row 30, etc.).
My goal was to end up with a total of 72 sts after all the increases, but somehow I ended up with 76 sts on the last increase row; I figured that was close enough (the most important thing was to end up with an even number of sts for the alpine stitch to work). The crown is worked with alternating FPDC and BPDC sts because it's easier to do increases with that combo of sts than it is to try to do increases in the alpine stitch, and I like how the alternating FPDC/BPDC more closely resembles the texture of the alpine stitch at the crown (it looks better than making the crown with all plain DC).
I didn't actually keep count while working the crown, but I think the crown here is 22 rows in purple (the first 6 or 7 rows are alternating FPDC/BPDC increases, then I switched to alpine stitch). If you want to change colors where the balaclava splits to make the face opening, it's important to end the first color on an alpine stitch row where you're working the FPDC/DC sts. The next row is a SC row. I was beginning/ending rounds at the center back. Place stitch markers at each side of the face opening. Then on the SC row, join your new color and SC to first marker; FSC for however many sts you need to skip to reach the next marker; at the next marker, SC normally to the end of the round. This way when you continue the following row in alpine stitch (FPDC/DC), the color change will look better because the post stitches are reaching across an SC row of the same color (rather than an SC row of a different color).
That's just the way I wanted the color change on this hat to look. It probably could look cool to do the color change over a contrasting SC row as well (so if that's the way you want to do it on your project, go for it!). I also increased the stitch count for the cowl portion to 78 for a bit more ease around the wearer's face.
It only took a few days to complete the crocheted portion of this project. The part that subsequently took months to do was searching for an acceptable pair of buttons to sew onto the folded tab as the last finishing touch. Originally I wanted to use a pair of Pokemon character buttons, but I wasn't able to find any I liked or that would be suitable here. So finally I settled on these washable coconut wood buttons, which I think look nice with the project.
Updated to add a removable 3.5-inch pom:


