Tuesday, September 12, 2023

Neo and Scoop Mini-Dinos free pattern

Since the beginning of the year I have been in the middle of several large, long-term projects and felt like I needed to give myself a mental break and make something that works up super fast but also gives a finished product that is super satisfying. 


This Mini-Dino designed by Mary of the MerryMakes blog turned out to be just the project that my weary heart needed. He is SO STINKIN' CUTE!!! And he was really fast and easy to make. I wuv him!!! I also love that Mary has a video tutorial that walks us through every step of the creation process.


I made mine with a 5.5mm hook, which is a larger hook than the pattern specifies, but I tend to crochet tighter than the average bear anyhow, so I think it worked out fine. At the gauge I was working, my dino turned out to be about 6.5 inches tall. For comparison, Mary's Mini-Dinos work up to be about 5 inches tall when made with worsted weight yarn and a 4mm hook. I was also using the yarn-over single crochet technique rather than the more traditional yarn-under single crochet technique that a lot of amigurumi makers use. Mary also works her dinos using the yarn-over single crochet, but I've read that if you use the yarn-under single crochet, your finished item will be slightly shorter than if you used the yarn-over single crochet.

The pattern also specifies to use 6mm safety eyes, but I didn't have any safety eyes on hand, so I used two 10mm black buttons from this kit that I found on Amazon last year. It has black buttons in a bunch of different sizes, so they are useful for lots of various projects. So far I have used these buttons for eyes on a few recent amigurumis: my Zoey Zebra and also my Halloween Melly Teddy Ragdolls Gabby Ghost and Bobby Bat.

Just because he is soooo adorable, here's another picture of Neo posing on the coffee table with my Round Basket for Square Coasters. 😍

Neo turned out so cute that I decided he needed a friend, so I used a small scrap of Red Heart Super Saver in the Zebra colorway to make his friend Scoop. Scoop looks like newsprint from a newspaper, so that's how she got her name.


Wednesday, August 9, 2023

Raffie Sun Hat free pattern

This sun hat pattern by Kinga Erdem is drop-dead gorgeous, so I just had to make one. The Raffie Sun Hat pattern is available for free on Kinga's blog, My Hobby Is Crochet.

But I did have to adjust the pattern somewhat to make it in a messy-bun style to accommodate my everyday hairstyle. I used the Peekaboo Sun Hat design by Susanna Biyae as my guide for that. The Peekaboo Sun Hat pattern is available for free on Susanna's blog, Fosbas Designs.


I think I used a thinner raffia than Kinga used for hers, so it wasn't possible for me to meet gauge using the suggested hook size. I went up two hook sizes and also worked the top of the hat to 75 stitches to get to the size I need. My polyester raffia yarn came from Amazon


The cluster-stitch pattern for the sides of the hat crown needs a stitch count in a multiple of 3, so changing the stitch count is fairly easy. Kinga works hers in the round (so the right side of the work is always facing you), but for mine I was doing mine in rows (to make the back of the hat open). Fortunately for me, it was possible to work the cluster-stitch pattern she uses simply by reversing the order of the cluster stitches on the wrong-side rows (to keep the clusters "leaning" the same direction). Easy peasy. Working the rows this way probably changes the look of the cluster-stitch pattern somewhat, but I think it turned out great.

The wire rope I used to reinforce the brim came from Home Depot. This product was recommended by Jess Coppom in her free Fedora Crochet Sun Hat pattern, which is available on her blog, Make And Do Crew.

The last thing to figure out is the hat band. I used a 4mm hook and chained 150, which was long enough to wrap around the crown of the hat with ends long enough to tie in a loose square knot. I don't know if I'll leave it like that or if I'll maybe try adding some beads to dress it up a bit without being too busy.

My husband and I have a lovely vacation coming up, and I'm super excited to get to take this gorgeous sun hat along to wear during our adventures.

Monday, August 7, 2023

Witchypoo Scarf

This pattern came to me when I was drifting in that place where I was not quite asleep but not quite awake. It's an easy crescent moon-shaped scarf that can be made with just about any yarn at any gauge. Just in time for Halloween stitching, I present to you the Witchypoo Scarf!


The Witchypoo Scarf can be made in a solid colorway, or a variegated, or an ombre, or in any yarn that your heart desires, but I think making it in two colors really makes the curves of the crescent shape pop visually.

304 stitches on needle

Comprised of mostly mindless, movie-watching-friendly, reversible garter stitch, you only need to pay attention to what you're doing during the first few stitches of each row, where the bottom edging detail is worked as you go.

200 stitches on needle

This pattern is best worked with an interchangeable needle with a long cable (at least 42 inches) to accommodate the large number of stitches.


Seeing the black and purple stripes in my scarf reminds me of the fun witchy-poo striped tights that my daughters used to wear at Halloween, which are memories that bring a smile to my soul. I hope your soul will find reasons to smile, too, as you knit and wear this scarf.

Measuring my gauge

As you can see in the "measuring my gauge" photo above, my gauge is about 4 stitches per inch and 4 rows per inch. Details about the yarn and needles used are on my Ravelry project page.

The scarf grows quickly; the only reason why it took me a couple of months to finish mine is because I was multitasking and working on several other projects at the same time. 😂 

My only question now is: Should I release this scarf design as a paid pattern? Would you be interested in making it if the pattern was available?

Monday, July 24, 2023

Condensation fighter

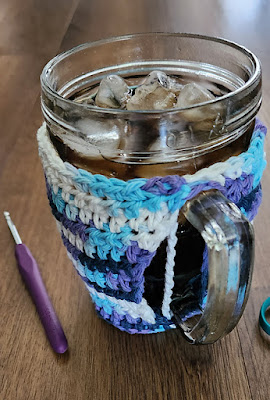
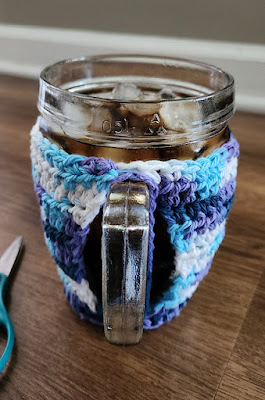
This is just another quick cotton cup cozy I whipped up to fit my glass filled with a refreshing drink with ice. 

I hate dealing with condensation on the outside of my glass, so I use a lot of cotton cup cozies in the summer. 


No pattern for this; I just crocheted this to fit the size of my glass. The cozy is secured with straps that fit over the handle in pretty much the same way a face mask's straps fit over a person's ears. 


A woman in a crafting group shared her idea for securing a cup cozy this way, no buttons or other fasteners required, and I thought it was very clever, so I wanted to try making a cozy that way too. 

Here's a link to my Ravelry project page.


Sunday, July 16, 2023

Zuzu's Petals - fingering

This is my very first project using fingering weight yarn! And if that weren't a cool enough fact all by itself, the yarn I'm using is a lovely ball that I found at a thrift shop for only 99 cents! How's that for cool?!


The yarn didn't come with a manufacturer's label on it, so I have no idea what brand it is or even what the fiber content is. It kind of feels like it has cotton in it; it might even be 100% cotton, for all I know. I just liked the color - it reminds me of the faded grayish blue of denim blue jeans, and I think it will make a lovely Zuzu's Petals cowlette. This is a paid pattern designed by Carina Spencer.


Because the width of the neck opening was only 16 inches when I reached the end of section 1, I knew I would need to keep adding width to make it be possible to pull the cowlette over my head. I decided to work two more 12-row repeats, hoping that would bring the width to something closer to 20 inches wide, which I figured would be a dimension that would fit better over my head. That meant my final stitch count at the end of section 1 was 151.

End of section 1 with 103 stitches


End of section 1 with 151 stitches

As I got toward the end, I was worried about losing at yarn chicken (running out of yarn, in other words). So I skipped the optional purl round and instead went directly to the cast off. But then, after casting off, I could see that I did actually have enough yarn left on the skein to be able to do the purl round, so I tinked back the cast-off round and added the purl round before casting off again. I just knew that I would always regret not having the purl round in there, if I didn't add it, because it really does help straighten out the edge curling, even before blocking. 

Before blocking

I could have saved myself the trouble of tinking back if I had weighed my skein when working the last few rounds. If I had weighed it, I would have been able to know that I'd have enough to work the last optional purl round before casting off. Live and learn! But it was pretty close!

Blocking

Gauge